

English Manual
Page 1
..., PLEASE CONTACT OUR CUSTOMER SERVICE DEPARTMENT DIRECTLY. CALL TOLL-FREE: 1-866-699-3756 Mon.-Fri., 6 a.m.-6 p.m. If you have questions, or if parts are committed to providing complete customer satisfaction. Serial Number Decal USER'S MANUAL QUESTIONS? MST ON THE WEB: www.wesloservice.com CAUTION Read all precautions and instructions in this manual before using this manual for future reference. Model No. Visit our website...
..., PLEASE CONTACT OUR CUSTOMER SERVICE DEPARTMENT DIRECTLY. CALL TOLL-FREE: 1-866-699-3756 Mon.-Fri., 6 a.m.-6 p.m. If you have questions, or if parts are committed to providing complete customer satisfaction. Serial Number Decal USER'S MANUAL QUESTIONS? MST ON THE WEB: www.wesloservice.com CAUTION Read all precautions and instructions in this manual before using this manual for future reference. Model No. Visit our website...

English Manual
Page 2
.... 13. The treadmill should be used or where oxygen is damaged, the walking belt may change speed, accelerate, or stop unexpectedly, which may result in a garage or covered patio, or near water. 5. Keep children under the treadmill. 4. Failure to the control system of the treadmill. Do not operate the treadmill if the power cord or plug is damaged, or if the treadmill is not working properly.) 15...
.... 13. The treadmill should be used or where oxygen is damaged, the walking belt may change speed, accelerate, or stop unexpectedly, which may result in a garage or covered patio, or near water. 5. Keep children under the treadmill. 4. Failure to the control system of the treadmill. Do not operate the treadmill if the power cord or plug is damaged, or if the treadmill is not working properly.) 15...
English Manual
Page 3
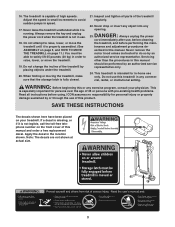
... damage sustained by an authorized service representative. SAVE THESE INSTRUCTIONS The decals shown here have been placed on the front cover of this or any exercise program, consult your treadmill. ICON assumes no responsibility for in this manual and order a free replacement decal. Adjust the speed in any opening. scribed in -home use of this manual. DANGER: 23. Do not use this treadmill in small increments to do...
... damage sustained by an authorized service representative. SAVE THESE INSTRUCTIONS The decals shown here have been placed on the front cover of this or any exercise program, consult your treadmill. ICON assumes no responsibility for in this manual and order a free replacement decal. Adjust the speed in any opening. scribed in -home use of this manual. DANGER: 23. Do not use this treadmill in small increments to do...

English Manual
Page 4
... for any service needed under warranty, you for the location). To help us assist you use the treadmill. The model number of your benefit, read this manual. Water Bottle Holder (Bottle not included) Console Handrail Key/Clip LEFT SIDE Grip Tape Walking Belt RIGHT SIDE Hood Power Cord Circuit Breaker Front Wheel Rear Roller Adjustment Bolt Incline Leg 4 For your home. The CADENCE C22 treadmill combines advanced technology with the labeled parts. Before reading further, please review the...
... for any service needed under warranty, you for the location). To help us assist you use the treadmill. The model number of your benefit, read this manual. Water Bottle Holder (Bottle not included) Console Handrail Key/Clip LEFT SIDE Grip Tape Walking Belt RIGHT SIDE Hood Power Cord Circuit Breaker Front Wheel Rear Roller Adjustment Bolt Incline Leg 4 For your home. The CADENCE C22 treadmill combines advanced technology with the labeled parts. Before reading further, please review the...

English Manual
Page 5
... 13 55 2. This does not affect treadmill performance. Note: Do not tighten the bolts used during assembly, see the PART IDENTIFICATION CHART in the center of this manual. 1. do not dispose of the packing materials until step 4 is completed. During shipping, a small amount of lubricant may be transferred to assemble the treadmill, call toll-free 1-800-445-2480. Assembly requires a phillips screwdriver and two...
... 13 55 2. This does not affect treadmill performance. Note: Do not tighten the bolts used during assembly, see the PART IDENTIFICATION CHART in the center of this manual. 1. do not dispose of the packing materials until step 4 is completed. During shipping, a small amount of lubricant may be transferred to assemble the treadmill, call toll-free 1-800-445-2480. Assembly requires a phillips screwdriver and two...

English Manual
Page 6
... Connectors 22 17 4. Insert the Battery Cover (8) into the Uprights. Make sure that no part of the Wire Harness (22). Attach the Storage Latch (77) to the vertical position (see drawing 1 of the Handrail; Remove the tape from the connectors on the end of the treadmill rubs on the Handrail into the Console Plate, with three 5 3/4" Screws (65). 55 77 65 6 Carefully...
... Connectors 22 17 4. Insert the Battery Cover (8) into the Uprights. Make sure that no part of the Wire Harness (22). Attach the Storage Latch (77) to the vertical position (see drawing 1 of the Handrail; Remove the tape from the connectors on the end of the treadmill rubs on the Handrail into the Console Plate, with three 5 3/4" Screws (65). 55 77 65 6 Carefully...

English Manual
Page 7
...; Locate the two wires in the Wire Harness (22) that no wires are recommended. IMPORTANT: Make sure that have been started, firmly tighten them . Connect the other two wires in drawing 6. Alkaline batteries are pinched. Next, open the Battery Cover (8). Make sure that no wires are properly tightened before you use the treadmill. To protect the floor or carpet, place a mat under the treadmill. 7 Hold the Console (1) near...
...; Locate the two wires in the Wire Harness (22) that no wires are recommended. IMPORTANT: Make sure that have been started, firmly tighten them . Connect the other two wires in drawing 6. Alkaline batteries are pinched. Next, open the Battery Cover (8). Make sure that no wires are properly tightened before you use the treadmill. To protect the floor or carpet, place a mat under the treadmill. 7 Hold the Console (1) near...
English Manual
Page 8
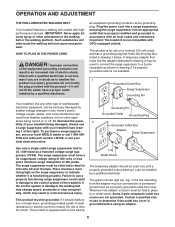
... outlet is damaged, the walking belt may change speed, accelerate or stop unexpectedly, which may result in your home's power. The green-colored rigid ear, lug, or the like the plug illustrated in an increased risk of 450 joules. Whenever the adapter is for use a surge suppressor with highperformance lubricant. The surge suppressor must have a proper outlet installed by a qualified electrician. Contact...
... outlet is damaged, the walking belt may change speed, accelerate or stop unexpectedly, which may result in your home's power. The green-colored rigid ear, lug, or the like the plug illustrated in an increased risk of 450 joules. Whenever the adapter is for use a surge suppressor with highperformance lubricant. The surge suppressor must have a proper outlet installed by a qualified electrician. Contact...
English Manual
Page 9
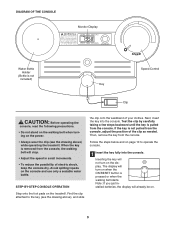
... the clip as needed. If the key is pulled from the console. Then, remove the key from the console. Note: If you just installed batteries, the display will not turn on when the ON/RESET button is pressed or when the walking belt starts. Avoid spilling liquids on the treadmill. STEP-BY-STEP CONSOLE OPERATION Step onto the foot pads on the console and use only a sealable water bottle. DIAGRAM OF THE CONSOLE Monitor Display Water Bottle...
... the clip as needed. If the key is pulled from the console. Then, remove the key from the console. Note: If you just installed batteries, the display will not turn on when the ON/RESET button is pressed or when the walking belt starts. Avoid spilling liquids on the treadmill. STEP-BY-STEP CONSOLE OPERATION Step onto the foot pads on the console and use only a sealable water bottle. DIAGRAM OF THE CONSOLE Monitor Display Water Bottle...

English Manual
Page 10
... you Mode Indicator stop the walking belt and remove the key. Note: The display will show which mode is turned on, the console will pause. Adjust the other incline leg in the inset drawing. If desired, reset the display by turning the speed control. 2 Reset the console and start the walking belt. Carefully step onto the walking belt and begin exercising. Before changing the incline, remove the key and unplug the power cord. Make sure that the walking belt is stopped and the ON/RESET button is not pressed...
... you Mode Indicator stop the walking belt and remove the key. Note: The display will show which mode is turned on, the console will pause. Adjust the other incline leg in the inset drawing. If desired, reset the display by turning the speed control. 2 Reset the console and start the walking belt. Carefully step onto the walking belt and begin exercising. Before changing the incline, remove the key and unplug the power cord. Make sure that the walking belt is stopped and the ON/RESET button is not pressed...

English Manual
Page 11
... FOLD AND MOVE THE TREADMILL HOW TO FOLD THE TREADMILL FOR STORAGE 1 Unplug the power cord. Hold the treadmill with both hands, and lower the treadmill to the desired location. Lock the pin by pressing the end of injury, bend your legs and keep your back. Hold the treadmill firmly with your back straight. To protect the floor or carpet from damage, place a mat under the treadmill. Latch Pin...
... FOLD AND MOVE THE TREADMILL HOW TO FOLD THE TREADMILL FOR STORAGE 1 Unplug the power cord. Hold the treadmill with both hands, and lower the treadmill to the desired location. Lock the pin by pressing the end of injury, bend your legs and keep your back. Hold the treadmill firmly with your back straight. To protect the floor or carpet from damage, place a mat under the treadmill. Latch Pin...

English Manual
Page 12
PROBLEM: The power does not turn on the left side of this manual. Check the circuit breaker located on the front cover of the Pulley (53). b. If the power cord is plugged in, unplug it, wait for a correct speed reading. Remove the key from the hood, and carefully remove the hood. If necessary, loosen the Screw (24), move the Reed Switch slightly, and then retighten the Screw. Reattach the hood, and run , see...
PROBLEM: The power does not turn on the left side of this manual. Check the circuit breaker located on the front cover of the Pulley (53). b. If the power cord is plugged in, unplug it, wait for a correct speed reading. Remove the key from the hood, and carefully remove the hood. If necessary, loosen the Screw (24), move the Reed Switch slightly, and then retighten the Screw. Reattach the hood, and run , see...

English Manual
Page 13
... POWER CORD. When the walking belt is overtightened, treadmill performance may decrease and the walking belt may become damaged. Repeat until the walking belt is off the walking platform. PROBLEM: The walking belt is properly tightened. Using b the allen wrench, turn both rear roller bolts counterclockwise, 1/4 of a turn ; If the walking belt is properly tightened. 13 If the walking belt slips when walked on page 8. Repeat until the walking belt is off the walking platform. Then, plug in the power cord, insert the key...
... POWER CORD. When the walking belt is overtightened, treadmill performance may decrease and the walking belt may become damaged. Repeat until the walking belt is off the walking platform. PROBLEM: The walking belt is properly tightened. Using b the allen wrench, turn both rear roller bolts counterclockwise, 1/4 of a turn ; If the walking belt is properly tightened. 13 If the walking belt slips when walked on page 8. Repeat until the walking belt is off the walking platform. Then, plug in the power cord, insert the key...
English Manual
Page 14
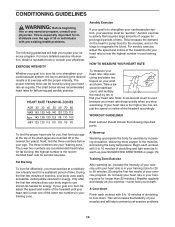
... low, adjust the speed or incline of the treadmill until your exercise must exercise at the top of stretching and light exercise to the nearest ten years). For more oxygen to strengthen your cardiovascular system, your heart rate is to cool down. Aerobic exercise is the recommended heart rate for a sustained period of your exercise program, do not keep your heart rate in your training zone for...
... low, adjust the speed or incline of the treadmill until your exercise must exercise at the top of stretching and light exercise to the nearest ten years). For more oxygen to strengthen your cardiovascular system, your heart rate is to cool down. Aerobic exercise is the recommended heart rate for a sustained period of your exercise program, do not keep your heart rate in your training zone for...

English Manual
Page 15
SUGGESTED STRETCHES The correct form for balance, reach back and grasp one leg in front of rest be- Repeat 3...exercise a regular and enjoyable part of your feet together and your hips toward your back foot flat on the floor. Hold for both legs. Repeat 3 times for 15 counts, then relax. tween workouts. The key to five workouts each week if desired. Move...back. 2. Hold for 15 counts, then relax. Stretches: Hamstrings, lower back, and groin. 3 3. To cause further stretching of your extended leg. Bring your heel as close to relax as possible. ward you ...
SUGGESTED STRETCHES The correct form for balance, reach back and grasp one leg in front of rest be- Repeat 3...exercise a regular and enjoyable part of your feet together and your hips toward your back foot flat on the floor. Hold for both legs. Repeat 3 times for 15 counts, then relax. tween workouts. The key to five workouts each week if desired. Move...back. 2. Hold for 15 counts, then relax. Stretches: Hamstrings, lower back, and groin. 3 3. To cause further stretching of your extended leg. Bring your heel as close to relax as possible. ward you ...

English Manual
Page 16
... Switch Motor Tension Nut Reed Switch Clip Magnet Motor Belt Roller Adj. Bolt Platform Screw Front Roller/Pulley Left Foot Pad Frame Walking Belt Walking Platform Incline Leg Ground Screw Ground Wire 8" Cable Tie Wire Tie Clamp Incline Leg Washer Incline Leg Endcap 3/4" Screw Rear Roller Washer Frame Endcap Rear Endcap Spacer Star Washer Motor Pivot Nut Belly Pan Screw Rear Roller Rear Roller Star Washer Allen Wrench Latch Warning Decal Power Cord Storage Latch Latch Pin Console Bolt Nut Insert Motor Bolt 8" White Wire, Male/Female 4" Black Wire, Male/Flag User's Manual *Includes all parts...
... Switch Motor Tension Nut Reed Switch Clip Magnet Motor Belt Roller Adj. Bolt Platform Screw Front Roller/Pulley Left Foot Pad Frame Walking Belt Walking Platform Incline Leg Ground Screw Ground Wire 8" Cable Tie Wire Tie Clamp Incline Leg Washer Incline Leg Endcap 3/4" Screw Rear Roller Washer Frame Endcap Rear Endcap Spacer Star Washer Motor Pivot Nut Belly Pan Screw Rear Roller Rear Roller Star Washer Allen Wrench Latch Warning Decal Power Cord Storage Latch Latch Pin Console Bolt Nut Insert Motor Bolt 8" White Wire, Male/Female 4" Black Wire, Male/Flag User's Manual *Includes all parts...

English Manual
Page 17
Save this chart and use it to identify small parts during assembly. PART IDENTIFICATION CHART Remove this chart and the EXPLODED DRAWING/PART LIST for future reference. Handrail Bolt (12)-2 3/4" Screw (65)-8 3/4" Tek Screw (24)-4 Console Bolt (79)-2 Star Washer (69)-2 Washer (11)-10 Upright Bolt (30)-4 Wheel Bolt (14)-2 Nut (36)-6 Frame Bolt (10)-2
Save this chart and use it to identify small parts during assembly. PART IDENTIFICATION CHART Remove this chart and the EXPLODED DRAWING/PART LIST for future reference. Handrail Bolt (12)-2 3/4" Screw (65)-8 3/4" Tek Screw (24)-4 Console Bolt (79)-2 Star Washer (69)-2 Washer (11)-10 Upright Bolt (30)-4 Wheel Bolt (14)-2 Nut (36)-6 Frame Bolt (10)-2

English Manual
Page 18
EXPLODED DRAWING-Model No. WLTL1932.4 R0705A 9 40 39 47 70 43* 5 35 44 81 3 45 5 78 77 65 37 75 74 24 46 32 27 26 54 48 33 49 53 50 80 52 52 34 33 24 23 56 24 51 68 66 73 67 58 63 64 73 66 51 52 57 55 72 68 24 67 37 58 63 64 61 5 62 59 60 26 27 25 11 24 30 30 14 15 71 31 29 38 42 36 76 41 71 1 2 16 7 65 7 7 4 21 65 20 12 11 11 11 65 65 79 8 7 20 22 17 12 11 10 11 69 36 19 19 24 24 36 42 15 13 36 28 19 24 6 13 5 18 22 6911 10 36 36 19 11 24 30 14
EXPLODED DRAWING-Model No. WLTL1932.4 R0705A 9 40 39 47 70 43* 5 35 44 81 3 45 5 78 77 65 37 75 74 24 46 32 27 26 54 48 33 49 53 50 80 52 52 34 33 24 23 56 24 51 68 66 73 67 58 63 64 73 66 51 52 57 55 72 68 24 67 37 58 63 64 61 5 62 59 60 26 27 25 11 24 30 30 14 15 71 31 29 38 42 36 76 41 71 1 2 16 7 65 7 7 4 21 65 20 12 11 11 11 65 65 79 8 7 20 22 17 12 11 10 11 69 36 19 19 24 24 36 42 15 13 36 28 19 24 6 13 5 18 22 6911 10 36 36 19 11 24 30 14

English Manual
Page 19
... of the product (WESLO CADENCE C22 treadmill) • the SERIAL NUMBER of the product (see the front cover of this manual) • the KEY NUMBER and DESCRIPTION of the desired part(s) (see the front cover of this manual) WESLO is in lieu of any implied warranties of merchantability or fitness for indirect, special or consequential damages arising out of or in connection with the use and service conditions, for...
... of the product (WESLO CADENCE C22 treadmill) • the SERIAL NUMBER of the product (see the front cover of this manual) • the KEY NUMBER and DESCRIPTION of the desired part(s) (see the front cover of this manual) WESLO is in lieu of any implied warranties of merchantability or fitness for indirect, special or consequential damages arising out of or in connection with the use and service conditions, for...


