
English Manual
Page 1
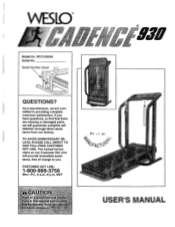
..., we are missing or damaged parts, we will provide immediate assistance, free of charge to you have questions, or find that there are committed to providing complete customer satisfaction. DEC: u 8 °A0 -0 USER'S MANUAL If you . Serial Number Decal e fr 4 QUESTIONS? TO AVOID UNNECESSARY DELAYS, PLEASE CALL DIRECT TO OUR TOLL-FREE CUSTOMER HOT LINE. CUSTOMER HOT LINE...
..., we are missing or damaged parts, we will provide immediate assistance, free of charge to you have questions, or find that there are committed to providing complete customer satisfaction. DEC: u 8 °A0 -0 USER'S MANUAL If you . Serial Number Decal e fr 4 QUESTIONS? TO AVOID UNNECESSARY DELAYS, PLEASE CALL DIRECT TO OUR TOLL-FREE CUSTOMER HOT LINE. CUSTOMER HOT LINE...

English Manual
Page 2
... Water • hOtOperate tetieadthill'Where „0 eing ep children under the treadmill. TABLE OF CONTENTS IMPORTANT PRECAUTIONS BEFORE YOU BEGIN ASSEMBLY OPERATION AND ADJUSTMENT HOW TO FOLD AND MOVE THE TREADMILL TROUBLE-SHOOTING CONDITIONING GUIDELINES ORDERING REPLACEMENT PARTS LIMITED WARRANTY 2 4 5 7 11 12 14 Back Cover Back Cover Note: An EXPLODED DRAWING and a PART LIST are recommended fo both men and women.'Always wear-athletic shoes...
... Water • hOtOperate tetieadthill'Where „0 eing ep children under the treadmill. TABLE OF CONTENTS IMPORTANT PRECAUTIONS BEFORE YOU BEGIN ASSEMBLY OPERATION AND ADJUSTMENT HOW TO FOLD AND MOVE THE TREADMILL TROUBLE-SHOOTING CONDITIONING GUIDELINES ORDERING REPLACEMENT PARTS LIMITED WARRANTY 2 4 5 7 11 12 14 Back Cover Back Cover Note: An EXPLODED DRAWING and a PART LIST are recommended fo both men and women.'Always wear-athletic shoes...
English Manual
Page 3
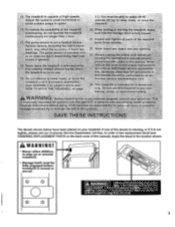
... tettin ARNI BefPrel:ieglnpirig exercise'€ rogrant; Apply the decal in determining heart rate rendt genera eVer. Adjust the speed in small increments to raise, lower, or move the treadmill until it is intended only. o. The pulse sensor is not legible, please call our Customer Service Department, toll-free, to order a free replacement decal (see ORDERING REPLACEMENT PARTS on or around treadmill. 0 • Storage latch must be able to...
... tettin ARNI BefPrel:ieglnpirig exercise'€ rogrant; Apply the decal in determining heart rate rendt genera eVer. Adjust the speed in small increments to raise, lower, or move the treadmill until it is intended only. o. The pulse sensor is not legible, please call our Customer Service Department, toll-free, to order a free replacement decal (see ORDERING REPLACEMENT PARTS on or around treadmill. 0 • Storage latch must be able to...
English Manual
Page 4
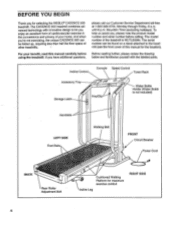
... home. Mountain Time (excluding holidays). Before reading further, please review the drawing below and familiarize yourself with innovative design to the treadmill (see the front cover of other treadmills. If you for selecting the WESLO® CADENCE 930 treadmill. Incline Control Console Speed Control Towel Rack Accessory Tray Storage Latch Key/Clip Water Bottle Holder (Water Bottle is WLTL93064. And when you , please note the product model number and serial number...
... home. Mountain Time (excluding holidays). Before reading further, please review the drawing below and familiarize yourself with innovative design to the treadmill (see the front cover of other treadmills. If you for selecting the WESLO® CADENCE 930 treadmill. Incline Control Console Speed Control Towel Rack Accessory Tray Storage Latch Key/Clip Water Bottle Holder (Water Bottle is WLTL93064. And when you , please note the product model number and serial number...

English Manual
Page 5
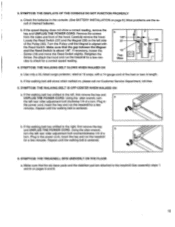
... adjustable wrenches and a phillips screwdriver .0=1" 1 #) (not included). 1. Hold the treadmill with your hands in a cleared area and remoVe all packing materials. Firmly hold the Left or Right Handrail (5 or 44) as shown. Raise the Handrails until assembly is completed. Make sure that there is not, attach the Frame Guide with your ( legs rather than your back straight. Set...
... adjustable wrenches and a phillips screwdriver .0=1" 1 #) (not included). 1. Hold the treadmill with your hands in a cleared area and remoVe all packing materials. Firmly hold the Left or Right Handrail (5 or 44) as shown. Raise the Handrails until assembly is completed. Make sure that there is not, attach the Frame Guide with your ( legs rather than your back straight. Set...

English Manual
Page 6
... to the Base (59) with the four Screws (100) as shown. 100 o O 9. Press the Allen Wrench (76) into the Adhesive Clip. Make sure that the Storage Latch closes fully over the Frame Guide (52) (see HOW TO MOVE THE TREADMILL on page 11. 7. 5. Attach the Stabilizer (64) to the Console with two Stabilizer Bolts (62) and two Stabilizer Nuts (61...
... to the Base (59) with the four Screws (100) as shown. 100 o O 9. Press the Allen Wrench (76) into the Adhesive Clip. Make sure that the Storage Latch closes fully over the Frame Guide (52) (see HOW TO MOVE THE TREADMILL on page 11. 7. 5. Attach the Stabilizer (64) to the Console with two Stabilizer Bolts (62) and two Stabilizer Nuts (61...
English Manual
Page 7
... connected to reduce the risk of your home's power. grounded in your treadmill being turned on a nominal 120-volt circuit, HOW TO PLUG IN THE POWER CORD and has a grounding plug that looks like extending from other appliances Whenever the adapter is equipped with a cord having an equipment-grounding conductor and a Your treadmill features a walking belt coated with all local codes and form. being damaged, always use...
... connected to reduce the risk of your home's power. grounded in your treadmill being turned on a nominal 120-volt circuit, HOW TO PLUG IN THE POWER CORD and has a grounding plug that looks like extending from other appliances Whenever the adapter is equipped with a cord having an equipment-grounding conductor and a Your treadmill features a walking belt coated with all local codes and form. being damaged, always use...
English Manual
Page 8
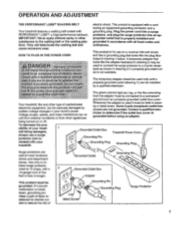
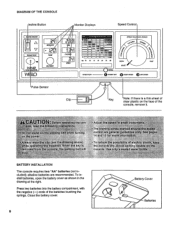
...: console.. DIAGRAM OF THE CONSOLE Incline Button Monitor Displays Speed Control PCWER INCLINE /-\ V THUMB PULSE DISTANCE • rt I CALOR Pews lomm iv Imola Soler WELD ON/RESET SPM HEART RATE TRAINING ZONES 'MCCl Of= MGM 0MIMI OO it41O O -i,..-144,04.V I 1Auk kriw iiiiiiiiiiiii C=Not: WE OOO OO ACM • OOO OOO D.O Aga 20 30 40 50 60 70 so SPEED TRAINING ZONES 1 1.')934 0 SLOW RESET FAST POWER • OPERATION 0 INSERT KEY...
...: console.. DIAGRAM OF THE CONSOLE Incline Button Monitor Displays Speed Control PCWER INCLINE /-\ V THUMB PULSE DISTANCE • rt I CALOR Pews lomm iv Imola Soler WELD ON/RESET SPM HEART RATE TRAINING ZONES 'MCCl Of= MGM 0MIMI OO it41O O -i,..-144,04.V I 1Auk kriw iiiiiiiiiiiii C=Not: WE OOO OO ACM • OOO OOO D.O Aga 20 30 40 50 60 70 so SPEED TRAINING ZONES 1 1.')934 0 SLOW RESET FAST POWER • OPERATION 0 INSERT KEY...
English Manual
Page 9
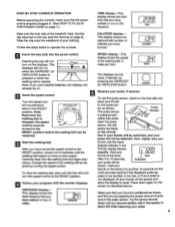
...- Change the speed of the walking belt, in miles. Hold your 12E1 thumb at slow speed. Note: Each time the walking belt is properly plugged in the PULSE display flashes steadily. Start the walking belt. Try the sensor several times until the heart- Insert the key fully into the power switch. STEP BY STEP CONSOLE OPERATION Before operating the console, make sure that the power cord is stopped, the speed control must be turned to the RESET position before the walking belt...
...- Change the speed of the walking belt, in miles. Hold your 12E1 thumb at slow speed. Note: Each time the walking belt is properly plugged in the PULSE display flashes steadily. Start the walking belt. Try the sensor several times until the heart- Insert the key fully into the power switch. STEP BY STEP CONSOLE OPERATION Before operating the console, make sure that the power cord is stopped, the speed control must be turned to the RESET position before the walking belt...
English Manual
Page 10
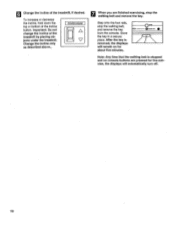
... bottom of the treadmill, if desired. Step onto the foot rails, stop the walking belt and remove the key. After the key is stopped and no console buttons are finished exercising, stop the walking belt, and remove the key DON from the console. Important: Do not change the incline of the treadmill by placing objects under the treadmill. Change the incline only as described above,. POWER INCLINE A When you are pressed for five minutes, the displays will remain...
... bottom of the treadmill, if desired. Step onto the foot rails, stop the walking belt and remove the key. After the key is stopped and no console buttons are finished exercising, stop the walking belt, and remove the key DON from the console. Important: Do not change the incline of the treadmill by placing objects under the treadmill. Change the incline only as described above,. POWER INCLINE A When you are pressed for five minutes, the displays will remain...

English Manual
Page 11
... a mat under the treadmill. HOW TO MOVE THE TREADMILL Before moving the treadmill. Hold the upper ends of injury, bend your legs and keep your left thumb, slide open the storage ) latch. Raise the treadmill about halfway to raise, lower, or move the treadmill over the frame guide. 1. Raise the treadmill until the frame and foot rail are past the storage latch. Carefully move the treadmill without tipping it...
... a mat under the treadmill. HOW TO MOVE THE TREADMILL Before moving the treadmill. Hold the upper ends of injury, bend your legs and keep your left thumb, slide open the storage ) latch. Raise the treadmill about halfway to raise, lower, or move the treadmill over the frame guide. 1. Raise the treadmill until the frame and foot rail are past the storage latch. Carefully move the treadmill without tipping it...
English Manual
Page 12
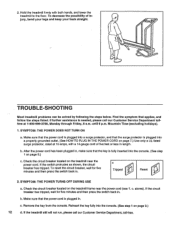
... breaker, wait for five minutes and then press the switch back in . Make sure that applies, and follow the steps listed. jury, bend your legs and keep your back straight. ( TROUBLE-SHOOTING Most treadmill problems can be solved by following the steps below. SYMPTOM: THE POWER DOES NOT TURN ON a. c Tripped Reset 2. SYMPTOM: THE POWER TURNS OFF DURING USE a. If the circuit breaker has tripped...
... breaker, wait for five minutes and then press the switch back in . Make sure that applies, and follow the steps listed. jury, bend your legs and keep your back straight. ( TROUBLE-SHOOTING Most treadmill problems can be solved by following the steps below. SYMPTOM: THE POWER DOES NOT TURN ON a. c Tripped Reset 2. SYMPTOM: THE POWER TURNS OFF DURING USE a. If the circuit breaker has tripped...
English Manual
Page 13
... the Pulley (90). If the walking belt has shifted to the treadmill See assembly steps 1 and 6 on the left rear roller adjustment bolt counterclockwise 1/4 of a turn the left side 37 90 of a turn the left , first remove the key and UNPLUG THE POWER CORD. b. Top 0 View 4. b. b. If necessary, loosen the 19 Screw (19) and move the Reed Switch slightly. Using the alien wrench, turn . Repeat until the walking belt is about 1/8". If the speed display does...
... the Pulley (90). If the walking belt has shifted to the treadmill See assembly steps 1 and 6 on the left rear roller adjustment bolt counterclockwise 1/4 of a turn the left side 37 90 of a turn the left , first remove the key and UNPLUG THE POWER CORD. b. Top 0 View 4. b. b. If necessary, loosen the 19 Screw (19) and move the Reed Switch slightly. Using the alien wrench, turn . Repeat until the walking belt is about 1/8". If the speed display does...
English Manual
Page 14
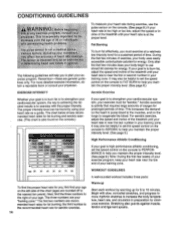
... the first few minutes does your body begin to use the pulse sensor on the console. (See page 9.) If your heart rate is too high or too low, adjust the speed or incline of the treadmill until your heart rate is high performance athletic conditioning, set the speed control on the console to PERFORMANCE to help you , first find the three numbers to oxygenate the blood. If your...
... the first few minutes does your body begin to use the pulse sensor on the console. (See page 9.) If your heart rate is too high or too low, adjust the speed or incline of the treadmill until your heart rate is high performance athletic conditioning, set the speed control on the console to PERFORMANCE to help you , first find the three numbers to oxygenate the blood. If your...
English Manual
Page 15
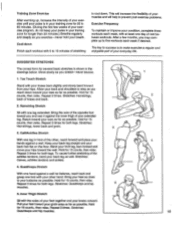
...exercise program, do not keep your pulse in the drawings below. Inner Thigh Stretch Sit with one day of rest between workouts. Repeat 3 times. After a few months, you may complete up , increase the intensity of your exercise until your pulse is in your training zone for both legs. Move ... the flexibility of the other hand. Hold for both legs. Quadriceps Stretch With one hand against a wall for several basic stretches is to relax as possible. Repeat 3 times for 15 counts, then relax. Stretches: Hamstrings, lower back and groin. 3 3. Reach toward you stretch-never...
...exercise program, do not keep your pulse in the drawings below. Inner Thigh Stretch Sit with one day of rest between workouts. Repeat 3 times. After a few months, you may complete up , increase the intensity of your exercise until your pulse is in your training zone for both legs. Move ... the flexibility of the other hand. Hold for both legs. Quadriceps Stretch With one hand against a wall for several basic stretches is to relax as possible. Repeat 3 times for 15 counts, then relax. Stretches: Hamstrings, lower back and groin. 3 3. Reach toward you stretch-never...
English Manual
Page 16
... and PART LIST attached to the center of this warranty is limited in connection with the use or performance of the product or damages with all other warranties and any product or damage to a product caused by or attributable to you specific legal rights. ICON is a registered trademark of ICON Health & Fitness, Inc. until 6 p.m. ORDERING REPLACEMENT PARTS To order replacement parts, call our Customer Service Department toll-free at...
... and PART LIST attached to the center of this warranty is limited in connection with the use or performance of the product or damages with all other warranties and any product or damage to a product caused by or attributable to you specific legal rights. ICON is a registered trademark of ICON Health & Fitness, Inc. until 6 p.m. ORDERING REPLACEMENT PARTS To order replacement parts, call our Customer Service Department toll-free at...

English Manual
Page 18
...Adhesive Clip Rear Roller Cover Rear Roller Roller Tension Spring Spring Sleeve Belt Tension Nut Left Foot Rail w/Fastener Walking Belt Walking Platform Platform Screw Isolator Left Console Attachment Shock Front Roller/Pulley Releasable Cable Tie Storage Latch Bracket Controller Electronics Bracket Incline Leg Pivot Bolt Frame Endcap Cable Tie Clamp 8" Cable Tie Battery Cover Screw Motor Guard Latch Decal Power Board w/Fastener Flat Washer Book Rack Tape Plastic Stand-Off Incline Control Incline Motor Guard 8" White Wire, 2 Female 8" Blue Wire, 2 Female User's Manual Includes all parts shown...
...Adhesive Clip Rear Roller Cover Rear Roller Roller Tension Spring Spring Sleeve Belt Tension Nut Left Foot Rail w/Fastener Walking Belt Walking Platform Platform Screw Isolator Left Console Attachment Shock Front Roller/Pulley Releasable Cable Tie Storage Latch Bracket Controller Electronics Bracket Incline Leg Pivot Bolt Frame Endcap Cable Tie Clamp 8" Cable Tie Battery Cover Screw Motor Guard Latch Decal Power Board w/Fastener Flat Washer Book Rack Tape Plastic Stand-Off Incline Control Incline Motor Guard 8" White Wire, 2 Female 8" Blue Wire, 2 Female User's Manual Includes all parts shown...


