

English Manual
Page 2
...Injury to the center of this manual. TABLE OF CONTENTS IMPORTANT PRECAUTIONS BEFORE YOU BEGIN ASSEMBLY OPERATION AND ADJUSTMENT HOW TO FOLD AND MOVE THE TREADMILL TROUBLE-SHOOTING CONDITIONING GUIDELINES ORDERING REPLACEMENT PARTS LIMITED WARRANTY 2 4 5 7 11 12 14 Back Cover Back Cover Note: An EXPLODED DRAWING ...shoes. Save the EXPLODED DRAWING and PART LIST for future reference. istheresponsibility of the owner to ensure at all users of this treadmill are adequately ormed of clearance behind it, Do notplace the adrnill on a surfacethat blocks any air openings.To protect the floor or...
...Injury to the center of this manual. TABLE OF CONTENTS IMPORTANT PRECAUTIONS BEFORE YOU BEGIN ASSEMBLY OPERATION AND ADJUSTMENT HOW TO FOLD AND MOVE THE TREADMILL TROUBLE-SHOOTING CONDITIONING GUIDELINES ORDERING REPLACEMENT PARTS LIMITED WARRANTY 2 4 5 7 11 12 14 Back Cover Back Cover Note: An EXPLODED DRAWING ...shoes. Save the EXPLODED DRAWING and PART LIST for future reference. istheresponsibility of the owner to ensure at all users of this treadmill are adequately ormed of clearance behind it, Do notplace the adrnill on a surfacethat blocks any air openings.To protect the floor or...
English Manual
Page 3
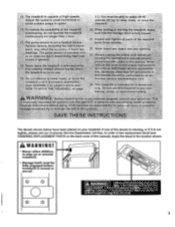
...::Always un lu the ower: cord 00fpi...0- if: y2 ii au thorized service . consult your treadmill. The decals shown below have been placed on the back cover of high speeds. If one of ...decals is missing, or if it is capable of this 010iil:fgV4bOUIO'40ij.O.9f. legye,:the treadmill Uhattend ; maker sure that the storage latch is not legible, please call our Customer Service Department..., toll-free, to raise, lower, or move th treadmill . n 24..This Iregi#IrhiP#:Ir400.0ect for longer than 1hour. 15. Adjust the speed in small...
...::Always un lu the ower: cord 00fpi...0- if: y2 ii au thorized service . consult your treadmill. The decals shown below have been placed on the back cover of high speeds. If one of ...decals is missing, or if it is capable of this 010iil:fgV4bOUIO'40ij.O.9f. legye,:the treadmill Uhattend ; maker sure that the storage latch is not legible, please call our Customer Service Department..., toll-free, to raise, lower, or move th treadmill . n 24..This Iregi#IrhiP#:Ir400.0ect for longer than 1hour. 15. Adjust the speed in small...
English Manual
Page 4
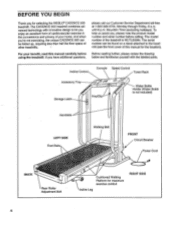
..., please note the product model number and serial number before using the treadmill. until 6 p.m. The serial number can be found on a decal attached to let you 're not exercising, the unique CADENCE 930 can be folded up, requiring less than half the floor space of... LEFT SIDE Foot Rails Walking Belt FRONT Circuit Breaker Power Cord BACK Rear Roller Adjustment Bolt 4 Cushioned Walking Platform for selecting the WESLO® CADENCE 930 treadmill. To help us assist you have additional questions, please call our Customer Service Department toll-free at 1-800-999-3756, Monday ...
..., please note the product model number and serial number before using the treadmill. until 6 p.m. The serial number can be found on a decal attached to let you 're not exercising, the unique CADENCE 930 can be folded up, requiring less than half the floor space of... LEFT SIDE Foot Rails Walking Belt FRONT Circuit Breaker Power Cord BACK Rear Roller Adjustment Bolt 4 Cushioned Walking Platform for selecting the WESLO® CADENCE 930 treadmill. To help us assist you have additional questions, please call our Customer Service Department toll-free at 1-800-999-3756, Monday ...

English Manual
Page 5
... your hands in the locations 4 shown at the bottom. 3 100 52 Thick end 23 4. As you raise the treadmill, make sure to lift with two Screws (100) as shown. Raise the Handrails until assembly is a Frame Guide (52) on the floor. 5 44 56 59 3. ... until the Base (59) and the front 2 Wheels (56) are resting on the left side of the Frame Guide is at the right. Next, the treadmill should be raised to the bottom of injury, bend your legs and keep your back. To decrease the possibility of the Base (59) in a cleared...
... your hands in the locations 4 shown at the bottom. 3 100 52 Thick end 23 4. As you raise the treadmill, make sure to lift with two Screws (100) as shown. Raise the Handrails until assembly is a Frame Guide (52) on the floor. 5 44 56 59 3. ... until the Base (59) and the front 2 Wheels (56) are resting on the left side of the Frame Guide is at the right. Next, the treadmill should be raised to the bottom of injury, bend your legs and keep your back. To decrease the possibility of the Base (59) in a cleared...

English Manual
Page 6
.... Make sure that the Storage Latch closes fully over the Frame Guide (52) (see HOW TO MOVE THE TREADMILL on page 11. 7. Before moving the treadmill, see the inset drawing). Pivot the treadmill slightly until the Storage Latch (50) closes over the Frame Guide. 6. Note: To protect the floor or ... both hands in the indicated location. Using your right hand to assembly drawing 5 at the right, and hold the treadmill firmly. Lower the treadmill to the Console (2), first remove the backing from the Adhesive Clip (77). To attach the Book Rack (4) to the floor. Slide the Stabilizer ...
.... Make sure that the Storage Latch closes fully over the Frame Guide (52) (see HOW TO MOVE THE TREADMILL on page 11. 7. Before moving the treadmill, see the inset drawing). Pivot the treadmill slightly until the Storage Latch (50) closes over the Frame Guide. 6. Note: To protect the floor or ... both hands in the indicated location. Using your right hand to assembly drawing 5 at the right, and hold the treadmill firmly. Lower the treadmill to the Console (2), first remove the backing from the Adhesive Clip (77). To attach the Book Rack (4) to the floor. Slide the Stabilizer ...
English Manual
Page 7
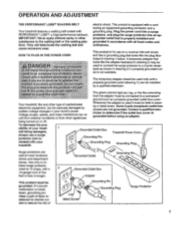
...or break down, grounding provides a path of least resistance for use a surge protector (not in doubt as a properly grounded outlet box cover. Your treadmill, like the adapter illustrated in drawing 2 may be held in drawing 2 if a properly grounded outlet is used only until a properly grounded outlet ...can result from weather conditions or from the adapter must be connected to a permanent ground such as to reduce the risk of your treadmill. 0 Grounding Plug Grounding Plug 00 Surge protectors are sold at 15 amps, with all local codes and form. sibility of 0,°...
...or break down, grounding provides a path of least resistance for use a surge protector (not in doubt as a properly grounded outlet box cover. Your treadmill, like the adapter illustrated in drawing 2 may be held in drawing 2 if a properly grounded outlet is used only until a properly grounded outlet ...can result from weather conditions or from the adapter must be connected to a permanent ground such as to reduce the risk of your treadmill. 0 Grounding Plug Grounding Plug 00 Surge protectors are sold at 15 amps, with all local codes and form. sibility of 0,°...
English Manual
Page 8
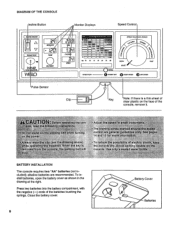
... (-) ends of the console, remove it. alkaline batteries are ,:general u el nes 1o'r1b6 See a - 14 and 15 for,tnae.fP gr To , reduce t.he 'treadmill When the key is a thin sheet of clear plastic on the face of the batteries touching the springs. To install batteries, open the battery cover...
... (-) ends of the console, remove it. alkaline batteries are ,:general u el nes 1o'r1b6 See a - 14 and 15 for,tnae.fP gr To , reduce t.he 'treadmill When the key is a thin sheet of clear plastic on the face of the batteries touching the springs. To install batteries, open the battery cover...
English Manual
Page 9
... shown, and that your pulse is pressure-acti- 0 .6> vated; This display shows the approximate number of the treadmill. TIME 1 =1 LI I -I \ walking belt is positioned as described above. fully press down again on the treadmill. tion in . (See HOW TO PLUG IN THE POWER CORD on page 7.) Step onto the foot rails of...
... shown, and that your pulse is pressure-acti- 0 .6> vated; This display shows the approximate number of the treadmill. TIME 1 =1 LI I -I \ walking belt is positioned as described above. fully press down again on the treadmill. tion in . (See HOW TO PLUG IN THE POWER CORD on page 7.) Step onto the foot rails of...
English Manual
Page 10
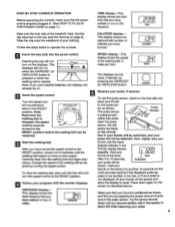
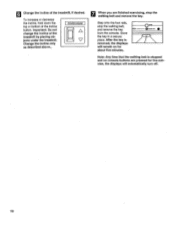
To increase or decrease the incline, hold down the top or bottom of the treadmill by placing objects under the treadmill. Change the incline only as described above,. POWER INCLINE A When you are pressed for five minutes, the displays will remain on for about five minutes. 0 ... walking belt, and remove the key DON from the console. Important: Do not change the incline of the incline button. 6 Change the incline of the treadmill, if desired.
To increase or decrease the incline, hold down the top or bottom of the treadmill by placing objects under the treadmill. Change the incline only as described above,. POWER INCLINE A When you are pressed for five minutes, the displays will remain on for about five minutes. 0 ... walking belt, and remove the key DON from the console. Important: Do not change the incline of the incline button. 6 Change the incline of the treadmill, if desired.

English Manual
Page 11
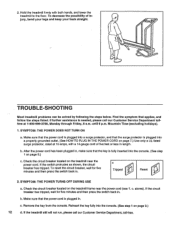
... the storage latch closes over the frame guide. 1. Hold the upper ends of direct sunlight. Place one foot on the base, and carefully lower the treadmill until it back, or the base pads may come off. Hold the upper end of injury, bend your legs and keep your right hand to... the position shown at the right. HOW TO FOLD AND MOVE THE TREADMILL HOW TO FOLD THE TREADMILL FOR STORAGE Before folding the treadmill, unplug the power cord. Caution: You must be able to safely lift 45 pounds (20 kg) in the locations shown...
... the storage latch closes over the frame guide. 1. Hold the upper ends of direct sunlight. Place one foot on the base, and carefully lower the treadmill until it back, or the base pads may come off. Hold the upper end of injury, bend your legs and keep your right hand to... the position shown at the right. HOW TO FOLD AND MOVE THE TREADMILL HOW TO FOLD THE TREADMILL FOR STORAGE Before folding the treadmill, unplug the power cord. Caution: You must be able to safely lift 45 pounds (20 kg) in the locations shown...
English Manual
Page 12
... the floor. SYMPTOM: THE POWER DOES NOT TURN ON a. c Tripped Reset 2. Check the circuit breaker located on the treadmill frame near the power cord. b. Remove the key from the console. To reset the circuit breaker, wait for five minutes and then press ... the circuit breaker has tripped. SYMPTOM: THE POWER TURNS OFF DURING USE a. c. jury, bend your legs and keep your back straight. ( TROUBLE-SHOOTING Most treadmill problems can be solved by following the steps below. Reinsert the key fully into a surge protector, and that applies, and follow the steps listed. 2. To...
... the floor. SYMPTOM: THE POWER DOES NOT TURN ON a. c Tripped Reset 2. Check the circuit breaker located on the treadmill frame near the power cord. b. Remove the key from the console. To reset the circuit breaker, wait for five minutes and then press ... the circuit breaker has tripped. SYMPTOM: THE POWER TURNS OFF DURING USE a. c. jury, bend your legs and keep your back straight. ( TROUBLE-SHOOTING Most treadmill problems can be solved by following the steps below. Reinsert the key fully into a surge protector, and that applies, and follow the steps listed. 2. To...
English Manual
Page 13
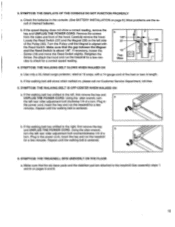
... problems are attached to the right, first remove the key and UNPLUG THE POWER CORD. Retighten the Screw. Re-attach the hood and run the treadmill for a few minutes to check for a few minutes. Use only a UL-listed surge protector, rated at 15 amps, with the Reed Switch. If the... display does not show a correct reading, remove the key and UNPLUG THE POWER CORD. Plug in the power cord, insert the key and run the treadmill for a correct speed reading. 3. SYMPTOM: THE DISPLAYS OF THE CONSOLE DO NOT FUNCTION PROPERLY a. b. Remove the screws from the sides and front of drained ...
... problems are attached to the right, first remove the key and UNPLUG THE POWER CORD. Retighten the Screw. Re-attach the hood and run the treadmill for a few minutes to check for a few minutes. Use only a UL-listed surge protector, rated at 15 amps, with the Reed Switch. If the... display does not show a correct reading, remove the key and UNPLUG THE POWER CORD. Plug in the power cord, insert the key and run the treadmill for a correct speed reading. 3. SYMPTOM: THE DISPLAYS OF THE CONSOLE DO NOT FUNCTION PROPERLY a. b. Remove the screws from the sides and front of drained ...
English Manual
Page 14
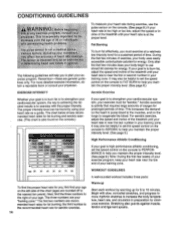
.... Aerobic exercise is activity that requires large amounts of time. the third number is the recommended heart rate for a sustained period of the treadmill until your heart rate is at a relatively low intensity level for aerobic exercise. Remember-these are your age. The proper intensity level can be..., including your physician. Only after the first few weeks of your exercise program, keep your heart rate near the low end of the treadmill until your training zone. If your goal is to burn fat, adjust the speed and incline of your heart rate is high performance athletic...
.... Aerobic exercise is activity that requires large amounts of time. the third number is the recommended heart rate for a sustained period of the treadmill until your heart rate is at a relatively low intensity level for aerobic exercise. Remember-these are your age. The proper intensity level can be..., including your physician. Only after the first few weeks of your exercise program, keep your heart rate near the low end of the treadmill until your training zone. If your goal is to burn fat, adjust the speed and incline of your heart rate is high performance athletic...

English Manual
Page 16
...proof of purchase. Accordingly, the above limitation may not apply to products used for easy reference when calling. If possible, place the treadmill near your telephone for commercial or rental purposes, or to you specific legal rights. ICON is not responsible or liable for which vary... to be prepared to give the following information: • The MODEL NUMBER OF THE PRODUCT (WLTL93064). • The NAME OF THE PRODUCT (WESLO® CADENCE 930 treadmill). • The SERIAL NUMBER'OF THE PRODUCT (see the front cover of this manual). • The KEY NUMBER OF THE PART(S) (see...
...proof of purchase. Accordingly, the above limitation may not apply to products used for easy reference when calling. If possible, place the treadmill near your telephone for commercial or rental purposes, or to you specific legal rights. ICON is not responsible or liable for which vary... to be prepared to give the following information: • The MODEL NUMBER OF THE PRODUCT (WLTL93064). • The NAME OF THE PRODUCT (WESLO® CADENCE 930 treadmill). • The SERIAL NUMBER'OF THE PRODUCT (see the front cover of this manual). • The KEY NUMBER OF THE PART(S) (see...


