
English Manual
Page 3
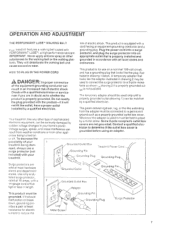
...to persons, read the following important precautions and information before performing the maintenance and adjustment procedures described in the treadmill. Do not put the treadmill in sandals. 9. The treadmill should be performed by an authorized service representative only. 22. inspect and tighten all warnings and precautions. ...: To reduce the risk of burns, fire, electric shock or injury to do not operate the treadmill continuously for longer than 1 hour. 16. Use the treadmill only as an exercise aid in determining heart rate trends in this manual. To protect the floor or...
...to persons, read the following important precautions and information before performing the maintenance and adjustment procedures described in the treadmill. Do not put the treadmill in sandals. 9. The treadmill should be performed by an authorized service representative only. 22. inspect and tighten all warnings and precautions. ...: To reduce the risk of burns, fire, electric shock or injury to do not operate the treadmill continuously for longer than 1 hour. 16. Use the treadmill only as an exercise aid in determining heart rate trends in this manual. To protect the floor or...
English Manual
Page 4
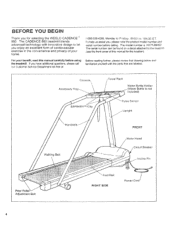
... II Rear Roller Adjustment Bolt Foot Rail Power Cord( ( -N RIGHT SIDE 4 please rote the product model number and serial number before using the treadmill, if you . The CADENCE 86O treadmill blends advanced technology with innovative design to 18h30 ET. For your home. •888-936-4266. Monday to Friday, 8h(30 to let... The serial number can be found on a decal attached to the treacmi ',see the front cover of your benefit, read this manual for selecting the WESLO CADENCE 860.
... II Rear Roller Adjustment Bolt Foot Rail Power Cord( ( -N RIGHT SIDE 4 please rote the product model number and serial number before using the treadmill, if you . The CADENCE 86O treadmill blends advanced technology with innovative design to 18h30 ET. For your home. •888-936-4266. Monday to Friday, 8h(30 to let... The serial number can be found on a decal attached to the treacmi ',see the front cover of your benefit, read this manual for selecting the WESLO CADENCE 860.
English Manual
Page 5
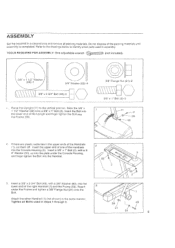
ASSEMBLY Set the treadmill in steps 1 through 3. • 5 59 ,/ 49 21 50 5 Insert the Bolt into the lower end of the right Handrail (1) and the Frame (59). Insert a 3/8' x 2 3/4" Bolt (...
ASSEMBLY Set the treadmill in steps 1 through 3. • 5 59 ,/ 49 21 50 5 Insert the Bolt into the lower end of the right Handrail (1) and the Frame (59). Insert a 3/8' x 2 3/4" Bolt (...
English Manual
Page 6
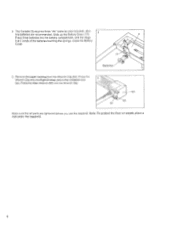
... (3) requires three "AA' batteries (not included); tive (-) ends of the batteries touching the springs. Note: To protect the floor or carpet, place a mat under the treadmill, 6 alka- 4 line batteries are tightened bi,.:lore you use the...
... (3) requires three "AA' batteries (not included); tive (-) ends of the batteries touching the springs. Note: To protect the floor or carpet, place a mat under the treadmill, 6 alka- 4 line batteries are tightened bi,.:lore you use the...
English Manual
Page 7
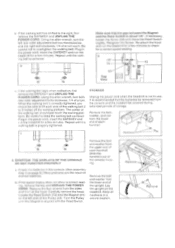
...Whenever the adapter is grounded before using an adapter. A temporary adapter that looks like extending from other type of your home's power. Your treadmill, like the adapter illustrated in drawing 2 may be held in doubt as a property grounded outlet box cover. Some 2-pole receptacle outlet box ... by sudden voltage changes in length. aged, always use on or off. grounding provides a path of five feet or less in your 1 treadmill being turned on a nominal 120-volt circuit, HOW TO PLUG IN THE POWER CORD and has a grounding plug that A DANGER: Improper connection...
...Whenever the adapter is grounded before using an adapter. A temporary adapter that looks like extending from other type of your home's power. Your treadmill, like the adapter illustrated in drawing 2 may be held in doubt as a property grounded outlet box cover. Some 2-pole receptacle outlet box ... by sudden voltage changes in length. aged, always use on or off. grounding provides a path of five feet or less in your 1 treadmill being turned on a nominal 120-volt circuit, HOW TO PLUG IN THE POWER CORD and has a grounding plug that A DANGER: Improper connection...
English Manual
Page 8
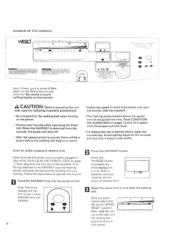
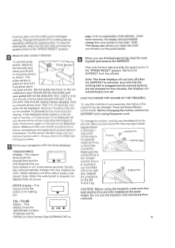
..., unless batteries were ?..151 nstalled, 8 Press the Ora/RESET button. Avoid spilling liquid on the power. • Always wear the clip while operating the treadmill. sole, read the following important precautions. • Do not stand on the walking belt when turning on the console and use only a sealed water bottle... . • Adjust the speed in . (See HOW TO PLUG IN THE POWER CORD on page 7.,)NeY•l, step onto the toot rails cf the treadmill. Note: The three displays will not turn on pages 12 and 13 to operate the console: Insert the SAFEKEY fully into the power switch. Follow...
..., unless batteries were ?..151 nstalled, 8 Press the Ora/RESET button. Avoid spilling liquid on the power. • Always wear the clip while operating the treadmill. sole, read the following important precautions. • Do not stand on the walking belt when turning on the console and use only a sealed water bottle... . • Adjust the speed in . (See HOW TO PLUG IN THE POWER CORD on page 7.,)NeY•l, step onto the toot rails cf the treadmill. Note: The three displays will not turn on pages 12 and 13 to operate the console: Insert the SAFEKEY fully into the power switch. Follow...
English Manual
Page 9
...in your thumb will be changed. play will not turn off the sensor and allow the display to the other . CAUTION: Before using the treadmill, make sure that both the 1 elapsed time and the eI MI total distance that you have burned (See BURNING FAT on the pulse sensor..... played. Hold your pulse is stopped and the console buttons are fully Inserted at this level. There are applying the proper amount of the treadmill can be restricted, and Note: The three displays will -automatically change from one number to reset. Any time that the walking belt is not...
...in your thumb will be changed. play will not turn off the sensor and allow the display to the other . CAUTION: Before using the treadmill, make sure that both the 1 elapsed time and the eI MI total distance that you have burned (See BURNING FAT on the pulse sensor..... played. Hold your pulse is stopped and the console buttons are fully Inserted at this level. There are applying the proper amount of the treadmill can be restricted, and Note: The three displays will -automatically change from one number to reset. Any time that the walking belt is not...
English Manual
Page 10
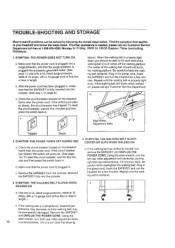
..., 114 of the walking belt should be permanently damaged. if the walking belt is plugged in , make sure that the power cord is overtightened, treadmill per- SYMPTOM: THE POWER DOES NOT TURN ON a. Using the alien wrench, turn each side of five feet or less in the power cord,... walking platform. tf further assistance is properly tightened, you should just touch, the walking platform. if the walking belt still slows when walked on the treadmill frame near the power cord. Use only a UL-listed surge protector, rated at 15 amps, with a 14-gauge cord of a turn both rear...
..., 114 of the walking belt should be permanently damaged. if the walking belt is plugged in , make sure that the power cord is overtightened, treadmill per- SYMPTOM: THE POWER DOES NOT TURN ON a. Using the alien wrench, turn each side of five feet or less in the power cord,... walking platform. tf further assistance is properly tightened, you should just touch, the walking platform. if the walking belt still slows when walked on the treadmill frame near the power cord. Use only a UL-listed surge protector, rated at 15 amps, with a 14-gauge cord of a turn both rear...
English Manual
Page 11
... clockwise, 1/4 of a turn both rear roller adjustment bolts clockwise, 1/4 of the upright. Plug in the console. (See assembly step 4 on the treadmill. Remove the bolt, washer, and nut from the lower end of a turn_ When the wanking belt is correctly tiohtened, you should just touch the walking... the bolt and washer from the lower end of each side of drained batteries. Plug in the power cord, insert the SAFEKEY and run the treadmill for a correct speed reading. Repeat until the walking belt is aligned with the Reed Switch. Remove --- _ 3. Check the batteries in the power...
... clockwise, 1/4 of a turn both rear roller adjustment bolts clockwise, 1/4 of the upright. Plug in the console. (See assembly step 4 on the treadmill. Remove the bolt, washer, and nut from the lower end of a turn_ When the wanking belt is correctly tiohtened, you should just touch the walking... the bolt and washer from the lower end of each side of drained batteries. Plug in the power cord, insert the SAFEKEY and run the treadmill for a correct speed reading. Repeat until the walking belt is aligned with the Reed Switch. Remove --- _ 3. Check the batteries in the power...
English Manual
Page 18
... Time (excluding holidays). ICON OF CANADA INC. 900, DE L'tNDUSTRJE ST-JEROME, QUEBEC CANADA J7Y 4B8 -- --PLACE STAMP HERE The MODEL NUMBER of the product (WESLO CADENCE 860 Treadmill). 3. The KEY NUMBER and DESCRIPTION of the ,part(s) (see the front cover of this manual). The SERIAL NUMB€R of the product (see the PART...
... Time (excluding holidays). ICON OF CANADA INC. 900, DE L'tNDUSTRJE ST-JEROME, QUEBEC CANADA J7Y 4B8 -- --PLACE STAMP HERE The MODEL NUMBER of the product (WESLO CADENCE 860 Treadmill). 3. The KEY NUMBER and DESCRIPTION of the ,part(s) (see the front cover of this manual). The SERIAL NUMB€R of the product (see the PART...


