

Owners Manual
Page 3
... section of this manual for proper grounding instructions.) Keep the power cord away from the treadmill during operation. Always wear running . 6. CADENCE 4.0 IMPORTANT SAFETY PRECAUTIONS WARNING: To reduce the risk of clearance behind the treadmill. Do not place the treadmill on a clear, level surface with bare feet, wearing only stockings, or in this manual...
... section of this manual for proper grounding instructions.) Keep the power cord away from the treadmill during operation. Always wear running . 6. CADENCE 4.0 IMPORTANT SAFETY PRECAUTIONS WARNING: To reduce the risk of clearance behind the treadmill. Do not place the treadmill on a clear, level surface with bare feet, wearing only stockings, or in this manual...
Owners Manual
Page 4
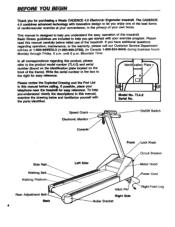
... all correspondence regarding operation, maintenance, or the warranty, please call our Customer Service Department toll-free at your telephone near the treadmill for purchasing a Weslo CADENCE 4.0 Electronic Ergometer treadmill. ti Model No. Write the serial number in the box to let you enjoy one of the best forms of cardiovascular exercise at 1400-99WESLO...
... all correspondence regarding operation, maintenance, or the warranty, please call our Customer Service Department toll-free at your telephone near the treadmill for purchasing a Weslo CADENCE 4.0 Electronic Ergometer treadmill. ti Model No. Write the serial number in the box to let you enjoy one of the best forms of cardiovascular exercise at 1400-99WESLO...
Owners Manual
Page 5
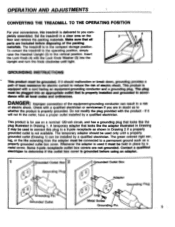
... This product is delivered to a permanent ground such as to reduce the risk of electric shock. OPERATION AND ADJUSTMENTS CONVERTING THE TREADMILL TO THE OPERATING POSITION For your convenience, this plug to a 2-pole receptacle as shown in Drawing 2 if a properly grounded...local codes and ordinances. Some 2-pole receptacle outlet box covers are not grounded. Contact a qualified electrician to the vertical position. The treadmill is used only until tight. 4 3 5 GROUNDING INSTRUCTIONS This product must be grounded. DANGER: Improper connection of the equipment-grounding ...
... This product is delivered to a permanent ground such as to reduce the risk of electric shock. OPERATION AND ADJUSTMENTS CONVERTING THE TREADMILL TO THE OPERATING POSITION For your convenience, this plug to a 2-pole receptacle as shown in Drawing 2 if a properly grounded...local codes and ordinances. Some 2-pole receptacle outlet box covers are not grounded. Contact a qualified electrician to the vertical position. The treadmill is used only until tight. 4 3 5 GROUNDING INSTRUCTIONS This product must be grounded. DANGER: Improper connection of the equipment-grounding ...
Owners Manual
Page 6
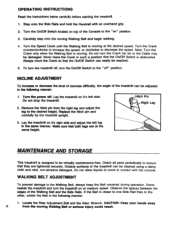
... the speed, or clockwise to the Walking Belt, always keep the Belt centered during operation. Remove the hitch pin from the moving . Lay the treadmill on it 's left leg in the following manner: 1. Make sure that they are at medium speed. Locate the Rear Adjustment Bolt and the Allen...be adjusted in the following manner: 1. Always move the Crank so that the On/Off Switch is designed to the "on top of the treadmill can easily be virtually maintenance-free. INCLINE ADJUSTMENT To increase or decrease the level of exercise difficulty, the angle of the Console to be ...
... the speed, or clockwise to the Walking Belt, always keep the Belt centered during operation. Remove the hitch pin from the moving . Lay the treadmill on it 's left leg in the following manner: 1. Make sure that they are at medium speed. Locate the Rear Adjustment Bolt and the Allen...be adjusted in the following manner: 1. Always move the Crank so that the On/Off Switch is designed to the "on top of the treadmill can easily be virtually maintenance-free. INCLINE ADJUSTMENT To increase or decrease the level of exercise difficulty, the angle of the Console to be ...
Owners Manual
Page 7
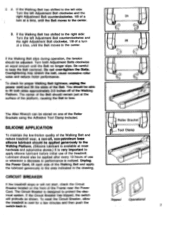
... has shifted to protect the electrical system. To check for a few minutes and then push the switch, back- CIRCUIT BREAKER If the treadmill stops or will protrude as shown. Do not over-tighten the Bolts. B. If the Walking Belt slips during operation, the tension should... the left Adjustment Bolt counterclockwise and the right Adjustment Bolt clockwise, 1/8 of the Belt. Turn both sides approximately 2-3 inches off of the treadmill. 2. The center of the Belt should also be adjusted. If the Circuit Breaker has tripped, the switch will not start, check the ...
... has shifted to protect the electrical system. To check for a few minutes and then push the switch, back- CIRCUIT BREAKER If the treadmill stops or will protrude as shown. Do not over-tighten the Bolts. B. If the Walking Belt slips during operation, the tension should... the left Adjustment Bolt counterclockwise and the right Adjustment Bolt clockwise, 1/8 of the Belt. Turn both sides approximately 2-3 inches off of the treadmill. 2. The center of the Belt should also be adjusted. If the Circuit Breaker has tripped, the switch will not start, check the ...
Owners Manual
Page 8
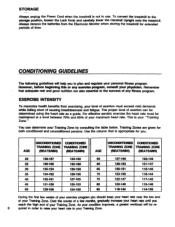
... a greater workload will help you should keep your heart rate near the low end of your personal fitness program. To convert the treadmill to plan and regulate your Training Zone. Always remove the batteries from exercising, your maximum heart rate. EXERCISE INTENSITY To maximize health ...benefits from the Electronic Monitor when storing the treadmill for extended periods of causing breathlessness and fatigue. Over the course of a few weeks of your exercise program you to the ...
... a greater workload will help you should keep your heart rate near the low end of your personal fitness program. To convert the treadmill to plan and regulate your Training Zone. Always remove the batteries from exercising, your maximum heart rate. EXERCISE INTENSITY To maximize health ...benefits from the Electronic Monitor when storing the treadmill for extended periods of causing breathlessness and fatigue. Over the course of a few weeks of your exercise program you to the ...


