
Owners Manual
Page 1
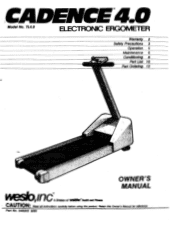
Retain this product. Part No. 046203 9/89 CADENCE 4.0 Model No. TL4.0 ELECTRONIC ERGOMETER Warranty 2 Safety Precautions 3 Operation 5 Maintenance 6 Conditioning 8 Part Ust 10 Part Ordering 12 qz) OWNER'S MANUAL vvedolin nr C A Division of WeidOeffesith and Fitness • CAUTION: Read all instructions carefully before using this Owner's Manual forreferenca-
Retain this product. Part No. 046203 9/89 CADENCE 4.0 Model No. TL4.0 ELECTRONIC ERGOMETER Warranty 2 Safety Precautions 3 Operation 5 Maintenance 6 Conditioning 8 Part Ust 10 Part Ordering 12 qz) OWNER'S MANUAL vvedolin nr C A Division of WeidOeffesith and Fitness • CAUTION: Read all instructions carefully before using this Owner's Manual forreferenca-
Owners Manual
Page 2
... 84321 WARNING: Before beginning this Warranty is limited to replacing or repairing, at Weslo's option, the product at one of purchase. This warranty does not extend to any exercise program consult your physician. All products for individuals over the age of purchase. No other warranty beyond that specifically set forth above is made must be free from defects in workmanship and material...
... 84321 WARNING: Before beginning this Warranty is limited to replacing or repairing, at Weslo's option, the product at one of purchase. This warranty does not extend to any exercise program consult your physician. All products for individuals over the age of purchase. No other warranty beyond that specifically set forth above is made must be free from defects in workmanship and material...

Owners Manual
Page 3
...-purpose cord of six to the BEFORE YOU BEGIN section of this manual for instructions if the treadmill is not working properly. (Refer to ten feet in this manual for both men and women. 7. Never drop or insert any opening. 8. Never remove the motor hood unless instructed to persons, read the following important safety precautions and information before performing the maintenance and adjustment procedures...
...-purpose cord of six to the BEFORE YOU BEGIN section of this manual for instructions if the treadmill is not working properly. (Refer to ten feet in this manual for both men and women. 7. Never drop or insert any opening. 8. Never remove the motor hood unless instructed to persons, read the following important safety precautions and information before performing the maintenance and adjustment procedures...
Owners Manual
Page 4
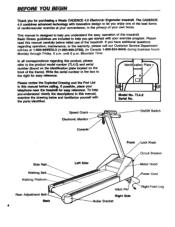
... this treadmill. TL4.0 Serial No. _ Speed Crank Electronic Monitor On/Off Switch Console Side Rail Walking Belt Walking Platfor Rear Adjustment Bolt Back 4 Left Side Front Lock Knob Circuit Breaker otor Hood Power Cord Hitch Pin Right Side Roller Bracket Right Front Leg In all correspondence regarding operation, maintenance, or the warranty, please call our Customer Service Department toll-free at your convenience, in the privacy of your own home. ti Model No. Write the serial number in...
... this treadmill. TL4.0 Serial No. _ Speed Crank Electronic Monitor On/Off Switch Console Side Rail Walking Belt Walking Platfor Rear Adjustment Bolt Back 4 Left Side Front Lock Knob Circuit Breaker otor Hood Power Cord Hitch Pin Right Side Roller Bracket Right Front Leg In all correspondence regarding operation, maintenance, or the warranty, please call our Customer Service Department toll-free at your convenience, in the privacy of your own home. ti Model No. Write the serial number in...
Owners Manual
Page 5
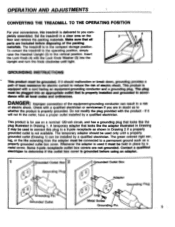
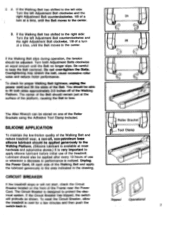
... the Upright and turn the Knob clockwise until a properly grounded outlet (Drawing 1) can result in place by a metal screw. The temporary adapter should malfunction or break down, grounding provides a path of least resistance for use on the floor and remove the packing materials. A temporary adapter that is in accordance with all parts are included before using an adapter. Grounded Outlet Box Grounding Plug...
... the Upright and turn the Knob clockwise until a properly grounded outlet (Drawing 1) can result in place by a metal screw. The temporary adapter should malfunction or break down, grounding provides a path of least resistance for use on the floor and remove the packing materials. A temporary adapter that is in accordance with all parts are included before using an adapter. Grounded Outlet Box Grounding Plug...
Owners Manual
Page 6
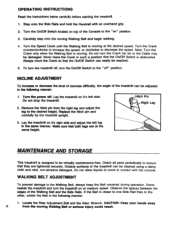
Carefully step onto the moving . Lay the treadmill on at medium speed. MAINTENANCE AND STORAGE This treadmill is designed to be cleaned using a damp cloth and mild, non-abrasive detergent. Turn the On/Off Switch located on top of the treadmill can be virtually maintenance-free. Turn the Crank counterclockwise to increase the speed, or clockwise to the Walking Belt, always keep the Belt centered during operation. Note: Turn the Crank only when...
Carefully step onto the moving . Lay the treadmill on at medium speed. MAINTENANCE AND STORAGE This treadmill is designed to be cleaned using a damp cloth and mild, non-abrasive detergent. Turn the On/Off Switch located on top of the treadmill can be virtually maintenance-free. Turn the Crank counterclockwise to increase the speed, or clockwise to the Walking Belt, always keep the Belt centered during operation. Note: Turn the Crank only when...
Owners Manual
Page 7
... center. Overtightening may stretch the belt, cause excessive roller noise and reduce motor performance. 2. Be careful to cool for proper Walking Belt tightness, unplug the power cord and lift the sides of the Walking Belt and apply the lubricant generously to bow. The Circuit Breaker is noticed. B. Lubricant should be stored on the front of the treadmill. A. If the Walking Belt slips during operation, the tension...
... center. Overtightening may stretch the belt, cause excessive roller noise and reduce motor performance. 2. Be careful to cool for proper Walking Belt tightness, unplug the power cord and lift the sides of the Walking Belt and apply the lubricant generously to bow. The Circuit Breaker is noticed. B. Lubricant should be stored on the front of the treadmill. A. If the Walking Belt slips during operation, the tension...
Owners Manual
Page 8
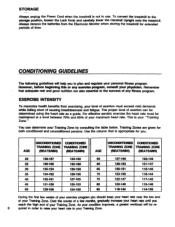
...-139 During the first few months, gradually increase your Training Zone. STORAGE Always unplug the Power Cord when the treadmill is not in order to raise your heart rate to the storage position, loosen the Lock Knob and carefully lower the Handrail Upright onto the treadmill. However, before beginning this or any fitness program. Training Zones are also essential to plan and regulate your physician...
...-139 During the first few months, gradually increase your Training Zone. STORAGE Always unplug the Power Cord when the treadmill is not in order to raise your heart rate to the storage position, loosen the Lock Knob and carefully lower the Handrail Upright onto the treadmill. However, before beginning this or any fitness program. Training Zones are also essential to plan and regulate your physician...
Owners Manual
Page 9
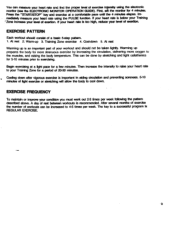
... heart rate is important in aiding circulation and preventing soreness. 5-10 minutes of exercise Intensity using the PULSE function. If your condition you must work out 2-3 times per week. Warm-up prepares the body for a few minutes. First, ad the monitor for a period of workouts can be increased to 4-5 times per week following the pattern described above. Press the "START/STOP" key and exercise...
... heart rate is important in aiding circulation and preventing soreness. 5-10 minutes of exercise Intensity using the PULSE function. If your condition you must work out 2-3 times per week. Warm-up prepares the body for a few minutes. First, ad the monitor for a period of workouts can be increased to 4-5 times per week following the pattern described above. Press the "START/STOP" key and exercise...
Owners Manual
Page 10
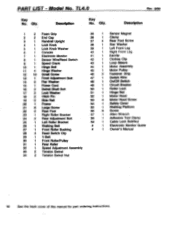
...28 4 Reed Switch Clip 29 1 V-Belt 30 1 Front Roller/Pulley 31 1 Rear Roller 32 1 Speed Adjustment Assembly 33 2 Tension Swivel 34 2 Tension Swivel Nut 1 Sensor Magnet 1 Clamp 4 Rear Foot Screw 1 Star Washer 1 Left Front Leg 1 Right Front Leg 1 Earclip 1 Clothes Clip 1 Loop Sleeve 1 Motor Assembly 1 Motor Pulley • 3 Fastener Strip 1 Switch Wire 1 On/Off Switch 1 Circuit Breaker 1 Roller Lock 1 Hinge Nut 1 Motor Hood 4 Motor Hood Screw 1 _Safety Cover 1 Walking Platform 8 Screw 1 Allen Wrench 1 Adhesive Tool Clamp 1 Cable Lock Bolt/Nut 1 Electronic Monitor Guide 1 Owner's Manual 1O...
...28 4 Reed Switch Clip 29 1 V-Belt 30 1 Front Roller/Pulley 31 1 Rear Roller 32 1 Speed Adjustment Assembly 33 2 Tension Swivel 34 2 Tension Swivel Nut 1 Sensor Magnet 1 Clamp 4 Rear Foot Screw 1 Star Washer 1 Left Front Leg 1 Right Front Leg 1 Earclip 1 Clothes Clip 1 Loop Sleeve 1 Motor Assembly 1 Motor Pulley • 3 Fastener Strip 1 Switch Wire 1 On/Off Switch 1 Circuit Breaker 1 Roller Lock 1 Hinge Nut 1 Motor Hood 4 Motor Hood Screw 1 _Safety Cover 1 Walking Platform 8 Screw 1 Allen Wrench 1 Adhesive Tool Clamp 1 Cable Lock Bolt/Nut 1 Electronic Monitor Guide 1 Owner's Manual 1O...
Owners Manual
Page 11
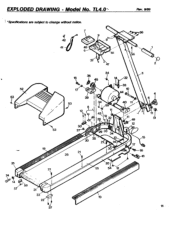
EXPLODED DRAWING - TL4.0°- ) *Specifications are subject to change without notice. 7 42 41 6 47 34 Rev. 9/89 2 3 52 19 24 J 14 5 21 58 31 23 2 37 39 I 12 ( 59 11 2 3 40 11 O 0 11 ,49 12 4 5 11 51 30 35 21 34 13 14. - 21 26 15 17 cr 16 -18 54 12 19 Model No.
EXPLODED DRAWING - TL4.0°- ) *Specifications are subject to change without notice. 7 42 41 6 47 34 Rev. 9/89 2 3 52 19 24 J 14 5 21 58 31 23 2 37 39 I 12 ( 59 11 2 3 40 11 O 0 11 ,49 12 4 5 11 51 30 35 21 34 13 14. - 21 26 15 17 cr 16 -18 54 12 19 Model No.
Owners Manual
Page 12
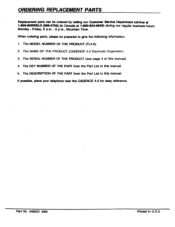
... MODEL NUMBER OF THE PRODUCT (TL4.0). 2. ORDERING REPLACEMENT PARTS Replacement parts can be prepared to give the following information. 1. When ordering parts, please be ordered by calling our Customer Service Department toll-free at 1-800-99WESLO (999-3756) (in this manual. The SERIAL NUMBER OF THE PRODUCT (see page 4 of this manual. 5. The NAME OF THE PRODUCT (CADENCE 4.0 Electronic Ergometer). 3. The KEY NUMBER OF THE PART from the Part List...
... MODEL NUMBER OF THE PRODUCT (TL4.0). 2. ORDERING REPLACEMENT PARTS Replacement parts can be prepared to give the following information. 1. When ordering parts, please be ordered by calling our Customer Service Department toll-free at 1-800-99WESLO (999-3756) (in this manual. The SERIAL NUMBER OF THE PRODUCT (see page 4 of this manual. 5. The NAME OF THE PRODUCT (CADENCE 4.0 Electronic Ergometer). 3. The KEY NUMBER OF THE PART from the Part List...


