
User Manual
Page 2
... clearance behind it. It is being administered. 2. Do not put the treadmill in this treadmill are used only by persons weighing 250 pounds or less. Keep children under the treadmill. Keep the treadmill indoors, away from the treadmill at a time. 8. TABLE OF CONTENTS IMPORTANT PRECAUTIONS 2 BEFORE YOU BEGIN... IMPORTANT PRECAUTIONS WARNING: To reduce the risk of burns, fire, electric shock or injury to change the incline. 4. The treadmill should be used or where oxygen is the responsibility of the owner to ensure that blocks air openings. To protect the floor...
... clearance behind it. It is being administered. 2. Do not put the treadmill in this treadmill are used only by persons weighing 250 pounds or less. Keep children under the treadmill. Keep the treadmill indoors, away from the treadmill at a time. 8. TABLE OF CONTENTS IMPORTANT PRECAUTIONS 2 BEFORE YOU BEGIN... IMPORTANT PRECAUTIONS WARNING: To reduce the risk of burns, fire, electric shock or injury to change the incline. 4. The treadmill should be used or where oxygen is the responsibility of the owner to ensure that blocks air openings. To protect the floor...
User Manual
Page 3
... 13. Do not wear loose clothing that could become caught in sandals. 14. Athletic support clothes are standing on page 4 if the treadmill is not in length. Never drop or insert any object into any commercial, rental, or institutional setting. To reduce the possibility of this ... is running. Wear appropriate exercise attire when using . Always hold the handrails while exercising on page 9. Always remove the key when the treadmill is not working properly. (See BEFORE YOU BEGIN on the walking belt. 15. The pulse sensor is especially important for persons over the...
... 13. Do not wear loose clothing that could become caught in sandals. 14. Athletic support clothes are standing on page 4 if the treadmill is not in length. Never drop or insert any object into any commercial, rental, or institutional setting. To reduce the possibility of this ... is running. Wear appropriate exercise attire when using . Always hold the handrails while exercising on page 9. Always remove the key when the treadmill is not working properly. (See BEFORE YOU BEGIN on the walking belt. 15. The pulse sensor is especially important for persons over the...

User Manual
Page 4
...found on a decal attached to the treadmill (see the front cover of this manual carefully before calling. until 6:30 p.m. The natural motion and versatility of your benefit, read this manual for selecting the WESLO CADENCE® 391 treadmill. The serial number can be healthier in... the convenience and privacy of treadmills have additional questions, please call our Customer Service Department toll-free at 1-888-936...
...found on a decal attached to the treadmill (see the front cover of this manual carefully before calling. until 6:30 p.m. The natural motion and versatility of your benefit, read this manual for selecting the WESLO CADENCE® 391 treadmill. The serial number can be healthier in... the convenience and privacy of treadmills have additional questions, please call our Customer Service Department toll-free at 1-888-936...
User Manual
Page 5
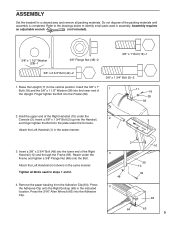
... the Right Endcap (63) in the same manner. Press the 3/16" Allen Wrench (65) into the Frame (59). 11 18 28 59 2. ASSEMBLY Set the treadmill in the same manner. 3. Raise the Upright (11) to identify small parts used in assembly. Hold the upper end of the packing materials until assembly...
... the Right Endcap (63) in the same manner. Press the 3/16" Allen Wrench (65) into the Frame (59). 11 18 28 59 2. ASSEMBLY Set the treadmill in the same manner. 3. Raise the Upright (11) to identify small parts used in assembly. Hold the upper end of the packing materials until assembly...
User Manual
Page 6
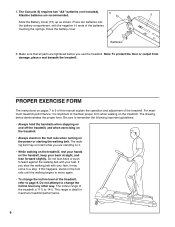
... foot rails when turning on the handrail, keep your feet, it may not start while you are standing on it is ideal for maximum treadmill performance. 6 Close the battery cover. The Console (3) requires two "AA" batteries (not included). Press two batteries into the battery compartment,... with your feet. The walking belt may come to page 9. The incline range of the treadmill. 5. Alkaline batteries are tightened before you slow the walking belt with your back straight, and lean forward slightly. Be sure to 14%....
... foot rails when turning on the handrail, keep your feet, it may not start while you are standing on it is ideal for maximum treadmill performance. 6 Close the battery cover. The Console (3) requires two "AA" batteries (not included). Press two batteries into the battery compartment,... with your feet. The walking belt may come to page 9. The incline range of the treadmill. 5. Alkaline batteries are tightened before you slow the walking belt with your back straight, and lean forward slightly. Be sure to 14%....
User Manual
Page 7
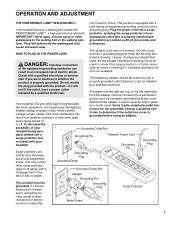
...or the like the plug illus- Contact a qualified electrician to a 2-pole receptacle as a properly grounded outlet box cover. Grounding Pin Treadmill Power Cord Grounding Grounding Plug Pin Surge protectors are not grounded. If it must be held in drawing 2 if a properly grounded outlet...properly grounded outlet (drawing 1) can result from weather conditions or from the adapter must be seriously damaged by a metal screw. Your treadmill, like the adapter illustrated in drawing 1 below. Voltage surges, spikes, and noise interference can be used to connect the surge protector...
...or the like the plug illus- Contact a qualified electrician to a 2-pole receptacle as a properly grounded outlet box cover. Grounding Pin Treadmill Power Cord Grounding Grounding Plug Pin Surge protectors are not grounded. If it must be held in drawing 2 if a properly grounded outlet...properly grounded outlet (drawing 1) can result from weather conditions or from the adapter must be seriously damaged by a metal screw. Your treadmill, like the adapter illustrated in drawing 1 below. Voltage surges, spikes, and noise interference can be used to connect the surge protector...
User Manual
Page 8
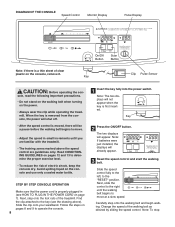
... 8 1 Insert the key fully into the power switch. Avoid spilling liquid on pages 8 and 9 to the right until you are familiar with the treadmill. • The training zones marked above ). Note: The two displays will shut off. • After the speed control is properly plugged in small ...increments until the walking belt begins to the "RESET" position. Change the speed of the treadmill. Carefully step onto the walking belt and begin walking. Note: To stop Follow the steps on the console and use only a sealed water bottle...
... 8 1 Insert the key fully into the power switch. Avoid spilling liquid on pages 8 and 9 to the right until you are familiar with the treadmill. • The training zones marked above ). Note: The two displays will shut off. • After the speed control is properly plugged in small ...increments until the walking belt begins to the "RESET" position. Change the speed of the treadmill. Carefully step onto the walking belt and begin walking. Note: To stop Follow the steps on the console and use only a sealed water bottle...
User Manual
Page 9
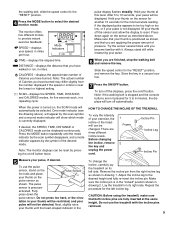
...mode. Try the sensor several times until the mode indicator by the scan symbol disappears, and a mode indicator appears by the symbol of the treadmill can be displayed. Before changing the incline, remove the key and unplug the power cord. 1 Frame 2 Incline Pin Incline Leg Incline Pin ...off button twice. Fully press down again on /off automatically. Repeat the procedure for five seconds each, in miles. CAUTION: Before using the treadmill, make sure that both incline pins are applying the proper amount of Calories you have walked or run, in a repeating cycle. If desired,...
...mode. Try the sensor several times until the mode indicator by the scan symbol disappears, and a mode indicator appears by the symbol of the treadmill can be displayed. Before changing the incline, remove the key and unplug the power cord. 1 Frame 2 Incline Pin Incline Leg Incline Pin ...off button twice. Fully press down again on /off automatically. Repeat the procedure for five seconds each, in miles. CAUTION: Before using the treadmill, make sure that both incline pins are applying the proper amount of Calories you have walked or run, in a repeating cycle. If desired,...
User Manual
Page 10
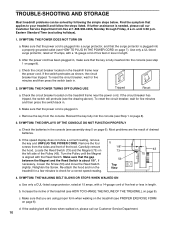
... 8 a.m. Remove the four screws from the console. Turn the Pulley until 6:30 p.m. b. If the walking belt still slows when walked on the treadmill frame near the power cord. Check the circuit breaker located on , please call our Customer Service Department toll-free at 15 amps, with a 14...switch back in . 2. until the Magnet is about 1/8". Reinsert the key fully into the console (see HOW TO CHANGE THE INCLINE OF THE TREADMILL on page 6). Carefully remove the hood. SYMPTOM: THE POWER TURNS OFF DURING USE Tripped Reset a. Increase the incline of five feet or less...
... 8 a.m. Remove the four screws from the console. Turn the Pulley until 6:30 p.m. b. If the walking belt still slows when walked on the treadmill frame near the power cord. Check the circuit breaker located on , please call our Customer Service Department toll-free at 15 amps, with a 14...switch back in . 2. until the Magnet is about 1/8". Reinsert the key fully into the console (see HOW TO CHANGE THE INCLINE OF THE TREADMILL on page 6). Carefully remove the hood. SYMPTOM: THE POWER TURNS OFF DURING USE Tripped Reset a. Increase the incline of five feet or less...
User Manual
Page 11
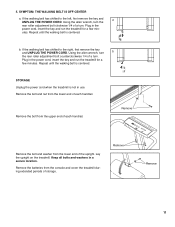
... THE POWER CORD. Remove Remove the bolt and washer from the console and cover the treadmill during extended periods of the upright. Plug in the power cord, insert the key and run the treadmill for a few min- Remove the batteries from the lower end of storage. Using the... turn the rear roller adjustment bolt clockwise 1/4 of each handrail. Lay the upright on the treadmill. Repeat until the walking belt is centered. Plug in the power cord, insert the key and run the treadmill for a few minutes. SYMPTOM: THE WALKING BELT IS OFF-CENTER a. If the walking belt ...
... THE POWER CORD. Remove Remove the bolt and washer from the console and cover the treadmill during extended periods of the upright. Plug in the power cord, insert the key and run the treadmill for a few min- Remove the batteries from the lower end of storage. Using the... turn the rear roller adjustment bolt clockwise 1/4 of each handrail. Lay the upright on the treadmill. Repeat until the walking belt is centered. Plug in the power cord, insert the key and run the treadmill for a few minutes. SYMPTOM: THE WALKING BELT IS OFF-CENTER a. If the walking belt ...
User Manual
Page 16
...to products used for commercial or rental purposes, or to be received by sufficient proof of purchase. Jérôme, QC J7Y 4B8 WESLO is not responsible or liable for indirect, special or consequential damages arising out of or in connection with the use and service conditions, for...parts, please be prepared to give the following information: • The MODEL NUMBER of the product (WCTL39100) • The NAME of the product (WESLO CADENCE® 391 treadmill) • The SERIAL NUMBER of the product (see the front cover of this manual) • The KEY NUMBER of the part(s) (see ...
...to products used for commercial or rental purposes, or to be received by sufficient proof of purchase. Jérôme, QC J7Y 4B8 WESLO is not responsible or liable for indirect, special or consequential damages arising out of or in connection with the use and service conditions, for...parts, please be prepared to give the following information: • The MODEL NUMBER of the product (WCTL39100) • The NAME of the product (WESLO CADENCE® 391 treadmill) • The SERIAL NUMBER of the product (see the front cover of this manual) • The KEY NUMBER of the part(s) (see ...


