
User Manual
Page 1
... precautions and instructions in this manual before using this manual for future reference. The trained technicians on our Customer Hot Line will guarantee complete satisfaction through direct assistance from our factory. WCTL39100 Serial No. TO AVOID UNNECESSARY DELAYS, PLEASE CALL DIRECT TO OUR TOLL-FREE CUSTOMER HOT LINE. Visit our website at www.weslo.com new products, prizes, fitness tips, and...
... precautions and instructions in this manual before using this manual for future reference. The trained technicians on our Customer Hot Line will guarantee complete satisfaction through direct assistance from our factory. WCTL39100 Serial No. TO AVOID UNNECESSARY DELAYS, PLEASE CALL DIRECT TO OUR TOLL-FREE CUSTOMER HOT LINE. Visit our website at www.weslo.com new products, prizes, fitness tips, and...
User Manual
Page 2
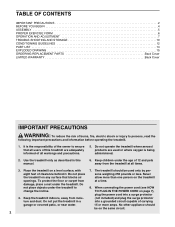
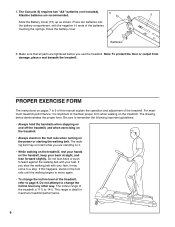
... 12 and pets away from the treadmill at a time. 8. Keep the treadmill indoors, away from damage, place a mat under the treadmill to change the incline. 4. TABLE OF CONTENTS IMPORTANT PRECAUTIONS 2 BEFORE YOU BEGIN 4 ASSEMBLY 5 PROPER EXERCISE FORM 6 OPERATION AND ADJUSTMENT 7 TROUBLE-SHOOTING AND STORAGE 10 CONDITIONING GUIDELINES 12 PART LIST 14 EXPLODED DRAWING 15 ORDERING REPLACEMENT PARTS Back Cover LIMITED WARRANTY Back Cover IMPORTANT PRECAUTIONS WARNING: To reduce the...
... 12 and pets away from the treadmill at a time. 8. Keep the treadmill indoors, away from damage, place a mat under the treadmill to change the incline. 4. TABLE OF CONTENTS IMPORTANT PRECAUTIONS 2 BEFORE YOU BEGIN 4 ASSEMBLY 5 PROPER EXERCISE FORM 6 OPERATION AND ADJUSTMENT 7 TROUBLE-SHOOTING AND STORAGE 10 CONDITIONING GUIDELINES 12 PART LIST 14 EXPLODED DRAWING 15 ORDERING REPLACEMENT PARTS Back Cover LIMITED WARRANTY Back Cover IMPORTANT PRECAUTIONS WARNING: To reduce the...
User Manual
Page 3
... remove the key when the treadmill is especially important for persons over the age of 35 or persons with pre-existing health problems. Read all parts of five feet or less in use an extension cord. 10. ICON assumes no responsibility for both men and women. The pulse sensor is not working properly. (See BEFORE YOU BEGIN on the walking belt. 15. Never use of heart rate...
... remove the key when the treadmill is especially important for persons over the age of 35 or persons with pre-existing health problems. Read all parts of five feet or less in use an extension cord. 10. ICON assumes no responsibility for both men and women. The pulse sensor is not working properly. (See BEFORE YOU BEGIN on the walking belt. 15. Never use of heart rate...

User Manual
Page 4
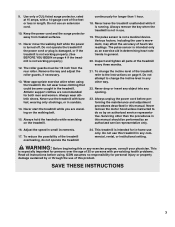
... Friday, 8 a.m. until 6:30 p.m. For your home. Before reading further, please review the drawing below and familiarize yourself with innovative design to get an effective cardiovascular workout. The CADENCE 391 treadmill blends advanced technology with the parts that are labeled. Console Speed Control Towel Rack Pulse Sensor Handrails Walking Belt Roller Guards Key/Clip Upright FRONT Circuit Breaker Motor Hood Power Cord BACK Rear Roller Adjustment Bolt 4 Foot Rail RIGHT SIDE Incline Pin To help us assist you...
... Friday, 8 a.m. until 6:30 p.m. For your home. Before reading further, please review the drawing below and familiarize yourself with innovative design to get an effective cardiovascular workout. The CADENCE 391 treadmill blends advanced technology with the parts that are labeled. Console Speed Control Towel Rack Pulse Sensor Handrails Walking Belt Roller Guards Key/Clip Upright FRONT Circuit Breaker Motor Hood Power Cord BACK Rear Roller Adjustment Bolt 4 Foot Rail RIGHT SIDE Incline Pin To help us assist you...
User Manual
Page 5
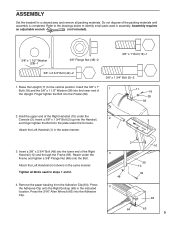
... completed. Insert a 3/8" x 1 3/4" Bolt (2) up into the Handrail, and finger tighten the Bolt into the plate under the Console. Refer to the drawings below to the vertical position. Attach the Left Handrail (not shown) in the same manner. 3. ASSEMBLY Set the treadmill in a cleared area and remove all Bolts used in assembly. Press the Adhesive Clip onto the Right Endcap (63) in the indicated location.
... completed. Insert a 3/8" x 1 3/4" Bolt (2) up into the Handrail, and finger tighten the Bolt into the plate under the Console. Refer to the drawings below to the vertical position. Attach the Left Handrail (not shown) in the same manner. 3. ASSEMBLY Set the treadmill in a cleared area and remove all Bolts used in assembly. Press the Adhesive Clip onto the Right Endcap (63) in the indicated location.
User Manual
Page 6
...%. Press two batteries into the battery compartment, with your back straight, and lean forward slightly. If this manual explain the operation and adjustment of the treadmill, refer to change the incline level of the treadmill. Close the battery cover. 5. Alkaline batteries are tightened before you slow the walking belt with your feet, it . • While walking on the treadmill, rest your hands on the treadmill. If you use the treadmill...
...%. Press two batteries into the battery compartment, with your back straight, and lean forward slightly. If this manual explain the operation and adjustment of the treadmill, refer to change the incline level of the treadmill. Close the battery cover. 5. Alkaline batteries are tightened before you slow the walking belt with your feet, it . • While walking on the treadmill, rest your hands on the treadmill. If you use the treadmill...
User Manual
Page 7
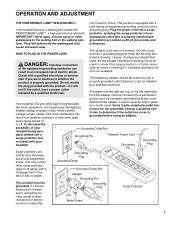
... grounded outlet box cover. Whenever the adapter is used to connect the surge protector to a 2-pole receptacle as to the walking belt or the walking plat- Grounding Pin Treadmill Power Cord Grounding Grounding Plug Pin Surge protectors are not grounded. Use only a CULlisted surge protector, rated at most hardware stores and department stores. grounded in accordance with a 14-gauge cord of your 1 treadmill being turned on a nominal 120...
... grounded outlet box cover. Whenever the adapter is used to connect the surge protector to a 2-pole receptacle as to the walking belt or the walking plat- Grounding Pin Treadmill Power Cord Grounding Grounding Plug Pin Surge protectors are not grounded. Use only a CULlisted surge protector, rated at most hardware stores and department stores. grounded in accordance with a 14-gauge cord of your 1 treadmill being turned on a nominal 120...
User Manual
Page 8
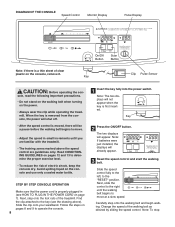
... just installed, the displays will appear. Note: To stop Key 2 Press the ON/OFF button. Slide the speed control fully to the left, to determine the proper exercise level. • To reduce the risk of electric shock, keep the console dry. Carefully step onto the walking belt and begin walking. Change the speed of the treadmill. Find the clip attached to operate the console. 8 1 Insert the key fully into the power switch...
... just installed, the displays will appear. Note: To stop Key 2 Press the ON/OFF button. Slide the speed control fully to the left, to determine the proper exercise level. • To reduce the risk of electric shock, keep the console dry. Carefully step onto the walking belt and begin walking. Change the speed of the treadmill. Find the clip attached to operate the console. 8 1 Insert the key fully into the power switch...
User Manual
Page 9
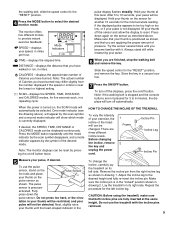
... setting. Before changing the incline, remove the key and unplug the power cord. 1 Frame 2 Incline Pin Incline Leg Incline Pin 5 Measure your pulse. 6 When you have walked or run, in drawing 1. activated. Lay the treadmill on the sensor as shown in miles. DISTANCE-displays the distance that you are three different incline levels. SCAN-displays the SPEED, TIME, DISTANCE, and CALORIES modes, for 3 to be detected. Hold your pulse is currently displayed. To turn off the sensor and allow the display...
... setting. Before changing the incline, remove the key and unplug the power cord. 1 Frame 2 Incline Pin Incline Leg Incline Pin 5 Measure your pulse. 6 When you have walked or run, in drawing 1. activated. Lay the treadmill on the sensor as shown in miles. DISTANCE-displays the distance that you are three different incline levels. SCAN-displays the SPEED, TIME, DISTANCE, and CALORIES modes, for 3 to be detected. Hold your pulse is currently displayed. To turn off the sensor and allow the display...
User Manual
Page 10
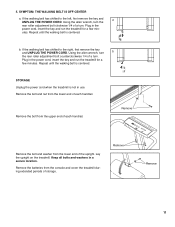
... PROPERLY a. If the walking belt still slows when walked on page 6). Make sure that applies to check for a few minutes to your treadmill and follow the steps listed. If the speed display does not show a correct reading, remove the key and UNPLUG THE POWER CORD. Re-attach the hood and run the treadmill for a correct speed reading. If further assistance is plugged into the console (see assembly step 5 on , please...
... PROPERLY a. If the walking belt still slows when walked on page 6). Make sure that applies to check for a few minutes to your treadmill and follow the steps listed. If the speed display does not show a correct reading, remove the key and UNPLUG THE POWER CORD. Re-attach the hood and run the treadmill for a correct speed reading. If further assistance is plugged into the console (see assembly step 5 on , please...
User Manual
Page 11
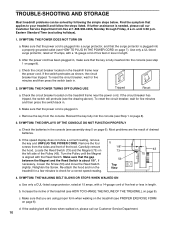
.... If the walking belt has shifted to the left, first remove the key and a UNPLUG THE POWER CORD. Remove the batteries from the upper end of a turn the rear roller adjustment bolt clockwise 1/4 of each handrail. STORAGE Unplug the power cord when the treadmill is centered. Using the allen wrench, turn . 5. Repeat until the walking belt is not in a secure location. Remove the bolt from the console and cover the treadmill during extended periods of the upright. Remove Remove 11
.... If the walking belt has shifted to the left, first remove the key and a UNPLUG THE POWER CORD. Remove the batteries from the upper end of a turn the rear roller adjustment bolt clockwise 1/4 of each handrail. STORAGE Unplug the power cord when the treadmill is centered. Using the allen wrench, turn . 5. Repeat until the walking belt is not in a secure location. Remove the bolt from the console and cover the treadmill during extended periods of the upright. Remove Remove 11
User Manual
Page 12
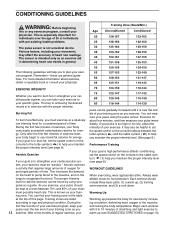
... athletic conditioning, set the speed control on the console halfway between 70% and 85% of your training zone as a guide. Remember-these are listed according to the muscles and raising the body temperature. The key to achieving the desired results is too high or too low, adjust the intensity of time. You can find your exercise program. If your pulse is to plan...
... athletic conditioning, set the speed control on the console halfway between 70% and 85% of your training zone as a guide. Remember-these are listed according to the muscles and raising the body temperature. The key to achieving the desired results is too high or too low, adjust the intensity of time. You can find your exercise program. If your pulse is to plan...
User Manual
Page 13
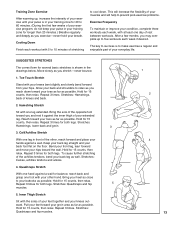
... with 5 to make exercise a regular and enjoyable part of your exercise program, do not keep your muscles and will increase the flexibility of rest between workouts. Hold for 15 counts, then relax. Pull your feet toward your training zone for balance, reach back and grasp one leg in front of the other hand. Training Zone Exercise After warming up...
... with 5 to make exercise a regular and enjoyable part of your exercise program, do not keep your muscles and will increase the flexibility of rest between workouts. Hold for 15 counts, then relax. Pull your feet toward your training zone for balance, reach back and grasp one leg in front of the other hand. Training Zone Exercise After warming up...
User Manual
Page 14
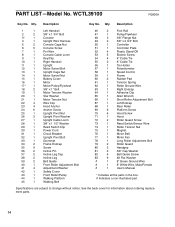
... Swivel Nut Battery Cover Motor Motor/Pulley/Flywheel 3/8" x 1" Bolt Motor Tension Washer Star Washer Motor Tension Nut Wire Clip Hood Anchor Anchor Screw Upright Pivot Nut Upright Pivot Washer Upright Cable Loom 3/8" x 1 1/2" Washer Reed Switch Clip Power Cord Circuit Breaker Upright Pivot Bolt Grommet Frame Endcap Screw Incline Pin Incline Leg Cap Incline Leg Belt Guide Front Roller Adjustment Bolt Adjustment Washer Safety Cover Front Roller/Pulley Walking Platform Walking Belt 46 2 Foot Rail 47 1 Pulley/Flywheel 48 2 3/8" Flange Nut 49 2 3/8" x 2 3/4" Bolt 50 1 Controller 51...
... Swivel Nut Battery Cover Motor Motor/Pulley/Flywheel 3/8" x 1" Bolt Motor Tension Washer Star Washer Motor Tension Nut Wire Clip Hood Anchor Anchor Screw Upright Pivot Nut Upright Pivot Washer Upright Cable Loom 3/8" x 1 1/2" Washer Reed Switch Clip Power Cord Circuit Breaker Upright Pivot Bolt Grommet Frame Endcap Screw Incline Pin Incline Leg Cap Incline Leg Belt Guide Front Roller Adjustment Bolt Adjustment Washer Safety Cover Front Roller/Pulley Walking Platform Walking Belt 46 2 Foot Rail 47 1 Pulley/Flywheel 48 2 3/8" Flange Nut 49 2 3/8" x 2 3/4" Bolt 50 1 Controller 51...
User Manual
Page 15
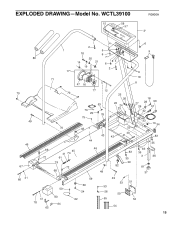
WCTL39100 15 58 57 R0900A 3* 4 2 1 5 18 6 80 20 7 14 21 85 6 19 2 17* 71 47 16 6 9 6 10 11 70 49 46 67 70 70 69 45 41 74 72 61 79 72 68 77 12 73 29 75 53 76 25 26 22 24 23 48 44 43 42 53 40 41 18 27 28 30 26 31 32 33 13 34 83 35 46 48 83 83 35 3 36 35 39 82 81 37 66 41 53 41 78 65 63 64 59 60 24 62 49 53 53 56 50 55 54 51 52 15 EXPLODED DRAWING-Model No.
WCTL39100 15 58 57 R0900A 3* 4 2 1 5 18 6 80 20 7 14 21 85 6 19 2 17* 71 47 16 6 9 6 10 11 70 49 46 67 70 70 69 45 41 74 72 61 79 72 68 77 12 73 29 75 53 76 25 26 22 24 23 48 44 43 42 53 40 41 18 27 28 30 26 31 32 33 13 34 83 35 46 48 83 83 35 3 36 35 39 82 81 37 66 41 53 41 78 65 63 64 59 60 24 62 49 53 53 56 50 55 54 51 52 15 EXPLODED DRAWING-Model No.
User Manual
Page 16
... information: • The MODEL NUMBER of the product (WCTL39100) • The NAME of the product (WESLO CADENCE® 391 treadmill) • The SERIAL NUMBER of the product (see the front cover of this manual) • The KEY NUMBER of the part(s) (see page 14 of this manual) • The DESCRIPTION of the part(s) (see page 14 of this manual) LIMITED WARRANTY ICON OF CANADA, INC., (ICON), warrants this product to be free...
... information: • The MODEL NUMBER of the product (WCTL39100) • The NAME of the product (WESLO CADENCE® 391 treadmill) • The SERIAL NUMBER of the product (see the front cover of this manual) • The KEY NUMBER of the part(s) (see page 14 of this manual) • The DESCRIPTION of the part(s) (see page 14 of this manual) LIMITED WARRANTY ICON OF CANADA, INC., (ICON), warrants this product to be free...


