
English Manual
Page 2
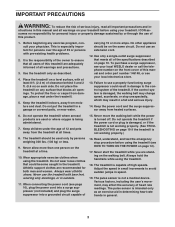
... actual size. WESLO is missing or illegible, call the telephone number on the treadmill. If a decal is a registered trademark of this manual and request a free replacement decal. TABLE OF CONTENTS WARNING DECAL PLACEMENT 2 IMPORTANT PRECAUTIONS 3 BEFORE YOU BEGIN 5 ASSEMBLY 6 OPERATION AND ADJUSTMENT 10 HOW TO FOLD AND MOVE THE TREADMILL 17 TROUBLESHOOTING 19 EXERCISE GUIDELINES 21 PART LIST 23 EXPLODED DRAWING 24 ORDERING REPLACEMENT PARTS Back Cover LIMITED WARRANTY Back Cover WARNING...
... actual size. WESLO is missing or illegible, call the telephone number on the treadmill. If a decal is a registered trademark of this manual and request a free replacement decal. TABLE OF CONTENTS WARNING DECAL PLACEMENT 2 IMPORTANT PRECAUTIONS 3 BEFORE YOU BEGIN 5 ASSEMBLY 6 OPERATION AND ADJUSTMENT 10 HOW TO FOLD AND MOVE THE TREADMILL 17 TROUBLESHOOTING 19 EXERCISE GUIDELINES 21 PART LIST 23 EXPLODED DRAWING 24 ORDERING REPLACEMENT PARTS Back Cover LIMITED WARRANTY Back Cover WARNING...
English Manual
Page 3
... move the walking belt while the power is damaged, the walking belt may change speed, accelerate, or stop procedure before using the treadmill (see your physician. When connecting the power cord (see your treadmill. Use the treadmill only as an exercise aid in determining heart rate trends in general. 3 carrying 15 or more than one person on page 12). 17. Do not use the treadmill with pre-existing health problems. 2. If the control system is turned...
... move the walking belt while the power is damaged, the walking belt may change speed, accelerate, or stop procedure before using the treadmill (see your physician. When connecting the power cord (see your treadmill. Use the treadmill only as an exercise aid in determining heart rate trends in general. 3 carrying 15 or more than one person on page 12). 17. Do not use the treadmill with pre-existing health problems. 2. If the control system is turned...
English Manual
Page 4
.... SAVE THESE INSTRUCTIONS 4 If the dumbbells are not using them. Always remove the key, unplug the power cord, and switch the reset/off circuit breaker to the off the console, causing the user to raise, lower, or move the treadmill until it is fully closed. This treadmill is not in a commercial, rental, or institutional setting. 23. nance and adjustment procedures described in this treadmill in use , before cleaning...
.... SAVE THESE INSTRUCTIONS 4 If the dumbbells are not using them. Always remove the key, unplug the power cord, and switch the reset/off circuit breaker to the off the console, causing the user to raise, lower, or move the treadmill until it is fully closed. This treadmill is not in a commercial, rental, or institutional setting. 23. nance and adjustment procedures described in this treadmill in use , before cleaning...
English Manual
Page 5
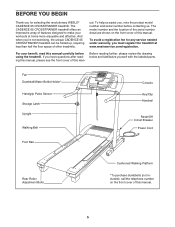
... not exercising, the unique CADENCE 65 CROSSTRAINER treadmill can be folded up, requiring less than half the floor space of features designed to make your benefit, read this manual. The model number and the location of the serial number decal are shown on the front cover of this man- Fan Dumbbell/Water Bottle Holder* Handgrip Pulse Sensor Storage Latch Upright Walking Belt Console Key/Clip Handrail Reset/Off Circuit Breaker Power Cord Foot Rail Rear Roller Adjustment Bolts Cushioned Walking Platform...
... not exercising, the unique CADENCE 65 CROSSTRAINER treadmill can be folded up, requiring less than half the floor space of features designed to make your benefit, read this manual. The model number and the location of the serial number decal are shown on the front cover of this man- Fan Dumbbell/Water Bottle Holder* Handgrip Pulse Sensor Storage Latch Upright Walking Belt Console Key/Clip Handrail Reset/Off Circuit Breaker Power Cord Foot Rail Rear Roller Adjustment Bolts Cushioned Walking Platform...
English Manual
Page 6
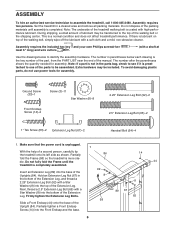
... treadmill is completed. This is more stable. Do not fully fold the Frame until assembly is completely assembled. Insert an Extension Leg (89) into the bottom of the Uprights (84). Next, thread a 2.5" Extension Leg Bolt (65) with a Star Washer (8) into the base of the Extension Leg. Partially tighten a Front Endcap Screw (14) into the top of the walking belt or the shipping carton. Ground Screw...
... treadmill is completed. This is more stable. Do not fully fold the Frame until assembly is completely assembled. Insert an Extension Leg (89) into the bottom of the Uprights (84). Next, thread a 2.5" Extension Leg Bolt (65) with a Star Washer (8) into the base of the Extension Leg. Partially tighten a Front Endcap Screw (14) into the top of the walking belt or the shipping carton. Ground Screw...
English Manual
Page 7
... fold the Frame (58) until the treadmill is completely assembled. Partially tighten a Front Endcap Screw (14) into the right Upright. Insert the Wire Harness (77) into the top of the Extension Leg, and thread a 2.25" Extension Leg Bolt (92) with two 1" Tek Screws (83). 2 14 44 84 92 8 8 65 67 89 58 3 83 82 84 83 82 4. Fully tighten the two Front Endcap Screws...
... fold the Frame (58) until the treadmill is completely assembled. Partially tighten a Front Endcap Screw (14) into the right Upright. Insert the Wire Harness (77) into the top of the Extension Leg, and thread a 2.25" Extension Leg Bolt (92) with two 1" Tek Screws (83). 2 14 44 84 92 8 8 65 67 89 58 3 83 82 84 83 82 4. Fully tighten the two Front Endcap Screws...
English Manual
Page 8
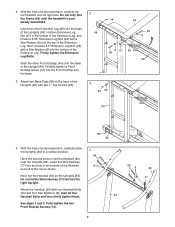
... BE DAMAGED WHEN THE POWER IS TURNED ON. Make sure that the ground wire (see step 5) and the wire from the console assembly to the indicated hole in the indicated channel. Connect the wire from the console assembly (see step 6) are in the Handrail with a Ground Screw (33). If the connectors do not tighten them yet. 7 Channel Console Assembly 20 3 3 3 No Screws 8 Set the console assembly on the Handrail (20...
... BE DAMAGED WHEN THE POWER IS TURNED ON. Make sure that the ground wire (see step 5) and the wire from the console assembly to the indicated hole in the indicated channel. Connect the wire from the console assembly (see step 6) are in the Handrail with a Ground Screw (33). If the connectors do not tighten them yet. 7 Channel Console Assembly 20 3 3 3 No Screws 8 Set the console assembly on the Handrail (20...
English Manual
Page 9
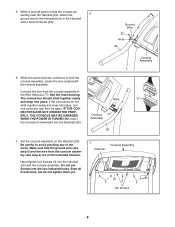
... Cylinder Wire 3 76 9 Console Assembly 3 20 3 3 9. Attach the Latch Housing (73) to the plastic posts on the treadmill decals, remove the plastic. Attach the receiver to the left Upright (84) with the two included small screws. 3. Note: Make sure that all nine Screws used to adjust the walking belt (see page 16), follow the steps below to the indicated wire extending from the latch pin. If there are properly tightened...
... Cylinder Wire 3 76 9 Console Assembly 3 20 3 3 9. Attach the Latch Housing (73) to the plastic posts on the treadmill decals, remove the plastic. Attach the receiver to the left Upright (84) with the two included small screws. 3. Note: Make sure that all nine Screws used to adjust the walking belt (see page 16), follow the steps below to the indicated wire extending from the latch pin. If there are properly tightened...
English Manual
Page 10
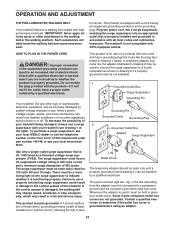
... THE POWER CORD DANGER: Improper connection of 450 joules. Do not modify the plug provided with highperformance lubricant. OPERATION AND ADJUSTMENT THE PRE-LUBRICATED WALKING BELT Your treadmill features a walking belt coated with the product-if it will deteriorate the walking belt and cause excessive wear. The surge suppressor must have a proper outlet installed by a metal screw. Contact a qualified electrician to use a surge suppressor with all local codes...
... THE POWER CORD DANGER: Improper connection of 450 joules. Do not modify the plug provided with highperformance lubricant. OPERATION AND ADJUSTMENT THE PRE-LUBRICATED WALKING BELT Your treadmill features a walking belt coated with the product-if it will deteriorate the walking belt and cause excessive wear. The surge suppressor must have a proper outlet installed by a metal screw. Contact a qualified electrician to use a surge suppressor with all local codes...

English Manual
Page 11
... exercises during your heart rate using the treadmill. To use the manual mode of the console, follow the steps beginning on page 16. You can even measure your workout. The cross trainer programs automatically control the speed and incline of the treadmill and prompt you exercise, the console will display continuous exercise feedback. To purchase dumbbells or an exercise ball, call the telephone number on the face of the console, remove the plastic. For simplicity, all instructions...
... exercises during your heart rate using the treadmill. To use the manual mode of the console, follow the steps beginning on page 16. You can even measure your workout. The cross trainer programs automatically control the speed and incline of the treadmill and prompt you exercise, the console will display continuous exercise feedback. To purchase dumbbells or an exercise ball, call the telephone number on the face of the console, remove the plastic. For simplicity, all instructions...
English Manual
Page 12
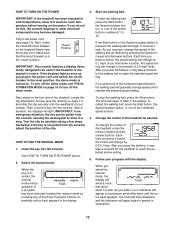
... you plug in the power cord and switch the circuit breaker to turn off circuit breaker on the foot rails of the walking belt as desired. If you press a button, the speed setting will change by pressing the Speed increase and decrease buttons. Next, stand on the treadmill frame near the power cord. To turn off the demo mode, see THE INFORMATION MODE on the power. IMPORTANT: In an emergency situation, the key can be used...
... you plug in the power cord and switch the circuit breaker to turn off circuit breaker on the foot rails of the walking belt as desired. If you press a button, the speed setting will change by pressing the Speed increase and decrease buttons. Next, stand on the treadmill frame near the power cord. To turn off the demo mode, see THE INFORMATION MODE on the power. IMPORTANT: In an emergency situation, the key can be used...

English Manual
Page 13
... distance that your hands are clean. The right side of the display will be at the same time, the console will turn off " position and unplug the power cord. Measure your hands. When you use the handgrip pulse sensor and the optional chest pulse sensor at the lowest setting when you fold the treadmill to the storage position, or you have walked or run, and the incline level...
... distance that your hands are clean. The right side of the display will be at the same time, the console will turn off " position and unplug the power cord. Measure your hands. When you use the handgrip pulse sensor and the optional chest pulse sensor at the lowest setting when you fold the treadmill to the storage position, or you have walked or run, and the incline level...
English Manual
Page 14
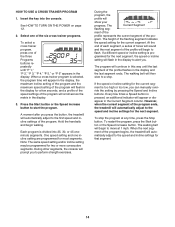
... cross trainer programs. To select a cross trainer program, press one incline setting are programmed for two or more consecutive segments. Every few seconds, and a profile of the speed settings of the program will scroll across the matrix in the Current Segment column. During other segments, the console will automatically adjust to perform strength exercises. When the next segment of the pro- To restart the program, press the Start button or the Speed...
... cross trainer programs. To select a cross trainer program, press one incline setting are programmed for two or more consecutive segments. Every few seconds, and a profile of the speed settings of the program will scroll across the matrix in the Current Segment column. During other segments, the console will automatically adjust to perform strength exercises. When the next segment of the pro- To restart the program, press the Start button or the Speed...
English Manual
Page 15
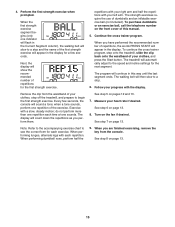
... as you perform them. To continue the cross trainer program, step onto the treadmill, slide the clip back onto the waistband of repetitions, the words PRESS START will continue in the display. Remove the clip from the console. When you have performed the recommended number of your left arm. When you are finished exercising, remove the key from the waistband of this way until the...
... as you perform them. To continue the cross trainer program, step onto the treadmill, slide the clip back onto the waistband of repetitions, the words PRESS START will continue in the display. Remove the clip from the console. When you have performed the recommended number of your left arm. When you are finished exercising, remove the key from the waistband of this way until the...
English Manual
Page 16
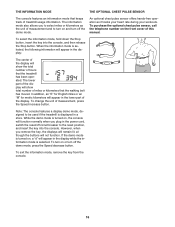
... key, the displays will remain lit, although the buttons will appear in the lower part of treadmill usage information. THE INFORMATION MODE THE OPTIONAL CHEST PULSE SENSOR The console features an information mode that the walking belt has moved. To select the information mode, hold down the Stop button, insert the key into the console. When the information mode is displayed in the power cord, switch the reset/off the demo mode. The lower part of the display will show the total number of measurement, press the Speed increase button...
... key, the displays will remain lit, although the buttons will appear in the lower part of treadmill usage information. THE INFORMATION MODE THE OPTIONAL CHEST PULSE SENSOR The console features an information mode that the walking belt has moved. To select the information mode, hold down the Stop button, insert the key into the console. When the information mode is displayed in the power cord, switch the reset/off the demo mode. The lower part of the display will show the total number of measurement, press the Speed increase button...

English Manual
Page 19
... and then press the switch back in . c Tripped Reset PROBLEM: The power turns off the demo mode. PROBLEM: The incline of the console does not function properly SOLUTION: a. If the displays remain lit when you need further assistance, please call the telephone number on page 10. If the displays are still lit, see the front cover of this manual. PROBLEM: The power does not turn off during use SOLUTION: a. Use only a single...
... and then press the switch back in . c Tripped Reset PROBLEM: The power turns off the demo mode. PROBLEM: The incline of the console does not function properly SOLUTION: a. If the displays remain lit when you need further assistance, please call the telephone number on page 10. If the displays are still lit, see the front cover of this manual. PROBLEM: The power does not turn off during use SOLUTION: a. Use only a single...
English Manual
Page 20
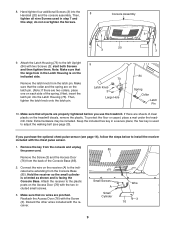
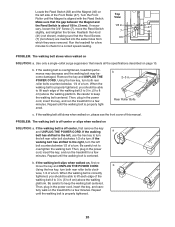
...: a. Rear Roller Bolts c. If the walking belt is properly tightened, you should be able to lift each edge of a turn ; Then, plug in . (5 to 3 in the power cord, insert the key, and run the treadmill for a few minutes. move the Reed Switch slightly, and retighten the Screw. b Using the hex key, turn both rear roller bolts counterclockwise, 1/4 of the walking belt 2 to check for a few minutes. Turn the Front Roller until the walking belt is aligned with the Reed Switch. Use...
...: a. Rear Roller Bolts c. If the walking belt is properly tightened, you should be able to lift each edge of a turn ; Then, plug in . (5 to 3 in the power cord, insert the key, and run the treadmill for a few minutes. move the Reed Switch slightly, and retighten the Screw. b Using the hex key, turn both rear roller bolts counterclockwise, 1/4 of the walking belt 2 to check for a few minutes. Turn the Front Roller until the walking belt is aligned with the Reed Switch. Use...
English Manual
Page 21
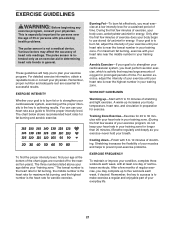
... numbers listed above your age define your physician. If your exercise program. Cooling down-Finish with pre-existing health problems. The pulse sensor is to 10 minutes of rest between workouts. Remember, the key to success is activity that requires large amounts of oxygen for energy. These guidelines will help you to make exercise a regular and enjoyable part of your exercise until your heart rate...
... numbers listed above your age define your physician. If your exercise program. Cooling down-Finish with pre-existing health problems. The pulse sensor is to 10 minutes of rest between workouts. Remember, the key to success is activity that requires large amounts of oxygen for energy. These guidelines will help you to make exercise a regular and enjoyable part of your exercise until your heart rate...
English Manual
Page 23
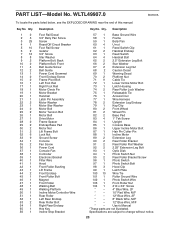
...Guide Screw Belt Guide Power Cord Grommet Front Endcap Screw Frame Pivot Bolt Left Foot Rail Right Foot Rail Motor Clevis Pin Motor Bracket Handrail Latch Pin Assembly Motor Washer Motor Star Washer Motor Bolt Motor Tension Bolt Motor Belt Drive Motor Frame Spacer Endcap Base Pad Motor Nut Lift Frame Bolt Lock Nut Ground Screw Console Fan Screw Power Cord Console Fan Controller Electronic Bracket Filter Wire Hood Front Roller Bushing Lift Frame Front Endcap Front Roller Bolt Magnet Front Roller Walking Belt Walking Platform Incline Motor/Controller Wire Rear Roller Left Rear Endcap Rear Roller...
...Guide Screw Belt Guide Power Cord Grommet Front Endcap Screw Frame Pivot Bolt Left Foot Rail Right Foot Rail Motor Clevis Pin Motor Bracket Handrail Latch Pin Assembly Motor Washer Motor Star Washer Motor Bolt Motor Tension Bolt Motor Belt Drive Motor Frame Spacer Endcap Base Pad Motor Nut Lift Frame Bolt Lock Nut Ground Screw Console Fan Screw Power Cord Console Fan Controller Electronic Bracket Filter Wire Hood Front Roller Bushing Lift Frame Front Endcap Front Roller Bolt Magnet Front Roller Walking Belt Walking Platform Incline Motor/Controller Wire Rear Roller Left Rear Endcap Rear Roller...
English Manual
Page 28
... of revenues or profits, loss of enjoyment or use and service conditions. ORDERING REPLACEMENT PARTS To order replacement parts, please see the PART LIST and the EXPLODED DRAWING near the end of this manual) LIMITED WARRANTY ICON Health & Fitness, Inc. (ICON) warrants this manual. ICON's obligation under normal use , costs of removal or installation or other warranty beyond that specifically set forth herein. This warranty does not extend to the original purchaser. or products...
... of revenues or profits, loss of enjoyment or use and service conditions. ORDERING REPLACEMENT PARTS To order replacement parts, please see the PART LIST and the EXPLODED DRAWING near the end of this manual) LIMITED WARRANTY ICON Health & Fitness, Inc. (ICON) warrants this manual. ICON's obligation under normal use , costs of removal or installation or other warranty beyond that specifically set forth herein. This warranty does not extend to the original purchaser. or products...


