Weslo Cardio Glide Plus 975 Support and Manuals
Get Help and Manuals for this Weslo item

View All Support Options Below
Free Weslo Cardio Glide Plus 975 manuals!
Problems with Weslo Cardio Glide Plus 975?
Ask a Question
Free Weslo Cardio Glide Plus 975 manuals!
Problems with Weslo Cardio Glide Plus 975?
Ask a Question
Popular Weslo Cardio Glide Plus 975 Manual Pages
English Manual - Page 2
... roblems i::Bead a u .:ocprope ''damagi
2
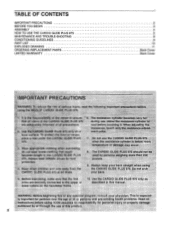
TABLE OF CONTENTS
IMPORTANT PRECAUTIONS
BEFORE YOU BEGIN ASSEMBLY HOW TO USE THE CARDIO GLIDE PLUS 975
MAINTENANCE AND TROUBLE-SHOOTING CONDITIONING GUIDELINES PART LIST EXPLODED DRAWING ORDERING REPLACEMENT PARTS LIMITED WARRANTY
2
3 4
5 8 9 10
11
Back Cover Back Cover
maRaiNif
•• '' ingtomM$ -K. e resistance.adjust
Neal appr fla...
English Manual - Page 3
... WESLO® CARDIO GLIDE PLUS 975. The CARDIO GLIDE PLUS 975 offers a unique form of low-impact exercise that are labeled. until 6 p.m.
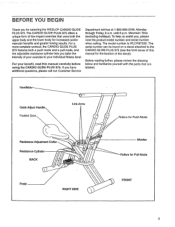
BEFORE YOU BEGIN
Thank you for Pull Mode
FRONT
3 To help us assist you have additional questions, please call our Customer Service
Department toll-free at 1-800-999-3756, Monday through Friday, 6 a.m. For your individual fitness level. The model...
English Manual - Page 4
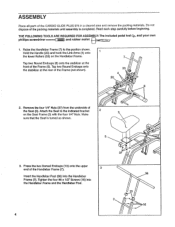
ASSEMBLY
Place all parts of
the Seat (3). Read each step carefully before beginning. Raise the Handlebar Frame (7) to the indicated bracket
2
3
on the Handlebar Frame.
Remove the four 1/4" Nuts (37) from the underside of the CARDIO GLIDE PLUS 975 in a cleared area and remove the packing materials. Attach the Seat to the position shown. Tighten the...
English Manual - Page 6
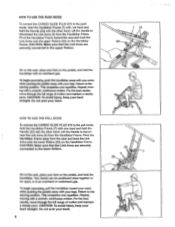
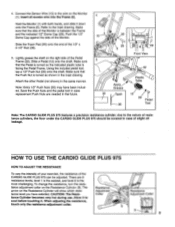
...while pushing the pedals away with the other hand. HOW TO USE THE PUSH MODE
To convert the CARDIO GLIDE PLUS 975 to the push mode, hold the Handlebar Frame (7) with one hand and hold the Handle (20) ... a steady pace. Do not arch your back.
6 HOW TO USE THE PULL MODE
To convert the CARDIO GLIDE PLUS 975 to the pull mode, hold the Handlebar Frame (7) with one hand and hold the handlebar. Sit on ...
English Manual - Page 7
...each, in the following order: speed, time, distance, calories.
3. DESCRIPTION OF THE MONITOR MODES
The CARDIO GLIDE PLUS 975 features one of the monitor, remove it before operating the monitor.
-AUTO-OFF -
1. Select one...of the five modes:
Scan mode-When the power is near the highest or lowest setting, the actual number of time you have exercised. Note: If the resistance is turned ...
English Manual - Page 8
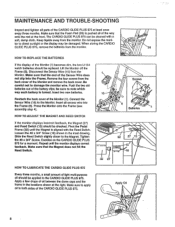
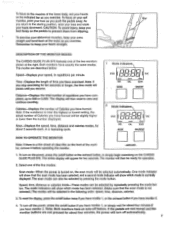
MAINTENANCE AND TROUBLE-SHOOTING
Inspect and tighten all parts of light multi-purpose oil should be applied to the CARDIO GLIDE PLUS 975. Do not expose the moni- be ...15) should be cleaned with the Reed Switch. Repeat until the Magnet is turned. The CARDIO GLIDE PLUS•975 can be replaced. Disconnect the Sensor Wire (15) from the monitor. Reattach the back cover of the ...
English Manual - Page 12
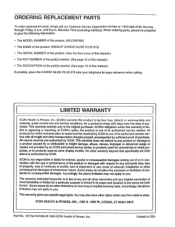
...abnormal usage or repairs not provided by ICON. Accordingly, the above limitation may not apply to you specific legal rights. Printed in workmanship and material, under this manual.) If -possible, place the CARDIO GLIDE PLUS 975 near your telephone for which vary from defects in USA ORDERING REPLACEMENT PARTS
To order replacement parts, simply call our Customer Service Department toll...
English Manual - Page 2
... manual. TABLE OF CONTENTS
IMPORTANT PRECAUTIONS BEFORE YOU BEGIN ASSEMBLY HOW TO USE THE CARDIO GLIDE PLUS 975 MAINTENANCE AND TROUBLE-SHOOTING CONDITIONING GUIDELINES PART LIST EXPLODED DRAWING ORDERING REPLACEMENT PARTS LIMITED...;pi..ipgp..wp 975 should. ly Important for foot protectiort '
eep small children and pets away from the CARDIO GLIDE PLUS 975 at all instructions before touching it ...
English Manual - Page 3
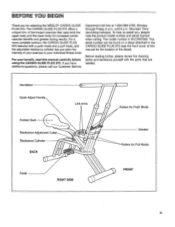
... cardiovascular benefits and greater toning results. BEFORE YOU BEGIN.
For your exercise to the CARDIO GLIDE PLUS 975 (see the front cover of this manual carefully before using the CARDIO GLIDE PLUS 975. Before reading further, please review the drawing below and familiarize yourself with the parts that uses both a push mode and a pull mode, and the adjustable resistance cylinder...
English Manual - Page 4
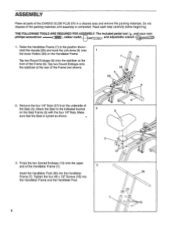
...the Handlebar Frame. Remove the four 1/4" Nuts (37) from the underside of the CARDIO GLIDE PLUS 975 in a cleared area and remove the packing materials. Press the two Domed Endcaps (13...Nuts.
Tighten the four #8 x 1/2" Screws (16) into the Handlebar Frame (7). ASSEMBLY
Place all parts of
the Seat (3). Read each step carefully before beginning. THE FOLLOWING TOOLS ARE REQUIRED FOR ASSEMBLY: ...
English Manual - Page 5
...
30 Pedal
30
Tool
Note: The CARDIO GLIDE PLUS 975 features a precision resistance cylinder; Adjustment
...replacement Push Nuts are 9
resistance levels; CAUTION: The Resis-
Connect the Sensor Wire (15) to the inset drawing. There are needed in the same manner. Collar
tance Cylinder becomes very hot during use. Slide the Foam Pad (26) onto the end of the
CARDIO GLIDE PLUS 975...
English Manual - Page 6

...: To avoid injury, keep your feet on the Handlebar Frame. HOW TO USE THE PUSH MODE
To convert the CARDIO GLIDE PLUS 975 to the starting position. HOW TO USE THE PULL MODE
a
To convert the CARDIO GLIDE PLUS 975 to the upper Rollers. CAUTION: Make sure that the Link Arms are securely connected to the pull mode...
English Manual - Page 7
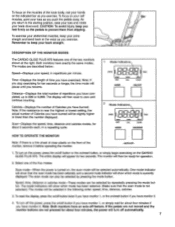
...Indicators
I 00:0
TIME
DIST.
Note: If the resistance is near the highest or lowest setting, the actual number of the two monitors shown at the waist as you exercise. One mode... calories modes, for about four minutes if you resume. DESCRIPTION OF THE MONITOR MODES
The CARDIO GLIDE PLUS 975 features one of the lower body, rest your heels downward.
Note: Both monitors have an...
English Manual - Page 8
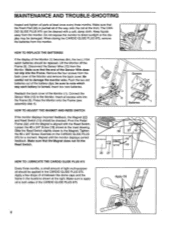
...feedback, the Magnet (27) and Reed Switch (15) shoiuld be replaced. Make sure that the Foam Pad (26) is aligned with a soft, damp cloth. HOW TO LUBRICATE THE CARDIO GLIDE PLUS 975
Every three months, a small amount of the Sensor Wire does ...
Tighten the #8 x 3/4" Screw. Insert all excess wire into the Frame. MAINTENANCE AND TROUBLE-SHOOTING
Inspect and tighten all parts at the front.
English Manual - Page 12
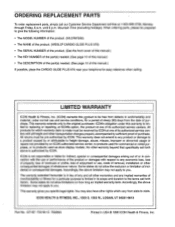
... specific legal rights. When ordering parts, please be received by ICON at one of purchase. All returns must be prepared to give the following information:
• The MODEL NUMBER of the product. (WLCR97558) • The NAME of the product. (WESLO® CARDIO GLIDE PLUS 975) • The SERIAL NUMBER of the product. (See the front cover of this manual...
Weslo Cardio Glide Plus 975 Reviews
We have not received any reviews for Weslo yet.