
English Manual
Page 2
... BEFORE YOU BEGIN ASSEMBLY HOW TO USE THE CARDIO GLIDE PLUS 975 MAINTENANCE AND TROUBLE-SHOOTING CONDITIONING GUIDELINES PART LIST EXPLODED DRAWING ORDERING REPLACEMENT PARTS LIMITED WARRANTY 2 3 4 5 8 9 10 11 Back Cover Back Cover maRaiNif •• '' ingtomM$ -K. c eep til40:049g.pLus 9 e sa:aliwtai•me orwexerc s n , ma the securel ,connected es er• ARD Tf should;,.no -weig 'kW& re. Yrs," RNINGt.Td reducelhe risk of 'owner ' .;.thatalet ith...
... BEFORE YOU BEGIN ASSEMBLY HOW TO USE THE CARDIO GLIDE PLUS 975 MAINTENANCE AND TROUBLE-SHOOTING CONDITIONING GUIDELINES PART LIST EXPLODED DRAWING ORDERING REPLACEMENT PARTS LIMITED WARRANTY 2 3 4 5 8 9 10 11 Back Cover Back Cover maRaiNif •• '' ingtomM$ -K. c eep til40:049g.pLus 9 e sa:aliwtai•me orwexerc s n , ma the securel ,connected es er• ARD Tf should;,.no -weig 'kW& re. Yrs," RNINGt.Td reducelhe risk of 'owner ' .;.thatalet ith...
English Manual
Page 3
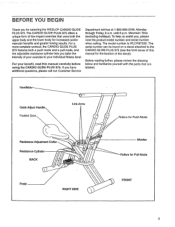
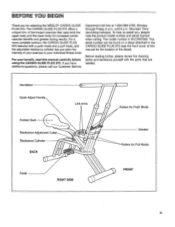
... Customer Service Department toll-free at 1-800-999-3756, Monday through Friday, 6 a.m. The model number is WLCR97550. The CARDIO GLIDE PLUS 975 offers a unique form of low-impact exercise that are labeled. For your individual fitness level. Handlebar Quick Adjust Handle Padded Seat Link Arms Rollers for Push Mode Resistance Adjustment Collar Resistance Cylinder II BACK Pedal RIGHT SIDE Monitor Rollers for Pull Mode FRONT 3 If you , please note the product model number and serial number when...
... Customer Service Department toll-free at 1-800-999-3756, Monday through Friday, 6 a.m. The model number is WLCR97550. The CARDIO GLIDE PLUS 975 offers a unique form of low-impact exercise that are labeled. For your individual fitness level. Handlebar Quick Adjust Handle Padded Seat Link Arms Rollers for Push Mode Resistance Adjustment Collar Resistance Cylinder II BACK Pedal RIGHT SIDE Monitor Rollers for Pull Mode FRONT 3 If you , please note the product model number and serial number when...
English Manual
Page 4
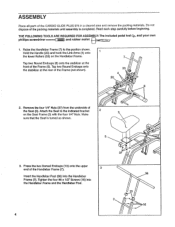
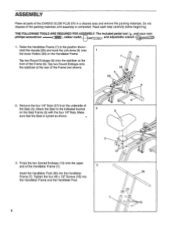
... rubber mallet 1. Attach the Seat to the position shown. Do not dispose of the CARDIO GLIDE PLUS 975 in a cleared area and remove the packing materials. Read each step carefully before beginning. ASSEMBLY Place all parts of the packing materials until assembly is turned as shown. 5 37 3. Hold the Handle (20) and hook the Link Arms (4) onto 1 the lower Rollers (33) on the Seat Frame (5) with...
... rubber mallet 1. Attach the Seat to the position shown. Do not dispose of the CARDIO GLIDE PLUS 975 in a cleared area and remove the packing materials. Read each step carefully before beginning. ASSEMBLY Place all parts of the packing materials until assembly is turned as shown. 5 37 3. Hold the Handle (20) and hook the Link Arms (4) onto 1 the lower Rollers (33) on the Seat Frame (5) with...
English Manual
Page 5
... nature of the CARDIO GLIDE PLUS 975 can be covered in the same manner. Push the 1/2" Dome Cap against the side of the Monitor. 15 39 Slide the Foam Pad (26) onto the end of the Pedal Frame (32). Save the Push Nuts and the pedal tool in case replacement Push Nuts are 9 resistance levels; To change the resistance, turn the resistance adjustment collar on...
... nature of the CARDIO GLIDE PLUS 975 can be covered in the same manner. Push the 1/2" Dome Cap against the side of the Monitor. 15 39 Slide the Foam Pad (26) onto the end of the Pedal Frame (32). Save the Push Nuts and the pedal tool in case replacement Push Nuts are 9 resistance levels; To change the resistance, turn the resistance adjustment collar on...
English Manual
Page 6
... hand and hold the handlebar. To begin exercising, push the handlebar away with your arms while pushing the pedals away with your legs. HOW TO USE THE PULL MODE To convert the CARDIO GLIDE PLUS 975 to disconnect the Link Arms (4) from the Handlebar Frame. HOW TO USE THE PUSH MODE To convert the CARDIO GLIDE PLUS 975 to the upper Rollers. Your hands can be positioned close...
... hand and hold the handlebar. To begin exercising, push the handlebar away with your arms while pushing the pedals away with your legs. HOW TO USE THE PULL MODE To convert the CARDIO GLIDE PLUS 975 to disconnect the Link Arms (4) from the Handlebar Frame. HOW TO USE THE PUSH MODE To convert the CARDIO GLIDE PLUS 975 to the upper Rollers. Your hands can be positioned close...
English Manual
Page 7
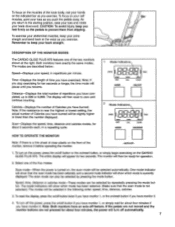
... turn on the power, press the on/off button or the on/reset button, or simply begin exercising on /off automatically. 7 Both monitors have an auto-off the power, press the on the CARDIO GLIDE PLUS 975. If the pedals are not moved and the monitor buttons are described below: Speed-Displays your hands cn the indicated bar as you resume. DESCRIPTION OF THE MONITOR MODES The CARDIO GLIDE PLUS 975 features one of Calories you exercise. Calories-Displays...
... turn on the power, press the on/off button or the on/reset button, or simply begin exercising on /off automatically. 7 Both monitors have an auto-off the power, press the on the CARDIO GLIDE PLUS 975. If the pedals are not moved and the monitor buttons are described below: Speed-Displays your hands cn the indicated bar as you resume. DESCRIPTION OF THE MONITOR MODES The CARDIO GLIDE PLUS 975 features one of Calories you exercise. Calories-Displays...
English Manual
Page 8
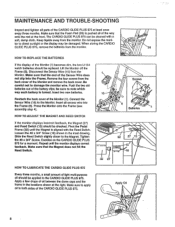
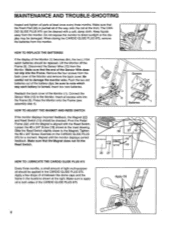
... TROUBLE-SHOOTING Inspect and tighten all parts of the CARDIO GLIDE PLUS 975 at the right. Make sure that the Magnet does not hit the Reed Switch. Make sure that the end of the CARDIO GLIDE PLUS 975. Pivot the Pedal Frame (32) until the monitor displays correct feedback. Reattach the back cover of the battery clips; Remove the four screws from the Monitor. Be careful not to the Magnet. Connect the Sensor Wire...
... TROUBLE-SHOOTING Inspect and tighten all parts of the CARDIO GLIDE PLUS 975 at the right. Make sure that the Magnet does not hit the Reed Switch. Make sure that the end of the CARDIO GLIDE PLUS 975. Pivot the Pedal Frame (32) until the monitor displays correct feedback. Reattach the back cover of the battery clips; Remove the four screws from the Monitor. Be careful not to the Magnet. Connect the Sensor Wire...
English Manual
Page 9
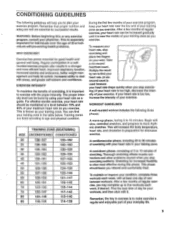
... your exercise program. You can find your heart rate. (A sixsecond count is used because your heart rate drops quickly when you stop exercising.) If your heart rate is too high, decrease the intensity of your training zone. Take a six-second heartbeat count. Begin with slow, controlled stretches, and progress to more efficient heart, improved respiratory function, increased stamina and endurance, better weight management and body fat control...
... your exercise program. You can find your heart rate. (A sixsecond count is used because your heart rate drops quickly when you stop exercising.) If your heart rate is too high, decrease the intensity of your training zone. Take a six-second heartbeat count. Begin with slow, controlled stretches, and progress to more efficient heart, improved respiratory function, increased stamina and endurance, better weight management and body fat control...
English Manual
Page 10
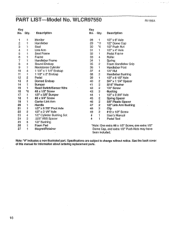
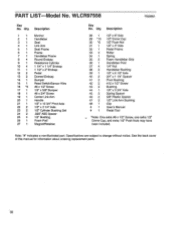
... Seat Link Arm Seat Frame Frame Handlebar Frame Round Endcap Resistance Cylinder 1 1/4" x 1 1/4" Endcap 1 1/2" x 2" Endcap Pedal Domed Endcap Bumper Reed Switch/Sensor Wire #8 x 1/2" Screw 1/2" x 5/8" Bumper #8 x 3/4" Screw Center Link Arm Handle 1/2" x 9 7/8" Pivot Axle 1/2" x 3 1/4" Axle 1/2" Cylinder Bushing Set .925" ABS Spacer 1/2" Bushing Foam Pad Magnet/Retainer Key No. Specifications are subject to change without notice. Note: "V' indicates a non-illustrated part. Qty. Qty. See the back cover of this manual for information about ordering replacement parts...
... Seat Link Arm Seat Frame Frame Handlebar Frame Round Endcap Resistance Cylinder 1 1/4" x 1 1/4" Endcap 1 1/2" x 2" Endcap Pedal Domed Endcap Bumper Reed Switch/Sensor Wire #8 x 1/2" Screw 1/2" x 5/8" Bumper #8 x 3/4" Screw Center Link Arm Handle 1/2" x 9 7/8" Pivot Axle 1/2" x 3 1/4" Axle 1/2" Cylinder Bushing Set .925" ABS Spacer 1/2" Bushing Foam Pad Magnet/Retainer Key No. Specifications are subject to change without notice. Note: "V' indicates a non-illustrated part. Qty. Qty. See the back cover of this manual for information about ordering replacement parts...
English Manual
Page 12
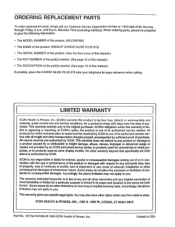
... holidays). LIMITED WARRANTY ICON Health & Fitness, Inc. (ICON) warrants this product to be prepared to give the following information: • The MODEL NUMBER of the product. (WLCR97550) • The NAME of the product. (WESLW CARDIO GLIDE PLUS 975) • The SERIAL NUMBER of the product. (See the front cover of this manual.) • The KEY NUMBER of the part(s) needed. (See page 10 of this manual.) • The DESCRIPTION of the part(s) needed. (See...
... holidays). LIMITED WARRANTY ICON Health & Fitness, Inc. (ICON) warrants this product to be prepared to give the following information: • The MODEL NUMBER of the product. (WLCR97550) • The NAME of the product. (WESLW CARDIO GLIDE PLUS 975) • The SERIAL NUMBER of the product. (See the front cover of this manual.) • The KEY NUMBER of the part(s) needed. (See page 10 of this manual.) • The DESCRIPTION of the part(s) needed. (See...
English Manual
Page 2
... this 'or any exercise program, consult your back; 5 Before exercising; When adjusting the resistance, touch only the resistance adjus ment collar. ©o.,not uSe the cARpio GLIDE PLUS 975 whenthe;resistance:cylinder:is especial- 11. TABLE OF CONTENTS IMPORTANT PRECAUTIONS BEFORE YOU BEGIN ASSEMBLY HOW TO USE THE CARDIO GLIDE PLUS 975 MAINTENANCE AND TROUBLE-SHOOTING CONDITIONING GUIDELINES PART LIST EXPLODED DRAWING ORDERING REPLACEMENT PARTS LIMITED WARRANTY 2 3 4 5 8 9 10 11 Back Cover Back Cover pp.FTANT:PFMPAUTIONS:•...
... this 'or any exercise program, consult your back; 5 Before exercising; When adjusting the resistance, touch only the resistance adjus ment collar. ©o.,not uSe the cARpio GLIDE PLUS 975 whenthe;resistance:cylinder:is especial- 11. TABLE OF CONTENTS IMPORTANT PRECAUTIONS BEFORE YOU BEGIN ASSEMBLY HOW TO USE THE CARDIO GLIDE PLUS 975 MAINTENANCE AND TROUBLE-SHOOTING CONDITIONING GUIDELINES PART LIST EXPLODED DRAWING ORDERING REPLACEMENT PARTS LIMITED WARRANTY 2 3 4 5 8 9 10 11 Back Cover Back Cover pp.FTANT:PFMPAUTIONS:•...
English Manual
Page 3
... for Pull Mode FRONT 3 The CARDIO GLIDE PLUS 975 offers a unique form of low-impact exercise that are labeled. Thank you tailor the intensity of the decal). For your exercise to the CARDIO GLIDE PLUS 975 (see the front cover of this manual carefully before using the CARDIO GLIDE PLUS 975. until 6 p.m. Handlebar Quick Adjust Handle Padded Seat Resistance Adjustment Collar Resistance Cylinder BACK Link Arms 0 Pedal RIGHT SIDE Rollers for Push Mode Monitor Rollers for selecting the WESLO® CARDIO GLIDE PLUS 975. BEFORE...
... for Pull Mode FRONT 3 The CARDIO GLIDE PLUS 975 offers a unique form of low-impact exercise that are labeled. Thank you tailor the intensity of the decal). For your exercise to the CARDIO GLIDE PLUS 975 (see the front cover of this manual carefully before using the CARDIO GLIDE PLUS 975. until 6 p.m. Handlebar Quick Adjust Handle Padded Seat Resistance Adjustment Collar Resistance Cylinder BACK Link Arms 0 Pedal RIGHT SIDE Rollers for Push Mode Monitor Rollers for selecting the WESLO® CARDIO GLIDE PLUS 975. BEFORE...
English Manual
Page 4
...) onto the upper end of the Seat (3). Read each step carefully before beginning. Raise the Handlebar Frame (7) to the indicated bracket 2 on the Handlebar Frame. Tighten the four #8 x 1/2" Screws (16) into the Handlebar Frame (7). Tap two Round Endcaps (8) onto the stabilizer at the rear of the CARDIO GLIDE PLUS 975 in a cleared area and remove the packing materials. Make sure...
...) onto the upper end of the Seat (3). Read each step carefully before beginning. Raise the Handlebar Frame (7) to the indicated bracket 2 on the Handlebar Frame. Tighten the four #8 x 1/2" Screws (16) into the Handlebar Frame (7). Tap two Round Endcaps (8) onto the stabilizer at the rear of the CARDIO GLIDE PLUS 975 in a cleared area and remove the packing materials. Make sure...
English Manual
Page 5
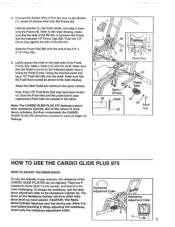
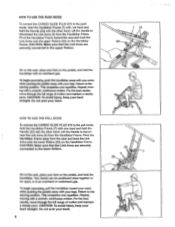
... most challenging. HOW TO USE THE CARDIO GLIDE PLUS 975 HOW TO ADJUST THE RESISTANCE To vary the intensity of your exercise, the resistance of the CARDIO GLIDE PLUS 975 can be covered In case of resistance cylinders, the floor under the CARDIO GLIDE PLUS 975 should be adjusted. When adjusting the resistance, touch only the resistance adjustment collar. 9 Resistance Adjustment Collar 9 V '7•0 1"C 5 4. Hold the Monitor (1) with both hands, and slide it . Slide a Pedal (12) onto the shaft...
... most challenging. HOW TO USE THE CARDIO GLIDE PLUS 975 HOW TO ADJUST THE RESISTANCE To vary the intensity of your exercise, the resistance of the CARDIO GLIDE PLUS 975 can be covered In case of resistance cylinders, the floor under the CARDIO GLIDE PLUS 975 should be adjusted. When adjusting the resistance, touch only the resistance adjustment collar. 9 Resistance Adjustment Collar 9 V '7•0 1"C 5 4. Hold the Monitor (1) with both hands, and slide it . Slide a Pedal (12) onto the shaft...

English Manual
Page 6
... begin exercising, pull the handlebar toward the seat and hook the Link Arms onto the upper Rollers (33) on the Handlebar Frame. HOW TO USE THE PUSH MODE To convert the CARDIO GLIDE PLUS 975 to the push mode, hold the Handlebar Frame (7) with one hand and hold the Handle (20) with your legs. Sit on the seat, place your feet on the pedals...
... begin exercising, pull the handlebar toward the seat and hook the Link Arms onto the upper Rollers (33) on the Handlebar Frame. HOW TO USE THE PUSH MODE To convert the CARDIO GLIDE PLUS 975 to the push mode, hold the Handlebar Frame (7) with one hand and hold the Handle (20) with your legs. Sit on the seat, place your feet on the pedals...
English Manual
Page 7
... modes will then reset to the starting position, raise your toes and rotate your heels downward. Speed, time, distance or calories mode-These modes can also be selected by pressing the mode button. To turn on the power, press the on/off feature. To focus on the muscles of the lower body, rest your hands on the indicated bar as you push the pedals away. To exercise your...
... modes will then reset to the starting position, raise your toes and rotate your heels downward. Speed, time, distance or calories mode-These modes can also be selected by pressing the mode button. To turn on the power, press the on/off feature. To focus on the muscles of the lower body, rest your hands on the indicated bar as you push the pedals away. To exercise your...
English Manual
Page 8
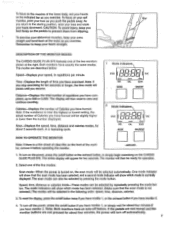
... back cover of the battery clips; Loosen the #8 x 3/4" Screw (18) shown in the locations shown at least once every three months. Exercise on the CARDIO GLIDE PLUS 975 for a moment. Push the two old batteries out of the Monitor (1). Press the Monitor onto the Frame (see assembly step 4). Make sure to apply oil to the Monitor. Make sure that the Foam Pad (26) is turned. Connect the Sensor Wire (15...
... back cover of the battery clips; Loosen the #8 x 3/4" Screw (18) shown in the locations shown at least once every three months. Exercise on the CARDIO GLIDE PLUS 975 for a moment. Push the two old batteries out of the Monitor (1). Press the Monitor onto the Frame (see assembly step 4). Make sure to apply oil to the Monitor. Make sure that the Foam Pad (26) is turned. Connect the Sensor Wire (15...

English Manual
Page 9
... your exercise program. Thorough stretching offsets muscle contractions and other problems caused when you to plan your everyday life. 9 To measure your heart rate, stop exercising.) If your heart rate is to make exercise a regular and enjoyable part of your training zone in preparation for good health and general well-being. Take a six-second heartbeat count. This is especially important for your workouts, and...
... your exercise program. Thorough stretching offsets muscle contractions and other problems caused when you to plan your everyday life. 9 To measure your heart rate, stop exercising.) If your heart rate is to make exercise a regular and enjoyable part of your training zone in preparation for good health and general well-being. Take a six-second heartbeat count. This is especially important for your workouts, and...
English Manual
Page 10
... R0296A Key No. Note: "#" indicates a non-illustrated part. Qty. See the back cover of this manual for information about ordering replacement parts. 10 Description 1 1 2 1 3 1 4 1 5 1 6 1 7 1 8 4 9 1 10 4 11 1 12 2 13 2 14 1 15 1 16 *6 17 1 18 1 19 1 20 1 21 1 22 2 23 2 24 2 25 4 26 1 27 1 Monitor Handlebar Seat Link Arm Seat Frame Frame Handlebar Frame Round Endcap Resistance Cylinder 1 1/4" x 1 1/4" Endcap 1 1/2" x 2" Endcap Pedal Domed Endcap Bumper Reed Switch/Sensor Wire #8 x 1/2" Screw 1/2" x 5/8" Bumper #8 x 3/4" Screw...
... R0296A Key No. Note: "#" indicates a non-illustrated part. Qty. See the back cover of this manual for information about ordering replacement parts. 10 Description 1 1 2 1 3 1 4 1 5 1 6 1 7 1 8 4 9 1 10 4 11 1 12 2 13 2 14 1 15 1 16 *6 17 1 18 1 19 1 20 1 21 1 22 2 23 2 24 2 25 4 26 1 27 1 Monitor Handlebar Seat Link Arm Seat Frame Frame Handlebar Frame Round Endcap Resistance Cylinder 1 1/4" x 1 1/4" Endcap 1 1/2" x 2" Endcap Pedal Domed Endcap Bumper Reed Switch/Sensor Wire #8 x 1/2" Screw 1/2" x 5/8" Bumper #8 x 3/4" Screw...
English Manual
Page 12
... the CARDIO GLIDE PLUS 975 near your telephone for commercial or rental purposes, or to state. LIMITED WARRANTY ICON Health & Fitness, Inc. (ICON) warrants this ploduct to be prepared to give the following information: • The MODEL NUMBER of the product. (WLCR97558) • The NAME of the product. (WESLO® CARDIO GLIDE PLUS 975) • The SERIAL NUMBER of the product. (See the front cover of this manual.) • The KEY NUMBER of the part(s) needed...
... the CARDIO GLIDE PLUS 975 near your telephone for commercial or rental purposes, or to state. LIMITED WARRANTY ICON Health & Fitness, Inc. (ICON) warrants this ploduct to be prepared to give the following information: • The MODEL NUMBER of the product. (WLCR97558) • The NAME of the product. (WESLO® CARDIO GLIDE PLUS 975) • The SERIAL NUMBER of the product. (See the front cover of this manual.) • The KEY NUMBER of the part(s) needed...


