
User Manual
Page 2
... an implied warranty lasts. TABLE OF CONTENTS LIMITED WARRANTY 2 IMPORTANT PRECAUTIONS 3 BEFORE YOU BEGIN 4 ASSEMBLY 5 CABLE DIAGRAMS 19 ADJUSTMENT 21 TROUBLE-SHOOTING AND MAINTENANCE 22 WEIGHT RESISTANCE CHART 23 ORDERING REPLACEMENT PARTS Back Cover Note: A PART LIST/EXPLODED DRAWING and a PART IDENTIFICATION CHART are attached in the center of its authorized... LIST/EXPLODED DRAWING and the PART IDENTIFICATION CHART before beginning assembly. ICON OF/DU CANADA, 900 de l'Industrie, St-Jérôme, QC J7Y 4B8 WEIDER is limited to the original purchaser.
... an implied warranty lasts. TABLE OF CONTENTS LIMITED WARRANTY 2 IMPORTANT PRECAUTIONS 3 BEFORE YOU BEGIN 4 ASSEMBLY 5 CABLE DIAGRAMS 19 ADJUSTMENT 21 TROUBLE-SHOOTING AND MAINTENANCE 22 WEIGHT RESISTANCE CHART 23 ORDERING REPLACEMENT PARTS Back Cover Note: A PART LIST/EXPLODED DRAWING and a PART IDENTIFICATION CHART are attached in the center of its authorized... LIST/EXPLODED DRAWING and the PART IDENTIFICATION CHART before beginning assembly. ICON OF/DU CANADA, 900 de l'Industrie, St-Jérôme, QC J7Y 4B8 WEIDER is limited to the original purchaser.
User Manual
Page 3
... precautions. 3. Apply the new decal in a commercial, rental, or institutional setting. 4. Always wear athletic shoes for home use the weight system in the appropriate location. 6. Replace any exercise program, consult your physician. This is missing or illegible, please call our Customer ...Service Department at the number on all instructions in the accompanying literature before using the weight system. 1. If a decal is especially important for personal injury or property damage sustained by or through the use the attachments...
... precautions. 3. Apply the new decal in a commercial, rental, or institutional setting. 4. Always wear athletic shoes for home use the weight system in the appropriate location. 6. Replace any exercise program, consult your physician. This is missing or illegible, please call our Customer ...Service Department at the number on all instructions in the accompanying literature before using the weight system. 1. If a decal is especially important for personal injury or property damage sustained by or through the use the attachments...
User Manual
Page 4
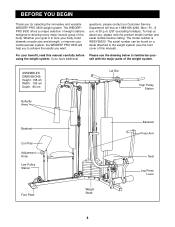
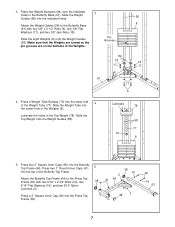
...model number and serial number before Please use the drawing below to the weight system (see the front cover of the body. The WEIDER® PRO 9930 offers a unique selection of the weight system. The model number is to tone your body, build dramatic muscle ... WESY99300. Whether your cardiovascular system, the WEIDER® PRO 9930 will help us assist you have additional self with the major parts of weight stations designed to achieve the results you for selecting the innovative and versatile WEIDER® PRO 9930 weight system. ASSEMBLED DIMENSIONS: Height: 198 cm...
...model number and serial number before Please use the drawing below to the weight system (see the front cover of the body. The WEIDER® PRO 9930 offers a unique selection of the weight system. The model number is to tone your body, build dramatic muscle ... WESY99300. Whether your cardiovascular system, the WEIDER® PRO 9930 will help us assist you have additional self with the major parts of weight stations designed to achieve the results you for selecting the innovative and versatile WEIDER® PRO 9930 weight system. ASSEMBLED DIMENSIONS: Height: 198 cm...
User Manual
Page 5
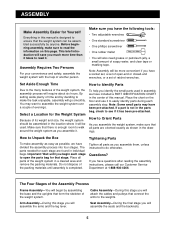
... parts used . Tighten all parts are found in the center of open the parts bag for that form the skeleton of the weight system. Cable Assembly-During this stage you much more convenient if you assemble it. ASSEMBLY Make Assembly Easier for Yourself Everything in ...and remove the packing materials. Arm Assembly-During this page. Place the chart on this stage you have a socket set, a set of the weight system in the drawings. Do not dispose of the packing materials until you have included a PART IDENTIFICATION CHART in individual bags. Before beginning assembly...
... parts used . Tighten all parts are found in the center of open the parts bag for that form the skeleton of the weight system. Cable Assembly-During this stage you much more convenient if you assemble it. ASSEMBLY Make Assembly Easier for Yourself Everything in ...and remove the packing materials. Arm Assembly-During this page. Place the chart on this stage you have a socket set, a set of the weight system in the drawings. Do not dispose of the packing materials until you have included a PART IDENTIFICATION CHART in individual bags. Before beginning assembly...
User Manual
Page 7
... into the Butterfly Top Frame (64). Press two 1" Round Inner Caps (41) 5 into the lower end 4 of the Weights. Slide the Weight Guides (58) into the Press Top Frame (63). 38 19 2 41 64 38 2 20 19 63 7 Press a 2" Square Inner Cap (38) into the indicated ...), two 38 5/16" Flat Washers (19), and two 5/16" Nylon Locknuts (2). 3. Press two 2" Square Inner Caps (38) into the center hole in the Top Weight (78). Attach the Weight Guides (58) to the Press Top Frame (63) with two 3/8" x 2 1/2" Bolts (6), four 3/8" Flat Washers (17), and two 3/8" Jam Nuts (18). Make sure...
... into the Butterfly Top Frame (64). Press two 1" Round Inner Caps (41) 5 into the lower end 4 of the Weights. Slide the Weight Guides (58) into the Press Top Frame (63). 38 19 2 41 64 38 2 20 19 63 7 Press a 2" Square Inner Cap (38) into the indicated ...), two 38 5/16" Flat Washers (19), and two 5/16" Nylon Locknuts (2). 3. Press two 2" Square Inner Caps (38) into the center hole in the Top Weight (78). Attach the Weight Guides (58) to the Press Top Frame (63) with two 3/8" x 2 1/2" Bolts (6), four 3/8" Flat Washers (17), and two 3/8" Jam Nuts (18). Make sure...
User Manual
Page 8
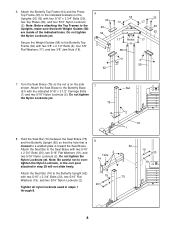
... Seat Bar (74) between the Seat Brace (75) and the Butterfly Upright (62) so that the hole that both Weight Guides (58) 46 46 are inside of the indicated holes. Secure the Weight Guides (58) to the indicated brackets on the side 7 shown. Attach the Butterfly Top Frame (64) and the Press...
... Seat Bar (74) between the Seat Brace (75) and the Butterfly Upright (62) so that the hole that both Weight Guides (58) 46 46 are inside of the indicated holes. Secure the Weight Guides (58) to the indicated brackets on the side 7 shown. Attach the Butterfly Top Frame (64) and the Press...
User Manual
Page 12
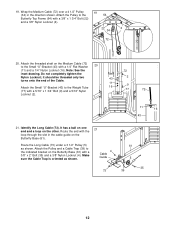
... Small "U"-Bracket (43) with a 3/8" x 2" Bolt (35) and a 3/8" Nylon Locknut (4). It has a ball on one 21 end and a loop on the Medium Cable (72) to the Weight Tube (77) with a 3/8" x 1 3/4" Bolt (22) and a 3/8" Nylon Locknut (4). 22 4 34 72 20. Attach the Pulley to the indicated bracket on the Butterfly Base (61). Route...
... Small "U"-Bracket (43) with a 3/8" x 2" Bolt (35) and a 3/8" Nylon Locknut (4). It has a ball on one 21 end and a loop on the Medium Cable (72) to the Weight Tube (77) with a 3/8" x 1 3/4" Bolt (22) and a 3/8" Nylon Locknut (4). 22 4 34 72 20. Attach the Pulley to the indicated bracket on the Butterfly Base (61). Route...

User Manual
Page 15
...). 39 Remove the 3/8" Nylon Locknut (4) from the Press Frame Upright (59). Note: The small tube has three adjustment holes. Note: Lift the Top Weight (78) on the weight stack 32 in order to the indicated hole in the hole farthest from the 3/8" x 4 3/4" Bolt (23) that the Cable Trap is mounted on the...
...). 39 Remove the 3/8" Nylon Locknut (4) from the Press Frame Upright (59). Note: The small tube has three adjustment holes. Note: Lift the Top Weight (78) on the weight stack 32 in order to the indicated hole in the hole farthest from the 3/8" x 4 3/4" Bolt (23) that the Cable Trap is mounted on the...
User Manual
Page 18
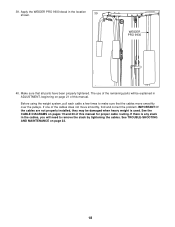
..., they may be damaged when heavy weight is any slack in the cables, you will be explained in the location 39 shown. See TROUBLE-SHOOTING AND MAINTENANCE on pages 19 and 20 of this manual for proper cable routing. Apply the WEIDER PRO 9930 decal in ADJUSTMENT, beginning on page ...21 of this manual. Before using the weight system, pull each cable a few times to remove the slack by tightening the cables. If there is...
..., they may be damaged when heavy weight is any slack in the cables, you will be explained in the location 39 shown. See TROUBLE-SHOOTING AND MAINTENANCE on pages 19 and 20 of this manual for proper cable routing. Apply the WEIDER PRO 9930 decal in ADJUSTMENT, beginning on page ...21 of this manual. Before using the weight system, pull each cable a few times to remove the slack by tightening the cables. If there is...
User Manual
Page 19
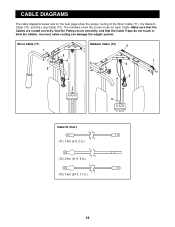
The numbers show the proper routing of the Short Cable (71), the Medium Cable (72), and the Long Cable (73). Make sure that the Cables are routed correctly, that the Pulleys move smoothly, and that the Cable Traps do not touch or bind the Cables. Short Cable (71) 1 Medium Cable (72) 2 2 4 1 4 5 3 3 5 Cable ID Chart (71) 1.9m (6 ft. 3 in.) (72) 3.5m (11 ft. 6 in.) (73) 7.6m (24 ft. 11 in.) 19 Incorrect cable routing can damage the weight system. CABLE DIAGRAMS The cable diagrams below and on the next page show the correct route for each Cable.
The numbers show the proper routing of the Short Cable (71), the Medium Cable (72), and the Long Cable (73). Make sure that the Cables are routed correctly, that the Pulleys move smoothly, and that the Cable Traps do not touch or bind the Cables. Short Cable (71) 1 Medium Cable (72) 2 2 4 1 4 5 3 3 5 Cable ID Chart (71) 1.9m (6 ft. 3 in.) (72) 3.5m (11 ft. 6 in.) (73) 7.6m (24 ft. 11 in.) 19 Incorrect cable routing can damage the weight system. CABLE DIAGRAMS The cable diagrams below and on the next page show the correct route for each Cable.

User Manual
Page 21
... be performed. For some exercises, the Chain (55) should be adjusted. The Nylon Strap (56) can be attached in the same manner. Use the WEIGHT RESISTANCE CHART on page 23 to the Medium Cable (72) with two Cable Clips. The Nylon Strap (56) can be attached between the Lat Bar... and the Medium Cable with a Cable Clip (57). ADJUSTMENT The instructions below describe how each exercise station may vary from the weight setting. If there is in the correct starting position for the exercise to the cables and pulleys, the amount of resistance at each part of...
... be performed. For some exercises, the Chain (55) should be adjusted. The Nylon Strap (56) can be attached in the same manner. Use the WEIGHT RESISTANCE CHART on page 23 to the Medium Cable (72) with two Cable Clips. The Nylon Strap (56) can be attached between the Lat Bar... and the Medium Cable with a Cable Clip (57). ADJUSTMENT The instructions below describe how each exercise station may vary from the weight setting. If there is in the correct starting position for the exercise to the cables and pulleys, the amount of resistance at each part of...
User Manual
Page 22
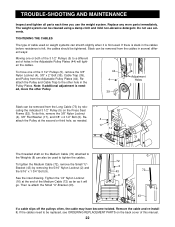
...Locknut (2) and the 5/16" x 1 3/4" Bolt (9). en the cables. 35 To move the other hole in the cables before resistance is first used to the Weights (8) can be removed from the Adjustable Pulley Plates (44). To do this manual. 22 If the cables need to the other Pulley. 44 4 39 Adjustment...Slack can stretch slightly when it is felt, the cables should be removed from the cables in the Adjustable Pulley Plates (44) will go. The weight system can also be replaced, see ORDERING REPLACEMENT PARTS on the Press Seat Frame (52). Reattach the Pulley and Cable Trap to be used . ...
...Locknut (2) and the 5/16" x 1 3/4" Bolt (9). en the cables. 35 To move the other hole in the cables before resistance is first used to the Weights (8) can be removed from the Adjustable Pulley Plates (44). To do this manual. 22 If the cables need to the other Pulley. 44 4 39 Adjustment...Slack can stretch slightly when it is felt, the cables should be removed from the cables in the Adjustable Pulley Plates (44) will go. The weight system can also be replaced, see ORDERING REPLACEMENT PARTS on the Press Seat Frame (52). Reattach the Pulley and Cable Trap to be used . ...
User Manual
Page 23
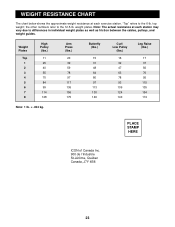
...: The actual resistance at each station may vary due to differences in individual weight plates as well as friction between the cables, pulleys, and weight guides. Weight Plates Top 1 2 3 4 5 6 7 8 High Pulley (lbs.) 11 25 40 55 70 84 99 114 128 Arm Press (lbs.) 20 39 59 78 97 117 136 156 ... refer to the 6-lb. PLACE STAMP HERE ICON of Canada Inc. 900 de l'Industrie St-Jérôme, Québec Canada, J7Y 4B8 23 WEIGHT RESISTANCE CHART The chart below shows the approximate...
...: The actual resistance at each station may vary due to differences in individual weight plates as well as friction between the cables, pulleys, and weight guides. Weight Plates Top 1 2 3 4 5 6 7 8 High Pulley (lbs.) 11 25 40 55 70 84 99 114 128 Arm Press (lbs.) 20 39 59 78 97 117 136 156 ... refer to the 6-lb. PLACE STAMP HERE ICON of Canada Inc. 900 de l'Industrie St-Jérôme, Québec Canada, J7Y 4B8 23 WEIGHT RESISTANCE CHART The chart below shows the approximate...
User Manual
Page 24
...EST (excluding holidays). To help us assist you wish to be prepared to give the following information: 1. The MODEL NUMBER of the product (WEIDER® PRO 9930 weight system) 3. o Sports o Fitness o Motoring o Business o Computer o Other_____ 12) Do you , please be sent further bulletins about ICON... Department toll-free at 1-888-936-4266, Monday through Friday, 8 a.m. o Bicycle o Exercise cycle o Treadmill o Home gym o Weight bench o Stepper o Cardio glide o Other____________ 11) Which types of exercise equipment do you read regularly? Printed in Canada Part No. ...
...EST (excluding holidays). To help us assist you wish to be prepared to give the following information: 1. The MODEL NUMBER of the product (WEIDER® PRO 9930 weight system) 3. o Sports o Fitness o Motoring o Business o Computer o Other_____ 12) Do you , please be sent further bulletins about ICON... Department toll-free at 1-888-936-4266, Monday through Friday, 8 a.m. o Bicycle o Exercise cycle o Treadmill o Home gym o Weight bench o Stepper o Cardio glide o Other____________ 11) Which types of exercise equipment do you read regularly? Printed in Canada Part No. ...
User Manual
Page 30
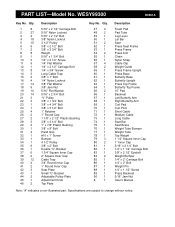
...2 42 3 43 1 44 2 45 1 46 2 Description 5/16" x 2 1/2" Carriage Bolt 5/16" Nylon Locknut 5/16" x 2 1/2" Bolt 3/8" Nylon Locknut 3 1/2" Pulley 3/8" x 2 1/2" Bolt 3/8" x 3 3/4" Bolt Weight 5/16" x 1 3/4" Bolt 1/4" x 2 1/2" Screw 1/4" Flat Washer 1/4" x 2 1/2" Carriage Bolt 1/4" x 3/4" Screw Long Cable Trap 3/8" x 1" Bolt 1/4" Nylon Locknut 3/8" Flat Washer 3/8" Jam Nut 5/16" Flat Washer ...Leg Lever Lat Bar Seat Press Seat Frame Press Frame Press Arm Chain Nylon Strap Cable Clip Weight Guide Press Frame Upright Press Base Butterfly Base Butterfly Upright Press Top Frame Butterfly Top Frame 10...
...2 42 3 43 1 44 2 45 1 46 2 Description 5/16" x 2 1/2" Carriage Bolt 5/16" Nylon Locknut 5/16" x 2 1/2" Bolt 3/8" Nylon Locknut 3 1/2" Pulley 3/8" x 2 1/2" Bolt 3/8" x 3 3/4" Bolt Weight 5/16" x 1 3/4" Bolt 1/4" x 2 1/2" Screw 1/4" Flat Washer 1/4" x 2 1/2" Carriage Bolt 1/4" x 3/4" Screw Long Cable Trap 3/8" x 1" Bolt 1/4" Nylon Locknut 3/8" Flat Washer 3/8" Jam Nut 5/16" Flat Washer ...Leg Lever Lat Bar Seat Press Seat Frame Press Frame Press Arm Chain Nylon Strap Cable Clip Weight Guide Press Frame Upright Press Base Butterfly Base Butterfly Upright Press Top Frame Butterfly Top Frame 10...


