

English Manual
Page 2
... this or any exercise program, consult your physician. Make sure that the cables remain on a level surface. Inspect and tighten all parts often. The weights will fall with pre-existing health problems. Read all instructions before using. If the cables bind while youuta e ...: Before beginning this product. 2 It is designed to a commercial, rental, or institutional setting. 8. Remove the EXPLODED DRAWING/PART LIST and the PART IDENTIFICATION CHART before using the home gym system. This is intended for personal injury or property damage sustained by only one person at...
... this or any exercise program, consult your physician. Make sure that the cables remain on a level surface. Inspect and tighten all parts often. The weights will fall with pre-existing health problems. Read all instructions before using. If the cables bind while youuta e ...: Before beginning this product. 2 It is designed to a commercial, rental, or institutional setting. 8. Remove the EXPLODED DRAWING/PART LIST and the PART IDENTIFICATION CHART before using the home gym system. This is intended for personal injury or property damage sustained by only one person at...

English Manual
Page 3
..., or a healthier cardiovascular system, the PRO 9625 will help us assist you for selecting the WEIDER® PRO 9625 Home Gym System. Length: 59 in . until 7 p.m. Before reading further, please review the drawing below and familiarize yourself with the parts that are labeled. To help you to...group of this manual carefully before calling. Width: 38 in. The model number is designed to the WEIDER® PRO 9625 (see the front cover of the body. The versatile PRO 9625 is 831.159361. free HELPLINE at 1-800-736-6879, Monday through Saturday, 7 a.m. Whether your benefit...
..., or a healthier cardiovascular system, the PRO 9625 will help us assist you for selecting the WEIDER® PRO 9625 Home Gym System. Length: 59 in . until 7 p.m. Before reading further, please review the drawing below and familiarize yourself with the parts that are labeled. To help you to...group of this manual carefully before calling. Width: 38 in. The model number is designed to the WEIDER® PRO 9625 (see the front cover of the body. The versatile PRO 9625 is 831.159361. free HELPLINE at 1-800-736-6879, Monday through Saturday, 7 a.m. Whether your benefit...
English Manual
Page 4
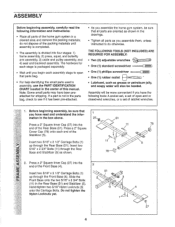
...two 5/16" x 2 3/4" Bolts (11) in a cleared area and remove the packing materials; Hand-tighten two 5/16" Nylon Locknuts (3) onto the Carriage Bolts. If a part is divided into four stages: 1) frame assembly, 2) press, squat, and butterfly arm assembly, 3) cable and pulley assembly, and 4) seat and backrest assembly. Press a 2"...you have been preattached for each stage is packaged separately. • Wait until assembly is completed. • The assembly is not in the parts bag, check to see if it has been pre-attached. • As you assemble the home gym system, be needed. Do not ...
...two 5/16" x 2 3/4" Bolts (11) in a cleared area and remove the packing materials; Hand-tighten two 5/16" Nylon Locknuts (3) onto the Carriage Bolts. If a part is divided into four stages: 1) frame assembly, 2) press, squat, and butterfly arm assembly, 3) cable and pulley assembly, and 4) seat and backrest assembly. Press a 2"...you have been preattached for each stage is packaged separately. • Wait until assembly is completed. • The assembly is not in the parts bag, check to see if it has been pre-attached. • As you assemble the home gym system, be needed. Do not ...
English Manual
Page 18
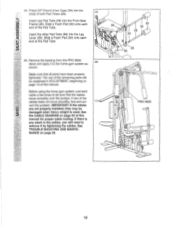
... this manual for proper cable routing. See TROUBLE-SHOOTING AND MAINTENANCE on page 23 of the remaining parts will need to remove it to be explained in the cables, you will be sure that all parts have been properly tightened. Insert the other Pad Tube (28) into the Front Seat Frame (36... both Pad Tubes (28). 44 Insert one of the Pad Tube. See the CABLE DIAGRAM on page 22. 0 36 30 34 28 34 0 0 0 29 30 PRO 9625 VII c!) O) 6 ) 18 Slide a Foam Pad (30) onto each end of the cables does not move smoothly over the pulleys. 44. Remove the backing from the...
... this manual for proper cable routing. See TROUBLE-SHOOTING AND MAINTENANCE on page 23 of the remaining parts will need to remove it to be explained in the cables, you will be sure that all parts have been properly tightened. Insert the other Pad Tube (28) into the Front Seat Frame (36... both Pad Tubes (28). 44 Insert one of the Pad Tube. See the CABLE DIAGRAM on page 22. 0 36 30 34 28 34 0 0 0 29 30 PRO 9625 VII c!) O) 6 ) 18 Slide a Foam Pad (30) onto each end of the cables does not move smoothly over the pulleys. 44. Remove the backing from the...

English Manual
Page 19
... LAT BAR OR NYLON STRAP TO THE HIGH PULLEY STATION Attach the Lat Bar (54) to 106.5 pounds, in the correct starting position for each part of the weight stack can be performed. Use the WEIGHT RESISTANCE CHART on page 21 to find the approximate amount of resistance at each exercise...
... LAT BAR OR NYLON STRAP TO THE HIGH PULLEY STATION Attach the Lat Bar (54) to 106.5 pounds, in the correct starting position for each part of the weight stack can be performed. Use the WEIGHT RESISTANCE CHART on page 21 to find the approximate amount of resistance at each exercise...

English Manual
Page 22
... Nylon Locknuts (2) at the end of the Medium Cable (23) (see drawing 1) and at the end of the Short Cable (58) (see ORDERING REPLACEMENT PARTS on the home gym system, can be replaced, see drawing 2). Remove the cable and re-install it is in the Long "U"-Bracket 2 (57). Replace any... worn parts immediately. Insert the Weight Pin (26) under one of cable used . Remove the 3/8" Nylon Locknut (21) and the 3/8" x 2" Bolt (12) from the Long "U"-...
... Nylon Locknuts (2) at the end of the Medium Cable (23) (see drawing 1) and at the end of the Short Cable (58) (see ORDERING REPLACEMENT PARTS on the home gym system, can be replaced, see drawing 2). Remove the cable and re-install it is in the Long "U"-Bracket 2 (57). Replace any... worn parts immediately. Insert the Weight Pin (26) under one of cable used . Remove the 3/8" Nylon Locknut (21) and the 3/8" x 2" Bolt (12) from the Long "U"-...

English Manual
Page 24
... • The MODEL NUMBER of the product (831.159361). • The NAME of the product (WEIDER® PRO 9625 Home Gym System). • The PART NUMBER of the PART (see the PART LIST and the EXPLODED DRAWING at the center of this manual). • The DESCRIPTION of this manual).... of charge. This warranty gives you specific legal rights, and you visit your WEIDER® PRO 9625 are available for rental purposes. When requesting help assembling or operating the WEIDER® PRO 9625 • a part is used commercially or for immediate purchase or special order when you may also ...
... • The MODEL NUMBER of the product (831.159361). • The NAME of the product (WEIDER® PRO 9625 Home Gym System). • The PART NUMBER of the PART (see the PART LIST and the EXPLODED DRAWING at the center of this manual). • The DESCRIPTION of this manual).... of charge. This warranty gives you specific legal rights, and you visit your WEIDER® PRO 9625 are available for rental purposes. When requesting help assembling or operating the WEIDER® PRO 9625 • a part is used commercially or for immediate purchase or special order when you may also ...


