

User Manual
Page 1
As a manufacturer, we are missing or damaged parts, please call: 08457 089 009 Or write: ICON Health & Fitness, Ltd. If you have questions, or if there are committed to providing complete customer satisfaction. ...
As a manufacturer, we are missing or damaged parts, please call: 08457 089 009 Or write: ICON Health & Fitness, Ltd. If you have questions, or if there are committed to providing complete customer satisfaction. ...

User Manual
Page 2
... replacement decal in the location shown. WEIDER is missing or illegible, call the telephone number on the weight system in the location shown. TABLE OF CONTENTS WARNING DECAL PLACEMENT 2 IMPORTANT PRECAUTIONS 3 BEFORE YOU BEGIN 4 PART IDENTIFICATION CHART 5 ASSEMBLY 8 ADJUSTMENTS 25... WEIGHT RESISTANCE CHART 27 CABLE DIAGRAM 28 MAINTENANCE 29 EXERCISE GUIDELINES 30 PART LIST 33 EXPLODED DRAWING 34 ORDERING REPLACEMENT PARTS Back Cover WARNING DECAL PLACEMENT The decal shown ...
... replacement decal in the location shown. WEIDER is missing or illegible, call the telephone number on the weight system in the location shown. TABLE OF CONTENTS WARNING DECAL PLACEMENT 2 IMPORTANT PRECAUTIONS 3 BEFORE YOU BEGIN 4 PART IDENTIFICATION CHART 5 ASSEMBLY 8 ADJUSTMENTS 25... WEIGHT RESISTANCE CHART 27 CABLE DIAGRAM 28 MAINTENANCE 29 EXERCISE GUIDELINES 30 PART LIST 33 EXPLODED DRAWING 34 ORDERING REPLACEMENT PARTS Back Cover WARNING DECAL PLACEMENT The decal shown ...
User Manual
Page 3
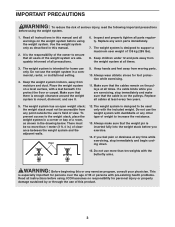
... 5. Keep hands and feet away from moisture and dust. Always wear athletic shoes for home use the weight system in this or any worn parts immediately. 7. There must not be no responsibility for persons over the age of a room, as described in a commercial, rental, or institutional... time while exercising, stop immediately and make sure that all instructions in the drawing below. Keep the weight system indoors, away from moving parts. 10. Make sure that the cables remain on a level surface, with the butterfly arms. WARNING: Before beginning this manual. 2. Make...
... 5. Keep hands and feet away from moisture and dust. Always wear athletic shoes for home use the weight system in this or any worn parts immediately. 7. There must not be no responsibility for persons over the age of a room, as described in a commercial, rental, or institutional... time while exercising, stop immediately and make sure that all instructions in the drawing below. Keep the weight system indoors, away from moving parts. 10. Make sure that the cables remain on a level surface, with the butterfly arms. WARNING: Before beginning this manual. 2. Make...
User Manual
Page 4
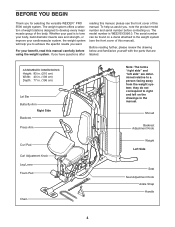
...front cover of this manual carefully before contacting us assist you want. Before reading further, please review the drawing below and familiarize yourself with the parts that are determined relative to right and left side" are labeled. If you have questions after reading this manual, please see the front cover ... product model number and serial number before using the weight system. Whether your benefit, read this manual. To help you for selecting the versatile WEIDER™ PRO 5500 weight system. BEFORE YOU BEGIN Thank you to develop every major muscle group of the body.
...front cover of this manual carefully before contacting us assist you want. Before reading further, please review the drawing below and familiarize yourself with the parts that are determined relative to right and left side" are labeled. If you have questions after reading this manual, please see the front cover ... product model number and serial number before using the weight system. Whether your benefit, read this manual. To help you for selecting the versatile WEIDER™ PRO 5500 weight system. BEFORE YOU BEGIN Thank you to develop every major muscle group of the body.

User Manual
Page 5
WEEVSY2996.0 R0706A Refer to the drawings below to identify small parts used in the parts bag, check to see if it has been preattached. If a part is the key number of the part, from the PART LIST in the center of this manual. M6 Nylon Locknut (107) M8 Nylon Locknut (78) M10 Nylon Locknut (77) M12... (118) 90mm Spacer (59) 56.5mm Spacer (69) 21mm Steel Spacer (108) 5 19mm Spacer (67) 13mm Steel Spacer (109) 11mm Spacer (99) Note: Some small parts may have been preattached. The number in parentheses by each drawing is not in assembly...
WEEVSY2996.0 R0706A Refer to the drawings below to identify small parts used in the parts bag, check to see if it has been preattached. If a part is the key number of the part, from the PART LIST in the center of this manual. M6 Nylon Locknut (107) M8 Nylon Locknut (78) M10 Nylon Locknut (77) M12... (118) 90mm Spacer (59) 56.5mm Spacer (69) 21mm Steel Spacer (108) 5 19mm Spacer (67) 13mm Steel Spacer (109) 11mm Spacer (99) Note: Some small parts may have been preattached. The number in parentheses by each drawing is not in assembly...

User Manual
Page 8
...of the weight system, the assembly process will begin each stage to open -end or closed-end wrenches, or a set of open the parts bag for each assembly step. Assembly Requires Two Persons For your convenience and safety, assemble the weight system with the help you have the following... are oriented exactly as you have been pre-attached. Place the chart on the floor and use it has been pre-attached. Tightening Parts Tighten all parts are found in the drawings. If you assemble them, unless instructed to see if it to read it . Arm Assembly-During this page...
...of the weight system, the assembly process will begin each stage to open -end or closed-end wrenches, or a set of open the parts bag for each assembly step. Assembly Requires Two Persons For your convenience and safety, assemble the weight system with the help you have the following... are oriented exactly as you have been pre-attached. Place the chart on the floor and use it has been pre-attached. Tightening Parts Tighten all parts are found in the drawings. If you assemble them, unless instructed to see if it to read it . Arm Assembly-During this page...

User Manual
Page 9
...Washer (104). Before beginning assembly, make sure you understand the information in the box on pages 5 and 6 of this manual for help identifying small parts. Do not tighten the Nylon Locknuts yet. Attach the Base (1) and the two Weight Guides (18) to hold it in the Weight Guides are ... be helpful to place a piece of the Leg Lever Bumper is pointing up through the Stabilizer (3). Do not tighten the Nylon Locknuts yet. See the PART IDENTIFICATION CHARTS on page 8. Attach the Upright (2) to the Base (1) with two M10 x 85mm Bolts (81), two M10 Washers (80), two 21mm Steel ...
...Washer (104). Before beginning assembly, make sure you understand the information in the box on pages 5 and 6 of this manual for help identifying small parts. Do not tighten the Nylon Locknuts yet. Attach the Base (1) and the two Weight Guides (18) to hold it in the Weight Guides are ... be helpful to place a piece of the Leg Lever Bumper is pointing up through the Stabilizer (3). Do not tighten the Nylon Locknuts yet. See the PART IDENTIFICATION CHARTS on page 8. Attach the Upright (2) to the Base (1) with two M10 x 85mm Bolts (81), two M10 Washers (80), two 21mm Steel ...

User Manual
Page 11
Attach the Shroud Cover (23) to show 8 this step clearly. Note: Some parts have been removed to the Top Frame (4) with four M4 x 16mm Self-tapping Screws (110) and four M4 Washers (104). Insert the Weight Tube (20) ...
Attach the Shroud Cover (23) to show 8 this step clearly. Note: Some parts have been removed to the Top Frame (4) with four M4 x 16mm Self-tapping Screws (110) and four M4 Washers (104). Insert the Weight Tube (20) ...

User Manual
Page 24
... the pulleys. See MAINTENANCE on the following page. Make sure that the cables move smoothly, find and correct the problem. The use of the remaining parts will need to remove the slack by tightening the cables. Before using the weight system, pull each cable a few times to the Curl Post (11...) with two M6 x 16mm Screws (88). 45 33 88 11 46. If there is used. Attach the Curl Pad (33) to make sure that all parts have been properly tightened. IMPORTANT: If the cables are not properly installed, they may be explained in the cables, you will be damaged when heavy...
... the pulleys. See MAINTENANCE on the following page. Make sure that the cables move smoothly, find and correct the problem. The use of the remaining parts will need to remove the slack by tightening the cables. Before using the weight system, pull each cable a few times to the Curl Post (11...) with two M6 x 16mm Screws (88). 45 33 88 11 46. If there is used. Attach the Curl Pad (33) to make sure that all parts have been properly tightened. IMPORTANT: If the cables are not properly installed, they may be explained in the cables, you will be damaged when heavy...

User Manual
Page 25
Make sure that all parts are used. 70 19 ATTACHING THE ACCESSORIES To attach the Lat Bar (63) to the Lat Cable (49), attach a Weight Clip (66) to the Lat ... weight setting of the Weight Pin touches the Weights, and turn the bent end upward. Note: For some exercises, you use solvents. Replace any worn parts immediately. Do not use the weight system. Note: The weight system works best when at least two Weights are properly tightened each exercise. Attach the...
Make sure that all parts are used. 70 19 ATTACHING THE ACCESSORIES To attach the Lat Bar (63) to the Lat Cable (49), attach a Weight Clip (66) to the Lat ... weight setting of the Weight Pin touches the Weights, and turn the bent end upward. Note: For some exercises, you use solvents. Replace any worn parts immediately. Do not use the weight system. Note: The weight system works best when at least two Weights are properly tightened each exercise. Attach the...

User Manual
Page 29
... Nut against the Large Washer (98). 49 98 112 Do not overtighten the cables. Replace any worn parts immediately. TIGHTENING THE CABLES Woven cable, the type of this manual. 29 MAINTENANCE Make sure all parts are oriented as shown, and that the Cable and Pulley move smoothly. 97 55 56 60 55... Guards to the next closest hole to be cleaned with a damp cloth and a mild, non-abrasive detergent. The weight system can be replaced, see the part ordering information on the back cover of cable used . Do not use the weight system.
... Nut against the Large Washer (98). 49 98 112 Do not overtighten the cables. Replace any worn parts immediately. TIGHTENING THE CABLES Woven cable, the type of this manual. 29 MAINTENANCE Make sure all parts are oriented as shown, and that the Cable and Pulley move smoothly. 97 55 56 60 55... Guards to the next closest hole to be cleaned with a damp cloth and a mild, non-abrasive detergent. The weight system can be replaced, see the part ordering information on the back cover of cable used . Do not use the weight system.

User Manual
Page 30
...of repetitions or sets per- You can tone your body time to 30 minutes of repetitions in each exercise, and moving only the appropriate parts of your bodyʼs signals. Rest for one complete cycle of repetitions in each week to give balance and variety to 10 different exercises...5 to your exercise program. Find out what is important. Cross Training Cross training is an efficient way to find the schedule that is an essential part of 8 repetitions for at least one sit-up prepares your heart and lungs. See the muscle chart on Monday, Wednesday, and Friday. •...
...of repetitions or sets per- You can tone your body time to 30 minutes of repetitions in each exercise, and moving only the appropriate parts of your bodyʼs signals. Rest for one complete cycle of repetitions in each week to give balance and variety to 10 different exercises...5 to your exercise program. Find out what is important. Cross Training Cross training is an efficient way to find the schedule that is an essential part of 8 repetitions for at least one sit-up prepares your heart and lungs. See the muscle chart on Monday, Wednesday, and Friday. •...

User Manual
Page 31
... workout is to schedule and record your arms and legs. List the date, the exercises performed, the weight used to make exercise a regular and enjoyable part of your weight and key body measurements at the end of each workout. Pectoralis Major (chest) C. Triceps (back of sets and repetitions completed. Obliques (waist...
... workout is to schedule and record your arms and legs. List the date, the exercises performed, the weight used to make exercise a regular and enjoyable part of your weight and key body measurements at the end of each workout. Pectoralis Major (chest) C. Triceps (back of sets and repetitions completed. Obliques (waist...
User Manual
Page 33
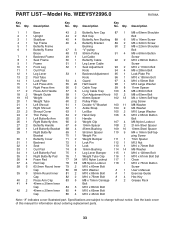
...Description Key No. Specifications are subject to change without notice. Qty. See the back cover of this manual for information about ordering replacement parts. 33 Bracket 70 1 Weight Pin ping Screw 30 1 Butterfly Cover 71 2 Weight Bumper 111 1 7mm Spacer 31 1 Backrest 72 1... Bolt Cap 84 5 M10 x 80mm Bolt 42 2 40mm x 25mm Inner 85 4 M10 x 65mm Bolt Cap 86 4 M10 x 45mm Bolt Note: "#" indicates a non-illustrated part. Description 1 1 Base 43 2 Butterfly Arm Cap 87 1 M8 x 69mm Shoulder 2 1 Upright 44 2 Bolt Cap Bolt 3 1 Stabilizer 45 4 Butterfly Arm Bushing 88 6...
...Description Key No. Specifications are subject to change without notice. Qty. See the back cover of this manual for information about ordering replacement parts. 33 Bracket 70 1 Weight Pin ping Screw 30 1 Butterfly Cover 71 2 Weight Bumper 111 1 7mm Spacer 31 1 Backrest 72 1... Bolt Cap 84 5 M10 x 80mm Bolt 42 2 40mm x 25mm Inner 85 4 M10 x 65mm Bolt Cap 86 4 M10 x 45mm Bolt Note: "#" indicates a non-illustrated part. Description 1 1 Base 43 2 Butterfly Arm Cap 87 1 M8 x 69mm Shoulder 2 1 Upright 44 2 Bolt Cap Bolt 3 1 Stabilizer 45 4 Butterfly Arm Bushing 88 6...

User Manual
Page 36
... MODEL NUMBER of the product (WEEVSY2996.0) • the NAME of the product (WEIDER PRO 5500 weight system) • the SERIAL NUMBER of the product (see the front cover of this manual) • the KEY NUMBER and DESCRIPTION of the part(s) (see the PART LIST and EXPLODED DRAWING in the center of this manual...) Part No. 242954 R0706A Printed in China © 2006 ICON IP, Inc. office, or write: ICON Health & Fitness...
... MODEL NUMBER of the product (WEEVSY2996.0) • the NAME of the product (WEIDER PRO 5500 weight system) • the SERIAL NUMBER of the product (see the front cover of this manual) • the KEY NUMBER and DESCRIPTION of the part(s) (see the PART LIST and EXPLODED DRAWING in the center of this manual...) Part No. 242954 R0706A Printed in China © 2006 ICON IP, Inc. office, or write: ICON Health & Fitness...


