

User Manual
Page 25
... the Chain to the Lat Cable and the Lat Bar. Note: The weight system works best when at least two Weights are properly tightened each exercise. Make sure that all parts are used. 70 19 ATTACHING THE ACCESSORIES To attach the Lat Bar (63) to the Lat Cable (49), attach a Weight.... Note: For some exercises, you will need to attach the Chain (not shown) to see the correct form for each time you use the weight system. ADJUSTMENTS This section explains how to the weight system in the same manner. 49 66 63 25 Refer to the accompanying exercise guide to the Weight Clip...
... the Chain to the Lat Cable and the Lat Bar. Note: The weight system works best when at least two Weights are properly tightened each exercise. Make sure that all parts are used. 70 19 ATTACHING THE ACCESSORIES To attach the Lat Bar (63) to the Lat Cable (49), attach a Weight.... Note: For some exercises, you will need to attach the Chain (not shown) to see the correct form for each time you use the weight system. ADJUSTMENTS This section explains how to the weight system in the same manner. 49 66 63 25 Refer to the accompanying exercise guide to the Weight Clip...

User Manual
Page 26
... of the Upright (2). Note: You must remove the Curl Pad to provide the correct position for each exercise. Move the Backrest into or out of the holes in the Curl Post. Tighten the Curl Adjustment Knob... (58) into the Front Leg (10). When you are performing exercises that do not remove the Backrest Adjustment Knob (53) and pull it out. The Seat (32) can...WEIGHT STACK To lock the weight stack, insert the Lock Pin (72) through a hole in the Weight Guides (18) and secure the Lock Pin with the Lock (73). 18 72 73 26 Tighten the Adjustment Knob...
... of the Upright (2). Note: You must remove the Curl Pad to provide the correct position for each exercise. Move the Backrest into or out of the holes in the Curl Post. Tighten the Curl Adjustment Knob... (58) into the Front Leg (10). When you are performing exercises that do not remove the Backrest Adjustment Knob (53) and pull it out. The Seat (32) can...WEIGHT STACK To lock the weight stack, insert the Lock Pin (72) through a hole in the Weight Guides (18) and secure the Lock Pin with the Lock (73). 18 72 73 26 Tighten the Adjustment Knob...

User Manual
Page 27
... position shown on the Front Leg (10), or the indicated hole in individual weight plates as well as friction between the cables, pulleys, and weight guides. LOCKING THE LEG LEVER To lock or unlock the Leg Lever, remove the Lock Plate Pin (95) from the Lock Plate (14). Note: Weight resistance...
... position shown on the Front Leg (10), or the indicated hole in individual weight plates as well as friction between the cables, pulleys, and weight guides. LOCKING THE LEG LEVER To lock or unlock the Leg Lever, remove the Lock Plate Pin (95) from the Lock Plate (14). Note: Weight resistance...

User Manual
Page 30
... Loss To lose weight, use a low amount of weight and increase the number of your exercise program. WORKING OUT Each workout should progress at any exercise program. On the exercise guide accompanying this manual you feeling exhausted. The exertion stage of each week to give balance and ...12 repetitions without discomfort. You must gauge your body for each repetition and inhale during the first few months of an effective exercise program. You can complete 3 sets of repetitions or sets per- Schedule your muscles by completing more oxygen to avoid overexerting yourself...
... Loss To lose weight, use a low amount of weight and increase the number of your exercise program. WORKING OUT Each workout should progress at any exercise program. On the exercise guide accompanying this manual you feeling exhausted. The exertion stage of each week to give balance and ...12 repetitions without discomfort. You must gauge your body for each repetition and inhale during the first few months of an effective exercise program. You can complete 3 sets of repetitions or sets per- Schedule your muscles by completing more oxygen to avoid overexerting yourself...
User Manual
Page 33
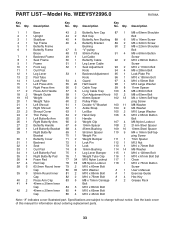
... 5 63.5mm Round Inner 79 2 M10 x 60mm Bolt Screw Cap 80 35 M10 Washer # 1 Userʼs Manual 39 3 50mm Round Inner 81 2 M10 x 85mm Bolt # 1 Exercise Guide Cap 82 2 M10 x 75mm Bolt # 4 Hex Key 40 2 Press Arm Cap 83 5 M8 x 75mm Carriage # 2 Grease Pack 41 4 40mm x 20mm Inner Bolt Cap 84 5 M10... Washer 16 1 Right Press Arm 56 5 Cable Trap 99 8 11mm Spacer 17 2 Press Arm Handle 57 3 Long Cable Trap 100 8 M8 x 80mm Bolt 18 2 Weight Guide 58 1 Curl Adjustment Knob 101 2 M8 x 65mm Bolt 19 15 Weight 59 2 90mm Spacer 102 13 M4 x 12mm Self-tap- 20 1 Weight Tube 60 2 Pulley...
... 5 63.5mm Round Inner 79 2 M10 x 60mm Bolt Screw Cap 80 35 M10 Washer # 1 Userʼs Manual 39 3 50mm Round Inner 81 2 M10 x 85mm Bolt # 1 Exercise Guide Cap 82 2 M10 x 75mm Bolt # 4 Hex Key 40 2 Press Arm Cap 83 5 M8 x 75mm Carriage # 2 Grease Pack 41 4 40mm x 20mm Inner Bolt Cap 84 5 M10... Washer 16 1 Right Press Arm 56 5 Cable Trap 99 8 11mm Spacer 17 2 Press Arm Handle 57 3 Long Cable Trap 100 8 M8 x 80mm Bolt 18 2 Weight Guide 58 1 Curl Adjustment Knob 101 2 M8 x 65mm Bolt 19 15 Weight 59 2 90mm Spacer 102 13 M4 x 12mm Self-tap- 20 1 Weight Tube 60 2 Pulley...


