

English Manual
Page 2
Remove the PART IDENTIFICATION CHART and the PART LIST/EXPLODED DRAWING before beginning assembly. 2 TABLE OF CONTENTS IMPORTANT PRECAUTIONS 3 BEFORE YOU BEGIN 4 ASSEMBLY 5 ADJUSTMENTS 21 WEIGHT RESISTANCE CHART 23 CABLE DIAGRAM 24 EXERCISE GUIDELINES 26 ORDERING REPLACEMENT PARTS Back Cover FULL 90 DAY WARRANTY Back Cover Note: A PART IDENTIFICATION CHART and a PART LIST/EXPLODED DRAWING are attached in the center of this manual.
Remove the PART IDENTIFICATION CHART and the PART LIST/EXPLODED DRAWING before beginning assembly. 2 TABLE OF CONTENTS IMPORTANT PRECAUTIONS 3 BEFORE YOU BEGIN 4 ASSEMBLY 5 ADJUSTMENTS 21 WEIGHT RESISTANCE CHART 23 CABLE DIAGRAM 24 EXERCISE GUIDELINES 26 ORDERING REPLACEMENT PARTS Back Cover FULL 90 DAY WARRANTY Back Cover Note: A PART IDENTIFICATION CHART and a PART LIST/EXPLODED DRAWING are attached in the center of this manual.
English Manual
Page 5
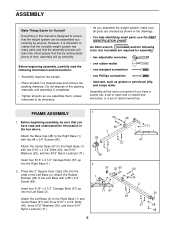
...26 2 71 67 33 57 57 98 68 5 Do not dispose of the Left Base (2). However, it is designed to realize that the versatile weight system has many parts and that by anyone. Attach the Base Cap (28) to the Right Base (1) with two #8 x 3/4" Screws (68).... Before beginning assembly, carefully read and understand the information in the drawings. • For help identifying small parts, use the PART IDENTIFICATION CHART. Insert four 5/16" x 2 1/2" Carriage Bolts (57) up into the ends of the packing materials until assembly is completed. • Tighten all ...
...26 2 71 67 33 57 57 98 68 5 Do not dispose of the Left Base (2). However, it is designed to realize that the versatile weight system has many parts and that by anyone. Attach the Base Cap (28) to the Right Base (1) with two #8 x 3/4" Screws (68).... Before beginning assembly, carefully read and understand the information in the drawings. • For help identifying small parts, use the PART IDENTIFICATION CHART. Insert four 5/16" x 2 1/2" Carriage Bolts (57) up into the ends of the packing materials until assembly is completed. • Tighten all ...

English Manual
Page 11
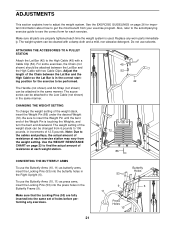
...step is turned to loosen the four indicated 5/16" Nylon Locknuts (71). Attach the Pulley at the rear hole, inside of the weight system, with the Left Top Frame (3) removed for proper cable routing and help identifying the cables. Attach the Pulley and a Cable ...) with a 3/8" x 2 3/4" Bolt (81), two 3/8" Washers (75), two 1/2" Spacers (34), and a 3/8" Nylon Locknut (70). 18. Refer to the CABLE DIAGRAMS and CABLE ID CHART on the Center Top Frame (14) with a 3/8" x 2 3/4" Bolt (81), two 3/8" Washers (75), two 1/2" Spacers (34), and a 3/8" Nylon Locknut (70). Wrap the High ...
...step is turned to loosen the four indicated 5/16" Nylon Locknuts (71). Attach the Pulley at the rear hole, inside of the weight system, with the Left Top Frame (3) removed for proper cable routing and help identifying the cables. Attach the Pulley and a Cable ...) with a 3/8" x 2 3/4" Bolt (81), two 3/8" Washers (75), two 1/2" Spacers (34), and a 3/8" Nylon Locknut (70). 18. Refer to the CABLE DIAGRAMS and CABLE ID CHART on the Center Top Frame (14) with a 3/8" x 2 3/4" Bolt (81), two 3/8" Washers (75), two 1/2" Spacers (34), and a 3/8" Nylon Locknut (70). Wrap the High ...
English Manual
Page 21
...ATTACHING THE ACCESSORIES TO A PULLEY STATION Attach the Lat Bar (42) to adjust the weight system. Be sure to 106 pounds, in the same manner. Use the WEIGHT RESISTANCE CHART on page 26 for each weight station. 45 52 42 72 86 CONVERTING THE BUTTERFLY ARMS To use the Butterfly Arms ...the accompanying exercise guide to see the correct form for important information about how to find the actual amount of the weight stack, insert the Weight Pin (86) under the desired Weight (72). See the EXERCISE GUIDELINES on page 23 to get the most benefit from your exercise program. Butterfly Holes...
...ATTACHING THE ACCESSORIES TO A PULLEY STATION Attach the Lat Bar (42) to adjust the weight system. Be sure to 106 pounds, in the same manner. Use the WEIGHT RESISTANCE CHART on page 26 for each weight station. 45 52 42 72 86 CONVERTING THE BUTTERFLY ARMS To use the Butterfly Arms ...the accompanying exercise guide to see the correct form for important information about how to find the actual amount of the weight stack, insert the Weight Pin (86) under the desired Weight (72). See the EXERCISE GUIDELINES on page 23 to get the most benefit from your exercise program. Butterfly Holes...
English Manual
Page 23
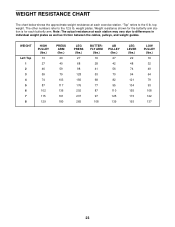
WEIGHT RESISTANCE CHART The chart below shows the approximate weight resistance at each station may vary due to the 6 lb. top weight. Note: The actual resistance at each butterfly arm. "Top" refers to differences in individual weight plates as well as friction between the cables, pulleys, and weight guides. weight plates. The other numbers refer to the 12.5 lb...
WEIGHT RESISTANCE CHART The chart below shows the approximate weight resistance at each station may vary due to the 6 lb. top weight. Note: The actual resistance at each butterfly arm. "Top" refers to differences in individual weight plates as well as friction between the cables, pulleys, and weight guides. weight plates. The other numbers refer to the 12.5 lb...
English Manual
Page 26
... stage. Warming up . WORKING OUT Each workout should be sensitive to your muscles by at any exercise program. Refer to the muscle chart on Tuesday and Thursday. • Rest from session to session. The repetitions in each repetition should progress at your own pace and ... push them to a moderate percentage of their maximum capacity. You can complete 3 sets of 12 repetitions without difficulty, increase the amount of weight that adequate rest and a proper diet are important factors in an uncontrolled manner will leave you will find photographs showing the correct form for ...
... stage. Warming up . WORKING OUT Each workout should be sensitive to your muscles by at any exercise program. Refer to the muscle chart on Tuesday and Thursday. • Rest from session to session. The repetitions in each repetition should progress at your own pace and ... push them to a moderate percentage of their maximum capacity. You can complete 3 sets of 12 repetitions without difficulty, increase the amount of weight that adequate rest and a proper diet are important factors in an uncontrolled manner will leave you will find photographs showing the correct form for ...
English Manual
Page 27
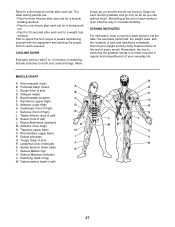
... familiarizing yourself with the equipment and learning the proper form for a short period of each workout. list the date, the exercises performed, the weight used, and the numbers of thigh) E J. Sartorius (front of sets and repetitions completed. Soleus (front of calf) N O P Q.... Remember, the key to achieving the greatest results is an effective way to make exercise a regular and enjoyable part of every month. MUSCLE CHART A. Pectoralis Major (chest) A C. Brachioradials (forearm) C F. Abductor (outer thigh) D H. Quadriceps (front of each workout is to ...
... familiarizing yourself with the equipment and learning the proper form for a short period of each workout. list the date, the exercises performed, the weight used, and the numbers of thigh) E J. Sartorius (front of sets and repetitions completed. Soleus (front of calf) N O P Q.... Remember, the key to achieving the greatest results is an effective way to make exercise a regular and enjoyable part of every month. MUSCLE CHART A. Pectoralis Major (chest) A C. Brachioradials (forearm) C F. Abductor (outer thigh) D H. Quadriceps (front of each workout is to ...


