
User Manual
Page 2
...3 4 15 18 19 Back Cover Back Cover Note: A PART IDENTIFICATION CHART and a PARTS LIST/EXPLODED DRAWING are attached at any time while exercising, stop immediately and make sure that the cables are on a level surface. Cover the floor beneath the weight system for foot protection. 8. Inspect... and tighten all times. Make sure that the cables remain on a foot plate when performing an exercise that does not use the weight system. WARNING: Before beginning this manual. This is especially important for personal injury or property damage ...
...3 4 15 18 19 Back Cover Back Cover Note: A PART IDENTIFICATION CHART and a PARTS LIST/EXPLODED DRAWING are attached at any time while exercising, stop immediately and make sure that the cables are on a level surface. Cover the floor beneath the weight system for foot protection. 8. Inspect... and tighten all times. Make sure that the cables remain on a foot plate when performing an exercise that does not use the weight system. WARNING: Before beginning this manual. This is especially important for personal injury or property damage ...
User Manual
Page 15
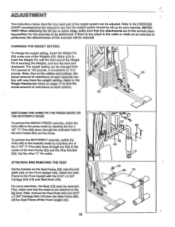
... 63 6 13 14 IMPORTANT: When attaching the lat bar or nylon strap, make sure that the attachments are In the correct starting position for each exercise. CHANGING THE WEIGHT SETTING To change the weight setting, insert the Weight Pin (26) under one of the 4 1/2" "L" Pins (60) down through the ...indicated holes in the Arm Frame (52) and the Arms. To perform the BUTTERFLY exercise, switch the Arms (46) to be adjusted. Next, remove the Seat Knob (40) and 5/16" x 2 3/4" Carriage Bolt (14) from the weight setting. Refer ...
... 63 6 13 14 IMPORTANT: When attaching the lat bar or nylon strap, make sure that the attachments are In the correct starting position for each exercise. CHANGING THE WEIGHT SETTING To change the weight setting, insert the Weight Pin (26) under one of the 4 1/2" "L" Pins (60) down through the ...indicated holes in the Arm Frame (52) and the Arms. To perform the BUTTERFLY exercise, switch the Arms (46) to be adjusted. Next, remove the Seat Knob (40) and 5/16" x 2 3/4" Carriage Bolt (14) from the weight setting. Refer ...
User Manual
Page 16
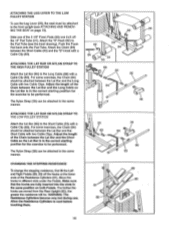
... Pedals. Attach the Chain (84) between the Lat Bar and the Short Cable so the Lat Bar is In the correct starting position for the exercise to be attached in the same manner. The Nylon Strap (39) can be performed. ATTACHING THE LAT BAR OR NYLON STRAP TO THP I ^IA' D111... the Left and Right Pedals (89, 90) off the 13" Pad Tube (31). Allow the Resistance Cylinders to different slots under the Pedals. For some exercises, the Chain (84) should be attached between the Lat Bar and the Short Cable with a Cable Clip (83). WARNING: The Resistance Cylinders become very hot...
... Pedals. Attach the Chain (84) between the Lat Bar and the Short Cable so the Lat Bar is In the correct starting position for the exercise to be attached in the same manner. The Nylon Strap (39) can be performed. ATTACHING THE LAT BAR OR NYLON STRAP TO THP I ^IA' D111... the Left and Right Pedals (89, 90) off the 13" Pad Tube (31). Allow the Resistance Cylinders to different slots under the Pedals. For some exercises, the Chain (84) should be attached between the Lat Bar and the Short Cable with a Cable Clip (83). WARNING: The Resistance Cylinders become very hot...
User Manual
Page 27
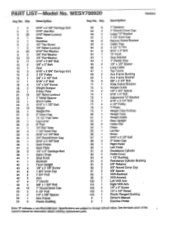
... Resistance Cylinder Bushing 5/8" Retainer 5/8" Round Cover Cap 5/8" Spacer VKR Backrest VKR Armrest Left VKR Arm Right VKR Arm 1/4" x 2" Screw 1/4" x 1/2" Screw Plastic Flanged Bushing Owner's Manual Exercise Poster Note: -fr indicates a non-illustrated part.
... Resistance Cylinder Bushing 5/8" Retainer 5/8" Round Cover Cap 5/8" Spacer VKR Backrest VKR Armrest Left VKR Arm Right VKR Arm 1/4" x 2" Screw 1/4" x 1/2" Screw Plastic Flanged Bushing Owner's Manual Exercise Poster Note: -fr indicates a non-illustrated part.


