
User Manual
Page 3
...this product. 3 If you are raised. Never release the press arm, butterfly arms, squat arm, leg lever, lat bar or nylon strap while weights are exercising, stop immediately and begin cooling down. 13. Do not use of this home gym system are on a level surface. ICON assumes no... responsibility for personal injury or property damage sustained by or through the use the VKR station when either weight stack is especially important for foot protection. 10. Inspect and properly tighten all instructions before using the home gym system. 1. The...
...this product. 3 If you are raised. Never release the press arm, butterfly arms, squat arm, leg lever, lat bar or nylon strap while weights are exercising, stop immediately and begin cooling down. 13. Do not use of this home gym system are on a level surface. ICON assumes no... responsibility for personal injury or property damage sustained by or through the use the VKR station when either weight stack is especially important for foot protection. 10. Inspect and properly tighten all instructions before using the home gym system. 1. The...
User Manual
Page 4
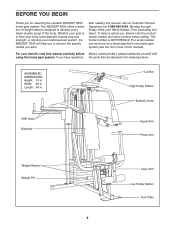
For your benefit, read this manual). If you for selecting the versatile WEIDER® 8530 home gym system. Whether your cardiovascular system, the WEIDER® 8530 will help us assist you want. The serial number can be found on a decal attached to achieve the specific results... Width: 60 in. The model number is to develop every major muscle group of this manual carefully before calling. The WEIDER® 8530 offers a selection of weight stations designed to tone your body, build dramatic muscle size and strength, or improve your goal is WESY8530C2. after reading ...
For your benefit, read this manual). If you for selecting the versatile WEIDER® 8530 home gym system. Whether your cardiovascular system, the WEIDER® 8530 will help us assist you want. The serial number can be found on a decal attached to achieve the specific results... Width: 60 in. The model number is to develop every major muscle group of this manual carefully before calling. The WEIDER® 8530 offers a selection of weight stations designed to tone your body, build dramatic muscle size and strength, or improve your goal is WESY8530C2. after reading ...
User Manual
Page 6
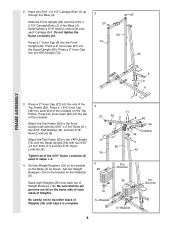
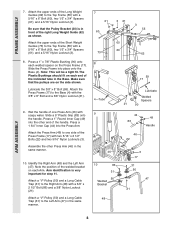
...5/16" x 2 1/2" Carriage Bolts (1) in steps 1-3. 4. Press two Inner Caps (96) into the Squat Upright (56). Stack eight Weights (25) onto each end of the crossbar on the same side of Weights (25) until step 6 is complete. 3 27 11 74 1 11 55 3 8 96 44 Crossbar 44 3 56 42 4 Pin ... with two 5/16" x 2 3/4" Bolts (11) and two 5/16" Nylon Locknuts (3). 2. Set two Weight Bumpers (19) on the bracket on the Stabilizer (5). Hand-tighten a 5/16" Nylon Locknut (3) onto each stack of Weight Bumpers (19). Tighten all on the Top Frame. Do not tighten the Nylon Locknuts yet. 27 56...
...5/16" x 2 1/2" Carriage Bolts (1) in steps 1-3. 4. Press two Inner Caps (96) into the Squat Upright (56). Stack eight Weights (25) onto each end of the crossbar on the same side of Weights (25) until step 6 is complete. 3 27 11 74 1 11 55 3 8 96 44 Crossbar 44 3 56 42 4 Pin ... with two 5/16" x 2 3/4" Bolts (11) and two 5/16" Nylon Locknuts (3). 2. Set two Weight Bumpers (19) on the bracket on the Stabilizer (5). Hand-tighten a 5/16" Nylon Locknut (3) onto each stack of Weight Bumpers (19). Tighten all on the Top Frame. Do not tighten the Nylon Locknuts yet. 27 56...
User Manual
Page 7
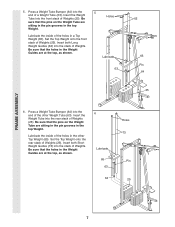
...the top, as shown. 6 Lubricate 65 63 64 Holes 73 Pin 25 7 FRAME ASSEMBLY 5. Set the Top Weight onto the front stack of Weights (25). Be sure that the pins on the Weight Tube are at the top, as shown. 5 Holes Lubricate 63 62 65 Pin 64 25 6. Lubricate the ...of the holes in the top Weight. Set the Top Weight onto the rear stack of Weights (25). Press a Weight Tube Bumper (64) into the stack of Weights (25). Insert both Long Weight Guides (62) into the rear stack of Weights. Be sure that the holes in a Top Weight (65). Press a Weight Tube Bumper (64) into the...
...the top, as shown. 6 Lubricate 65 63 64 Holes 73 Pin 25 7 FRAME ASSEMBLY 5. Set the Top Weight onto the front stack of Weights (25). Be sure that the pins on the Weight Tube are at the top, as shown. 5 Holes Lubricate 63 62 65 Pin 64 25 6. Lubricate the ...of the holes in the top Weight. Set the Top Weight onto the rear stack of Weights (25). Press a Weight Tube Bumper (64) into the stack of Weights (25). Insert both Long Weight Guides (62) into the rear stack of Weights. Be sure that the holes in a Top Weight (65). Press a Weight Tube Bumper (64) into the...
User Manual
Page 8
... the Left Arm (47) in the same manner. 10. Press a 1" Round Inner Cap (49) into the Press Arm. Assemble the other end of the Long Weight Guides (62) to the Top Frame (55) with a 3/8" x 2 1/2" Bolt (86) and a 3/8" Nylon Locknut (21). Arm identification is in the Base. Slide a 5" Plastic Grip (83... the Press Frame into place onto the Base (4). The Plastic Bushings should fit on each end of the indicated tube in front of the Short Weight Guides (73) to the Top Frame (55) with the 3/8" x 8" Bolt and a 3/8" Nylon Locknut (21). 9. Identify the Right Arm (48) and the Left Arm (...
... the Left Arm (47) in the same manner. 10. Press a 1" Round Inner Cap (49) into the Press Arm. Assemble the other end of the Long Weight Guides (62) to the Top Frame (55) with a 3/8" x 2 1/2" Bolt (86) and a 3/8" Nylon Locknut (21). Arm identification is in the Base. Slide a 5" Plastic Grip (83... the Press Frame into place onto the Base (4). The Plastic Bushings should fit on each end of the indicated tube in front of the Short Weight Guides (73) to the Top Frame (55) with the 3/8" x 8" Bolt and a 3/8" Nylon Locknut (21). 9. Identify the Right Arm (48) and the Left Arm (...
User Manual
Page 12
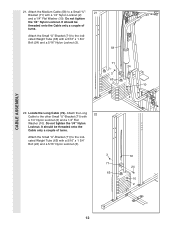
... (63) with a 5/16" x 1 3/4" Bolt (24) and a 5/16" Nylon Locknut (3). 3 71 63 72 24 10 2 12 Attach the Small "U"-Bracket (71) to the indicated Weight Tube (63) with a 5/16" x 1 3/4" Bolt (24) and a 5/16" Nylon Locknut (3). 58 71 24 3 63 10 2 22. CABLE ASSEMBLY 21. It should be threaded onto the ...
... (63) with a 5/16" x 1 3/4" Bolt (24) and a 5/16" Nylon Locknut (3). 3 71 63 72 24 10 2 12 Attach the Small "U"-Bracket (71) to the indicated Weight Tube (63) with a 5/16" x 1 3/4" Bolt (24) and a 5/16" Nylon Locknut (3). 58 71 24 3 63 10 2 22. CABLE ASSEMBLY 21. It should be threaded onto the ...
User Manual
Page 16
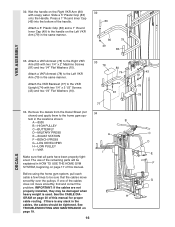
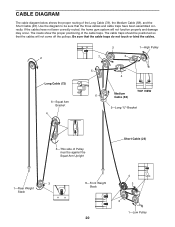
IMPORTANT: If the cables are not properly installed, they may be damaged when heavy weight is any slack in the cables, the cables should be tightened. tem in the same manner. Before using the home gym system, pull each cable a ... ASSEMBLY 33. Remove the decals from the Decal Sheet (not 34 shown) and apply them to the Left VKR Arm (79) in the locations shown: B A -8530 B -HIGH PULLEY C -BUTTERFLY D-MILITARY PRESS A E -SQUAT STATION F -BENCH PRESS G-LEG DEVELOPER H-LOW PULLEY I -VKR I Make sure that the cables move smoothly, find and correct the...
IMPORTANT: If the cables are not properly installed, they may be damaged when heavy weight is any slack in the cables, the cables should be tightened. tem in the same manner. Before using the home gym system, pull each cable a ... ASSEMBLY 33. Remove the decals from the Decal Sheet (not 34 shown) and apply them to the Left VKR Arm (79) in the locations shown: B A -8530 B -HIGH PULLEY C -BUTTERFLY D-MILITARY PRESS A E -SQUAT STATION F -BENCH PRESS G-LEG DEVELOPER H-LOW PULLEY I -VKR I Make sure that the cables move smoothly, find and correct the...
User Manual
Page 17
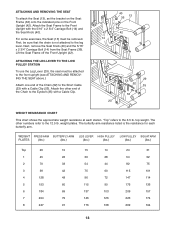
... how the home gym system should be attached in increments of 12.5 pounds. CHANGING THE WEIGHT SETTING The WEIDER 8530 features two weight stacks. The weight setting of either weight stack, insert a Weight Pin (26) under the desired Weight (25). Use the WEIGHT RESISTANCE CHART on page 18 to find the approximate amount of resistance at each exercise station...
... how the home gym system should be attached in increments of 12.5 pounds. CHANGING THE WEIGHT SETTING The WEIDER 8530 features two weight stacks. The weight setting of either weight stack, insert a Weight Pin (26) under the desired Weight (25). Use the WEIGHT RESISTANCE CHART on page 18 to find the approximate amount of resistance at each exercise station...
User Manual
Page 18
...to the Short Cable (23) with a Cable Clip. 40 36 13 42 14 53 29 52 35 53 23 WEIGHT RESISTANCE CHART This chart shows the approximate weight resistance at each butterfly arm. top weight. Attach the other numbers refer to the Eyebolt (35) with a Cable Clip (53). For some exercises, the... Seat (13) must be sure that the chain is the resistance for each station. weight plates. Next, remove the Seat Knob (40) and the 5/16" x 2 3/4" Carriage Bolt (14) from the Seat Frame (36). First, be attached to the front...
...to the Short Cable (23) with a Cable Clip. 40 36 13 42 14 53 29 52 35 53 23 WEIGHT RESISTANCE CHART This chart shows the approximate weight resistance at each butterfly arm. top weight. Attach the other numbers refer to the Eyebolt (35) with a Cable Clip (53). For some exercises, the... Seat (13) must be sure that the chain is the resistance for each station. weight plates. Next, remove the Seat Knob (40) and the 5/16" x 2 3/4" Carriage Bolt (14) from the Seat Frame (36). First, be attached to the front...
User Manual
Page 19
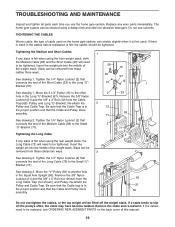
... be replaced, see ORDERING REPLACEMENT PARTS on the home gym system, can stretch slightly when it . TIGHTENING THE CABLES Woven cable, the type of the weight stack. Tighten the 1/4" Nylon Locknut (2) that the Cable and Pulley move smoothly. 71 See drawing 2. Remove the 3/8" Nylon Locknut (21) and the ...3/8" x 2" Bolt (12) from the Long Cable Trap (not shown), and Pulley. Insert the weight pin into the middle of cable used . Slack can be tightened. See drawing 1. Re-attach the 2 Pulley and Cable Trap. Do not use the ...
... be replaced, see ORDERING REPLACEMENT PARTS on the home gym system, can stretch slightly when it . TIGHTENING THE CABLES Woven cable, the type of the weight stack. Tighten the 1/4" Nylon Locknut (2) that the Cable and Pulley move smoothly. 71 See drawing 2. Remove the 3/8" Nylon Locknut (21) and the ...3/8" x 2" Bolt (12) from the Long Cable Trap (not shown), and Pulley. Insert the weight pin into the middle of cable used . Slack can be tightened. See drawing 1. Re-attach the 2 Pulley and Cable Trap. Do not use the ...
User Manual
Page 20
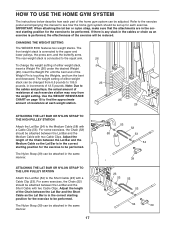
... routed, the home gym system will not come off the pulleys. Use the diagram to be against the Squat Arm Upright Short Cable (23) 3 1-Rear Weight Stack 4 8-Front Weight 3 Stack 2 1-Low Pulley 20 If the cables have been assembled correctly.
... routed, the home gym system will not come off the pulleys. Use the diagram to be against the Squat Arm Upright Short Cable (23) 3 1-Rear Weight Stack 4 8-Front Weight 3 Stack 2 1-Low Pulley 20 If the cables have been assembled correctly.
User Manual
Page 23
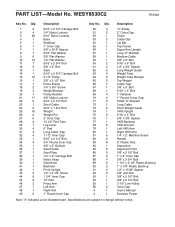
... ordering parts, please be prepared to give the following information: • the MODEL NUMBER of the product (WESY8530C2) • the NAME of the product (WEIDER® 8530 weight system) • the SERIAL NUMBER of the product (see the front cover of this manual) • the KEY NUMBER and DESCRIPTION of the part(s) (see...
... ordering parts, please be prepared to give the following information: • the MODEL NUMBER of the product (WESY8530C2) • the NAME of the product (WEIDER® 8530 weight system) • the SERIAL NUMBER of the product (see the front cover of this manual) • the KEY NUMBER and DESCRIPTION of the part(s) (see...
User Manual
Page 24
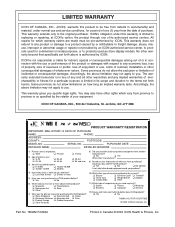
... or rental purposes, or to products used as store display models. You may also have purchased, would you exercise? J Bicycle J Exercise Cycle J Treadmill J Home Gym J Weight Bench J Stepper J Cardio Glide J Other 11) Which type of magazines do not allow limitations on your equipment. LIMITED WARRANTY ICON OF CANADA, INC., (ICON), warrants...
... or rental purposes, or to products used as store display models. You may also have purchased, would you exercise? J Bicycle J Exercise Cycle J Treadmill J Home Gym J Weight Bench J Stepper J Cardio Glide J Other 11) Which type of magazines do not allow limitations on your equipment. LIMITED WARRANTY ICON OF CANADA, INC., (ICON), warrants...
User Manual
Page 29
... 5/16" Flat Washer 3/8" Flat Washer 1/4" Flat Washer 5/16" x 2 3/4" Bolt 3/8" x 2" Bolt Seat 5/16" x 2 3/4" Carriage Bolt 3 1/2" Pulley 3/8" x 3 1/2" Bolt Press Frame 1/4" x 3/4" Screw Weight Bumper Pulley Bracket 3/8" Nylon Locknut 5/16" x 2 1/2" Bolt Short Cable 5/16" x 1 3/4" Bolt Weight Weight Pin 2" Inner Cap 13 1/2" Pad Tube Leg Lever 6" Pad Long Cable Trap 1 1/2" Inner Cap 5/16" x 2 1/4" Bolt 3/4" Round Inner Cap 3/8" x 2" Eyebolt...
... 5/16" Flat Washer 3/8" Flat Washer 1/4" Flat Washer 5/16" x 2 3/4" Bolt 3/8" x 2" Bolt Seat 5/16" x 2 3/4" Carriage Bolt 3 1/2" Pulley 3/8" x 3 1/2" Bolt Press Frame 1/4" x 3/4" Screw Weight Bumper Pulley Bracket 3/8" Nylon Locknut 5/16" x 2 1/2" Bolt Short Cable 5/16" x 1 3/4" Bolt Weight Weight Pin 2" Inner Cap 13 1/2" Pad Tube Leg Lever 6" Pad Long Cable Trap 1 1/2" Inner Cap 5/16" x 2 1/4" Bolt 3/4" Round Inner Cap 3/8" x 2" Eyebolt...


