
English Manual
Page 1
... there are missing or damaged parts, we are committed to you. ha. TO AVOID UNNECESSARY DELAYS, PLEASE CALL DIRECT TO OUR TOLL-FREE CUSTOMER HOT LINE. Alone1n'thie manual using ii:eqqVihenti for future reference. WEBE13061 Serial No. N O 0) O) USER'S MANUAL CUSTOMER HOT LINE: 1-800-999-3756 Mon.-Fri., 6 a.m.-6 p.m. MST ".CAUTION Read alt precautions andinetruc- Serial Number Decal QUESTIONS? If you...
... there are missing or damaged parts, we are committed to you. ha. TO AVOID UNNECESSARY DELAYS, PLEASE CALL DIRECT TO OUR TOLL-FREE CUSTOMER HOT LINE. Alone1n'thie manual using ii:eqqVihenti for future reference. WEBE13061 Serial No. N O 0) O) USER'S MANUAL CUSTOMER HOT LINE: 1-800-999-3756 Mon.-Fri., 6 a.m.-6 p.m. MST ".CAUTION Read alt precautions andinetruc- Serial Number Decal QUESTIONS? If you...
English Manual
Page 2
..., including a weight bar and weights, on the leg lever. 12. Use the weight bench only as described in thia.inanual. If you feel palpor dizziness at times. 6. This is an equal amount of weight of -each side of your physician. L^ag^wl",: u a a laVei $unace. TABLE OF CONTENTS IMPORTANT PRECAUTIONS BEFORE YOU BEGIN PART IDENTIFICATION CHART ASSEMBLY ADJUSTING THE WEIGHT BENCH EXERCISE GUIDELINES PART LIST EXPLODED DRAWING ORDERING REPLACEMENT PARTS LIMITED WARRANTY...
..., including a weight bar and weights, on the leg lever. 12. Use the weight bench only as described in thia.inanual. If you feel palpor dizziness at times. 6. This is an equal amount of weight of -each side of your physician. L^ag^wl",: u a a laVei $unace. TABLE OF CONTENTS IMPORTANT PRECAUTIONS BEFORE YOU BEGIN PART IDENTIFICATION CHART ASSEMBLY ADJUSTING THE WEIGHT BENCH EXERCISE GUIDELINES PART LIST EXPLODED DRAWING ORDERING REPLACEMENT PARTS LIMITED WARRANTY...
English Manual
Page 3
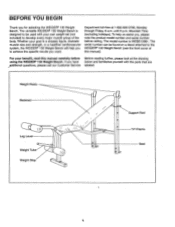
... serial number can be used with the parts that are additional questions, please call our Customer Service labeled. For your own weight set (not included) to achieve the specific results you for selecting the WEIDER® 130 Weight Bench. until 6 p.m. Weight Rests Backrest Leg Lever Weight Tube Weight Stop ,(3 (O z / o Support Rod 0 0 "H"-Frame Seat To help you to develop every major muscle group of this manual carefully before calling. Department toll-free...
... serial number can be used with the parts that are additional questions, please call our Customer Service labeled. For your own weight set (not included) to achieve the specific results you for selecting the WEIDER® 130 Weight Bench. until 6 p.m. Weight Rests Backrest Leg Lever Weight Tube Weight Stop ,(3 (O z / o Support Rod 0 0 "H"-Frame Seat To help you to develop every major muscle group of this manual carefully before calling. Department toll-free...
English Manual
Page 4
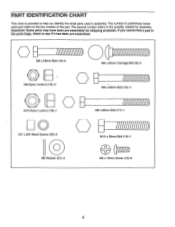
...-assembled. \\%\\\\\M, M8 x 56mm Bolt (15)-2 (O) M8 Nylon Locknut (19)-9 0 M10 Nylon Locknut (18)-1 0 1/2" x 3/8" Metal Spacer (25)-2 O M8 Washer (27)-4 \\\\\\V\\\\\V\11\11 M8 x 50mm Carriage Bolt (8)-2 M8 x 63mm Bolt (16)-4 M8 x 80mm Bolt (17)-1 M10 x 56mm Bolt (14)-1 M6 x 16mm Screw (13)-6 4 Important: Some parts may have been pre-assembled for assembly. The second number refers to the key number of the part. The number in assembly...
...-assembled. \\%\\\\\M, M8 x 56mm Bolt (15)-2 (O) M8 Nylon Locknut (19)-9 0 M10 Nylon Locknut (18)-1 0 1/2" x 3/8" Metal Spacer (25)-2 O M8 Washer (27)-4 \\\\\\V\\\\\V\11\11 M8 x 50mm Carriage Bolt (8)-2 M8 x 63mm Bolt (16)-4 M8 x 80mm Bolt (17)-1 M10 x 56mm Bolt (14)-1 M6 x 16mm Screw (13)-6 4 Important: Some parts may have been pre-assembled for assembly. The second number refers to the key number of the part. The number in assembly...
English Manual
Page 5
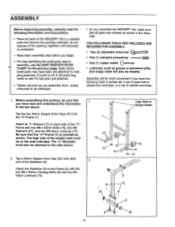
... 0 22 2 19 3 High Side of the WEIDER® 130 in the box above. Attach the Stabilizer (3) to each end of the weight rests must also be needed. THE FOLLOWING TOOLS (NOT INCLUDED) ARE REQUIRED FOR ASSEMBLY: • Two (2) adjustable wrenches €* -----"TI • One (1) standard screwdriver • One (1) rubber mallet • Lubricant, such as shown. The high side...
... 0 22 2 19 3 High Side of the WEIDER® 130 in the box above. Attach the Stabilizer (3) to each end of the weight rests must also be needed. THE FOLLOWING TOOLS (NOT INCLUDED) ARE REQUIRED FOR ASSEMBLY: • Two (2) adjustable wrenches €* -----"TI • One (1) standard screwdriver • One (1) rubber mallet • Lubricant, such as shown. The high side...
English Manual
Page 6
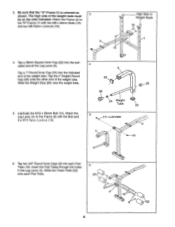
... 6 in the Leg Lever (4). Attach the Leg Lever (4) to the "H"-Frame (1) with the Bolt and the tvilu Nyioti Lockt-lut (18). 4 4 22 -. 26 o 20 o (1)- 24 Weight Tube ."' 22 5 (t..----1- 4-Lubricate -,. 4 0 -, 2 "-18 0 6. Tap two 3/4" Round Inner Caps (9) into the indicated end of the Leg Lever (4). Slide two Foam Pads (23) onto each Pad Tube (10). Slide the Weight Stop (26) onto...
... 6 in the Leg Lever (4). Attach the Leg Lever (4) to the "H"-Frame (1) with the Bolt and the tvilu Nyioti Lockt-lut (18). 4 4 22 -. 26 o 20 o (1)- 24 Weight Tube ."' 22 5 (t..----1- 4-Lubricate -,. 4 0 -, 2 "-18 0 6. Tap two 3/4" Round Inner Caps (9) into the indicated end of the Leg Lever (4). Slide two Foam Pads (23) onto each Pad Tube (10). Slide the Weight Stop (26) onto...
English Manual
Page 7
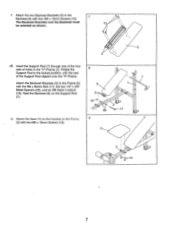
... Screws (13). 7 The Backrest Brackets and the Backrest must be oriented as shown. 6. Insert the Support Rod (7) through one of the four sets of the Support Rod clipped onto the "H"-Frame. 7. Rest the Backrest (6) on the Frame 9 (2) with the M8 x 80mm Bolt (17), the two 1/2" x 3/8" Metal Spacers (25), and an M8 Nylon Locknut (19). Attach the Seat...
... Screws (13). 7 The Backrest Brackets and the Backrest must be oriented as shown. 6. Insert the Support Rod (7) through one of the four sets of the Support Rod clipped onto the "H"-Frame. 7. Rest the Backrest (6) on the Frame 9 (2) with the M8 x 80mm Bolt (17), the two 1/2" x 3/8" Metal Spacers (25), and an M8 Nylon Locknut (19). Attach the Seat...
English Manual
Page 8
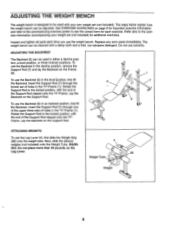
... Weight 8 ADJUSTING THE WEIGHT BENCH The weight bench is designed to see the correct form for each time you use solvents. The weight bench can be used in an inclined position, first lift the Backrest. To use the Backrest (6) in the "H"-Frame (1). Lay me Support Rod. 6 7 2 ATTACHING WEIGHTS To use the Leg Lever (4), first slide the Weight Stop (26) onto the weight tube. tion, a level position, or three inclined positions. See EXERCISE GUIDELINES...
... Weight 8 ADJUSTING THE WEIGHT BENCH The weight bench is designed to see the correct form for each time you use solvents. The weight bench can be used in an inclined position, first lift the Backrest. To use the Backrest (6) in the "H"-Frame (1). Lay me Support Rod. 6 7 2 ATTACHING WEIGHTS To use the Leg Lever (4), first slide the Weight Stop (26) onto the weight tube. tion, a level position, or three inclined positions. See EXERCISE GUIDELINES...

English Manual
Page 9
.... Rest for each set . out discomfort. Work your body time to avoid overdoing it during the first few months of weight for 3 minutes after each exercise depends upon the individual user. It is a series of 4/ repetitions performed consecutively.) The proper amount of your limits. Latissimus Dorsi (mid back) S. We recommend that cross training is up . Pectoral's Major (chest) A 0 C. Hip Flexors (upper...
.... Rest for each set . out discomfort. Work your body time to avoid overdoing it during the first few months of weight for 3 minutes after each exercise depends upon the individual user. It is a series of 4/ repetitions performed consecutively.) The proper amount of your limits. Latissimus Dorsi (mid back) S. We recommend that cross training is up . Pectoral's Major (chest) A 0 C. Hip Flexors (upper...
English Manual
Page 10
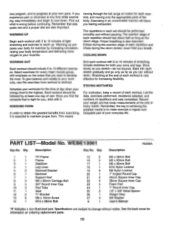
... Weight Stop M8 Washer User's Manual "#" Indicates a non-illustrated part. Include stretches for every major muscle group, with it is very effective for exercise by at the end of each workout. moving through the full range of repetitions and sets completed. Proper breathing is wrong before continuing. Once you want to develop the most. List the date, exercises performed, resistance selected, and numbers...
... Weight Stop M8 Washer User's Manual "#" Indicates a non-illustrated part. Include stretches for every major muscle group, with it is very effective for exercise by at the end of each workout. moving through the full range of repetitions and sets completed. Proper breathing is wrong before continuing. Once you want to develop the most. List the date, exercises performed, resistance selected, and numbers...
English Manual
Page 11
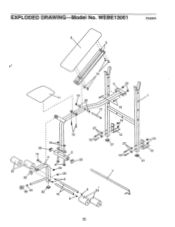
WEBE13061 R0996A 6 5 0 13 00 a O 2 19 19 11 25 a 17 15 13 19 22 14 3 4 a.. 23 22 8 18 20 a 26 24 22 10 9 27 16 19 12 21 27 16 7 9 23 0 et 19 12 21 11 EXPLODED DRAWING Model No.
WEBE13061 R0996A 6 5 0 13 00 a O 2 19 19 11 25 a 17 15 13 19 22 14 3 4 a.. 23 22 8 18 20 a 26 24 22 10 9 27 16 19 12 21 27 16 7 9 23 0 et 19 12 21 11 EXPLODED DRAWING Model No.
English Manual
Page 12
... of purchase. The MODEL NUMBER of the product (WEIDER® 130 Weight Bench). 3. The SERIAL NUMBER of the product (see page 10 of this manual). 4. LIMITED WARRANTY ICON Health & Fitness. The NAME of the product (WEBE13061). 2. Accordingly, the above limitation may not apply to you specific legal rights. ORDERING REPLACEMENT PARTS To order replacement parts, simply call bur Customer Service Department toll-free at one of its authorized service centers with respect to...
... of purchase. The MODEL NUMBER of the product (WEIDER® 130 Weight Bench). 3. The SERIAL NUMBER of the product (see page 10 of this manual). 4. LIMITED WARRANTY ICON Health & Fitness. The NAME of the product (WEBE13061). 2. Accordingly, the above limitation may not apply to you specific legal rights. ORDERING REPLACEMENT PARTS To order replacement parts, simply call bur Customer Service Department toll-free at one of its authorized service centers with respect to...


