User Manual
Page 1
User's Manual DIGGER THE WOOLLY MAMMOTH TM © 2014 VTech Printed in China 91-002929-000 US
User's Manual DIGGER THE WOOLLY MAMMOTH TM © 2014 VTech Printed in China 91-002929-000 US
User Manual
Page 2
... as a woolly mammoth! Press my charge-up lever, then press my release button to embark on the ground! The more fun, be sure to love playing with me you and I 've been specially created just for some wicked transformations, but you 'll hear me ! And remember, with me make awesome sounds. Maybe you know, I 'm a part of the Switch & Go Dinos® Turbo crew...
... as a woolly mammoth! Press my charge-up lever, then press my release button to embark on the ground! The more fun, be sure to love playing with me you and I 've been specially created just for some wicked transformations, but you 'll hear me ! And remember, with me make awesome sounds. Maybe you know, I 'm a part of the Switch & Go Dinos® Turbo crew...
User Manual
Page 3
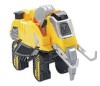
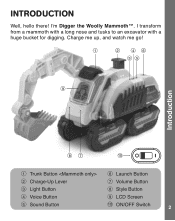
I 'm Digger the Woolly Mammoth™. Charge me up, and watch me go! 1 2 46 35 9 Introduction 87 10 1 Trunk Button 6 Launch Button 2 Charge-Up Lever 7 Volume Button 3 Light Button 8 Style Button 4 Voice Button 9 LCD Screen 5 Sound Button 10 ON/OFF Switch 2 I transform from a mammoth with a long nose and tusks to an excavator with a huge bucket for digging. INTRODUCTION Well, hello there!
I 'm Digger the Woolly Mammoth™. Charge me up, and watch me go! 1 2 46 35 9 Introduction 87 10 1 Trunk Button 6 Launch Button 2 Charge-Up Lever 7 Volume Button 3 Light Button 8 Style Button 4 Voice Button 9 LCD Screen 5 Sound Button 10 ON/OFF Switch 2 I transform from a mammoth with a long nose and tusks to an excavator with a huge bucket for digging. INTRODUCTION Well, hello there!
User Manual
Page 4
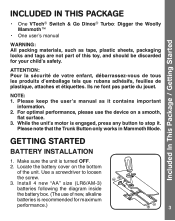
... Button only works in Mammoth Mode. Install 4 new "AA" size (LR6/AM-3) batteries following the diagram inside the battery box. (The use the device on the bottom of new, alkaline batteries is turned OFF. 2. Make sure the unit is recommended for your child's safety. Use a screwdriver to stop it contains important information. 2. GETTING STARTED BATTERY INSTALLATION 1. Included In This Package / Getting Started INCLUDED IN THIS PACKAGE • One VTech® Switch & Go Dinos® Turbo: Digger...
... Button only works in Mammoth Mode. Install 4 new "AA" size (LR6/AM-3) batteries following the diagram inside the battery box. (The use the device on the bottom of new, alkaline batteries is turned OFF. 2. Make sure the unit is recommended for your child's safety. Use a screwdriver to stop it contains important information. 2. GETTING STARTED BATTERY INSTALLATION 1. Included In This Package / Getting Started INCLUDED IN THIS PACKAGE • One VTech® Switch & Go Dinos® Turbo: Digger...
User Manual
Page 5
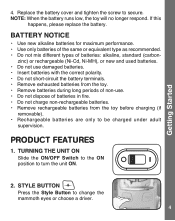
... replace the battery. BATTERY NOTICE • Use new alkaline batteries for maximum performance. • Use only batteries of the same or equivalent type as recommended. • Do not mix different types of batteries in fire. • Do not charge non-rechargeable batteries. • Remove rechargeable batteries from the toy before charging (if removable). • Rechargeable batteries are only to change the mammoth eyes or choose a driver. 4 STYLE BUTTON Press the Style Button...
... replace the battery. BATTERY NOTICE • Use new alkaline batteries for maximum performance. • Use only batteries of the same or equivalent type as recommended. • Do not mix different types of batteries in fire. • Do not charge non-rechargeable batteries. • Remove rechargeable batteries from the toy before charging (if removable). • Rechargeable batteries are only to change the mammoth eyes or choose a driver. 4 STYLE BUTTON Press the Style Button...
User Manual
Page 6
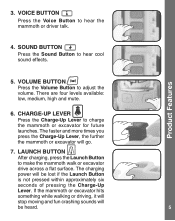
...-UP LEVER Press the Charge-Up Lever to hear the mammoth or driver talk. 4. If the mammoth or excavator hits something while walking or driving, it will stop moving and fun crashing sounds will go. 7. VOLUME BUTTON Press the Volume Button to make the mammoth walk or excavator drive across a flat surface. The faster and more times you press the Charge-Up Lever, the further the...
...-UP LEVER Press the Charge-Up Lever to hear the mammoth or driver talk. 4. If the mammoth or excavator hits something while walking or driving, it will stop moving and fun crashing sounds will go. 7. VOLUME BUTTON Press the Volume Button to make the mammoth walk or excavator drive across a flat surface. The faster and more times you press the Charge-Up Lever, the further the...
User Manual
Page 7
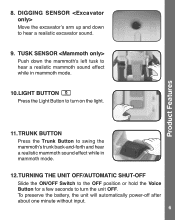
To preserve the battery, the unit will automatically power-off after about one minute without input. 6 DIGGING SENSOR Move the excavator's arm up and down the mammoth's left tusk to hear a realistic mammoth sound effect while in mammoth mode. 12.TURNING THE UNIT OFF/AUTOMATIC SHUT-OFF Slide the ON/OFF Switch to the OFF position or hold the Voice Button for a few seconds...
To preserve the battery, the unit will automatically power-off after about one minute without input. 6 DIGGING SENSOR Move the excavator's arm up and down the mammoth's left tusk to hear a realistic mammoth sound effect while in mammoth mode. 12.TURNING THE UNIT OFF/AUTOMATIC SHUT-OFF Slide the ON/OFF Switch to the OFF position or hold the Voice Button for a few seconds...
User Manual
Page 8
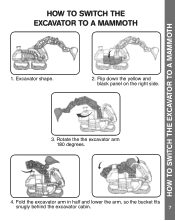
HOW TO SWITCH THE EXCAVATOR TO A MAMMOTH HOW TO SWITCH THE EXCAVATOR TO A MAMMOTH 1. Flip down the yellow and black panel on the right side. 3. Excavator shape. 2. Fold the excavator arm in half and lower the arm, so the bucket fits snugly behind the excavator cabin. 7 Rotate the the excavator arm 180 degrees. 4.
HOW TO SWITCH THE EXCAVATOR TO A MAMMOTH HOW TO SWITCH THE EXCAVATOR TO A MAMMOTH 1. Flip down the yellow and black panel on the right side. 3. Excavator shape. 2. Fold the excavator arm in half and lower the arm, so the bucket fits snugly behind the excavator cabin. 7 Rotate the the excavator arm 180 degrees. 4.
User Manual
Page 9
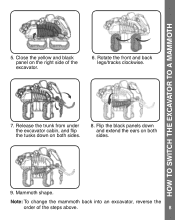
Release the trunk from under the excavator cabin, and flip the tusks down and extend the ears on the right side of the steps above. 8 HOW TO SWITCH THE EXCAVATOR TO A MAMMOTH 5. Flip the black panels down on both sides. 9. Mammoth shape. Note: To change the mammoth back into an excavator, reverse the order of the excavator. 6. Rotate the front and back legs/tracks clockwise. 7. Close the yellow and black panel on both sides. 8.
Release the trunk from under the excavator cabin, and flip the tusks down and extend the ears on the right side of the steps above. 8 HOW TO SWITCH THE EXCAVATOR TO A MAMMOTH 5. Flip the black panels down on both sides. 9. Mammoth shape. Note: To change the mammoth back into an excavator, reverse the order of the excavator. 6. Rotate the front and back legs/tracks clockwise. 7. Close the yellow and black panel on both sides. 8.
User Manual
Page 10
... energy and, if not installed and used in accordance with a new battery. The unit should now be happy to play again. 5. However, there is not in a residential installation. Keep the unit clean by removing the battery. 3. or 1-877-352-8697 in the U.S. Keep the unit out of time. 4. Let the unit stand for some reason the unit stops working or malfunctions, please follow these steps: 1. These limits are...
... energy and, if not installed and used in accordance with a new battery. The unit should now be happy to play again. 5. However, there is not in a residential installation. Keep the unit clean by removing the battery. 3. or 1-877-352-8697 in the U.S. Keep the unit out of time. 4. Let the unit stand for some reason the unit stops working or malfunctions, please follow these steps: 1. These limits are...
User Manual
Page 11
...reception, which can be determined by turning the equipment off and on a circuit different from that interference will not occur in a particular installation. THIS DEVICE COMPLIES WITH PART 15 OF THE FCC RULES. CAN ICES-3 (B)/NMB-3(B) 10 Caution: Changes or modifications not expressly approved by ...8226; Increase the separation between the equipment and receiver. • Connect the equipment into an outlet on , the user is encouraged to try to operate the equipment. Note guarantee that to which the receiver is connected. • Consult the dealer or an experienced radio/TV technician ...
...reception, which can be determined by turning the equipment off and on a circuit different from that interference will not occur in a particular installation. THIS DEVICE COMPLIES WITH PART 15 OF THE FCC RULES. CAN ICES-3 (B)/NMB-3(B) 10 Caution: Changes or modifications not expressly approved by ...8226; Increase the separation between the equipment and receiver. • Connect the equipment into an outlet on , the user is encouraged to try to operate the equipment. Note guarantee that to which the receiver is connected. • Consult the dealer or an experienced radio/TV technician ...


