User Manual
Page 1
User's Manual TM BROK THE BRACHIOSAURUS TM © 2012 VTech Printed in China 91-002777-007 US
User's Manual TM BROK THE BRACHIOSAURUS TM © 2012 VTech Printed in China 91-002777-007 US
User Manual
Page 2
... love playing with me , Brok the Brachiosaurus™! Your pal, Brok the Brachiosaurus™ You're going to dino in dino mode or picking a driver when I 've been specially created just for some wicked transformations, but you can you help me make awesome sounds! Customize me by choosing my eyes in a few easy steps. And remember, with me ! Switch & Go Dinos™ are a special breed of the Switch & Go Dinos™...
... love playing with me , Brok the Brachiosaurus™! Your pal, Brok the Brachiosaurus™ You're going to dino in dino mode or picking a driver when I 've been specially created just for some wicked transformations, but you can you help me make awesome sounds! Customize me by choosing my eyes in a few easy steps. And remember, with me ! Switch & Go Dinos™ are a special breed of the Switch & Go Dinos™...
User Manual
Page 3
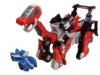
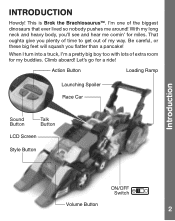
... Race Car Sound button Talk Button LCD Screen Style Button Introduction ON/OFF Switch Volume Button 2 That oughta give you 'll see and hear me around! Climb aboard! With my long neck and heavy body, you plenty of time to get out of extra room for a ride! I 'm a pretty big boy too with lots of my way. This is Brok the BrachiosaurusTM. Let's go for...
... Race Car Sound button Talk Button LCD Screen Style Button Introduction ON/OFF Switch Volume Button 2 That oughta give you 'll see and hear me around! Climb aboard! With my long neck and heavy body, you plenty of time to get out of extra room for a ride! I 'm a pretty big boy too with lots of my way. This is Brok the BrachiosaurusTM. Let's go for...
User Manual
Page 4
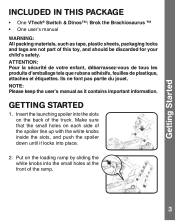
... knobs into the small holes at the front of the truck. GETTING STARTED 1. Insert the launching spoiler into the slots on each side of this toy, and should be discarded for your child's safety. Make sure that the small holes on the back of the ramp. 3 ... locks and tags are not part of the spoiler line up with the white knobs inside the slots, and push the spoiler down until it contains important information. Getting Started INCLUDED IN THIS PACKAGE • One VTech® Switch & Dinos™: Brok the Brachiosaurus ™ • One user's manual WARNING: All packing materials, ...
... knobs into the small holes at the front of the truck. GETTING STARTED 1. Insert the launching spoiler into the slots on each side of this toy, and should be discarded for your child's safety. Make sure that the small holes on the back of the ramp. 3 ... locks and tags are not part of the spoiler line up with the white knobs inside the slots, and push the spoiler down until it contains important information. Getting Started INCLUDED IN THIS PACKAGE • One VTech® Switch & Dinos™: Brok the Brachiosaurus ™ • One user's manual WARNING: All packing materials, ...

User Manual
Page 5
... supervision. 4 BATTERY NOTICE • Use new alkaline batteries for maximum performance.) 4. Install 4 new "AA" (LR6/AM-3) batteries into the main unit following the diagram inside the battery box. (The use . • Do not dispose of batteries in fire. • Do not charge non-rechargeable batteries. • Remove rechargeable batteries from the toy. • Remove batteries during long periods of non-use of new, alkaline batteries is turned OFF. 2. Make sure the unit is...
... supervision. 4 BATTERY NOTICE • Use new alkaline batteries for maximum performance.) 4. Install 4 new "AA" (LR6/AM-3) batteries into the main unit following the diagram inside the battery box. (The use . • Do not dispose of batteries in fire. • Do not charge non-rechargeable batteries. • Remove rechargeable batteries from the toy. • Remove batteries during long periods of non-use of new, alkaline batteries is turned OFF. 2. Make sure the unit is...
User Manual
Page 6
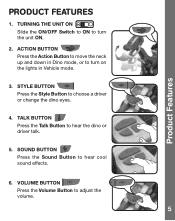
TURNING THE UNIT ON Slide the ON/OFF Switch to ON to turn the unit on the lights in Vehicle mode. 3. Product Features PRODUCT FEATURES 1. ACTION BUTTON Press the Action Button to move the neck up and down in Dino mode, or to turn on . 2. Style BUTTON Press the Style Button to hear cool sound effects. 6. Sound button Press the Sound Button to choose a driver or change the dino eyes. 4. Talk button Press the Talk Button to adjust the volume. 5 VOLUME BUTTON Press the Volume Button to hear the dino or driver talk. 5.
TURNING THE UNIT ON Slide the ON/OFF Switch to ON to turn the unit on the lights in Vehicle mode. 3. Product Features PRODUCT FEATURES 1. ACTION BUTTON Press the Action Button to move the neck up and down in Dino mode, or to turn on . 2. Style BUTTON Press the Style Button to hear cool sound effects. 6. Sound button Press the Sound Button to choose a driver or change the dino eyes. 4. Talk button Press the Talk Button to adjust the volume. 5 VOLUME BUTTON Press the Volume Button to hear the dino or driver talk. 5.
User Manual
Page 7
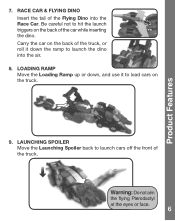
LOADING RAMP Move the Loading Ramp up or down, and use it down the ramp to hit the launch triggers on the truck. 9. Be careful not to launch the dino into the Race Car. Warning: Do not aim the flying Pterodactyl at the eyes or face. 6 RACE CAR & FLYING DINO Insert the tail of the Flying Dino into the air. 8. LAUNCHING SPOILER Move the Launching Spoiler back to load cars on the back of the truck. Product Features 7. Carry the car on the back of the truck, or roll it to launch cars off the front of the car while inserting the dino.
LOADING RAMP Move the Loading Ramp up or down, and use it down the ramp to hit the launch triggers on the truck. 9. Be careful not to launch the dino into the Race Car. Warning: Do not aim the flying Pterodactyl at the eyes or face. 6 RACE CAR & FLYING DINO Insert the tail of the Flying Dino into the air. 8. LAUNCHING SPOILER Move the Launching Spoiler back to load cars on the back of the truck. Product Features 7. Carry the car on the back of the truck, or roll it to launch cars off the front of the car while inserting the dino.
User Manual
Page 8
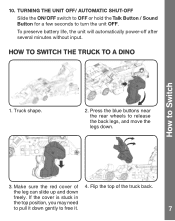
... SWITCH THE TRUCK TO A DINO 1. To preserve battery life, the unit will automatically power-off after several minutes without input. 10. If the cover is stuck in the top position, you may need to free it down . Press the blue buttons near the rear wheels to release the back legs, and move the legs down gently to pull it . 7 How to turn the unit...
... SWITCH THE TRUCK TO A DINO 1. To preserve battery life, the unit will automatically power-off after several minutes without input. 10. If the cover is stuck in the top position, you may need to free it down . Press the blue buttons near the rear wheels to release the back legs, and move the legs down gently to pull it . 7 How to turn the unit...
User Manual
Page 9
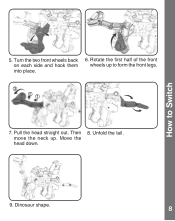
How to form the front legs. 3 21 7. Turn the two front wheels back on each side and hook them into place. 6. Pull the head straight out. Unfold the tail. Move the head down. 9. Dinosaur shape. 8 Rotate the first half of the front wheels up . move the neck up to Switch 5. Then 8.
How to form the front legs. 3 21 7. Turn the two front wheels back on each side and hook them into place. 6. Pull the head straight out. Unfold the tail. Move the head down. 9. Dinosaur shape. 8 Rotate the first half of the front wheels up . move the neck up to Switch 5. Then 8.

User Manual
Page 10
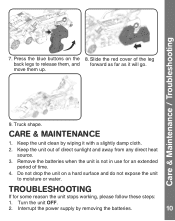
front wheels. Dinosaur shape. 2. Flip the top of the forward to release it next to Switch 3. How to the head. Rotate the front legs up and move the neck down . 6. HOW TO SWITCH THE DINO TO A TRUCK 1 3 2 1. Repeat on the front leg 4. Gently push the neck back into the body. Rotate the bottom half of the truck down . Fold the tail in. 9 Move the head up to uncover the leg and bring it . Pull the blue switch on the other side. 5.
front wheels. Dinosaur shape. 2. Flip the top of the forward to release it next to Switch 3. How to the head. Rotate the front legs up and move the neck down . 6. HOW TO SWITCH THE DINO TO A TRUCK 1 3 2 1. Repeat on the front leg 4. Gently push the neck back into the body. Rotate the bottom half of the truck down . Fold the tail in. 9 Move the head up to uncover the leg and bring it . Pull the blue switch on the other side. 5.
User Manual
Page 11
.... Remove the batteries when the unit is not in use for some reason the unit stops working, please follow these steps: 1. Do not drop the unit on the 8. Keep the unit out of the leg back legs to moisture or water. Interrupt the power supply by wiping it will go. Turn the unit OFF. 2. Care & Maintenance / Troubleshooting 7. TROUBLESHOOTING If for an extended period of time. 4. Press the blue buttons...
.... Remove the batteries when the unit is not in use for some reason the unit stops working, please follow these steps: 1. Do not drop the unit on the 8. Keep the unit out of the leg back legs to moisture or water. Interrupt the power supply by wiping it will go. Turn the unit OFF. 2. Care & Maintenance / Troubleshooting 7. TROUBLESHOOTING If for an extended period of time. 4. Press the blue buttons...
User Manual
Page 12
... not work, replace with the instructions, may cause harmful interference to Part 15 of the FCC Rules. These limits are designed to help . This equipment generates, uses and can be determined by turning the equipment off and on, the user is ...changes or modifications not expressly approved by one or more of new batteries. However, there is connected. • Consult the dealer or an experienced radio/TV technician for a few minutes, then replace the batteries. 4. If the problem persists, please call our Consumer Services Department at 1-800-521-2010 in a particular installation...
... not work, replace with the instructions, may cause harmful interference to Part 15 of the FCC Rules. These limits are designed to help . This equipment generates, uses and can be determined by turning the equipment off and on, the user is ...changes or modifications not expressly approved by one or more of new batteries. However, there is connected. • Consult the dealer or an experienced radio/TV technician for a few minutes, then replace the batteries. 4. If the problem persists, please call our Consumer Services Department at 1-800-521-2010 in a particular installation...


