
XVT3D424SV User Manual
Page 6
... drops into your HDTV, unplug the power cord and contact your HDTV and easily accessible. • Only power of the marked voltage can damage the remote control or injure the operator. • If any way. - Incorrect polarities may expose you to leak which can be used for your HDTV away from damage...
... drops into your HDTV, unplug the power cord and contact your HDTV and easily accessible. • Only power of the marked voltage can damage the remote control or injure the operator. • If any way. - Incorrect polarities may expose you to leak which can be used for your HDTV away from damage...

XVT3D424SV User Manual
Page 9
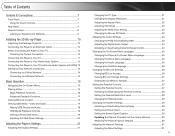
... Contents Chapter 1: Installing the TV 1 Installing the TV Stand...1 Installing the TV on a Wall...3 Chapter 2: Controls and Connections 4 Using the Jag Wheel Control...6 Using the Quick Menu...6 Remote Control Buttons...8 Replacing the Batteries...9 Activating the Bluetooth Remote Control 9 Using the Remote for Your Other Devices 10 Chapter 3: Completing the First-Time Setup 11 Chapter 4: Connecting Your Devices...
... Contents Chapter 1: Installing the TV 1 Installing the TV Stand...1 Installing the TV on a Wall...3 Chapter 2: Controls and Connections 4 Using the Jag Wheel Control...6 Using the Quick Menu...6 Remote Control Buttons...8 Replacing the Batteries...9 Activating the Bluetooth Remote Control 9 Using the Remote for Your Other Devices 10 Chapter 3: Completing the First-Time Setup 11 Chapter 4: Connecting Your Devices...

XVT3D424SV User Manual
Page 12
Bluetooth® Remote Control (with batteries) VIZIO 3D HDTV with Stand Cleaning Cloth Power Cord XVT3D424SV / XVT3D474SV / XVT3D554SV QUICK START GUIDE XVT3D424SV / XVT3D474SV / XVT3D554SV QUICK START GUIDE Quick Start Guide and User ... a cardboard carton designed to be shipped for warranty service. It may be useful if your device needs to protect it from damage. Package Contents Your VIZIO product has been carefully packed in good condition.
Bluetooth® Remote Control (with batteries) VIZIO 3D HDTV with Stand Cleaning Cloth Power Cord XVT3D424SV / XVT3D474SV / XVT3D554SV QUICK START GUIDE XVT3D424SV / XVT3D474SV / XVT3D554SV QUICK START GUIDE Quick Start Guide and User ... a cardboard carton designed to be shipped for warranty service. It may be useful if your device needs to protect it from damage. Package Contents Your VIZIO product has been carefully packed in good condition.
XVT3D424SV User Manual
Page 16
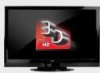
Controls and Connections Remote Control Sensor VIZIO Light Front Panel Detail Remote Control Point the remote control directly at this sensor for the best response to familiarize yourself with the TV much faster and your experience with the various 2 controls and connections. USB (3) HDMI Side Panel Detail USB Ports (3)...DVD player, game console, etc). 4 Chapter 2: Controls and Connections Before the first-time setup, take a few moments to the Sensor remote. This will make the setup process much more enjoyable! VIZIO Light The VIZIO logo lights up white when the TV is powered ...
Controls and Connections Remote Control Sensor VIZIO Light Front Panel Detail Remote Control Point the remote control directly at this sensor for the best response to familiarize yourself with the TV much faster and your experience with the various 2 controls and connections. USB (3) HDMI Side Panel Detail USB Ports (3)...DVD player, game console, etc). 4 Chapter 2: Controls and Connections Before the first-time setup, take a few moments to the Sensor remote. This will make the setup process much more enjoyable! VIZIO Light The VIZIO logo lights up white when the TV is powered ...

XVT3D424SV User Manual
Page 19
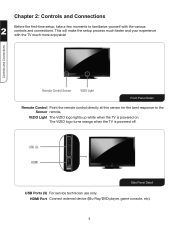
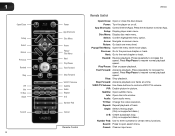
Device Power/Standby Input A/V Controls Power/Standby 2 List Info Exit Menu Controls and Connections OK Arrow Back VIA Volume Up/Down Mute Guide VIA Shortcuts Channel Up/Down Last Number Pad 3D Arrow QUERTY Keypad VIA Shortcuts Move/Delete App from VIA Dock Change Screen Size (when VIA Sidebar is open) View Settings for Active VIA App Exit App/Exit VIA Dock Bluetooth® Remote Control Buttons (See opposite page for button descriptions.) 7
Device Power/Standby Input A/V Controls Power/Standby 2 List Info Exit Menu Controls and Connections OK Arrow Back VIA Volume Up/Down Mute Guide VIA Shortcuts Channel Up/Down Last Number Pad 3D Arrow QUERTY Keypad VIA Shortcuts Move/Delete App from VIA Dock Change Screen Size (when VIA Sidebar is open) View Settings for Active VIA App Exit App/Exit VIA Dock Bluetooth® Remote Control Buttons (See opposite page for button descriptions.) 7
XVT3D424SV User Manual
Page 20
...of the button, the TV will increase or decrease by one. See Chapter 6: Using VIZIO Internet Apps on -screen menu. See Chapter 6: Using VIZIO Internet Apps on -screen menu. Input: Change the input device. VIA Shortcuts: Control VIZIO Internet Apps. Back: Go to manually enter a channel. Last: Return to the ... on page 42. Guide: Display the episode guide (digital channels only). Volume Up/Down: Increase or decrease the loudness of available channels. Remote Control Buttons Power/Standby: Turn the TV on or off . See Using the Info Window on -screen menu and episode guide.
...of the button, the TV will increase or decrease by one. See Chapter 6: Using VIZIO Internet Apps on -screen menu. See Chapter 6: Using VIZIO Internet Apps on -screen menu. Input: Change the input device. VIA Shortcuts: Control VIZIO Internet Apps. Back: Go to manually enter a channel. Last: Return to the ... on page 42. Guide: Display the episode guide (digital channels only). Volume Up/Down: Increase or decrease the loudness of available channels. Remote Control Buttons Power/Standby: Turn the TV on or off . See Using the Info Window on -screen menu and episode guide.

XVT3D424SV User Manual
Page 21
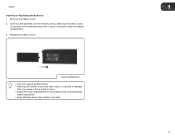
... five seconds. 5. Replacing the Batteries 1. To activate the Bluetooth remote control: 1. Select Bluetooth and press OK. 3. Insert two AA batteries into the remote control. Hold down the Record and Green VIA Shortcut buttons for devices and press OK. Activating the Bluetooth Remote Control Your TV includes a remote control that does not require a direct line of sight to search...
... five seconds. 5. Replacing the Batteries 1. To activate the Bluetooth remote control: 1. Select Bluetooth and press OK. 3. Insert two AA batteries into the remote control. Hold down the Record and Green VIA Shortcut buttons for devices and press OK. Activating the Bluetooth Remote Control Your TV includes a remote control that does not require a direct line of sight to search...
XVT3D424SV User Manual
Page 22
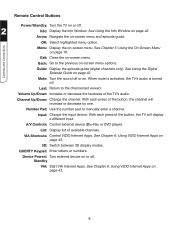
... does not respond at all, the battery may need to be kept dry and away from heat sources. Controls and Connections • The remote control should be replaced. • When storing the remote control, remove the batteries. • Do not take batteries apart, heat them, or throw them into a fire.... • Do not strike, throw, or drop the remote control. • Do not attempt to set up the remote for Your Other Devices The included remote can be used as a universal remote to control your other devices. Using the Remote for use with your other devices. 2 See Using Guided Setup...
... does not respond at all, the battery may need to be kept dry and away from heat sources. Controls and Connections • The remote control should be replaced. • When storing the remote control, remove the batteries. • Do not take batteries apart, heat them, or throw them into a fire.... • Do not strike, throw, or drop the remote control. • Do not attempt to set up the remote for Your Other Devices The included remote can be used as a universal remote to control your other devices. Using the Remote for use with your other devices. 2 See Using Guided Setup...

XVT3D424SV User Manual
Page 23
See Chapter 1: Installing the TV on the remote. When the remote is found . 3. Before you begin the first-time setup: • Your TV should be connected. See Chapter 2: Controls and Connections on page 4. • If you have a wireless network, have the network key ready. • If you are ...connecting to your TV ready for 5 seconds, then highlight Begin Activation and press OK. Wait for the remote to get your network with...
See Chapter 1: Installing the TV on the remote. When the remote is found . 3. Before you begin the first-time setup: • Your TV should be connected. See Chapter 2: Controls and Connections on page 4. • If you have a wireless network, have the network key ready. • If you are ...connecting to your TV ready for 5 seconds, then highlight Begin Activation and press OK. Wait for the remote to get your network with...
XVT3D424SV User Manual
Page 28
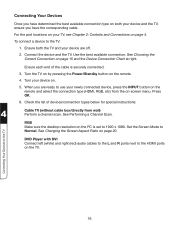
...x 1080. Connect the device and the TV. When you are off. 2. See Performing a Channel Scan. See Changing the Screen Aspect Ratio on the remote. 4. Turn the TV on by pressing the Power/Standby button on page 20. Ensure both your device on. 5. Check the list of the cable is.... Turn your device and the TV, ensure you have determined the best available connection type on both the TV and your TV, see Chapter 2: Controls and Connections on page 4. To connect a device to the TV 16 Connecting Your Devices to the TV: 1. Connecting Your Devices Once you have ...
...x 1080. Connect the device and the TV. When you are off. 2. See Performing a Channel Scan. See Changing the Screen Aspect Ratio on the remote. 4. Turn the TV on by pressing the Power/Standby button on page 20. Ensure both your device on. 5. Check the list of the cable is.... Turn your device and the TV, ensure you have determined the best available connection type on both the TV and your TV, see Chapter 2: Controls and Connections on page 4. To connect a device to the TV 16 Connecting Your Devices to the TV: 1. Connecting Your Devices Once you have ...

XVT3D424SV User Manual
Page 31
... Output Mode menu is displayed. 2. To change the 3D mode: 1. Select the 3D mode to the previous menu screen. To open the on the remote. From this menu, you can: • Change the 3D mode • Change the screen aspect radio • Set up closed captioning • ...sleep timer • Adjust the TV settings • Adjust PIP (Picture-in-Picture) controls • Adjust Network Settings • Pair Bluetooth devices • Access the Help menu While navigating the on -screen menu. The on the remote. The menu closes. If viewing 3D content, highlight 3D and press OK. 4. ...
... Output Mode menu is displayed. 2. To change the 3D mode: 1. Select the 3D mode to the previous menu screen. To open the on the remote. From this menu, you can: • Change the 3D mode • Change the screen aspect radio • Set up closed captioning • ...sleep timer • Adjust the TV settings • Adjust PIP (Picture-in-Picture) controls • Adjust Network Settings • Pair Bluetooth devices • Access the Help menu While navigating the on -screen menu. The on the remote. The menu closes. If viewing 3D content, highlight 3D and press OK. 4. ...

XVT3D424SV User Manual
Page 63
...troubleshooting guide. There is a picture, but no sound. • Press the Volume UP button on the remote, or touch the Volume UP control on the TV. • Press the MUTE button on the remote control to select a different input source. • If you have a cable connected to the TV, see ...Setting Up an External Antenna • If you call. Address: Phone: Fax: Email: 39 Tesla Irvine, CA 92618, USA (877) 698-4946 (949) 585-9563 techsupport@vizio.com Web: www.VIZIO.com ...
...troubleshooting guide. There is a picture, but no sound. • Press the Volume UP button on the remote, or touch the Volume UP control on the TV. • Press the MUTE button on the remote control to select a different input source. • If you have a cable connected to the TV, see ...Setting Up an External Antenna • If you call. Address: Phone: Fax: Email: 39 Tesla Irvine, CA 92618, USA (877) 698-4946 (949) 585-9563 techsupport@vizio.com Web: www.VIZIO.com ...

XVT3D424SV User Manual
Page 64
...seems low. • If you are still bars on plugging the TV in. • Adjust backlight, brightness, and contrast. When I press buttons on the remote, then select Settings > Screen Mode > Wide. This is common in a moving vehicle, the TV will not receive free-to-air television signals. A •... is black. • Make sure the ON/OFF switch is turned to ON, then press the Power button on the remote or TV. • Press the INPUT button on the remote control to select a different input source. • Ensure the TV's battery is precision-manufactured using a high level of technology....
...seems low. • If you are still bars on plugging the TV in. • Adjust backlight, brightness, and contrast. When I press buttons on the remote, then select Settings > Screen Mode > Wide. This is common in a moving vehicle, the TV will not receive free-to-air television signals. A •... is black. • Make sure the ON/OFF switch is turned to ON, then press the Power button on the remote or TV. • Press the INPUT button on the remote control to select a different input source. • Ensure the TV's battery is precision-manufactured using a high level of technology....
XVT3D424SV User Manual
Page 67
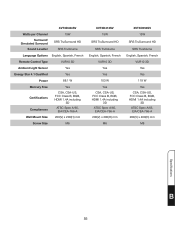
XVT3D424SV Watts per Channel Surround/ Simulated Surround Sound Leveller 15W SRS TruSurround HD SRS TruVolume Language Options English, Spanish, French Remote Control Type VUR10 3D Ambient Light Sensor Yes Energy Star 4.1 Qualified Yes Power 88.1 W Mercury Free Certifications Compliances Wall Mount Size Yes CSA, CSA-US, FCC ...
XVT3D424SV Watts per Channel Surround/ Simulated Surround Sound Leveller 15W SRS TruSurround HD SRS TruVolume Language Options English, Spanish, French Remote Control Type VUR10 3D Ambient Light Sensor Yes Energy Star 4.1 Qualified Yes Power 88.1 W Mercury Free Certifications Compliances Wall Mount Size Yes CSA, CSA-US, FCC ...
XVT3D424SV User Manual
Page 71
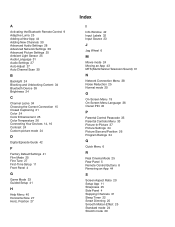
...-In-Picture 37 Picture Settings 24 Picture Size and Position 26 Program Ratings 34 Q Quick Menu 6 R Real Cinema Mode 25 Rear Panel 5 Remote Control Buttons 8 Removing an App 44 S Screen Aspect Ratio 20 Setup App 11 Sharpness 25 Side Panel 4 Skipping Channels 31 Sleep Timer 22 Smart Dimming... 25 Smooth Motion Effect 25 Standard mode 24 Stretch mode 20 A Activating the Bluetooth Remote Control 9 Adaptive Luma 25 Adding a New App 44 Adding New Channels 30 Advanced Audio Settings 28 Advanced Network Settings 39 Advanced Picture Settings 25 ...
...-In-Picture 37 Picture Settings 24 Picture Size and Position 26 Program Ratings 34 Q Quick Menu 6 R Real Cinema Mode 25 Rear Panel 5 Remote Control Buttons 8 Removing an App 44 S Screen Aspect Ratio 20 Setup App 11 Sharpness 25 Side Panel 4 Skipping Channels 31 Sleep Timer 22 Smart Dimming... 25 Smooth Motion Effect 25 Standard mode 24 Stretch mode 20 A Activating the Bluetooth Remote Control 9 Adaptive Luma 25 Adding a New App 44 Adding New Channels 30 Advanced Audio Settings 28 Advanced Network Settings 39 Advanced Picture Settings 25 ...
XVT3D424SV Quick Start Guide
Page 4
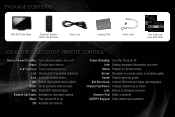
...: Display program information and time. Input: Change input device. A/V Controls: Control external device. Back: Go to previous channel. Arrow: Navigate on or off. VIA Shortcuts: Control VIZIO Internet Apps (see diagram). QUERTY Keypad: Enter letters and numbers. PACKAGE CONTENTS VIZIO 3DTV with Stand Bluetooth® Remote Control with Batteries Power Cord Cleaning Cloth Safety Cable XVT3D424SV / XVT3D474SV...
...: Display program information and time. Input: Change input device. A/V Controls: Control external device. Back: Go to previous channel. Arrow: Navigate on or off. VIA Shortcuts: Control VIZIO Internet Apps (see diagram). QUERTY Keypad: Enter letters and numbers. PACKAGE CONTENTS VIZIO 3DTV with Stand Bluetooth® Remote Control with Batteries Power Cord Cleaning Cloth Safety Cable XVT3D424SV / XVT3D474SV...
XVT3D424SV Quick Start Guide
Page 19
...sensor. (The sensor is on the remote. • Ensure the TV is connected to your network. See Connecting to Your Network in the User Guide. • Press the Green VIA Shortcut button to the picture. The TV does not respond when I cannot access VIZIO Internet Apps, or my Apps are...two separate images. • Enable SBS (side-by-side) 3D Mode. Press MENU > 3D > SBS. See Activating the Bluetooth Remote Control in the lower left corner.) • Activate your remote. Press MENU, then select Wide. • Adjust the video settings of the picture. • Set the TV to Wide or ...
...sensor. (The sensor is on the remote. • Ensure the TV is connected to your network. See Connecting to Your Network in the User Guide. • Press the Green VIA Shortcut button to the picture. The TV does not respond when I cannot access VIZIO Internet Apps, or my Apps are...two separate images. • Enable SBS (side-by-side) 3D Mode. Press MENU > 3D > SBS. See Activating the Bluetooth Remote Control in the lower left corner.) • Activate your remote. Press MENU, then select Wide. • Adjust the video settings of the picture. • Set the TV to Wide or ...
VBR334 User Manual
Page 5
...the Audio Settings 23 Changing the PCM Downsampling Rate 23 Adjusting the Digital Audio Output 24 Activating or Deactivating Dynamic Range Control 24 Changing the On-Screen Menu Language 25 Changing the Player's On-Screen Menu Language 25 Changing the Disc's Menu...Player's Factory Defaults 30 Adjusting the Network Settings 31 Adjusting the Wired Settings 31 5 Table of Contents Controls & Connections 7 Front Panel 7 Using the Touch Controls 7 Rear Panel 7 Remote Control 8 Inserting or Replacing the Batteries 9 Installing the 3D Blu-ray Player 10 Inspecting the Package Contents ...
...the Audio Settings 23 Changing the PCM Downsampling Rate 23 Adjusting the Digital Audio Output 24 Activating or Deactivating Dynamic Range Control 24 Changing the On-Screen Menu Language 25 Changing the Player's On-Screen Menu Language 25 Changing the Disc's Menu...Player's Factory Defaults 30 Adjusting the Network Settings 31 Adjusting the Wired Settings 31 5 Table of Contents Controls & Connections 7 Front Panel 7 Using the Touch Controls 7 Rear Panel 7 Remote Control 8 Inserting or Replacing the Batteries 9 Installing the 3D Blu-ray Player 10 Inspecting the Package Contents ...
VBR334 User Manual
Page 8
... Info TV Res Angle Search 8 Power App Shortcuts Disc Menu Arrow Popup/ Title Menu Next Play/Pause Fast Forward Step Forward VIZIO TV Volume Subtitle Audio Repeat A-B Number Pad Cancel Remote Control VBR334 Remote Control Open/Close: Open or close the disc drawer. Setup: Display player main menu. Return: Go back one frame at a time...
... Info TV Res Angle Search 8 Power App Shortcuts Disc Menu Arrow Popup/ Title Menu Next Play/Pause Fast Forward Step Forward VIZIO TV Volume Subtitle Audio Repeat A-B Number Pad Cancel Remote Control VBR334 Remote Control Open/Close: Open or close the disc drawer. Setup: Display player main menu. Return: Go back one frame at a time...
VBR334 User Manual
Page 9
... in cracking or leakage that the (+) and (-) symbols on the batteries match the (+) and (-) symbols inside the battery compartment. 3. Insert two AA batteries into the remote control. Replace the battery cover. VBR334 1 Inserting or Replacing the Batteries 1. Inserting Batteries • Use only a good quality battery. • Inserting the battery incorrectly may cause...
... in cracking or leakage that the (+) and (-) symbols on the batteries match the (+) and (-) symbols inside the battery compartment. 3. Insert two AA batteries into the remote control. Replace the battery cover. VBR334 1 Inserting or Replacing the Batteries 1. Inserting Batteries • Use only a good quality battery. • Inserting the battery incorrectly may cause...

