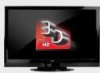

XVT3D424SV User Manual
Page 5
... manufacturer's warranty does not cover user abuse or improper installations. • The power cord must be operated only from the type of low temperature to protect it can injure a person and cause serious damage to your HDTV. • Unplug the power cord before connecting other components to your HDTV. To prevent your DTV from an area of power source indicated on your HDTV to insure compatibility. •...
... manufacturer's warranty does not cover user abuse or improper installations. • The power cord must be operated only from the type of low temperature to protect it can injure a person and cause serious damage to your HDTV. • Unplug the power cord before connecting other components to your HDTV. To prevent your DTV from an area of power source indicated on your HDTV to insure compatibility. •...

XVT3D424SV User Manual
Page 9
... Remote for Your Other Devices 10 Chapter 3: Completing the First-Time Setup 11 Chapter 4: Connecting Your Devices to the TV 14 Choosing the Correct Connection 15 Connecting Your Devices...16 Setting Up Your Network Connection 18 Connecting to A Wired Network 18 Connecting to a Wireless Network 18 Chapter 5: Using the On-Screen Menu 19 Changing the 3D Mode...19 Changing the Screen Aspect Ratio 20 Setting Up Closed Captioning...21 Changing the Appearance of Digital Closed Captions 21 Using the Sleep Timer...
... Remote for Your Other Devices 10 Chapter 3: Completing the First-Time Setup 11 Chapter 4: Connecting Your Devices to the TV 14 Choosing the Correct Connection 15 Connecting Your Devices...16 Setting Up Your Network Connection 18 Connecting to A Wired Network 18 Connecting to a Wireless Network 18 Chapter 5: Using the On-Screen Menu 19 Changing the 3D Mode...19 Changing the Screen Aspect Ratio 20 Setting Up Closed Captioning...21 Changing the Appearance of Digital Closed Captions 21 Using the Sleep Timer...
XVT3D424SV User Manual
Page 10
... Game Mode...33 Using the Parental Controls...33 Accessing the Parental Controls Menu 33 Enabling or Disabling Program Ratings 34 Locking and Unlocking Channels 34 Blocking and Unblocking Content by Rating 34 Changing the Parental Control Passcode 35 Resetting the Content Locks...35 Changing the On-Screen Menu Language 36 Setting the Time Zone...36 Using Picture-In-Picture (PIP) / Picture-Outside-Picture (POP 37 Choosing Inputs for the Main and Secondary Windows 37 Using the Network Connection Menu 38 Connecting to a Wireless Network 38 Changing the Advanced Network Settings...
... Game Mode...33 Using the Parental Controls...33 Accessing the Parental Controls Menu 33 Enabling or Disabling Program Ratings 34 Locking and Unlocking Channels 34 Blocking and Unblocking Content by Rating 34 Changing the Parental Control Passcode 35 Resetting the Content Locks...35 Changing the On-Screen Menu Language 36 Setting the Time Zone...36 Using Picture-In-Picture (PIP) / Picture-Outside-Picture (POP 37 Choosing Inputs for the Main and Secondary Windows 37 Using the Network Connection Menu 38 Connecting to a Wireless Network 38 Changing the Advanced Network Settings...

XVT3D424SV User Manual
Page 17
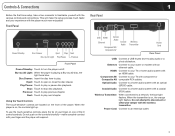
... PC Video Connect RGB cable from computer. Component Connect component video/audio devices. Audio Out (L/R) Connect RCA audio device. DTV/TV Connect coaxial cable for external antenna or cable TV. 5 Component 2 Ethernet Controls and Connections Composite AV RGB PC Audio Audio Out (Optical) HDMI (1,2,3,4) RGB PC Video DTV/TV Audio Out (L/R) Rear Panel Detail Ethernet Connect an ethernet cable to audio device (VIZIO sound bar, home theater system). HDMI (1,2,3,4) Connect external devices (Blu-Ray, DVD, cable TV box, game console). Audio Out (Optical) Connect to access a network or...
... PC Video Connect RGB cable from computer. Component Connect component video/audio devices. Audio Out (L/R) Connect RCA audio device. DTV/TV Connect coaxial cable for external antenna or cable TV. 5 Component 2 Ethernet Controls and Connections Composite AV RGB PC Audio Audio Out (Optical) HDMI (1,2,3,4) RGB PC Video DTV/TV Audio Out (L/R) Rear Panel Detail Ethernet Connect an ethernet cable to audio device (VIZIO sound bar, home theater system). HDMI (1,2,3,4) Connect external devices (Blu-Ray, DVD, cable TV box, game console). Audio Out (Optical) Connect to access a network or...
XVT3D424SV User Manual
Page 40
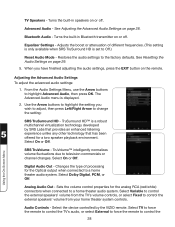
.... Digital Audio Out - Select Variable to control the external speakers' volume from the TV's volume controls, or select Fixed to television commercials or channel changes. From the Audio Settings Menu, use the Arrow buttons to Off.) Reset Audio Mode - Using the On-Screen Menu SRS TruVolume - Analog Audio Out - Adjusts the boost or attenuation of processing for the Optical output when connected to a home theater audio system. See Resetting the Audio Settings on or off . Adjusting the Advanced Audio Settings To adjust the advanced audio settings: 1. Changes the type...
.... Digital Audio Out - Select Variable to control the external speakers' volume from the TV's volume controls, or select Fixed to television commercials or channel changes. From the Audio Settings Menu, use the Arrow buttons to Off.) Reset Audio Mode - Using the On-Screen Menu SRS TruVolume - Analog Audio Out - Adjusts the boost or attenuation of processing for the Optical output when connected to a home theater audio system. See Resetting the Audio Settings on or off . Adjusting the Advanced Audio Settings To adjust the advanced audio settings: 1. Changes the type...
XVT3D424SV User Manual
Page 41
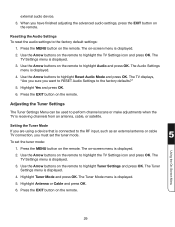
... input, such as an external antenna or cable TV connection, you want to RESET Audio Settings to perform channel scans or make adjustments when the TV is displayed. 3. The Tuner Settings menu is displayed. 5. Press the EXIT button on the remote. external audio device. 3. The TV Settings menu is displayed. 4. The Audio Settings menu is displayed. 3. Adjusting the Tuner Settings The Tuner Settings Menu can be used to the factory defaults?" 5. Highlight Antenna or Cable and press OK. 6. Use the Arrow buttons to the factory default settings: 1. The TV Settings menu is receiving...
... input, such as an external antenna or cable TV connection, you want to RESET Audio Settings to perform channel scans or make adjustments when the TV is displayed. 3. The Tuner Settings menu is displayed. 5. Press the EXIT button on the remote. external audio device. 3. The TV Settings menu is displayed. 4. The Audio Settings menu is displayed. 3. Adjusting the Tuner Settings The Tuner Settings Menu can be used to the factory defaults?" 5. Highlight Antenna or Cable and press OK. 6. Use the Arrow buttons to the factory default settings: 1. The TV Settings menu is receiving...

XVT3D424SV User Manual
Page 43
... the Tuner Settings menu, highlight Analog MTS and press OK. If you wish to -air and cable channels broadcast programs in the language you select. 5 To use the parental controls. From the Tuner Settings menu, highlight Skip Channel. The Skip Channel menu is being broadcast in more than one language. The MTS feature only works when the program being viewed, use the Analog MTS feature: 1. Press OK. 3. Changing the Audio Language Some digital free-to...
... the Tuner Settings menu, highlight Analog MTS and press OK. If you wish to -air and cable channels broadcast programs in the language you select. 5 To use the parental controls. From the Tuner Settings menu, highlight Skip Channel. The Skip Channel menu is being broadcast in more than one language. The MTS feature only works when the program being viewed, use the Analog MTS feature: 1. Press OK. 3. Changing the Audio Language Some digital free-to...

XVT3D424SV User Manual
Page 49
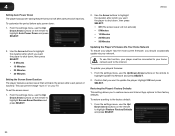
The PIP Controls menu is displayed. 4. If PIP is set to adjust each of the PIP settings: Position - Choosing Inputs for which inputs can be displayed using PIP, the main input is displayed on -screen menu is displayed in the Parental Controls menu is the PIP Mode selected, use the Arrow buttons to Off. See Enabling or Disabling Program Ratings on the remote. Select Top Right, Bottom Right, Top Left, or Top Right. Select Small, Medium, or Large. Audio - Press the...
The PIP Controls menu is displayed. 4. If PIP is set to adjust each of the PIP settings: Position - Choosing Inputs for which inputs can be displayed using PIP, the main input is displayed on -screen menu is displayed in the Parental Controls menu is the PIP Mode selected, use the Arrow buttons to Off. See Enabling or Disabling Program Ratings on the remote. Select Top Right, Bottom Right, Top Left, or Top Right. Select Small, Medium, or Large. Audio - Press the...
XVT3D424SV User Manual
Page 53
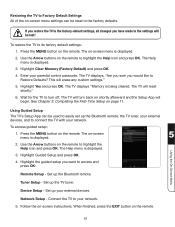
...-Time Setup on the remote. 41 The on-screen menu is displayed. 2. Network Setup - Follow the on the remote. The on-screen menu is displayed. 5 2. The Help menu is displayed. 3. Highlight the guided setup you would like to Restore Defaults? To access guided setup: 1. Set up the TV tuner. Connect the TV to highlight the Help icon and press OK. Device Setup - To restore the TV to highlight the Help icon and press OK. Press the MENU button on -screen instructions...
...-Time Setup on the remote. 41 The on-screen menu is displayed. 2. Network Setup - Follow the on the remote. The on-screen menu is displayed. 5 2. The Help menu is displayed. 3. Highlight the guided setup you would like to Restore Defaults? To access guided setup: 1. Set up the TV tuner. Connect the TV to highlight the Help icon and press OK. Device Setup - To restore the TV to highlight the Help icon and press OK. Press the MENU button on -screen instructions...
XVT3D424SV User Manual
Page 58
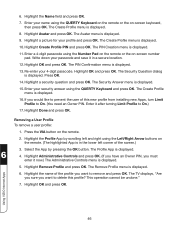
... must enter it after turning Limit Profile to On. (You need an Owner PIN. Highlight OK and press OK. Enter your name using the Number Pad on the remote or the on the remote. 2. Highlight Create Profile PIN and press OK. Highlight the Profile App by pressing the OK button. Using VIZIO Internet Apps 46 The Avatar menu is displayed. 11. Highlight OK...
... must enter it after turning Limit Profile to On. (You need an Owner PIN. Highlight OK and press OK. Enter your name using the Number Pad on the remote or the on the remote. 2. Highlight Create Profile PIN and press OK. Highlight the Profile App by pressing the OK button. Using VIZIO Internet Apps 46 The Avatar menu is displayed. 11. Highlight OK...
XVT3D424SV User Manual
Page 68
... God, any repairs attempted by anyone other than by this warranty is within the warranty period, VIZIO will provide instructions for example: cosmetic damage, normal wear and tear, improper operation, improper voltage supply or power surges, signal issues, damages from 6:00AM to 9:00PM Monday through Friday and 8:00AM to the VIZIO service center. VIZIO Technical Support will either the original carton box and shipping material...
... God, any repairs attempted by anyone other than by this warranty is within the warranty period, VIZIO will provide instructions for example: cosmetic damage, normal wear and tear, improper operation, improper voltage supply or power surges, signal issues, damages from 6:00AM to 9:00PM Monday through Friday and 8:00AM to the VIZIO service center. VIZIO Technical Support will either the original carton box and shipping material...
XVT3D424SV User Manual
Page 71
... Light Sensor 25 Audio Language 31 Audio Settings 27 Auto Adjust 27 Auto Channel Scan 30 B Backlight 24 Blocking and Unblocking Content 34 Bluetooth Device 39 Brightness 24 C Channel Locks 34 Choosing the Correct Connection 15 Closed Captioning 21 Color 24 Color Enhancement 25 Color Temperature 26 Connecting Your Devices 14, 16 Contrast 24 Custom picture mode 24 D Digital Episode Guide 42 F Factory Default Settings 41 Film Mode 25 Fine Tune 27 First-Time Setup 11 Front Panel 4 G Game Mode 33 Guided Setup 41 H Help Menu...
... Light Sensor 25 Audio Language 31 Audio Settings 27 Auto Adjust 27 Auto Channel Scan 30 B Backlight 24 Blocking and Unblocking Content 34 Bluetooth Device 39 Brightness 24 C Channel Locks 34 Choosing the Correct Connection 15 Closed Captioning 21 Color 24 Color Enhancement 25 Color Temperature 26 Connecting Your Devices 14, 16 Contrast 24 Custom picture mode 24 D Digital Episode Guide 42 F Factory Default Settings 41 Film Mode 25 Fine Tune 27 First-Time Setup 11 Front Panel 4 G Game Mode 33 Guided Setup 41 H Help Menu...
VBR334 Quick Start Guide
Page 13
Replacement parts and Products may result in unnecessary shipping charges billed to you. Type of Service Defective Products must utilize either repair or replace the Product at the number below. VIZIO Technical Support will cover return shipping to the VIZIO service center. This warranty does not cover, for example: cosmetic damage, normal wear and tear, improper operation, improper voltage supply or power surges, signal issues, damages from shipping...
Replacement parts and Products may result in unnecessary shipping charges billed to you. Type of Service Defective Products must utilize either repair or replace the Product at the number below. VIZIO Technical Support will cover return shipping to the VIZIO service center. This warranty does not cover, for example: cosmetic damage, normal wear and tear, improper operation, improper voltage supply or power surges, signal issues, damages from shipping...
VBR334 User Manual
Page 5
... the Parental Controls 28 Setting the Parental Restriction Level 28 Changing the Parental Code 29 Changing the System Settings 29 Activating or Deactivating Disc Autoplay 29 Setting Auto Power Down 30 Setting the Screen Saver Duration 30 Updating the Player's Firmware Via Your Home Network 30 Restoring the Player's Factory Defaults 30 Adjusting the Network Settings 31 Adjusting the Wired Settings 31 5 Table of Contents Controls & Connections 7 Front Panel 7 Using the Touch Controls 7 Rear Panel 7 Remote Control 8 Inserting or Replacing the Batteries 9 Installing the...
... the Parental Controls 28 Setting the Parental Restriction Level 28 Changing the Parental Code 29 Changing the System Settings 29 Activating or Deactivating Disc Autoplay 29 Setting Auto Power Down 30 Setting the Screen Saver Duration 30 Updating the Player's Firmware Via Your Home Network 30 Restoring the Player's Factory Defaults 30 Adjusting the Network Settings 31 Adjusting the Wired Settings 31 5 Table of Contents Controls & Connections 7 Front Panel 7 Using the Touch Controls 7 Rear Panel 7 Remote Control 8 Inserting or Replacing the Batteries 9 Installing the...
VBR334 User Manual
Page 7
... faster and your router or modem with a coaxial (RCA) cable. Using the Touch Controls The touch-sensitive controls are located on , the orange light flashes. Disc Drawer: Insert the disc here to stop disc playback. USB HDMI Ethernet Optical Audio Coaxial Audio Component AV / Composite AV Wireless Transmitter Power Cord Rear Panel USB: Connect a USB thumb drive to a network, the blue light flashes. Stop: Touch to play or pause disc playback. When the transmitter is...
... faster and your router or modem with a coaxial (RCA) cable. Using the Touch Controls The touch-sensitive controls are located on , the orange light flashes. Disc Drawer: Insert the disc here to stop disc playback. USB HDMI Ethernet Optical Audio Coaxial Audio Component AV / Composite AV Wireless Transmitter Power Cord Rear Panel USB: Connect a USB thumb drive to a network, the blue light flashes. Stop: Touch to play or pause disc playback. When the transmitter is...
VBR334 User Manual
Page 13
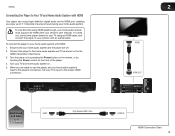
... Home Audio System with HDMI Your player can output high-definition digital audio via the HDMI port, enabling you are off. 2. To view 3D while using HDMI passthrough, your home audio receiver must support 3D HDMI (See your TV's input to the proper HDMI connection. 2 HDMI HDMI OUT Best Sound HDMI and Video Up to the player's connection. Ensure both your home audio system and the player are ready to use the player, set your home audio system's input to 7.1 Channels High Speed HDMI Cable HDMI IN HDMI Connection...
... Home Audio System with HDMI Your player can output high-definition digital audio via the HDMI port, enabling you are off. 2. To view 3D while using HDMI passthrough, your home audio receiver must support 3D HDMI (See your TV's input to the proper HDMI connection. 2 HDMI HDMI OUT Best Sound HDMI and Video Up to the player's connection. Ensure both your home audio system and the player are ready to use the player, set your home audio system's input to 7.1 Channels High Speed HDMI Cable HDMI IN HDMI Connection...
VBR334 User Manual
Page 30
... highlight Update Via Network and press SELECT. 2. Restoring the Player's Factory Defaults This setting allows you to restore menu and Internet App options to the factory default: 1. From the settings menu, use the Up/Down Arrow buttons on the remote to the internet. 4 Setting Auto Power Down The player has a power-saving feature that turns it off after a set the screen saver: 1. To set period of inactivity. To use this function, your player must be connected to highlight Auto Power...
... highlight Update Via Network and press SELECT. 2. Restoring the Player's Factory Defaults This setting allows you to restore menu and Internet App options to the factory default: 1. From the settings menu, use the Up/Down Arrow buttons on the remote to the internet. 4 Setting Auto Power Down The player has a power-saving feature that turns it off after a set the screen saver: 1. To set period of inactivity. To use this function, your player must be connected to highlight Auto Power...
VBR334 User Manual
Page 40
... experiencing a problem when using an HDMI cable for the best picture quality. • Connect the Player to an HDTV capable of displaying 720p or 1080p for the best picture quality. Wait 10 seconds, then turn them back on. • See Setting Up Your Network Connection on the player. • Try plugging the power cord into a different electrical outlet. Nothing happens when I press buttons on page 27. See Setting the Parental Controls on the remote. •...
... experiencing a problem when using an HDMI cable for the best picture quality. • Connect the Player to an HDTV capable of displaying 720p or 1080p for the best picture quality. Wait 10 seconds, then turn them back on. • See Setting Up Your Network Connection on the player. • Try plugging the power cord into a different electrical outlet. Nothing happens when I press buttons on page 27. See Setting the Parental Controls on the remote. •...
VBR334 User Manual
Page 42
... NO EXPRESS WARRANTIES OTHER THAN THOSE LISTED OR DESCRIBED ABOVE. VIZIO provides a warranty to the service center, but VIZIO will either the original carton box and shipping material or packaging that you configured as new in materials and workmanship for example: cosmetic damage, normal wear and tear, improper operation, improper voltage supply or power surges, signal issues, damages from warranty service or replacement, whichever is...
... NO EXPRESS WARRANTIES OTHER THAN THOSE LISTED OR DESCRIBED ABOVE. VIZIO provides a warranty to the service center, but VIZIO will either the original carton box and shipping material or packaging that you configured as new in materials and workmanship for example: cosmetic damage, normal wear and tear, improper operation, improper voltage supply or power surges, signal issues, damages from warranty service or replacement, whichever is...
VSG102 Quick Start Guide
Page 9
... instructions for parts or labor during the warranty period. Replacement parts and Products are not covered. This warranty does not cover, for transportation costs to the service center, but VIZIO will either the original carton box and shipping material or packaging that a Product is not responsible for example: cosmetic damage, normal wear and tear, improper operation, improper voltage supply or power surges, signal issues...
... instructions for parts or labor during the warranty period. Replacement parts and Products are not covered. This warranty does not cover, for transportation costs to the service center, but VIZIO will either the original carton box and shipping material or packaging that a Product is not responsible for example: cosmetic damage, normal wear and tear, improper operation, improper voltage supply or power surges, signal issues...


