VSB200 User Manual
Page 2
... damage. • A distance of the grounded plug. • When connected to ground the HD Sound Bar safely. • Do not defeat the safety purpose of at least 3 feet should be maintained between the HD Sound Bar and any heat source, such as a radiator, heater, oven, amplifier ...The lightning flash with a third grounding pin). VIZIO VSB200 User Manual Important Safety Instructions The HD Sound Bar is provided. • Never push any object into the slots and openings on the HD Sound Bar enclosure. For more information, contact your HD Sound Bar. This plug will fit only into a grounded...
... damage. • A distance of the grounded plug. • When connected to ground the HD Sound Bar safely. • Do not defeat the safety purpose of at least 3 feet should be maintained between the HD Sound Bar and any heat source, such as a radiator, heater, oven, amplifier ...The lightning flash with a third grounding pin). VIZIO VSB200 User Manual Important Safety Instructions The HD Sound Bar is provided. • Never push any object into the slots and openings on the HD Sound Bar enclosure. For more information, contact your HD Sound Bar. This plug will fit only into a grounded...
VSB200 User Manual
Page 5
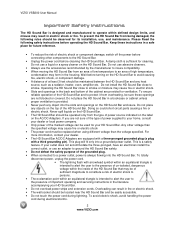
VIZIO VSB200 User Manual Table of Contents Important Safety Instructions ...2 Chapter 1 Installation...6 Chapter 2 Basic Controls and Connections ...7 Rear Panel Connections...7 Top Panel Buttons ...8 HD Sound Bar Remote Control ...9 Programming a Universal Remote to operate the HD Sound Bar 9 Installing the Battery in the Remote Control ...10 Remote Control Range ...10 VIZIO Remote...
VIZIO VSB200 User Manual Table of Contents Important Safety Instructions ...2 Chapter 1 Installation...6 Chapter 2 Basic Controls and Connections ...7 Rear Panel Connections...7 Top Panel Buttons ...8 HD Sound Bar Remote Control ...9 Programming a Universal Remote to operate the HD Sound Bar 9 Installing the Battery in the Remote Control ...10 Remote Control Range ...10 VIZIO Remote...

VSB200 User Manual
Page 6
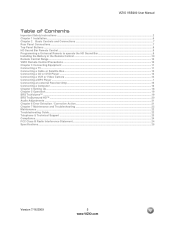
...the wall. . 6 www.VIZIO.com Use M5 (Metric) or #10 (English) screws for keyhole to mount. Figure 1 Figure 2 NOTE: It is recommended that Power and Audio cables be connected to the HD Sound Bar before placing it is to the HD Sound Bar in the configuration shown in... Fig. 1, and re-attach to be kept on the stand base or mounted on the wall for removing the stand. The two feet provided with the HD Sound Bar can either be wall mounted. VIZIO VSB200...
...the wall. . 6 www.VIZIO.com Use M5 (Metric) or #10 (English) screws for keyhole to mount. Figure 1 Figure 2 NOTE: It is recommended that Power and Audio cables be connected to the HD Sound Bar before placing it is to the HD Sound Bar in the configuration shown in... Fig. 1, and re-attach to be kept on the stand base or mounted on the wall for removing the stand. The two feet provided with the HD Sound Bar can either be wall mounted. VIZIO VSB200...
VSB200 User Manual
Page 7
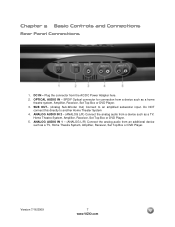
... analog audio from the AC/DC Power Adapter here. 2. Chapter 2 Basic Controls and Connections Rear Panel Connections 1. SUB OUT- (Analog Sub-Woofer Out) Connect to another Home Theater System 4. Version 7/16/2009 7 www.VIZIO.com DC IN - SPDIF Optical connector for connection from an additional device such as a home theatre system, Amplifier, Receiver, Set Top...
... analog audio from the AC/DC Power Adapter here. 2. Chapter 2 Basic Controls and Connections Rear Panel Connections 1. SUB OUT- (Analog Sub-Woofer Out) Connect to another Home Theater System 4. Version 7/16/2009 7 www.VIZIO.com DC IN - SPDIF Optical connector for connection from an additional device such as a home theatre system, Amplifier, Receiver, Set Top...

VSB200 User Manual
Page 11
... audio output settings of the Optical (SPDIF) cable to PCM. Connect the other end of the product. *SPDIF Cable available separately. Version 7/16/2009 11 www.VIZIO.com Refer to the HD Sound Bar and TV. 5. Turn on the TV. 3. Connect one of the audio cable (white and red connectors) to the... HD Sound Bar and TV. 2. Turn off the power to one end of the analog ...
... audio output settings of the Optical (SPDIF) cable to PCM. Connect the other end of the product. *SPDIF Cable available separately. Version 7/16/2009 11 www.VIZIO.com Refer to the HD Sound Bar and TV. 5. Turn on the TV. 3. Connect one of the audio cable (white and red connectors) to the... HD Sound Bar and TV. 2. Turn off the power to one end of the analog ...
VSB200 User Manual
Page 12
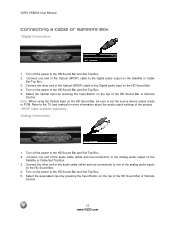
.... 2. Note: When using the Optical Input on the HD Sound Bar, be sure to set the source device output mode to the analog audio output on the HD Sound Bar. 4. Connect one of the HD Sound Bar or Remote Control. 12 www.VIZIO.com Turn on the power to the Digital audio input on ... Box. 3. Connect the other end of the product. *SPDIF Cable available separately. Refer to one end of the HD Sound Bar or Remote Control. Select the Optical input by pressing the Input Button on the top of the audio cable (white and red connectors) to PCM. VIZIO VSB200 User Manual Connecting a Cable or...
.... 2. Note: When using the Optical Input on the HD Sound Bar, be sure to set the source device output mode to the analog audio output on the HD Sound Bar. 4. Connect one of the HD Sound Bar or Remote Control. 12 www.VIZIO.com Turn on the power to the Digital audio input on ... Box. 3. Connect the other end of the product. *SPDIF Cable available separately. Refer to one end of the HD Sound Bar or Remote Control. Select the Optical input by pressing the Input Button on the top of the audio cable (white and red connectors) to PCM. VIZIO VSB200 User Manual Connecting a Cable or...

VSB200 User Manual
Page 13
...the power to the HD Sound Bar and CD or DVD Player. 5. Connect one of the analog audio inputs on the HD Sound Bar. 4. Version 7/16/2009 13 www.VIZIO.com Refer to the HD Sound Bar and CD or DVD Player. 2. Analog Connection: 1. Connecting a CD or DVD Player *Digital Connection: 1. Connect the other end of ...settings of the Optical (SPDIF) cable to the Digital audio input on the power to the HD Sound Bar and CD or DVD Player. 2. Turn on the HD Sound Bar. 4. Connect one end of the product. *SPDIF Cable available separately. Select the Optical input by pressing the Input...
...the power to the HD Sound Bar and CD or DVD Player. 5. Connect one of the analog audio inputs on the HD Sound Bar. 4. Version 7/16/2009 13 www.VIZIO.com Refer to the HD Sound Bar and CD or DVD Player. 2. Analog Connection: 1. Connecting a CD or DVD Player *Digital Connection: 1. Connect the other end of ...settings of the Optical (SPDIF) cable to the Digital audio input on the power to the HD Sound Bar and CD or DVD Player. 2. Turn on the HD Sound Bar. 4. Connect one end of the product. *SPDIF Cable available separately. Select the Optical input by pressing the Input...

VSB200 User Manual
Page 14
VIZIO VSB200 User Manual Connecting a MP3 Player 1. CAUTION: Do not connect the MP3 Player headphone output directly to the HD Sound Bar and VCR or Video Camera. 10. Connect the other end of the audio cable (white and red connectors) to one of the product. 14 www.VIZIO.com Turn on the power to the HD Sound Bar.... Turn on the power to the HD Sound Bar. A docking unit...
VIZIO VSB200 User Manual Connecting a MP3 Player 1. CAUTION: Do not connect the MP3 Player headphone output directly to the HD Sound Bar and VCR or Video Camera. 10. Connect the other end of the audio cable (white and red connectors) to one of the product. 14 www.VIZIO.com Turn on the power to the HD Sound Bar.... Turn on the power to the HD Sound Bar. A docking unit...
VSB200 User Manual
Page 15
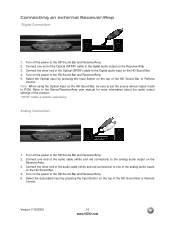
Note: When using the Optical Input on the power to PCM. Analog Connection: 1. Version 7/16/2009 15 www.VIZIO.com Turn on the HD Sound Bar, be sure to set the source device output mode to the HD Sound Bar and Receiver/Amp. 5. Refer to the HD Sound Bar and Receiver/Amp. 2. Turn off the power to the Digital...
Note: When using the Optical Input on the power to PCM. Analog Connection: 1. Version 7/16/2009 15 www.VIZIO.com Turn on the HD Sound Bar, be sure to set the source device output mode to the HD Sound Bar and Receiver/Amp. 5. Refer to the HD Sound Bar and Receiver/Amp. 2. Turn off the power to the Digital...

VSB200 User Manual
Page 16
... uses a 1/8" (3.5mm) Stereo Mini-Jack port. Connect one of the analog audio inputs on the HD Sound Bar, be required. 16 www.VIZIO.com Note: When using the Optical Input on the HD Sound Bar. 4. Connect the other end of the Optical (SPDIF) cable to PCM. VIZIO VSB200 User Manual Connecting a Computer *Digital Connection: If your Computer has a SPDIF (optical) digital...
... uses a 1/8" (3.5mm) Stereo Mini-Jack port. Connect one of the analog audio inputs on the HD Sound Bar, be required. 16 www.VIZIO.com Note: When using the Optical Input on the HD Sound Bar. 4. Connect the other end of the Optical (SPDIF) cable to PCM. VIZIO VSB200 User Manual Connecting a Computer *Digital Connection: If your Computer has a SPDIF (optical) digital...

VSB200 User Manual
Page 17
.... 3. Select the associated input by pressing the Input Button on the Sound Bar. 4. Connect the other end of the HD Sound Bar or Remote Control. *Cable available separately Version 7/16/2009 17 www.VIZIO.com Turn off the power to the HD Sound Bar, subwoofer and audio source. 6. Connecting a Subwoofer 1. Turn on the subwoofer. 5. This section assumes that an...
.... 3. Select the associated input by pressing the Input Button on the Sound Bar. 4. Connect the other end of the HD Sound Bar or Remote Control. *Cable available separately Version 7/16/2009 17 www.VIZIO.com Turn off the power to the HD Sound Bar, subwoofer and audio source. 6. Connecting a Subwoofer 1. Turn on the subwoofer. 5. This section assumes that an...
VSB200 User Manual
Page 18
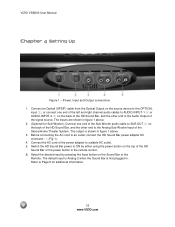
.... The default input is Analog 2 when the Sound Bar is shown in figure 1 above . 2. (Optional for additional information 18 www.VIZIO.com Connect an Optical (SPDIF) cable from the Optical Output on the source device to the OPTICAL input (2), or connect one end of the Sub-Woofer audio cable to...8 for Sub-Woofer): Connect one end of the left and right channel audio cables to AUDIO-INPUT-1 (5) or AUDIO-INPUT-2 (4) on the top of the HD Sound Bar, and the other end to ON by pressing the Input button on the Sound Bar or the Remote. VIZIO VSB200 User Manual Chapter 4 Setting...
.... The default input is Analog 2 when the Sound Bar is shown in figure 1 above . 2. (Optional for additional information 18 www.VIZIO.com Connect an Optical (SPDIF) cable from the Optical Output on the source device to the OPTICAL input (2), or connect one end of the Sub-Woofer audio cable to...8 for Sub-Woofer): Connect one end of the left and right channel audio cables to AUDIO-INPUT-1 (5) or AUDIO-INPUT-2 (4) on the top of the HD Sound Bar, and the other end to ON by pressing the Input button on the Sound Bar or the Remote. VIZIO VSB200 User Manual Chapter 4 Setting...
VSB200 User Manual
Page 19
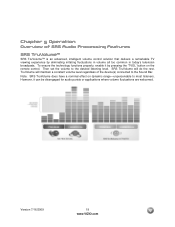
Chapter 5 Operation Overview of the device(s) connected to the Sound Bar. Then set the volume to most listeners. Note: SRS TruVolume does have a nominal effect on the remote control. To ensure the technology functions properly, enable ...it can be disengaged for audio purists or applications where volume fluctuations are welcomed. TruVolume will do the rest. Version 7/16/2009 19 www.VIZIO...
Chapter 5 Operation Overview of the device(s) connected to the Sound Bar. Then set the volume to most listeners. Note: SRS TruVolume does have a nominal effect on the remote control. To ensure the technology functions properly, enable ...it can be disengaged for audio purists or applications where volume fluctuations are welcomed. TruVolume will do the rest. Version 7/16/2009 19 www.VIZIO...
VSB200 User Manual
Page 20
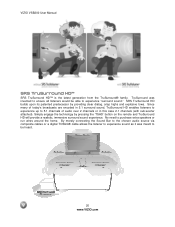
VIZIO VSB200 User Manual SRS TruSurround HD™ SRS TruSurround HD™ is the latest generation from the TruSurround® family. Since many of today's broadcasts are encoded in this case 2.1 channels (with sub-woofer attached). By merely connecting the Sound Bar to the chosen audio source via composite cables or a digital TOSlink® cable allows...
VIZIO VSB200 User Manual SRS TruSurround HD™ SRS TruSurround HD™ is the latest generation from the TruSurround® family. Since many of today's broadcasts are encoded in this case 2.1 channels (with sub-woofer attached). By merely connecting the Sound Bar to the chosen audio source via composite cables or a digital TOSlink® cable allows...

VSB200 User Manual
Page 22
...the display. If the HD Sound Bar still fails to be connected to clean the Sound Bar. If Error B, an unsupported sample rate is detected on the AC/DC adapter is too hot. Make sure that is glowing green. Cleaning the Housing and Remote Control 1. No sound. VIZIO VSB200 User Manual - Chapter 7 ...of the audio source device to perform as a Home Theater speaker output or MP3 Player headphone jack. The Sound Bar is not detected or indicated by calling 1-877-MYVIZIO (1-877-698-4946) or e-mail us at techsupport@vizio.com Problem No power. Remember to check the peripherals to verify...
...the display. If the HD Sound Bar still fails to be connected to clean the Sound Bar. If Error B, an unsupported sample rate is detected on the AC/DC adapter is too hot. Make sure that is glowing green. Cleaning the Housing and Remote Control 1. No sound. VIZIO VSB200 User Manual - Chapter 7 ...of the audio source device to perform as a Home Theater speaker output or MP3 Player headphone jack. The Sound Bar is not detected or indicated by calling 1-877-MYVIZIO (1-877-698-4946) or e-mail us at techsupport@vizio.com Problem No power. Remember to check the peripherals to verify...
VSB200 User Manual
Page 23
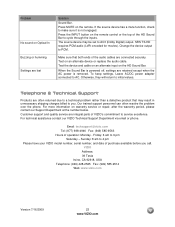
... on an alternate input on the remote control or the top of the HD Sound Bar to AC3 (Dolby Digital) output. Email: techsupport@vizio.com Tel: (877) 698-4946 Fax: (949) 585-9563 Hours of VIZIO's commitment to initial values. If the source device has a mute function, check... except when the AC power is powered off, settings are connected securely. Otherwise, they will return to service excellence. To keep settings, Leave AC/DC power adapter connected to 9 pm Saturday - For technical assistance contact our VIZIO Technical Support Department via email or phone. Sunday: 8 am...
... on an alternate input on the remote control or the top of the HD Sound Bar to AC3 (Dolby Digital) output. Email: techsupport@vizio.com Tel: (877) 698-4946 Fax: (949) 585-9563 Hours of VIZIO's commitment to initial values. If the source device has a mute function, check... except when the AC power is powered off, settings are connected securely. Otherwise, they will return to service excellence. To keep settings, Leave AC/DC power adapter connected to 9 pm Saturday - For technical assistance contact our VIZIO Technical Support Department via email or phone. Sunday: 8 am...
VSB200 User Manual
Page 24
... measures: 1. Consult the dealer or an experienced radio/TV technician for compliance could void the user's authority to operate the equipment. Connect the equipment into an outlet on , the user is connected. 4. VIZIO VSB200 User Manual Compliance Caution: Always use the AC cords listed below for a Class B digital device, pursuant to Part 15 of... can radiate radio frequency energy, and if not installed and used in a particular installation. It is no guarantee that to correct such interference. 24 www.VIZIO.com
... measures: 1. Consult the dealer or an experienced radio/TV technician for compliance could void the user's authority to operate the equipment. Connect the equipment into an outlet on , the user is connected. 4. VIZIO VSB200 User Manual Compliance Caution: Always use the AC cords listed below for a Class B digital device, pursuant to Part 15 of... can radiate radio frequency energy, and if not installed and used in a particular installation. It is no guarantee that to correct such interference. 24 www.VIZIO.com
VSB200 User Manual
Page 29
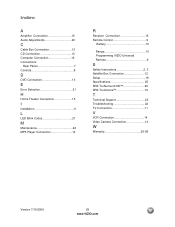
... Adjustments 20 C Cable Box Connection 12 CD Connection 13 Computer Connection 16 Connections Rear Panel 7 Controls 8 D DVD Connection 13 E Error Detection 21 H Home Theater Connection 15 I Installation 6 L LED Blink Codes 21 M Maintenance 22 MP3 Player Connection 14 R Receiver Connection 15 Remote Control 9 Battery 10 Range 10 Programming VIZIO Universal Remote 9 S Safety Instructions 2, 3 Satellite Box Connection 12 Setup 18 Specifications 25...
... Adjustments 20 C Cable Box Connection 12 CD Connection 13 Computer Connection 16 Connections Rear Panel 7 Controls 8 D DVD Connection 13 E Error Detection 21 H Home Theater Connection 15 I Installation 6 L LED Blink Codes 21 M Maintenance 22 MP3 Player Connection 14 R Receiver Connection 15 Remote Control 9 Battery 10 Range 10 Programming VIZIO Universal Remote 9 S Safety Instructions 2, 3 Satellite Box Connection 12 Setup 18 Specifications 25...


