User Manual
Page 3
...not locate the antenna near overhead light or power circuits, or where it easier for digital-to earth ground in the building installation. Your VIZIO TV comes with an antenna because of the Display changes substantially. • Operating environment. o The Display is electrically grounded to grounding electrodes, ... Liquids, sprays or any of the coaxial cable is intended to be connected to the TV, make sure that the antenna or cable system is exposed to receive this manufacturer at 877 MY VIZIO (877-698-4946), and from the wall outlet and disconnect the antenna or cable system....
...not locate the antenna near overhead light or power circuits, or where it easier for digital-to earth ground in the building installation. Your VIZIO TV comes with an antenna because of the Display changes substantially. • Operating environment. o The Display is electrically grounded to grounding electrodes, ... Liquids, sprays or any of the coaxial cable is intended to be connected to the TV, make sure that the antenna or cable system is exposed to receive this manufacturer at 877 MY VIZIO (877-698-4946), and from the wall outlet and disconnect the antenna or cable system....
User Manual
Page 4
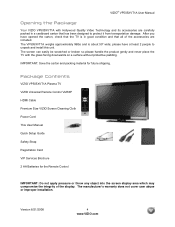
... manufacturer's warranty does not cover user abuse or improper installation. please have opened the carton, check that the TV is about 50" wide; Package Contents VIZIO VP505XVT1A Plasma TV VIZIO Universal Remote Control VUR8P HDMI Cable Premium Size VIZIO Screen Cleaning Cloth Power Cord This User Manual Quick Setup Guide Safety Strap Registration Card VIP Services Brochure...
... manufacturer's warranty does not cover user abuse or improper installation. please have opened the carton, check that the TV is about 50" wide; Package Contents VIZIO VP505XVT1A Plasma TV VIZIO Universal Remote Control VUR8P HDMI Cable Premium Size VIZIO Screen Cleaning Cloth Power Cord This User Manual Quick Setup Guide Safety Strap Registration Card VIP Services Brochure...
User Manual
Page 5
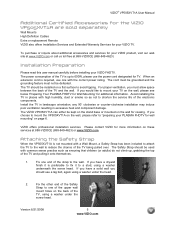
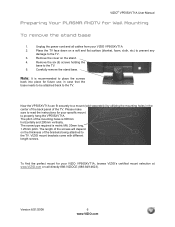
... Strap has been included to attach the TV to the wall to avoid tipping. The VIZIO VP505XVT1A can either be used with high humidity, dust or smoke so as ensuring that children (or adults) do not climb up to mount your PLASMA FHDTV for wall mounting" on the wall... life of the TV is preferable to "preparing your TV on these services at 888-VIZIOCE (888-849-4623) Installation Preparation Please read this user manual carefully before installing your VIZIO TV. Please contact VIZIO for more information on the wall, please see below 'Preparing Your PLASMA FHDTV for Wall Mounting...
... Strap has been included to attach the TV to the wall to avoid tipping. The VIZIO VP505XVT1A can either be used with high humidity, dust or smoke so as ensuring that children (or adults) do not climb up to mount your PLASMA FHDTV for wall mounting" on the wall... life of the TV is preferable to "preparing your TV on these services at 888-VIZIOCE (888-849-4623) Installation Preparation Please read this user manual carefully before installing your VIZIO TV. Please contact VIZIO for more information on the wall, please see below 'Preparing Your PLASMA FHDTV for Wall Mounting...
User Manual
Page 6
... and flat surface (blanket, foam, cloth, etc) to prevent any damage to the TV. 3. Please make sure to properly hang the VP505XVT1A. VIZIO® VP505XVT1A User Manual Preparing Your PLASMA FHDTV for your VIZIO VP505XVT1A, browse VIZIO's certified mount selection at www.VIZIO.com or call directly 888-VIZIOCE (888-849-4623). Unplug the power cord...
... and flat surface (blanket, foam, cloth, etc) to prevent any damage to the TV. 3. Please make sure to properly hang the VP505XVT1A. VIZIO® VP505XVT1A User Manual Preparing Your PLASMA FHDTV for your VIZIO VP505XVT1A, browse VIZIO's certified mount selection at www.VIZIO.com or call directly 888-VIZIOCE (888-849-4623). Unplug the power cord...
User Manual
Page 7
... 1.5 VIZIO Universal Remote Control ...12 1.5.1 Insertion of Batteries in the Remote Control 15 1.5.2 Remote Control Range ...15 1.5.3 VIZIO Universal... Television 32 3.1 Basic PLASMA FHDTV Start Up ...32 3.2 ATV/DTV Tuner Setup ...36 3.3 Watching a TV Program ...38 3.4 Adjusting... FHDTV 41 4.1 Using the On Screen Display (OSD) ...41 4.2 TV Inputs Picture Adjustment ...42 4.2.1 Picture Mode ...42 4.2.2 Brightness...42 4.2.3...45 4.2.8 Advanced Video Features ...45 4.2.9 Reset Picture Mode ...46 4.3 TV Input Display (Screen) Adjustments...47 4.3.1 Auto Adjust ...47 4.3.2 Wide Mode ...48 ...
... 1.5 VIZIO Universal Remote Control ...12 1.5.1 Insertion of Batteries in the Remote Control 15 1.5.2 Remote Control Range ...15 1.5.3 VIZIO Universal... Television 32 3.1 Basic PLASMA FHDTV Start Up ...32 3.2 ATV/DTV Tuner Setup ...36 3.3 Watching a TV Program ...38 3.4 Adjusting... FHDTV 41 4.1 Using the On Screen Display (OSD) ...41 4.2 TV Inputs Picture Adjustment ...42 4.2.1 Picture Mode ...42 4.2.2 Brightness...42 4.2.3...45 4.2.8 Advanced Video Features ...45 4.2.9 Reset Picture Mode ...46 4.3 TV Input Display (Screen) Adjustments...47 4.3.1 Auto Adjust ...47 4.3.2 Wide Mode ...48 ...
User Manual
Page 8
...Reset All Settings ...55 5.3 Parental Control ...56 5.3.1 DTV / TV Input Parental Control ...56 5.3.2 Parental Lock Enable...56 5.3.3 Digital TV Parental Control ...57 5.3.4 TV Rating...58 5.3.5 Movie Rating...58 5.3.6 Blocked Unrated Programming...59 ...5.3.7 Access Code Edit ...59 5.4 Understanding Viewing Features ...60 5.4.1 Viewing Modes ...60 Chapter 6 Picture-In-Picture (PIP) Mode 61 6.1 PIP Mode Adjustments...61 6.1.1 Adjusting Basic PIP Settings ...61 6.2 Programming the VIZIO...
...Reset All Settings ...55 5.3 Parental Control ...56 5.3.1 DTV / TV Input Parental Control ...56 5.3.2 Parental Lock Enable...56 5.3.3 Digital TV Parental Control ...57 5.3.4 TV Rating...58 5.3.5 Movie Rating...58 5.3.6 Blocked Unrated Programming...59 ...5.3.7 Access Code Edit ...59 5.4 Understanding Viewing Features ...60 5.4.1 Viewing Modes ...60 Chapter 6 Picture-In-Picture (PIP) Mode 61 6.1 PIP Mode Adjustments...61 6.1.1 Adjusting Basic PIP Settings ...61 6.2 Programming the VIZIO...
User Manual
Page 9
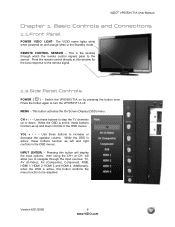
... to be adjusted. Pressing this button will allow you to navigate through which the remote control signals pass to step the TV channels up and down . Version 8/21/2008 9 www.VIZIO.com This is active, this window for the best response to turn the VP505XVT1A off. MENU - INPUT (ENTER) ...- Additionally, when the OSD is the window through the input sources: TV, AV (S-Video), AV (Composite), Component, RGB, HDMI 1, HDMI 2, HDMI 3 and ...
... to be adjusted. Pressing this button will allow you to navigate through which the remote control signals pass to step the TV channels up and down . Version 8/21/2008 9 www.VIZIO.com This is active, this window for the best response to turn the VP505XVT1A off. MENU - INPUT (ENTER) ...- Additionally, when the OSD is the window through the input sources: TV, AV (S-Video), AV (Composite), Component, RGB, HDMI 1, HDMI 2, HDMI 3 and ...
User Manual
Page 10
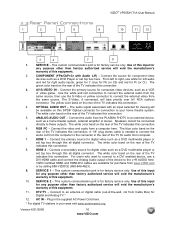
... an external device, such as a home theater system, external amplifier or stereo. SERVICE 1 - This custom communication port is for purchase from the PLASMA FHDTV to connect the external audio from the same source, then use white for left audio and red for right audio inputs, green for Y, blue...over AV RCA (yellow) connector. Use of this equipment. 2. Version 8/21/2008 10 www.VIZIO.com The white color band on the rear of the TV indicates this connection. 4. Connect the audio from www.VIZIO.com or by calling 888-VIZIOCE (888-849-4623). 9. The yellow color band on the rear...
... an external device, such as a home theater system, external amplifier or stereo. SERVICE 1 - This custom communication port is for purchase from the PLASMA FHDTV to connect the external audio from the same source, then use white for left audio and red for right audio inputs, green for Y, blue...over AV RCA (yellow) connector. Use of this equipment. 2. Version 8/21/2008 10 www.VIZIO.com The white color band on the rear of the TV indicates this connection. 4. Connect the audio from www.VIZIO.com or by calling 888-VIZIOCE (888-849-4623). 9. The yellow color band on the rear...

User Manual
Page 11
... such as a DVD multimedia player or set top box through this all digital connector. HDMI 4 - Version 8/21/2008 11 www.VIZIO.com Connect the third source for purchase from www.VIZIO.com or by calling 888VIZIOCE (888-849-4623). The white color band on the side of the... TV indicates this connection. 2. VIZIO® VP505XVT1A User Manual 1.4 Right-Side Panel Connection 1. The white color band on the side of the TV indicates this connection. 1 Certified HDMI and HDMI-DVI cables are available for digital...
... such as a DVD multimedia player or set top box through this all digital connector. HDMI 4 - Version 8/21/2008 11 www.VIZIO.com Connect the third source for purchase from www.VIZIO.com or by calling 888VIZIOCE (888-849-4623). The white color band on the side of the... TV indicates this connection. 2. VIZIO® VP505XVT1A User Manual 1.4 Right-Side Panel Connection 1. The white color band on the side of the TV indicates this connection. 1 Certified HDMI and HDMI-DVI cables are available for digital...

User Manual
Page 12
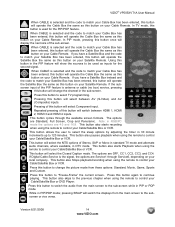
.... When selecting a digital channel directly use this button to TV. This button has been pre-programmed to select the codes to four different components. If the remote is not working with your VIZIO TV, press the TV button on the following pages. Remote LED - NOTE: This... is a programmable remote supporting up to operate the VIZIO FHDTV. VIZIO® VP505XVT1A User Manual 1.5 VIZIO Universal Remote Control The VIZIO Universal Remote Control is a comprehensive remote...
.... When selecting a digital channel directly use this button to TV. This button has been pre-programmed to select the codes to four different components. If the remote is not working with your VIZIO TV, press the TV button on the following pages. Remote LED - NOTE: This... is a programmable remote supporting up to operate the VIZIO FHDTV. VIZIO® VP505XVT1A User Manual 1.5 VIZIO Universal Remote Control The VIZIO Universal Remote Control is a comprehensive remote...
User Manual
Page 14
... versa. When CABLE is the signal, the options are Standard, Full Screen, Crop and Panoramic. Press this button on your Cable Remote. In TV mode, this button will operate the Satellite Box the same as this button to match your local company. Note: in PIP or POP mode....Movie, Game, Sports and Custom. While in 30 minute increments up to control your Cable/Satellite Box or VCR. Version 8/21/2008 14 www.VIZIO.com The options are 4:3 and 16:9. The options are Service1 through the available screen formats. This button allows the user to select the sleep options...
... versa. When CABLE is the signal, the options are Standard, Full Screen, Crop and Panoramic. Press this button on your Cable Remote. In TV mode, this button will operate the Satellite Box the same as this button to match your local company. Note: in PIP or POP mode....Movie, Game, Sports and Custom. While in 30 minute increments up to control your Cable/Satellite Box or VCR. Version 8/21/2008 14 www.VIZIO.com The options are 4:3 and 16:9. The options are Service1 through the available screen formats. This button allows the user to select the sleep options...

User Manual
Page 15
...When not using the remote control for Inserting the Batteries: Only use the specified AA batteries. If the TV responds erratically to the left and right, 20° up and down. 1.5.3 VIZIO Universal Remote Control Precautions The remote control should be kept dry and away from heat sources. Do not ...transmit the commands. Do not mix new and old batteries. If the batteries are low or exhausted, replace them into the remote control. VIZIO® VP505XVT1A User Manual 1.5.1 Insertion of Batteries in the Remote Control Insert two AA batteries into a fire. Version 8/21/2008 15 www...
...When not using the remote control for Inserting the Batteries: Only use the specified AA batteries. If the TV responds erratically to the left and right, 20° up and down. 1.5.3 VIZIO Universal Remote Control Precautions The remote control should be kept dry and away from heat sources. Do not ...transmit the commands. Do not mix new and old batteries. If the batteries are low or exhausted, replace them into the remote control. VIZIO® VP505XVT1A User Manual 1.5.1 Insertion of Batteries in the Remote Control Insert two AA batteries into a fire. Version 8/21/2008 15 www...
User Manual
Page 16
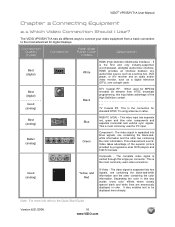
...DTV Coaxial RF. TV Coaxial RF. This is the connection for PC input. The complete video signal is the most commonly used video connection. Separating the color in color. VIZIO® VP505XVT1A User Manual Chapter 2 Connecting Equipment 2.1 Which Video Connection Should I Use? The VIZIO VP505XVT1A has six different.... The video signal is the first and only industry-supported, uncompressed, all-digital audio/video interface. When used for standard NTSC TV using antenna or cable. It also enables text to be displayed more info refer to the most commonly used for digital displays....
...DTV Coaxial RF. TV Coaxial RF. This is the connection for PC input. The complete video signal is the most commonly used video connection. Separating the color in color. VIZIO® VP505XVT1A User Manual Chapter 2 Connecting Equipment 2.1 Which Video Connection Should I Use? The VIZIO VP505XVT1A has six different.... The video signal is the first and only industry-supported, uncompressed, all-digital audio/video interface. When used for standard NTSC TV using antenna or cable. It also enables text to be displayed more info refer to the most commonly used for digital displays....
User Manual
Page 17
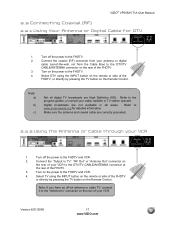
... using the INPUT button on the remote or side of the FHDTV, or directly by pressing the TV button on the rear of the FHDTV. 3. Version 8/21/2008 17 www.VIZIO.com Note: a) b) c) Not all areas. VIZIO® VP505XVT1A User Manual 2.2 Connecting Coaxial (RF) 2.2.1 Using Your Antenna or Digital Cable for detailed information...
... using the INPUT button on the remote or side of the FHDTV, or directly by pressing the TV button on the rear of the FHDTV. 3. Version 8/21/2008 17 www.VIZIO.com Note: a) b) c) Not all areas. VIZIO® VP505XVT1A User Manual 2.2 Connecting Coaxial (RF) 2.2.1 Using Your Antenna or Digital Cable for detailed information...

User Manual
Page 20
...TV) at the rear of the FHDTV. 6. Connect the Pr (red color) connector on your HDTV Set-Top Box to the corresponding Y (green color) connector in the Component group (green color area - Version 8/21/2008 20 www.VIZIO....com Turn off the power to the FHDTV and HDTV Set-Top Box. 7. row of connectors nearest to you when viewing from the rear of the TV) at the...the FHDTV. 5. Select Component using the INPUT button on your cable or satellite operator. VIZIO® VP505XVT1A User Manual 2.3.2 Using Component Video Connecting your HDTV Set-Top Box to ...
...TV) at the rear of the FHDTV. 6. Connect the Pr (red color) connector on your HDTV Set-Top Box to the corresponding Y (green color) connector in the Component group (green color area - Version 8/21/2008 20 www.VIZIO....com Turn off the power to the FHDTV and HDTV Set-Top Box. 7. row of connectors nearest to you when viewing from the rear of the TV) at the...the FHDTV. 5. Select Component using the INPUT button on your cable or satellite operator. VIZIO® VP505XVT1A User Manual 2.3.2 Using Component Video Connecting your HDTV Set-Top Box to ...
User Manual
Page 21
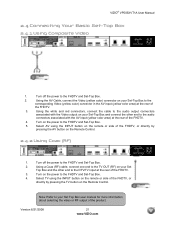
...yellow color area) at the rear of the FHDTV, or directly by pressing the TV button on your Set Top Box and the other end to the FHDTV and Set-Top Box. 5. Version 8/21/2008 21 www.VIZIO.com VIZIO® VP505XVT1A User Manual 2.4 Connecting Your Basic Set-Top Box 2.4.1 Using Composite ...Video 1. Turn off the power to the DTV/TV input at the rear of the FHDTV, or directly by pressing the AV button on...
...yellow color area) at the rear of the FHDTV, or directly by pressing the TV button on your Set Top Box and the other end to the FHDTV and Set-Top Box. 5. Version 8/21/2008 21 www.VIZIO.com VIZIO® VP505XVT1A User Manual 2.4 Connecting Your Basic Set-Top Box 2.4.1 Using Composite ...Video 1. Turn off the power to the DTV/TV input at the rear of the FHDTV, or directly by pressing the AV button on...

User Manual
Page 24
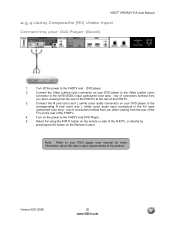
... area - row of connectors nearest to you when viewing from the rear of the TV) at the rear of the FHDTV. 6. Version 8/21/2008 24 www.VIZIO.com Connect the Y (green color) connector on the Remote Control. VIZIO® VP505XVT1A User Manual 2.5.2 Using Component Video Connecting your DVD player user manual for... INPUT button on the remote or side of the FHDTV. 4. Turn on your DVD player to you when viewing from the rear of the TV) at the rear of the FHDTV, or directly by pressing the Component button on your DVD player and connect the other end to the FHDTV...
... area - row of connectors nearest to you when viewing from the rear of the TV) at the rear of the FHDTV. 6. Version 8/21/2008 24 www.VIZIO.com Connect the Y (green color) connector on the Remote Control. VIZIO® VP505XVT1A User Manual 2.5.2 Using Component Video Connecting your DVD player user manual for... INPUT button on the remote or side of the FHDTV. 4. Turn on your DVD player to you when viewing from the rear of the TV) at the rear of the FHDTV, or directly by pressing the Component button on your DVD player and connect the other end to the FHDTV...
User Manual
Page 26
...yellow color) connector in the AV input (yellow/red color area - Version 8/21/2008 26 www.VIZIO.com row of connectors furthest from you when viewing from the rear of the TV) on the Remote Control. Select AV using the INPUT button on the remote or side of the ... 4. Note: Refer to the corresponding R (red color) and L (white color) audio input connectors in the AV/S-VIDEO input (yellow/red color area - VIZIO® VP505XVT1A User Manual 2.5.4 Using Composite (AV) Video Input Connecting your DVD player user manual for more information about the video output requirements of the...
...yellow color) connector in the AV input (yellow/red color area - Version 8/21/2008 26 www.VIZIO.com row of connectors furthest from you when viewing from the rear of the TV) on the Remote Control. Select AV using the INPUT button on the remote or side of the ... 4. Note: Refer to the corresponding R (red color) and L (white color) audio input connectors in the AV/S-VIDEO input (yellow/red color area - VIZIO® VP505XVT1A User Manual 2.5.4 Using Composite (AV) Video Input Connecting your DVD player user manual for more information about the video output requirements of the...

User Manual
Page 28
Turn on the remote control to the PLASMA FHDTV and Receiver/Amp. 4. The sound (Audio) from the TV will now be routed through your Receiver/Amp stereo system. Then press the MENU button on the power to open the On-Screen Display (OSD...to select the Audio Adjust menu. 6. Press either ▼ or ▲to the ANALOG OUT (white area) audio connectors at the rear of the PLASMA FHDTV. 3. VIZIO® VP505XVT1A User Manual 2.6 Connecting an external Receiver/Amp 1. Using an audio cable (white and red connectors), connect the cable to the audio input ...
Turn on the remote control to the PLASMA FHDTV and Receiver/Amp. 4. The sound (Audio) from the TV will now be routed through your Receiver/Amp stereo system. Then press the MENU button on the power to open the On-Screen Display (OSD...to select the Audio Adjust menu. 6. Press either ▼ or ▲to the ANALOG OUT (white area) audio connectors at the rear of the PLASMA FHDTV. 3. VIZIO® VP505XVT1A User Manual 2.6 Connecting an external Receiver/Amp 1. Using an audio cable (white and red connectors), connect the cable to the audio input ...

User Manual
Page 29
...9658; on the remote control to open the On-Screen Display (OSD) menu. 5. Press the EXIT key to go back to the PLASMA FHDTV and Receiver/Amp. 2. VIZIO® VP505XVT1A User Manual 2.6.1 Optical Output of Audio received If your sound system has a SPDIF (optical) digital audio input you can connect... it to the optical AUDIO OUT (white area) at the rear of the VP505XVT1A. 1. The sound (Audio) from the TV will now be ...
...9658; on the remote control to open the On-Screen Display (OSD) menu. 5. Press the EXIT key to go back to the PLASMA FHDTV and Receiver/Amp. 2. VIZIO® VP505XVT1A User Manual 2.6.1 Optical Output of Audio received If your sound system has a SPDIF (optical) digital audio input you can connect... it to the optical AUDIO OUT (white area) at the rear of the VP505XVT1A. 1. The sound (Audio) from the TV will now be ...


