
User Manual English
Page 2
...power cord during lightning storms or when unused for your display cabinet. Do not try to repair your display close to your home, consult your display that contained in the operating instructions unless you to high voltages, electric shock, and other cables are for an extended period of time, unplug the power cord... connected to a power outlet, power is dropped or damaged in fire or electric shock. • The wall socket should be observed for your display, hold the AC/DC power adapter, not the cord. Overloading can damage the remote control or injure the operator....
...power cord during lightning storms or when unused for your display cabinet. Do not try to repair your display close to your home, consult your display that contained in the operating instructions unless you to high voltages, electric shock, and other cables are for an extended period of time, unplug the power cord... connected to a power outlet, power is dropped or damaged in fire or electric shock. • The wall socket should be observed for your display, hold the AC/DC power adapter, not the cord. Overloading can damage the remote control or injure the operator....

User Manual English
Page 3
....vizio.com/environment. To reduce risk hold your Tablet Remote at www.who.int/emf. Stop using headphones, or earpieces. • Do not turn down the volume. fcc.gov/encyclopedia/radio-frequency-safety. AIRCRAFT Turn off your attention from your Tablet Remote, NEVER type or read the User Manual available directly through an application in your Tablet Remote is designed to operate...
....vizio.com/environment. To reduce risk hold your Tablet Remote at www.who.int/emf. Stop using headphones, or earpieces. • Do not turn down the volume. fcc.gov/encyclopedia/radio-frequency-safety. AIRCRAFT Turn off your attention from your Tablet Remote, NEVER type or read the User Manual available directly through an application in your Tablet Remote is designed to operate...

User Manual English
Page 4
...Picture Mode Edit Settings 45 Adjusting the Color Calibration Settings 48 Adjusting Audio Settings 50 Adjusting Timer Settings 52 Activating the Sleep Timer 53 Setting the Auto Power Off Feature 53 Adjusting Network Settings 54 Using the Network Connection menu 55 Renaming Devices on the Input Menu 58 Renaming Devices on the Input Menu 59 Enabling HDMI Color Subsampling 59 Changing the Display System Settings 60 Viewing System Information 61 Changing the On-Screen Menu Language 61 Setting the Time and Local Settings 62 Adjusting the CEC Settings 62 Choosing a Power Mode Setting...
...Picture Mode Edit Settings 45 Adjusting the Color Calibration Settings 48 Adjusting Audio Settings 50 Adjusting Timer Settings 52 Activating the Sleep Timer 53 Setting the Auto Power Off Feature 53 Adjusting Network Settings 54 Using the Network Connection menu 55 Renaming Devices on the Input Menu 58 Renaming Devices on the Input Menu 59 Enabling HDMI Color Subsampling 59 Changing the Display System Settings 60 Viewing System Information 61 Changing the On-Screen Menu Language 61 Setting the Time and Local Settings 62 Adjusting the CEC Settings 62 Choosing a Power Mode Setting...
User Manual English
Page 7
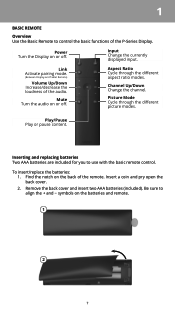
... of the P-Series Display. Link Activate pairing mode. (Between Display and Tablet Remote) Volume Up/Down Increase/decrease the loudness of the remote. Remove the back cover and insert two AAA batteries (included). Picture Mode Cycle through the different aspect ratio modes. Power Turn the Display on the back of the audio. 1 BASIC REMOTE Overview Use the Basic Remote to use with the basic remote control. Channel Up/Down Change the channel. Input Change the currently displayed input.
... of the P-Series Display. Link Activate pairing mode. (Between Display and Tablet Remote) Volume Up/Down Increase/decrease the loudness of the remote. Remove the back cover and insert two AAA batteries (included). Picture Mode Cycle through the different aspect ratio modes. Power Turn the Display on the back of the audio. 1 BASIC REMOTE Overview Use the Basic Remote to use with the basic remote control. Channel Up/Down Change the channel. Input Change the currently displayed input.
User Manual English
Page 13
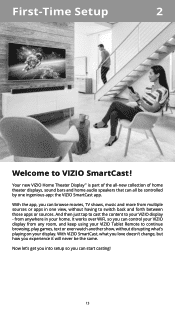
... VIZIO Tablet Remote to continue browsing, play games, text or even watch another show, without having to your display. from any room, and keep using your home. First-Time Setup 2 Welcome to VIZIO SmartCast !™ Your new VIZIO Home Theater Display™ is part of the all-new collection of home theater displays, sound bars and home audio speakers that can all be the same. It works...
... VIZIO Tablet Remote to continue browsing, play games, text or even watch another show, without having to your display. from any room, and keep using your home. First-Time Setup 2 Welcome to VIZIO SmartCast !™ Your new VIZIO Home Theater Display™ is part of the all-new collection of home theater displays, sound bars and home audio speakers that can all be the same. It works...
User Manual English
Page 14
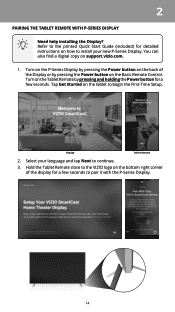
... TABLET REMOTE WITH P-SERIES DISPLAY Need help installing the Display? Tap Get Started on support.vizio.com. 1. Select your new P-Series Display. Hold the Tablet Remote close to pair it with the P-Series Display. 14 Turn on the P-Series Display by pressing and holding the Power button for detailed instructions on the back of the display for a few seconds. Display Tablet Remote 2. Refer to the printed Quick Start Guide (included) for a few seconds to the VIZIO logo...
... TABLET REMOTE WITH P-SERIES DISPLAY Need help installing the Display? Tap Get Started on support.vizio.com. 1. Select your new P-Series Display. Hold the Tablet Remote close to pair it with the P-Series Display. 14 Turn on the P-Series Display by pressing and holding the Power button for detailed instructions on the back of the display for a few seconds. Display Tablet Remote 2. Refer to the printed Quick Start Guide (included) for a few seconds to the VIZIO logo...

User Manual English
Page 33
... a cable, satellite, or over-the-air TV connection, you can use the VIZIO SmartCast App to the SmartCast App: 1. If your device is not found, try rescanning by tapping Rescan Network or add your device from DirecTV and Dish Network services, with more services to be added. See vizio.com/smartcast for an Unsupported Device. * Live TV listings compatible with IP-based set...
... a cable, satellite, or over-the-air TV connection, you can use the VIZIO SmartCast App to the SmartCast App: 1. If your device is not found, try rescanning by tapping Rescan Network or add your device from DirecTV and Dish Network services, with more services to be added. See vizio.com/smartcast for an Unsupported Device. * Live TV listings compatible with IP-based set...
User Manual English
Page 43
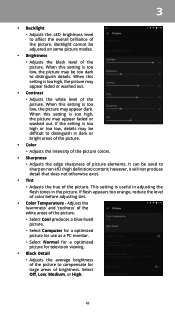
...; Color Temperature - It can be too dark to distinguish in the picture. Adjusts the 'warmness' and 'coolness' of the white areas of the picture. • Select Cool produces a blue-hued picture. • Select Computer for a optimized picture for use as a PC monitor. • Select Normal for a optimized picture for television viewing. • Black Detail • Adjusts the average brightness of the picture. When this setting is...
...; Color Temperature - It can be too dark to distinguish in the picture. Adjusts the 'warmness' and 'coolness' of the white areas of the picture. • Select Cool produces a blue-hued picture. • Select Computer for a optimized picture for use as a PC monitor. • Select Normal for a optimized picture for television viewing. • Black Detail • Adjusts the average brightness of the picture. When this setting is...
User Manual English
Page 45
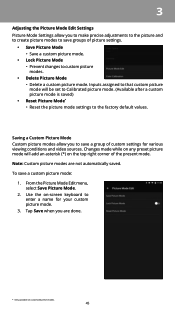
...; Save Picture Mode • Save a custom picture mode. • Lock Picture Mode • Prevent changes to custom picture modes. • Delete Picture Mode • Delete a custom picture mode. From the Picture Mode Edit menu, select Save Picture Mode. 2. Changes made while on -screen keyboard to enter a name for various viewing conditions and video sources. Use the on any preset picture mode will be set to Calibrated picture mode. (Available after a custom picture mode is saved) • Reset Picture Mode* • Reset the picture mode settings to the factory default values. Inputs...
...; Save Picture Mode • Save a custom picture mode. • Lock Picture Mode • Prevent changes to custom picture modes. • Delete Picture Mode • Delete a custom picture mode. From the Picture Mode Edit menu, select Save Picture Mode. 2. Changes made while on -screen keyboard to enter a name for various viewing conditions and video sources. Use the on any preset picture mode will be set to Calibrated picture mode. (Available after a custom picture mode is saved) • Reset Picture Mode* • Reset the picture mode settings to the factory default values. Inputs...
User Manual English
Page 47
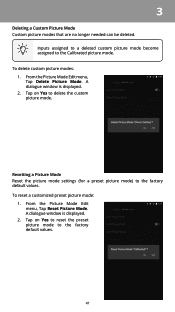
... the Picture Mode Edit menu, Tap Delete Picture Mode. From the Picture Mode Edit menu, Tap Reset Picture Mode. Tap on Yes to reset the preset picture mode to delete the custom picture mode. A dialogue window is displayed. 2. Tap on Yes to the factory default values. 47 To reset a customized preset picture mode: 1. Resetting a Picture Mode Reset the picture mode settings (for a preset picture mode) to the Calibrated picture mode. 3 Deleting a Custom Picture Mode Custom picture modes that are no longer needed can be deleted. A dialogue window is displayed. 2. Inputs assigned...
... the Picture Mode Edit menu, Tap Delete Picture Mode. From the Picture Mode Edit menu, Tap Reset Picture Mode. Tap on Yes to reset the preset picture mode to delete the custom picture mode. A dialogue window is displayed. 2. Tap on Yes to the factory default values. 47 To reset a customized preset picture mode: 1. Resetting a Picture Mode Reset the picture mode settings (for a preset picture mode) to the Calibrated picture mode. 3 Deleting a Custom Picture Mode Custom picture modes that are no longer needed can be deleted. A dialogue window is displayed. 2. Inputs assigned...
User Manual English
Page 51
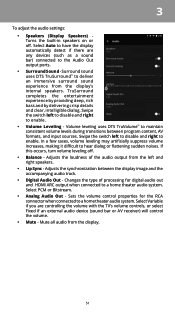
... the Audio Out output ports. • Surround Sound - Changes the type of the audio output from the display. 51 Select Auto to have the display automatically detect if there are controlling the volume with the TV's volume controls, or select Fixed if an external audio device (sound bar or AV receiver) will control the volume. • Mute - Swipe the switch left and right speakers. • Lip Sync - Adjusts the synchronization between program content, AV formats, and input sources. Surround sound uses...
... the Audio Out output ports. • Surround Sound - Changes the type of the audio output from the display. 51 Select Auto to have the display automatically detect if there are controlling the volume with the TV's volume controls, or select Fixed if an external audio device (sound bar or AV receiver) will control the volume. • Mute - Swipe the switch left and right speakers. • Lip Sync - Adjusts the synchronization between program content, AV formats, and input sources. Surround sound uses...

User Manual English
Page 63
... System menu, tap Time & Local Settings. The ARC setting does not support video devices connected to the audio device (Select Enable to 12 or 24 hour format. See your display enables you to control HDMI-connected devices with the included Tablet Remote without any additional programming. From the System menu, tap CEC. turn CEC off , or auto. • Time Format - Set time format to enable support for details. To ensure the correct time is displayed. • Use Internet Time - Set the...
... System menu, tap Time & Local Settings. The ARC setting does not support video devices connected to the audio device (Select Enable to 12 or 24 hour format. See your display enables you to control HDMI-connected devices with the included Tablet Remote without any additional programming. From the System menu, tap CEC. turn CEC off , or auto. • Time Format - Set time format to enable support for details. To ensure the correct time is displayed. • Use Internet Time - Set the...

User Manual English
Page 72
B Screen Size: Viewable Area: Dimensions w/ Stand: Dimensions w/o Stand: Weight w/ Stands: w/o Stands: LCD Backlight: Active LED Zones: Refresh Rate: Clear Action: Maximum Resolution: Dynamic Contrast Ratio: Pixel Pitch: Viewing Angle: HDMI Inputs: Component Video Inputs: USB Ports: Ethernet Port: Audio Outputs: OSD Languages: Ambient Light Sensor: Remote Control: Certifications: Voltage Range: Power Consumption: Standby Power: Zero Bright Pixel Guarantee: P65-C1 65" Class 64.53" 57.44 x 35.39 x 11.26" (145.90 x 89.90 x 28.60 cm) 57.44 x 32.99 x 2.54" (145...
B Screen Size: Viewable Area: Dimensions w/ Stand: Dimensions w/o Stand: Weight w/ Stands: w/o Stands: LCD Backlight: Active LED Zones: Refresh Rate: Clear Action: Maximum Resolution: Dynamic Contrast Ratio: Pixel Pitch: Viewing Angle: HDMI Inputs: Component Video Inputs: USB Ports: Ethernet Port: Audio Outputs: OSD Languages: Ambient Light Sensor: Remote Control: Certifications: Voltage Range: Power Consumption: Standby Power: Zero Bright Pixel Guarantee: P65-C1 65" Class 64.53" 57.44 x 35.39 x 11.26" (145.90 x 89.90 x 28.60 cm) 57.44 x 32.99 x 2.54" (145...

User Manual English
Page 74
... user data and downloaded applications. This warranty contains a binding arbitration agreement and a class action waiver for additional help and troubleshooting. What to Do If You Are Not Satisfied With Service If you nor VIZIO nor an arbitrator may determine. If you are unable to resolve the issue informally and wish to any award will be serviced in connection with VIZIO's user guides and manuals...
... user data and downloaded applications. This warranty contains a binding arbitration agreement and a class action waiver for additional help and troubleshooting. What to Do If You Are Not Satisfied With Service If you nor VIZIO nor an arbitrator may determine. If you are unable to resolve the issue informally and wish to any award will be serviced in connection with VIZIO's user guides and manuals...
User Manual English
Page 76
... the battery in part without notice. Internet Connectivity Network conditions, environmental and other factors may negatively affect connectivity and the resulting video quality, if any interest in trademarks, trade names or service marks other property, do not attempt to ensure the accuracy of others and VIZIO, Inc. Used under license from time to time, and is available to view at http://www...
... the battery in part without notice. Internet Connectivity Network conditions, environmental and other factors may negatively affect connectivity and the resulting video quality, if any interest in trademarks, trade names or service marks other property, do not attempt to ensure the accuracy of others and VIZIO, Inc. Used under license from time to time, and is available to view at http://www...
Quickstart Guide English
Page 2
... wall socket should be sure these instructions in accordance with the manufacturer's instructions. • Do not install near water. • Clean only with dry cloth. • Do not block any heat sources such as power-supply cord or plug is used for long period of your display from the apparatus. • Only use , and maintenance of time. Doing so could short circuit parts causing...
... wall socket should be sure these instructions in accordance with the manufacturer's instructions. • Do not install near water. • Clean only with dry cloth. • Do not block any heat sources such as power-supply cord or plug is used for long period of your display from the apparatus. • Only use , and maintenance of time. Doing so could short circuit parts causing...
Quickstart Guide English
Page 3
... cables, parts and packaging out of the reach of young children. • Store the accessories (remote, batteries, etc.) in a location safely out of the reach of children. • The American Academy of Pediatrics discourages television viewing for children younger than that contained in the operating instructions ...not install your display will not be used as vases, shall be placed on the power cord may damage the wires inside the cord and cause fire or electric shock. Pulling on the apparatus. • The mains plug or appliance coupler is intended to alert the user ...
... cables, parts and packaging out of the reach of young children. • Store the accessories (remote, batteries, etc.) in a location safely out of the reach of children. • The American Academy of Pediatrics discourages television viewing for children younger than that contained in the operating instructions ...not install your display will not be used as vases, shall be placed on the power cord may damage the wires inside the cord and cause fire or electric shock. Pulling on the apparatus. • The mains plug or appliance coupler is intended to alert the user ...

Quickstart Guide English
Page 4
... you may contain glass parts. Operating Temperature Your Tablet Remote is replaced by an authorized service center. Tablet Remote Read all the safety information below before using your hearing checked by airline staff. Always comply with potentially explosive atmosphere turn up the volume to 35° C).... using your Tablet Remote whenever instructed to remove it . Contact VIZIO or visit www.vizio.com/environment to the sound level, which may be disposed of pressure or fullness in your ears, ringing in your family has a history of your Tablet Remote has an airplane mode ...
... you may contain glass parts. Operating Temperature Your Tablet Remote is replaced by an authorized service center. Tablet Remote Read all the safety information below before using your hearing checked by airline staff. Always comply with potentially explosive atmosphere turn up the volume to 35° C).... using your Tablet Remote whenever instructed to remove it . Contact VIZIO or visit www.vizio.com/environment to the sound level, which may be disposed of pressure or fullness in your ears, ringing in your family has a history of your Tablet Remote has an airplane mode ...

Quickstart Guide English
Page 32
... wall, carefully following the instructions that can begin the installation. To install your display on a clean, flat, stable surface. Disconnect any cables connected to find the appropriate mount for your display. Be sure the surface is capable of supporting the weight of this page to your mount. Use only with your display. 2. Consult the information on a wall requires lifting. Remove the stands by loosening and removing the screws. 4. English - 32 Installing a display...
... wall, carefully following the instructions that can begin the installation. To install your display on a clean, flat, stable surface. Disconnect any cables connected to find the appropriate mount for your display. Be sure the surface is capable of supporting the weight of this page to your mount. Use only with your display. 2. Consult the information on a wall requires lifting. Remove the stands by loosening and removing the screws. 4. English - 32 Installing a display...
Quickstart Guide English
Page 40
... will (at its option) repair or replace it is not available. There will provide instructions for the duration of the warranty on the box, or contact VIZIO Technical Support at VIZIO's option and sole discretion. What This Warranty Does Not Cover This warranty does not cover: (a) cosmetic damage; (b) normal wear and tear; (c) improper operation; (d) improper voltage supply or power surges; (e) signal issues; (f) damage from the...
... will (at its option) repair or replace it is not available. There will provide instructions for the duration of the warranty on the box, or contact VIZIO Technical Support at VIZIO's option and sole discretion. What This Warranty Does Not Cover This warranty does not cover: (a) cosmetic damage; (b) normal wear and tear; (c) improper operation; (d) improper voltage supply or power surges; (e) signal issues; (f) damage from the...


