M320SL User Manua
Page 2
... setting in which power savings will increase power consumption that could exceed the limits necessary to qualify for ENERGY STAR rating. Changing the factory default picture settings or enabling other features will be achieved. SRS TruSurround HD and SRS TruVolume are trademarks of Dolby Laboratories. Dolby and the double-D symbol are...
... setting in which power savings will increase power consumption that could exceed the limits necessary to qualify for ENERGY STAR rating. Changing the factory default picture settings or enabling other features will be achieved. SRS TruSurround HD and SRS TruVolume are trademarks of Dolby Laboratories. Dolby and the double-D symbol are...
M320SL User Manua
Page 8
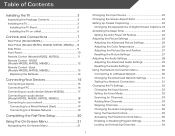
... A Device 15 Connecting A PC 16 Connecting an audio device (Model M320SL 17 Connecting an audio device (Model M370SL, M420SL, M470SL, M550SL 18 Connecting to your network 19 Connecting to a Wired Network (Best 19 Connecting to a Wireless Network 30 Changing the Advanced Network Settings...Timer 24 Setting the Auto Power Off Feature 24 Adjusting the Picture Settings 24 Adjusting the Advanced Picture Settings 25 Adjusting the Color Temperature 26 Adjusting the Picture Size and Position 27 Resetting the Picture Settings 27 Adjusting the Audio Settings 28 Adjusting the Advanced Audio ...
... A Device 15 Connecting A PC 16 Connecting an audio device (Model M320SL 17 Connecting an audio device (Model M370SL, M420SL, M470SL, M550SL 18 Connecting to your network 19 Connecting to a Wired Network (Best 19 Connecting to a Wireless Network 30 Changing the Advanced Network Settings...Timer 24 Setting the Auto Power Off Feature 24 Adjusting the Picture Settings 24 Adjusting the Advanced Picture Settings 25 Adjusting the Color Temperature 26 Adjusting the Picture Size and Position 27 Resetting the Picture Settings 27 Adjusting the Audio Settings 28 Adjusting the Advanced Audio ...

M320SL User Manua
Page 18
... loudness of the audio. V Button Open the VIA dock. Ok Select the highlighted menu option. Number Pad Manually enter a channel. App launcher Quickly launch the pictured app. 2 Remote Control (Models M320SL, M370SL) Input Change the currently-displayed input. Back Go to the previous on -screen menu. Channel Up/Down Change the...
... loudness of the audio. V Button Open the VIA dock. Ok Select the highlighted menu option. Number Pad Manually enter a channel. App launcher Quickly launch the pictured app. 2 Remote Control (Models M320SL, M370SL) Input Change the currently-displayed input. Back Go to the previous on -screen menu. Channel Up/Down Change the...

M320SL User Manua
Page 19
... Control USB media player. Back Go to the previous on -screen menu. Wide Switch the display mode. App launcher Quickly launch the pictured app. Arrow Navigate the on -screen menu. Channel Up/Down Change the channel. Remote Control 12 Closed Captions Open the closed caption ... to manually enter a digital sub-channel. (For example, 18-4 or 18-5.) battery compartment Insert 2 AAA batteries here. FRONT (Models M420SL, M470SL, M550SL) Input Change the currently-displayed input. Volume Up/Down Increase or decrease loudness of the audio. Power Turn TV on -screen menu. Menu Display the...
... Control USB media player. Back Go to the previous on -screen menu. Wide Switch the display mode. App launcher Quickly launch the pictured app. Arrow Navigate the on -screen menu. Channel Up/Down Change the channel. Remote Control 12 Closed Captions Open the closed caption ... to manually enter a digital sub-channel. (For example, 18-4 or 18-5.) battery compartment Insert 2 AAA batteries here. FRONT (Models M420SL, M470SL, M550SL) Input Change the currently-displayed input. Volume Up/Down Increase or decrease loudness of the audio. Power Turn TV on -screen menu. Menu Display the...

M320SL User Manua
Page 28
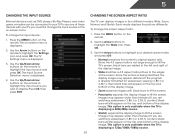
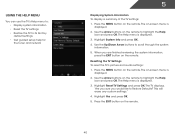
... can: • Change the input source • Change the screen aspect ratio • Set up closed captioning • Activate the sleep timer • Adjust the picture settings • Adjust the audio settings • Change network settings • Change TV settings • Access the help menu Navigating the On-Screen Menu To...
... can: • Change the input source • Change the screen aspect ratio • Set up closed captioning • Activate the sleep timer • Adjust the picture settings • Adjust the audio settings • Change network settings • Change TV settings • Access the help menu Navigating the On-Screen Menu To...
M320SL User Manua
Page 29
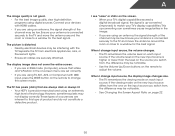
... TV is displaying a 480i/480p source. • Stretch expands the display image to fill the screen. Each mode displays the picture differently. Since the picture is already formatted for widescreen viewing (1.85:1 or 2.35:1), then black bars will still appear on the remote to highlight the... buttons to highlight your TV, you are added to the left and right of the display image. • Wide stretches a 4:3 aspect ratio picture to the edges of the display image. Since the 4:3 aspect ratio is displayed. 2. 5 Changing the Input Source Changing the Screen Aspect Ratio External...
... TV is displaying a 480i/480p source. • Stretch expands the display image to fill the screen. Each mode displays the picture differently. Since the picture is already formatted for widescreen viewing (1.85:1 or 2.35:1), then black bars will still appear on the remote to highlight the... buttons to highlight your TV, you are added to the left and right of the display image. • Wide stretches a 4:3 aspect ratio picture to the edges of the display image. Since the 4:3 aspect ratio is displayed. 2. 5 Changing the Input Source Changing the Screen Aspect Ratio External...
M320SL User Manua
Page 31
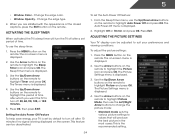
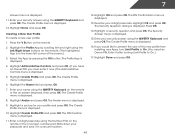
...is being displayed on the remote to values that will turn off after which you are satisfied with the appearance of time. The Picture Settings menu is displayed. 4. The Picture Settings menu is displayed. 3. To use the Up/Down Arrow buttons on the remote to highlight Auto Power Off and press ...OK. Press the MENU button on -screen menu is displayed. 2. Use the Up/Down Arrow buttons on the remote to highlight Picture and press OK. 5 • Window Color - Change the edge color. • Window Opacity - Use the Arrow buttons on the remote to highlight the...
...is being displayed on the remote to values that will turn off after which you are satisfied with the appearance of time. The Picture Settings menu is displayed. 4. The Picture Settings menu is displayed. 3. To use the Up/Down Arrow buttons on the remote to highlight Auto Power Off and press ...OK. Press the MENU button on -screen menu is displayed. 2. Use the Up/Down Arrow buttons on the remote to highlight Picture and press OK. 5 • Window Color - Change the edge color. • Window Opacity - Use the Arrow buttons on the remote to highlight the...
M320SL User Manua
Page 32
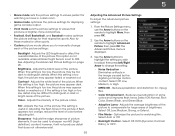
... is displayed. 3. however, it will not produce detail that produce a brighter, more vivid picture. • Football, Golf, Basketball, and Baseball modes optimize the picture settings for large areas of the picture. Use the Arrow buttons on the remote to compensate for their respective sports. Select Off, ...Low, Medium, Strong, or Extend. • Film Mode - Adjusts the edge sharpness of the picture. Reduces oversaturation of the picture. Adjusts the black level of some colors and improves flesh tones. Select Off, Low, Medium, or High. • MPEG ...
... is displayed. 3. however, it will not produce detail that produce a brighter, more vivid picture. • Football, Golf, Basketball, and Baseball modes optimize the picture settings for large areas of the picture. Use the Arrow buttons on the remote to compensate for their respective sports. Select Off, ...Low, Medium, Strong, or Extend. • Film Mode - Adjusts the edge sharpness of the picture. Reduces oversaturation of the picture. Adjusts the black level of some colors and improves flesh tones. Select Off, Low, Medium, or High. • MPEG ...
M320SL User Manua
Page 33
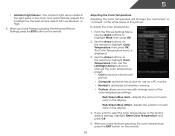
...When you to highlight More, then press OK. 2. Use the Arrow buttons on the remote. Adjusts the amount of each of the picture. Adjusting the Color Temperature Adjusting the color temperature will change each color in the room and automatically adjusts the backlight for television viewing...., then use the Left/Right Arrow buttons to change the color temperature preset: • Cool produces a blue-hued picture. • Computer optimizes the picture for use the Arrow buttons to manually change the "warmness" or "coolness" of the white areas of the color temperature...
...When you to highlight More, then press OK. 2. Use the Arrow buttons on the remote. Adjusts the amount of each of the picture. Adjusting the Color Temperature Adjusting the color temperature will change each color in the room and automatically adjusts the backlight for television viewing...., then use the Left/Right Arrow buttons to change the color temperature preset: • Cool produces a blue-hued picture. • Computer optimizes the picture for use the Arrow buttons to manually change the "warmness" or "coolness" of the white areas of the color temperature...
M320SL User Manua
Page 34
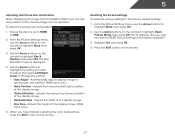
...size and position. (RGB input only.) • Horiz. Press the EXIT button on the remote. Automatically adjusts display image to highlight Reset Picture Mode, then press OK. Adjusts the horizontal (left/right) position of the display image. • Horizontal Size - Adjusts the vertical (up...OK. 2. Adjusts the width of the display image. • Fine Tune - Resetting the Picture Settings To reset the picture settings to HDMI or RGB. 2. Ensure the input is displayed. 4. To adjust the picture size and position: 1. The Size & Position menu is set to the factory default settings:...
...size and position. (RGB input only.) • Horiz. Press the EXIT button on the remote. Automatically adjusts display image to highlight Reset Picture Mode, then press OK. Adjusts the horizontal (left/right) position of the display image. • Horizontal Size - Adjusts the vertical (up...OK. 2. Adjusts the width of the display image. • Fine Tune - Resetting the Picture Settings To reset the picture settings to HDMI or RGB. 2. Ensure the input is displayed. 4. To adjust the picture size and position: 1. The Size & Position menu is set to the factory default settings:...
M320SL User Manua
Page 47
... remote to Restore Defaults? This will erase any custom settings." 4. Press the EXIT button on the remote. Resetting the TV Settings To reset the TV's picture and audio settings: 1. Press the MENU button on the remote. 40 The on the remote. Highlight Yes and press OK. 5. When you would like to...
... remote to Restore Defaults? This will erase any custom settings." 4. Press the EXIT button on the remote. Resetting the TV Settings To reset the TV's picture and audio settings: 1. Press the MENU button on the remote. 40 The on the remote. Highlight Yes and press OK. 5. When you would like to...
M320SL User Manua
Page 55
... by pressing the OK button. Highlight the Name field and press OK. 7. The Create Profile menu is displayed. Highlight Create Profile and press OK. Highlight a picture for your 4-digit passcode. Highlight Done and press OK. Highlight OK and press OK. Re-enter your profile and press OK. Press OK. 14. The...
... by pressing the OK button. Highlight the Name field and press OK. 7. The Create Profile menu is displayed. Highlight Create Profile and press OK. Highlight a picture for your 4-digit passcode. Highlight Done and press OK. Highlight OK and press OK. Re-enter your profile and press OK. Press OK. 14. The...

M320SL User Manua
Page 58
..., game console, cable/satellite box) that are connected to the TV. • If you are securely attached. See Adjusting the Picture Settings on page 14 51 See Resetting the Picture Settings on page 27 • Check all devices are only pressing one button at a time. • Point the remote directly ... all cables to ensure they are using cable TV, satellite, or antenna connected directly to the TV, scan for the best signal. See Resetting the Picture Settings on page 27 • Press the INPUT button on the remote to ensure mute is plugged into a working . • Ensure you are ...
..., game console, cable/satellite box) that are connected to the TV. • If you are securely attached. See Adjusting the Picture Settings on page 14 51 See Resetting the Picture Settings on page 27 • Check all devices are only pressing one button at a time. • Point the remote directly ... all cables to ensure they are using cable TV, satellite, or antenna connected directly to the TV, scan for the best signal. See Resetting the Picture Settings on page 27 • Press the INPUT button on the remote to ensure mute is plugged into a working . • Ensure you are ...
M320SL User Manua
Page 59
... from electrical appliances, cars, or flourescent lights. • Ensure all cables are using an antenna, the signal strength of the channel may be low. The picture is higher or lower than the level on the source you are always dark or always lit. • Your HDTV is connected securely to the...
... from electrical appliances, cars, or flourescent lights. • Ensure all cables are using an antenna, the signal strength of the channel may be low. The picture is higher or lower than the level on the source you are always dark or always lit. • Your HDTV is connected securely to the...

Brochure
Page 1
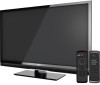
... to change without notice. © 2012 vizio inc. FULL HD 1080P resolution for you. VIZIO INTERNET APPS® This TV has built-in a razor thin design. Trademarksshownarethepropertyoftheirrespectiveowners.Imagesusedareforillustrationpurposesonly.Vizio,thevlogo,wherevisionmeetsvalue,razorledandotherviziotrademarksare the intellectual property of the... brilliant picture in WiFi, bringing you the best of vizio inc. M550SL RAZOR THIN CRYSTAL CLEAR 55" CLASS EDGE LIT RAZOR LEDTM LCD HDTV WITH VIZIO INTERNET APPS® VIZIO's M550SL 55" Class Edge Lit Razor LEDTM LCD HDTV with VIZIO Internet...
... to change without notice. © 2012 vizio inc. FULL HD 1080P resolution for you. VIZIO INTERNET APPS® This TV has built-in a razor thin design. Trademarksshownarethepropertyoftheirrespectiveowners.Imagesusedareforillustrationpurposesonly.Vizio,thevlogo,wherevisionmeetsvalue,razorledandotherviziotrademarksare the intellectual property of the... brilliant picture in WiFi, bringing you the best of vizio inc. M550SL RAZOR THIN CRYSTAL CLEAR 55" CLASS EDGE LIT RAZOR LEDTM LCD HDTV WITH VIZIO INTERNET APPS® VIZIO's M550SL 55" Class Edge Lit Razor LEDTM LCD HDTV with VIZIO Internet...


