M3D420SR User Manual
Page 4
... following instructions should be operated only from overheating, be replaced when using different voltage than the voltage specified. Keep these openings are provided for your TV and any heat sources such as when the power-supply cord or plug is a safety feature. If the provided plug does not fit into the apparatus, the apparatus has been exposed M3D420SR / M3D421SR / M3D460SR / M3D550SR...
... following instructions should be operated only from overheating, be replaced when using different voltage than the voltage specified. Keep these openings are provided for your TV and any heat sources such as when the power-supply cord or plug is a safety feature. If the provided plug does not fit into the apparatus, the apparatus has been exposed M3D420SR / M3D421SR / M3D460SR / M3D550SR...
M3D420SR User Manual
Page 5
... AC/DC power adapter, not the cord. Pulling on the apparatus. • The mains plug or appliance coupler is intended to alert the user to the presence of time. Continued use of your TV may cause fire or electric shock. • Do not install your TV in fire or electric shock. • The wall socket should be used for moving...
... AC/DC power adapter, not the cord. Pulling on the apparatus. • The mains plug or appliance coupler is intended to alert the user to the presence of time. Continued use of your TV may cause fire or electric shock. • Do not install your TV in fire or electric shock. • The wall socket should be used for moving...
M3D420SR User Manual
Page 6
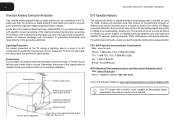
...-388-2009) List of time, unplug the TV from the wall outlet and disconnect the antenna or cable system. Ground Clamp Antenna Lead In Wire DTV Transition Advisory The nationwide switch to digital television broadcasting was complete on June 12, 2009. Power Lines Do not locate the antenna near overhead light or power circuits, or where it is needed. No extra converter box is left unattended...
...-388-2009) List of time, unplug the TV from the wall outlet and disconnect the antenna or cable system. Ground Clamp Antenna Lead In Wire DTV Transition Advisory The nationwide switch to digital television broadcasting was complete on June 12, 2009. Power Lines Do not locate the antenna near overhead light or power circuits, or where it is needed. No extra converter box is left unattended...
M3D420SR User Manual
Page 8
... 6 Rear Panel 7 Connecting Your Devices 8 Before You Begin 8 Connecting Your Devices 8 Setting Up Your Network Connection 10 Connecting to A Wired Network 10 Connecting to a Wireless Network 10 Completing the First-Time Setup 11 Using the On-Screen Menu 12 Navigating the On-Screen Menu 12 Changing the 3D Mode 12 Setting the Screen Aspect Ratio 13 Changing the Screen Aspect Ratio 14 Setting Up Closed Captioning 14 Changing the Appearance of Digital Closed Captions 15 Table of Contents Activating the Sleep Timer 15 Setting the Auto Power Off...
... 6 Rear Panel 7 Connecting Your Devices 8 Before You Begin 8 Connecting Your Devices 8 Setting Up Your Network Connection 10 Connecting to A Wired Network 10 Connecting to a Wireless Network 10 Completing the First-Time Setup 11 Using the On-Screen Menu 12 Navigating the On-Screen Menu 12 Changing the 3D Mode 12 Setting the Screen Aspect Ratio 13 Changing the Screen Aspect Ratio 14 Setting Up Closed Captioning 14 Changing the Appearance of Digital Closed Captions 15 Table of Contents Activating the Sleep Timer 15 Setting the Auto Power Off...
M3D420SR User Manual
Page 9
... / M3D460SR / M3D550SR Adjusting the CEC Settings 29 Turning the VIZIO Logo On or Off 30 Configuring Bluetooth Devices 30 Using the Help Menu 31 Displaying System Information 31 Resetting the TV Settings 31 Restoring the TV to Factory Default Settings 31 Using Guided Setup 32 Using the Info Window 32 Using the USB Media Player 33 Using the USB Media Player 33 Connecting a USB Thumb Drive to the TV 33 Playing USB Media 33 Using VIZIO Internet Apps 36 Using the VIA Shortcut Buttons 36 Using the...
... / M3D460SR / M3D550SR Adjusting the CEC Settings 29 Turning the VIZIO Logo On or Off 30 Configuring Bluetooth Devices 30 Using the Help Menu 31 Displaying System Information 31 Resetting the TV Settings 31 Restoring the TV to Factory Default Settings 31 Using Guided Setup 32 Using the Info Window 32 Using the USB Media Player 33 Using the USB Media Player 33 Connecting a USB Thumb Drive to the TV 33 Playing USB Media 33 Using VIZIO Internet Apps 36 Using the VIA Shortcut Buttons 36 Using the...

M3D420SR User Manual
Page 10
... Adapter Cleaning Cloth for Glasses 2 Pairs Premium Theater 3D Glasses 2. Slide the neck onto the TV and insert the included screws. Package Contents 1 Using a Phillips-head screwdriver, attach the base to inspect the package contents. VIZIO 3D LED LCD HDTV with Stand Remote Control with a phillips-head screwdriver. When you can still fall over . Tighten the screws with Batteries Installing the TV After removing...
... Adapter Cleaning Cloth for Glasses 2 Pairs Premium Theater 3D Glasses 2. Slide the neck onto the TV and insert the included screws. Package Contents 1 Using a Phillips-head screwdriver, attach the base to inspect the package contents. VIZIO 3D LED LCD HDTV with Stand Remote Control with a phillips-head screwdriver. When you can still fall over . Tighten the screws with Batteries Installing the TV After removing...

M3D420SR User Manual
Page 11
... the installation. 3. Using a Phillips-head screwdriver, loosen and remove the screws. 4. 1 4. Attach your TV and wall mount to find the appropriate mount for the weight of debris that came with your TV model: Screw Size: Screw Length: Screw Pitch: Hole Pattern: M3D420SR M3D421SR M6 10mm 1.0mm 400mm (V) x 400mm (H) M3D460SR M6 10mm 1.0mm 400mm (V) x 400mm (H) M3D550SR M6 10mm 1.0mm 400mm (V) x 400mm (H) Installing a TV on a clean, flat, stable surface. Specifications...
... the installation. 3. Using a Phillips-head screwdriver, loosen and remove the screws. 4. 1 4. Attach your TV and wall mount to find the appropriate mount for the weight of debris that came with your TV model: Screw Size: Screw Length: Screw Pitch: Hole Pattern: M3D420SR M3D421SR M6 10mm 1.0mm 400mm (V) x 400mm (H) M3D460SR M6 10mm 1.0mm 400mm (V) x 400mm (H) M3D550SR M6 10mm 1.0mm 400mm (V) x 400mm (H) Installing a TV on a clean, flat, stable surface. Specifications...
M3D420SR User Manual
Page 13
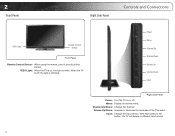
... TVs audio. 2 Front Panel Right Side Panel Controls and Connections VIZIO Light Remote Control Sensor Front Panel Remote Control Sensor: When using the remote, point it directly at this sensor. Power Menu Channel Up Channel Down Volume Up Volume Down Input Right Side Panel Power: Turn the TV on or off , the light is dimmed. Volume Up/Down: Increase or decrease the loudness of the button, the TV will display a different input source 4 Input: Change the input device. Channel Up/Down: Change the channel. VIZIO Light: When the TV is on -screen menu. Menu: Display...
... TVs audio. 2 Front Panel Right Side Panel Controls and Connections VIZIO Light Remote Control Sensor Front Panel Remote Control Sensor: When using the remote, point it directly at this sensor. Power Menu Channel Up Channel Down Volume Up Volume Down Input Right Side Panel Power: Turn the TV on or off , the light is dimmed. Volume Up/Down: Increase or decrease the loudness of the button, the TV will display a different input source 4 Input: Change the input device. Channel Up/Down: Change the channel. VIZIO Light: When the TV is on -screen menu. Menu: Display...
M3D420SR User Manual
Page 14
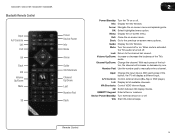
... Last Number Pad Dash 2 Power/Standby: Turn the TV on or off or on. Exit: Close the on -screen menu and episode guide. Channel Up/Down: Change the channel. List: Display list of the button, the TV will increase or decrease by one. Arrow: Navigate the on -screen menu. Input: Change the input device. VIA Shortcuts: Control VIZIO Internet Apps. 3D: Switch between 3D display modes. Menu: Display the on or off . ton, the channel will display a different input. Number Pad: Use the number...
... Last Number Pad Dash 2 Power/Standby: Turn the TV on or off or on. Exit: Close the on -screen menu and episode guide. Channel Up/Down: Change the channel. List: Display list of the button, the TV will increase or decrease by one. Arrow: Navigate the on -screen menu. Input: Change the input device. VIA Shortcuts: Control VIZIO Internet Apps. 3D: Switch between 3D display modes. Menu: Display the on or off . ton, the channel will display a different input. Number Pad: Use the number...
M3D420SR User Manual
Page 16
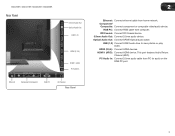
...HDMI (2,3,4): Connect HDMI devices. Component/ Composite: Connect component or composite video/audio device. RGB PC: Connect RGB cable from PC for audio on the RGB PC port. 7 M3D420SR / M3D421SR / M3D460SR / M3D550SR Rear Panel ETHERNET COMPONENT (BETTER) Y/V Pb/Cb Pr/Cr LR COMPOSITE [GOOD] Ethernet Component/Composite RGB PC RGB PC AUDIO OUT DIGITAL AUDIO OUT USB 2 USB 1 4 3.5mm Audio Out Optical Audio Out USB (1,2) 3 HDMI (2,3,4) 2 ARC 1 HDMI (BEST) PC AUDIO DTV/TV HDMI 1 (ARC) PC Audio In RF/Coaxial Rear Panel 2 Ethernet: Connect ethernet cable from home network...
...HDMI (2,3,4): Connect HDMI devices. Component/ Composite: Connect component or composite video/audio device. RGB PC: Connect RGB cable from PC for audio on the RGB PC port. 7 M3D420SR / M3D421SR / M3D460SR / M3D550SR Rear Panel ETHERNET COMPONENT (BETTER) Y/V Pb/Cb Pr/Cr LR COMPOSITE [GOOD] Ethernet Component/Composite RGB PC RGB PC AUDIO OUT DIGITAL AUDIO OUT USB 2 USB 1 4 3.5mm Audio Out Optical Audio Out USB (1,2) 3 HDMI (2,3,4) 2 ARC 1 HDMI (BEST) PC AUDIO DTV/TV HDMI 1 (ARC) PC Audio In RF/Coaxial Rear Panel 2 Ethernet: Connect ethernet cable from home network...

M3D420SR User Manual
Page 17
... the INPUT button on the remote and select the connection type (HDMI, RGB, etc) from wall) Perform a channel scan. • RGB Make sure the desktop resolution on -screen menu. Ensure each end of the cable is set to the HDMI ports on . 5. When you have the corresponding cable. Press OK. 6. Use the best available connection. Connect the device and the TV. For example, if you are connecting a Blu-ray player with DVI Connect left (white...
... the INPUT button on the remote and select the connection type (HDMI, RGB, etc) from wall) Perform a channel scan. • RGB Make sure the desktop resolution on -screen menu. Ensure each end of the cable is set to the HDMI ports on . 5. When you have the corresponding cable. Press OK. 6. Use the best available connection. Connect the device and the TV. For example, if you are connecting a Blu-ray player with DVI Connect left (white...
M3D420SR User Manual
Page 25
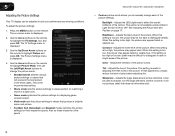
... Picture Settings menu is too low, the picture may appear dark. Adjusts the LED brightness to manually change the picture mode: • Standard mode sets the various picture settings to values that does not otherwise exist. 16 See Adjusting the Picture Size and Position on the remote to highlight Picture and press OK. Adjusts the white level of the picture. When this setting is useful in adjusting the flesh tones in the most cases. Color - Adjusts the...
... Picture Settings menu is too low, the picture may appear dark. Adjusts the LED brightness to manually change the picture mode: • Standard mode sets the various picture settings to values that does not otherwise exist. 16 See Adjusting the Picture Size and Position on the remote to highlight Picture and press OK. Adjusts the white level of the picture. When this setting is useful in adjusting the flesh tones in the most cases. Color - Adjusts the...
M3D420SR User Manual
Page 28
... Jazz. Changes the type of processing for the analog RCA (red/white) connectors when connected to highlight the setting you have finished adjusting the audio settings, press the EXIT button on the remote. 19 Press the MENU button on -screen menu is displayed. 2. M3D420SR / M3D421SR / M3D460SR / M3D550SR Adjusting the Audio Settings To adjust the audio settings: 1. StudioSound HD™ is displayed. 2. Use the Arrow buttons to a home theater audio system. The on the remote. Use the Arrow buttons to control the external speakers' volume from...
... Jazz. Changes the type of processing for the analog RCA (red/white) connectors when connected to highlight the setting you have finished adjusting the audio settings, press the EXIT button on the remote. 19 Press the MENU button on -screen menu is displayed. 2. M3D420SR / M3D421SR / M3D460SR / M3D550SR Adjusting the Audio Settings To adjust the audio settings: 1. StudioSound HD™ is displayed. 2. Use the Arrow buttons to a home theater audio system. The on the remote. Use the Arrow buttons to control the external speakers' volume from...
M3D420SR User Manual
Page 29
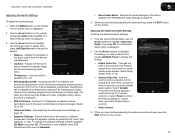
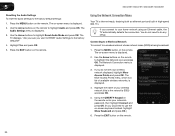
... button on the remote. Using the Network Connection Menu Your TV is displayed. 3. Connecting to a Wireless Network To connect to use the on the remote, enter your network's password, then highlight Connect and press OK. (If you want to RESET Audio Settings to your home network using an Ethernet cable, the TV automatically detects the connection. The Network Connection menu is displayed. 2. Using the QWERTY Keypad on -screen keyboard instead, highlight Show Keyboard and press OK.) 6. 5 M3D420SR / M3D421SR / M3D460SR / M3D550SR Resetting...
... button on the remote. Using the Network Connection Menu Your TV is displayed. 3. Connecting to a Wireless Network To connect to use the on the remote, enter your network's password, then highlight Connect and press OK. (If you want to RESET Audio Settings to your home network using an Ethernet cable, the TV automatically detects the connection. The Network Connection menu is displayed. 2. Using the QWERTY Keypad on -screen keyboard instead, highlight Show Keyboard and press OK.) 6. 5 M3D420SR / M3D421SR / M3D460SR / M3D550SR Resetting...

M3D420SR User Manual
Page 38
... Settings menu is connected and supports CEC. 5. Use this function to highlight Time & Local Settings and press OK. Press the MENU button on the remote. Press the MENU button on the remote. When system audio control is often used by VIA Apps to give you must be connected to control HDMI-connected devices with the included remote without any additional programming. Press the EXIT button on , you to the internet via an Ethernet cable or a wireless network. 1. Use...
... Settings menu is connected and supports CEC. 5. Use this function to highlight Time & Local Settings and press OK. Press the MENU button on the remote. Press the MENU button on the remote. When system audio control is often used by VIA Apps to give you must be connected to control HDMI-connected devices with the included remote without any additional programming. Press the EXIT button on , you to the internet via an Ethernet cable or a wireless network. 1. Use...
M3D420SR User Manual
Page 51
... audio connections of external devices (Blu-ray player, game console, cable/satellite box) that are connected to the TV. • If you are still experiencing an issue with new ones. Ensure your device's user manual for the best signal. 42 Devices differ; See Adjusting the Picture Settings on the remote aren't working electrical outlet. • Ensure the power cable is plugged into a working . • Ensure you are set to On. • Ensure no sound...
... audio connections of external devices (Blu-ray player, game console, cable/satellite box) that are connected to the TV. • If you are still experiencing an issue with new ones. Ensure your device's user manual for the best signal. 42 Devices differ; See Adjusting the Picture Settings on the remote aren't working electrical outlet. • Ensure the power cable is plugged into a working . • Ensure you are set to On. • Ensure no sound...
M3D420SR User Manual
Page 52
... picture is precision-manufactured using an extremely high level of technology. I change the screen mode. If the volume level on the new input source is connected securely to the TV and move the antenna around the room or close to match your TV's display capabilities. A When I see "noise" or static on page 12. 43 This up -converted (improved) to a window for the best signal...
... picture is precision-manufactured using an extremely high level of technology. I change the screen mode. If the volume level on the new input source is connected securely to the TV and move the antenna around the room or close to match your TV's display capabilities. A When I see "noise" or static on page 12. 43 This up -converted (improved) to a window for the best signal...
M3D420SR User Manual
Page 55
... installation and set-up issues or any type of protection. Proof of purchase in materials and workmanship. Replacement parts and Products are not covered. PRE-AUTHORIZATION IS REQUIRED BEFORE SENDING ANY PRODUCT TO A VIZIO SERVICE CENTER FOR WARRANTY SERVICE. Limitations and Exclusions VIZIO's one year limited warranty does not cover Products sold "AS IS", "FACTORY RECERTIFIED", or by a VIZIO authorized service center. THIS WARRANTY GIVES YOU SPECIFIC...
... installation and set-up issues or any type of protection. Proof of purchase in materials and workmanship. Replacement parts and Products are not covered. PRE-AUTHORIZATION IS REQUIRED BEFORE SENDING ANY PRODUCT TO A VIZIO SERVICE CENTER FOR WARRANTY SERVICE. Limitations and Exclusions VIZIO's one year limited warranty does not cover Products sold "AS IS", "FACTORY RECERTIFIED", or by a VIZIO authorized service center. THIS WARRANTY GIVES YOU SPECIFIC...
M3D420SR Quick Start Guide
Page 18
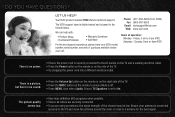
...; Product Setup • Technical Problems • Warranty Questions • And More For the best support experience, please have your VIZIO model number, serial number, and date of the TV. • Try plugging the power cord into a different electrical outlet. DO YOU HAVE QUESTIONS? Your VIZIO product includes FREE lifetime technical support. Ensure TV Speakers is connected securely to the TV and move the antenna around the room or close to...
...; Product Setup • Technical Problems • Warranty Questions • And More For the best support experience, please have your VIZIO model number, serial number, and date of the TV. • Try plugging the power cord into a different electrical outlet. DO YOU HAVE QUESTIONS? Your VIZIO product includes FREE lifetime technical support. Ensure TV Speakers is connected securely to the TV and move the antenna around the room or close to...
M3D420SR Quick Start Guide
Page 19
... the user manual. • Check all cables to Wide or Zoom Mode. Turn the 3D Blu-ray Player on first, then turn the 3D HDTV on the TV don't look right. • Adust the Color and Tint settings in the user manual. • Reset the picture settings. Press MENU, then select Help > Guided Setup. Select the type of your external device (Blu-ray™ or DVD player). • If using a supported desktop resolution. • Some television channels add black...
... the user manual. • Check all cables to Wide or Zoom Mode. Turn the 3D Blu-ray Player on first, then turn the 3D HDTV on the TV don't look right. • Adust the Color and Tint settings in the user manual. • Reset the picture settings. Press MENU, then select Help > Guided Setup. Select the type of your external device (Blu-ray™ or DVD player). • If using a supported desktop resolution. • Some television channels add black...


