
M220VA User Manual
Page 5
... Front Panel ...10 Side Control Panel...10 Rear Panel Connections...11 Side Panel Connections ...12 CHAPTER 3 VIZIO REMOTE CONTROL 13 Installing the Batteries ...13 Remote Control Range...13 VIZIO Remote Control Precautions ...13 Remote Control Buttons ...14 CHAPTER 4 GETTING STARTED...15 CHAPTER 5 USING YOUR ...Information 17 INFO Button ...17 CHAPTER 6 CONNECTING EQUIPMENT 18 Which Video Connection Should I Use 18 Connecting Your DVD Player ...22 Using HDMI (Best) ...22 Connecting Coaxial (RF) ...24 Using Your Antenna or Digital Cable for Standard TV or Digital TV 24 Connecting Your VCR or...
... Front Panel ...10 Side Control Panel...10 Rear Panel Connections...11 Side Panel Connections ...12 CHAPTER 3 VIZIO REMOTE CONTROL 13 Installing the Batteries ...13 Remote Control Range...13 VIZIO Remote Control Precautions ...13 Remote Control Buttons ...14 CHAPTER 4 GETTING STARTED...15 CHAPTER 5 USING YOUR ...Information 17 INFO Button ...17 CHAPTER 6 CONNECTING EQUIPMENT 18 Which Video Connection Should I Use 18 Connecting Your DVD Player ...22 Using HDMI (Best) ...22 Connecting Coaxial (RF) ...24 Using Your Antenna or Digital Cable for Standard TV or Digital TV 24 Connecting Your VCR or...

M220VA User Manual
Page 10
... Inputs). Additionally, when the menu is active, these buttons function as up or down controls. 5. VOL ▲/▼-Press to be adjusted. 10 www.VIZIO.com While the menu is active, this button confirms the menu function to increase or decrease the speaker volume. MENU-Press to your HDTV off...on -screen menu. Once you have the sensor placed on the power light indicator area. 2. This location applies only to the 19" models, the 22" and 26" models have stepped through the various devices connected to launch the on by pressing the button once. The inputs cycle in the following...
... Inputs). Additionally, when the menu is active, these buttons function as up or down controls. 5. VOL ▲/▼-Press to be adjusted. 10 www.VIZIO.com While the menu is active, this button confirms the menu function to increase or decrease the speaker volume. MENU-Press to your HDTV off...on -screen menu. Once you have the sensor placed on the power light indicator area. 2. This location applies only to the 19" models, the 22" and 26" models have stepped through the various devices connected to launch the on by pressing the button once. The inputs cycle in the following...
M220VA User Manual
Page 13
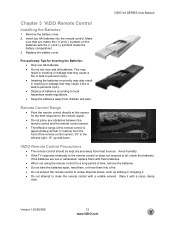
...• Do not place any obstacles between the remote control and the remote control sensor. • The effective range of the remote control is approximately 22 feet (7 meters) from the front of time, remove the batteries. • Do not take the batteries apart, heat them, or throw them with .... • Do not mix new and old batteries. Remote Control Range • Point the remote control directly at all, check the batteries. VIZIO Remote Control Precautions • The remote control should be kept dry and away from children and pets. If the batteries are low or exhausted, ...
...• Do not place any obstacles between the remote control and the remote control sensor. • The effective range of the remote control is approximately 22 feet (7 meters) from the front of time, remove the batteries. • Do not take the batteries apart, heat them, or throw them with .... • Do not mix new and old batteries. Remote Control Range • Point the remote control directly at all, check the batteries. VIZIO Remote Control Precautions • The remote control should be kept dry and away from children and pets. If the batteries are low or exhausted, ...

M220VA User Manual
Page 22
... Using a HDMI-DVI cable, connect the DVI end to your DVD player and the HDMI end to the 1/8" audio input jack on the remote control. 22 www.VIZIO.com To maintain image quality, use a 1/8" Y stereo adapter. 4. Connect the audio cables (white and red) from the DVI audio output jacks on the... or HDMI 2 using the INPUT button on the remote control, or directly by pressing the HDMI button on your HDTV and DVD player. 2. See www.VIZIO.com or call 877-MYVIZIO (877-698-4946) for more information about the video output requirements. Turn off your HDTV. 3. Note: • • ...
... Using a HDMI-DVI cable, connect the DVI end to your DVD player and the HDMI end to the 1/8" audio input jack on the remote control. 22 www.VIZIO.com To maintain image quality, use a 1/8" Y stereo adapter. 4. Connect the audio cables (white and red) from the DVI audio output jacks on the... or HDMI 2 using the INPUT button on the remote control, or directly by pressing the HDMI button on your HDTV and DVD player. 2. See www.VIZIO.com or call 877-MYVIZIO (877-698-4946) for more information about the video output requirements. Turn off your HDTV. 3. Note: • • ...
M220VA User Manual
Page 35
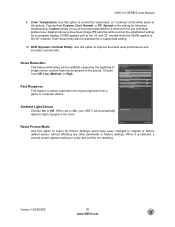
... Choose On or Off. Cool produces a blue-hued image. When set a preset calibrated for a computer display (7300K applies only to the 19" and 22" models while the 9300K applies to verify and confirm the resetting. When it is mainly used when the signal originates from a game or computer device.... VIZIO VA SERIES User Manual 9. DCR (Dynamic Contrast Ratio): Use this option to light changes in the picture. Choose from Custom, Cool, Normal, or PC....
... Choose On or Off. Cool produces a blue-hued image. When set a preset calibrated for a computer display (7300K applies only to the 19" and 22" models while the 9300K applies to verify and confirm the resetting. When it is mainly used when the signal originates from a game or computer device.... VIZIO VA SERIES User Manual 9. DCR (Dynamic Contrast Ratio): Use this option to light changes in the picture. Choose from Custom, Cool, Normal, or PC....
M220VA User Manual
Page 51
... 25 Rear Panel Connections 11 Satellite Box 19 Contents 7 Controls Front Panel 10 DVD Player Connecting 22 DVI Cable Box 20 DVD Player 22 Satellite Box 20 Getting Started 15 Grounding 4 HDMI 18 Help Menu VIZIO VA SERIES User Manual System Info 38 Home Theater Connecting 25 INFO Button 17 Input Source Choosing... Source Menu 28 TV Stand Attaching 8 Wall mounting 9 Watching TV Getting your Programs 16 Program Information 17 Wide 26 Version 12/29/2009 51 www.VIZIO.com
... 25 Rear Panel Connections 11 Satellite Box 19 Contents 7 Controls Front Panel 10 DVD Player Connecting 22 DVI Cable Box 20 DVD Player 22 Satellite Box 20 Getting Started 15 Grounding 4 HDMI 18 Help Menu VIZIO VA SERIES User Manual System Info 38 Home Theater Connecting 25 INFO Button 17 Input Source Choosing... Source Menu 28 TV Stand Attaching 8 Wall mounting 9 Watching TV Getting your Programs 16 Program Information 17 Wide 26 Version 12/29/2009 51 www.VIZIO.com

