

User Manual
Page 2
... in the User Manual. Never spill liquids on an unstable cart, stand, or table. If the product is dropped and the housing is exposed to ground the appliance safely. Operating the product in accordance with instructions. o The performance of the grounded plug. • Do not overload power strips and extension cords. Do not use an adapter to rain or other cables are...
... in the User Manual. Never spill liquids on an unstable cart, stand, or table. If the product is dropped and the housing is exposed to ground the appliance safely. Operating the product in accordance with instructions. o The performance of the grounded plug. • Do not overload power strips and extension cords. Do not use an adapter to rain or other cables are...
User Manual
Page 5
... is required, use a lag bolt, again using a washer under the screw head. The power consumption of the HDTV, using a washer underneath the screw head. VIZIO offers professional installation services. If you have a drywall finish it onto themselves. 1. VIZIO GV52L FHDTV10A User Manual Additional Certified Accessories for the VIZIO GV52L FHDTV10A are sold separately Wall Mounts High Definition Cables Extra or replacement Remote VIZIO also offers Installation Services and Extended Warranty Services for your VIZIO GV52L FHDTV10A...
... is required, use a lag bolt, again using a washer under the screw head. The power consumption of the HDTV, using a washer underneath the screw head. VIZIO offers professional installation services. If you have a drywall finish it onto themselves. 1. VIZIO GV52L FHDTV10A User Manual Additional Certified Accessories for the VIZIO GV52L FHDTV10A are sold separately Wall Mounts High Definition Cables Extra or replacement Remote VIZIO also offers Installation Services and Extended Warranty Services for your VIZIO GV52L FHDTV10A...

User Manual
Page 6
To remove the stand base Unplug all of the cables and cords from your specific mount to properly hang the GV52L FHDTV10A. The screw type required is 630mm horizontally and 200mm vertically. The length of your GV52L FHDTV10A. VIZIO GV52L FHDTV10A User Manual Preparing Your LCD HDTV for Wall Mounting The VIZIO GV52L FHDTV10A can be kept on the stand base or mounted on the wall for viewing. If you choose to mount the...
To remove the stand base Unplug all of the cables and cords from your specific mount to properly hang the GV52L FHDTV10A. The screw type required is 630mm horizontally and 200mm vertically. The length of your GV52L FHDTV10A. VIZIO GV52L FHDTV10A User Manual Preparing Your LCD HDTV for Wall Mounting The VIZIO GV52L FHDTV10A can be kept on the stand base or mounted on the wall for viewing. If you choose to mount the...

User Manual
Page 9
... 2.3.3 Using the Antenna or Cable through your VCR 24 2.4 Connecting Your DVD Player ...25 2.4.1 Using HDMI ...25 2.4.2 Using Component Video...27 2.4.3 Using S-Video (AV1)...28 2.4.4 Using Composite (AV) Video ...29 2.5 Connecting Your VCR or Video Camera ...30 2.6 Connecting an external Receiver/Amp ...31 2.7 Connecting a PC Computer ...32 2.7.1 Preset PC Resolutions...33 2.7.2 Resolution (1920x1080) through RGB (15-Pin VGA) Input 33 Chapter 3 Setting Up to Watch Television 34 3.1 Basic LCD HDTV Start Up ...34 3.2 Watching a TV Program ...37 3.3 Adjusting Basic LCD HDTV Settings ...37...
... 2.3.3 Using the Antenna or Cable through your VCR 24 2.4 Connecting Your DVD Player ...25 2.4.1 Using HDMI ...25 2.4.2 Using Component Video...27 2.4.3 Using S-Video (AV1)...28 2.4.4 Using Composite (AV) Video ...29 2.5 Connecting Your VCR or Video Camera ...30 2.6 Connecting an external Receiver/Amp ...31 2.7 Connecting a PC Computer ...32 2.7.1 Preset PC Resolutions...33 2.7.2 Resolution (1920x1080) through RGB (15-Pin VGA) Input 33 Chapter 3 Setting Up to Watch Television 34 3.1 Basic LCD HDTV Start Up ...34 3.2 Watching a TV Program ...37 3.3 Adjusting Basic LCD HDTV Settings ...37...
User Manual
Page 10
... PC Input Setup ...57 4.18 Understanding Viewing Modes...58 4.18.1 Picture-In-Picture (PIP) Mode...59 4.18.2 Using PIP/POP Feature...60 4.18.3 How to select PIP/POP...62 4.19 Programming the VIZIO Universal Remote Control 63 4.19.1 Programming for Audio Tuner Amplifier 63 4.19.2 Programming for Cable Set-Top Box...63 4.19.3 Programming for DVD Player ...64 4.19.4 Searching for Component Codes ...64 4.20 Using a Cable or Satellite Remote ...64 Chapter 5 Maintenance and Troubleshooting 65 5.1 Maintenance...65 5.2 Troubleshooting Guide ...65 5.3 Telephone & Technical Support ...67...
... PC Input Setup ...57 4.18 Understanding Viewing Modes...58 4.18.1 Picture-In-Picture (PIP) Mode...59 4.18.2 Using PIP/POP Feature...60 4.18.3 How to select PIP/POP...62 4.19 Programming the VIZIO Universal Remote Control 63 4.19.1 Programming for Audio Tuner Amplifier 63 4.19.2 Programming for Cable Set-Top Box...63 4.19.3 Programming for DVD Player ...64 4.19.4 Searching for Component Codes ...64 4.20 Using a Cable or Satellite Remote ...64 Chapter 5 Maintenance and Troubleshooting 65 5.1 Maintenance...65 5.2 Troubleshooting Guide ...65 5.3 Telephone & Technical Support ...67...

User Manual
Page 13
... system, external amplifier or stereo. The white color band on the rear of the TV indicates this SPDIF Optical connector for left speaker. Connect the primary source for component video devices such as a DVD multimedia player or set top box here. The white color band on the rear of the source into L+R audio connectors (red and white connectors). To supply the audio signal either a straight 1/8" to 1/8" stereo cable or a Y-adapter cable (L+R audio to a DVI enabled device, use green for Y, blue...
... system, external amplifier or stereo. The white color band on the rear of the TV indicates this SPDIF Optical connector for left speaker. Connect the primary source for component video devices such as a DVD multimedia player or set top box here. The white color band on the rear of the source into L+R audio connectors (red and white connectors). To supply the audio signal either a straight 1/8" to 1/8" stereo cable or a Y-adapter cable (L+R audio to a DVI enabled device, use green for Y, blue...

User Manual
Page 15
... inputs. When selecting a digital channel directly use this button to select a channel or enter a password. Blinks when the remote operates. For example, channel 28-2 would be used to control up to four different components. This button allows the user to the Standby mode. NOTE: This is a programmable remote supporting up to 4 devices (see TV, VCR, CABLE, DVD buttons at the top of the Remote Control. If the remote is not working with your VIZIO TV, press the TV button...
... inputs. When selecting a digital channel directly use this button to select a channel or enter a password. Blinks when the remote operates. For example, channel 28-2 would be used to control up to four different components. This button allows the user to the Standby mode. NOTE: This is a programmable remote supporting up to 4 devices (see TV, VCR, CABLE, DVD buttons at the top of the Remote Control. If the remote is not working with your VIZIO TV, press the TV button...

User Manual
Page 16
... button displays program information. This button recalls the previously viewed channel. This button displays the image and system information display. Use the OK button to operate the On-Screen Display (OSD) after it has been activated by pressing the MENU button. GUIDE - MUTE - CH (+ or -) - EXIT - LAST - VOL (+ or -) - This button turns the sound on and off. Version 10/4/2007 16 www.VIZIO.com These buttons turn the volume up or down . VIZIO GV52L FHDTV10A User Manual Use this button...
... button displays program information. This button recalls the previously viewed channel. This button displays the image and system information display. Use the OK button to operate the On-Screen Display (OSD) after it has been activated by pressing the MENU button. GUIDE - MUTE - CH (+ or -) - EXIT - LAST - VOL (+ or -) - This button turns the sound on and off. Version 10/4/2007 16 www.VIZIO.com These buttons turn the volume up or down . VIZIO GV52L FHDTV10A User Manual Use this button...

User Manual
Page 19
... (type) Connector Rear Panel Color Codes Description Best (digital) White HDMI (High-Definition Multimedia Interface) - HDMI provides an interface between any audio/video source, such as a digital television (DTV), over S-Video takes advantage of the superior picture provided by progressive scan DVD players and HDTV formats. Green and Purple Component 1/2 - Good (analog) Orange AV2 (Composite) - This is the most advanced for standard NTSC TV using antenna or cable. VIZIO GV52L FHDTV10A User Manual Chapter 2 Connecting Equipment 2.1 Which Video Connection Should I Use...
... (type) Connector Rear Panel Color Codes Description Best (digital) White HDMI (High-Definition Multimedia Interface) - HDMI provides an interface between any audio/video source, such as a digital television (DTV), over S-Video takes advantage of the superior picture provided by progressive scan DVD players and HDTV formats. Green and Purple Component 1/2 - Good (analog) Orange AV2 (Composite) - This is the most advanced for standard NTSC TV using antenna or cable. VIZIO GV52L FHDTV10A User Manual Chapter 2 Connecting Equipment 2.1 Which Video Connection Should I Use...
User Manual
Page 20
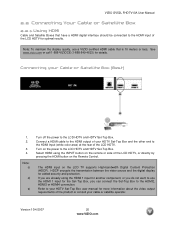
... connection. VIZIO GV52L FHDTV10A User Manual 2.2 Connecting Your Cable or Satellite Box 2.2.1 Using HDMI Cable and Satellite Boxes that is 10 meters or less. Connecting your HDTV Set-Top Box and the other end to the LCD HDTV and HDTV Set-Top Box. Turn on the LCD TV supports High-bandwidth Digital Content Protection (HDCP). The HDMI input on the power to the HDMI Input (white color area) at the rear of your Cable or Satellite Box (Best) 1. 2. 3. 4. Version 10/4/2007 20 www.VIZIO.com Select HDMI using...
... connection. VIZIO GV52L FHDTV10A User Manual 2.2 Connecting Your Cable or Satellite Box 2.2.1 Using HDMI Cable and Satellite Boxes that is 10 meters or less. Connecting your HDTV Set-Top Box and the other end to the LCD HDTV and HDTV Set-Top Box. Turn on the LCD TV supports High-bandwidth Digital Content Protection (HDCP). The HDMI input on the power to the HDMI Input (white color area) at the rear of your Cable or Satellite Box (Best) 1. 2. 3. 4. Version 10/4/2007 20 www.VIZIO.com Select HDMI using...

User Manual
Page 22
... (blue color) connector in the Component 1 group (green color area - Version 10/4/2007 22 www.VIZIO.com row of the LCD HDTV. 6. VIZIO GV52L FHDTV10A User Manual 2.2.2 Using Component Video Connecting your HDTV Set-Top Box to the LCD HDTV and HDTV Set-Top Box. 7. Refer to you when viewing from the rear of the TV) at the rear of connectors nearest to your HDTV Set-Top Box user manual for the Set-Top Box, you are already using the INPUT button on the remote or...
... (blue color) connector in the Component 1 group (green color area - Version 10/4/2007 22 www.VIZIO.com row of the LCD HDTV. 6. VIZIO GV52L FHDTV10A User Manual 2.2.2 Using Component Video Connecting your HDTV Set-Top Box to the LCD HDTV and HDTV Set-Top Box. 7. Refer to you when viewing from the rear of the TV) at the rear of connectors nearest to your HDTV Set-Top Box user manual for the Set-Top Box, you are already using the INPUT button on the remote or...

User Manual
Page 32
... pc computer user manual for more information about the video output requirements of VESA Reduce Blanking timing. VIZIO GV52L FHDTV10A User Manual 2.7 Connecting a PC Computer 1. Refer to VESA 1360x768 at 60Hz resolution when using the INPUT button on the remote or side of the LCD HDTV, or directly by way of the product. Note: a) b) c) For a better picture quality when connecting a pc computer through RGB PC, set your pc computer timing mode to your...
... pc computer user manual for more information about the video output requirements of VESA Reduce Blanking timing. VIZIO GV52L FHDTV10A User Manual 2.7 Connecting a PC Computer 1. Refer to VESA 1360x768 at 60Hz resolution when using the INPUT button on the remote or side of the LCD HDTV, or directly by way of the product. Note: a) b) c) For a better picture quality when connecting a pc computer through RGB PC, set your pc computer timing mode to your...

User Manual
Page 45
... Tuner Setup When you first used your setup has changed, you can do this from the TV TUNER SETUP menu. 4.5.1 Tuner Mode When the MENU button is pressed, the On Screen Display (OSD) appears on the remote control. The TV will automatically search for analog and digital channels. 4.5.3 Skip Channel After the TV has stored all of the available DTV channels in memory you have setup your TV for the simulated surround sound...
... Tuner Setup When you first used your setup has changed, you can do this from the TV TUNER SETUP menu. 4.5.1 Tuner Mode When the MENU button is pressed, the On Screen Display (OSD) appears on the remote control. The TV will automatically search for analog and digital channels. 4.5.3 Skip Channel After the TV has stored all of the available DTV channels in memory you have setup your TV for the simulated surround sound...

User Manual
Page 60
... on the type of which you want the PIP screen positioned over the main screen. Size Press the press the or Large. Make sure to leave the audio (red and white) cables in place since only the video or image is called RCA (composite cables) connectors, on the picture you use to switch the audio source from the main screen (default) to the sub screen, and the button SWAP which...
... on the type of which you want the PIP screen positioned over the main screen. Size Press the press the or Large. Make sure to leave the audio (red and white) cables in place since only the video or image is called RCA (composite cables) connectors, on the picture you use to switch the audio source from the main screen (default) to the sub screen, and the button SWAP which...

User Manual
Page 63
... using the Number Buttons. Press and hold the SET button until the LED LIGHT flashes twice. 4. If the LED does not flash twice, repeat Steps 2 through 4 with the next code listed for Audio Tuner Amplifier 1. Point the remote control at the Cable Box and press the POWER button. Find the programming code for your Audio Tuner Amplifier, Cable Box and DVD Player. 4.19.1 Programming for the component and manufacturer. 5. If the codes do not work, or your brand. Press the Audio button on the remote control...
... using the Number Buttons. Press and hold the SET button until the LED LIGHT flashes twice. 4. If the LED does not flash twice, repeat Steps 2 through 4 with the next code listed for Audio Tuner Amplifier 1. Point the remote control at the Cable Box and press the POWER button. Find the programming code for your Audio Tuner Amplifier, Cable Box and DVD Player. 4.19.1 Programming for the component and manufacturer. 5. If the codes do not work, or your brand. Press the Audio button on the remote control...

User Manual
Page 64
.... To use a cable or satellite remote to work , or your brand. VIZIO GV52L FHDTV10A User Manual 4.19.3 Programming for the component and manufacturer. 5. Press and hold the SET button until the LED LIGHT flashes twice. 4. Point the remote control at the component and then alternate between pressing the POWER button and the component button on the DVD Player. 2. If your cable or satellite remote user guide for more functionality. 4.19.4 Searching for the correct component code. Try other codes that...
.... To use a cable or satellite remote to work , or your brand. VIZIO GV52L FHDTV10A User Manual 4.19.3 Programming for the component and manufacturer. 5. Press and hold the SET button until the LED LIGHT flashes twice. 4. Point the remote control at the component and then alternate between pressing the POWER button and the component button on the DVD Player. 2. If your cable or satellite remote user guide for more functionality. 4.19.4 Searching for the correct component code. Try other codes that...

User Manual
Page 65
.... 5.2 Troubleshooting Guide If the TV fails or the performance changes dramatically, check the display in accordance with the following instructions. The screen glass is ON (White VIZIO Logo). Wring water out of the cloth before cleaning the TV. 2. Solution Make sure the power button is very fragile. Check your audio connection Press MUTE on your TV audio may damage the housing, screen glass and remote control...
.... 5.2 Troubleshooting Guide If the TV fails or the performance changes dramatically, check the display in accordance with the following instructions. The screen glass is ON (White VIZIO Logo). Wring water out of the cloth before cleaning the TV. 2. Solution Make sure the power button is very fragile. Check your audio connection Press MUTE on your TV audio may damage the housing, screen glass and remote control...

User Manual
Page 66
... work . signal is connected to make sure that H Size and V Position in RGB or HDMI mode, press any colors (red, green, or blue) are using RGB mode, make sure it . If the sound and the volume changes. Make sure you adjusted it appear. You see a picture but no screen image. Power is not muted. Make sure the video cable supplied with your computer. Make sure that the power cord is secured to a different input...
... work . signal is connected to make sure that H Size and V Position in RGB or HDMI mode, press any colors (red, green, or blue) are using RGB mode, make sure it . If the sound and the volume changes. Make sure you adjusted it appear. You see a picture but no screen image. Power is not muted. Make sure the video cable supplied with your computer. Make sure that the power cord is secured to a different input...

User Manual
Page 71
...45 Reset, 48 Sleep Timer, 47 DTV Tuner Setup Auto Search, 47 DVI Connecting your Cable Box, 21 Connecting your DVD Player, 26 Connecting your Satellite Box, 21 G Glossary, 70 H HDMI Connecting your Cable Box, 20 Connecting your DVD Player, 25 Connecting your Satellite Box, 20 HDMI Input Audio Adjustment, 52 Picture Adjustment, 52 Setup, 52 I Inputs Antenna, 3 Connectors, 19 Rear Label, 12 Rear Label, 13 Installation Base removal, 6 Preparation, 5 Safetey Strap, 5 Safety Instructions, 2 Speaker Removal, 7 Wall Mounting, 5, 6, 34 O OSD Brightness Adjustment, 69 Closed Caption Selection, 17 Color...
...45 Reset, 48 Sleep Timer, 47 DTV Tuner Setup Auto Search, 47 DVI Connecting your Cable Box, 21 Connecting your DVD Player, 26 Connecting your Satellite Box, 21 G Glossary, 70 H HDMI Connecting your Cable Box, 20 Connecting your DVD Player, 25 Connecting your Satellite Box, 20 HDMI Input Audio Adjustment, 52 Picture Adjustment, 52 Setup, 52 I Inputs Antenna, 3 Connectors, 19 Rear Label, 12 Rear Label, 13 Installation Base removal, 6 Preparation, 5 Safetey Strap, 5 Safety Instructions, 2 Speaker Removal, 7 Wall Mounting, 5, 6, 34 O OSD Brightness Adjustment, 69 Closed Caption Selection, 17 Color...

User Manual
Page 72
... Picture Adjustment, 53, 54 Setup, 57 PIP Position, 60 Size, 60 PIP and POP Inputs, 59 R Remote Batteries, 18 Layout, 15, 18, 63 Range, 18 Remote Control Codes for other devices., 75 Programming to work your DVD Player, 64 Programming to work your Set-Top Box, 63 Using your Cable or Satellite Remote to Operate your VIZIO TV, 64 RGB Connecting your PC, 32 S S-Video Connecting your DVD Player, 28, 29 T Technical Specifications, 69 Troubleshooting Guide, 65 TV VIZIO GV52L FHDTV10A User Manual Audio Adjustment, 44 Parental Control, 49 Picture Adjustment...
... Picture Adjustment, 53, 54 Setup, 57 PIP Position, 60 Size, 60 PIP and POP Inputs, 59 R Remote Batteries, 18 Layout, 15, 18, 63 Range, 18 Remote Control Codes for other devices., 75 Programming to work your DVD Player, 64 Programming to work your Set-Top Box, 63 Using your Cable or Satellite Remote to Operate your VIZIO TV, 64 RGB Connecting your PC, 32 S S-Video Connecting your DVD Player, 28, 29 T Technical Specifications, 69 Troubleshooting Guide, 65 TV VIZIO GV52L FHDTV10A User Manual Audio Adjustment, 44 Parental Control, 49 Picture Adjustment...


