User Guide
Page 2
... can be replaced when using dropped or damaged appliances. Do not install the product close to smoke or moisture may expose you are unplugged before connecting other hazards. To ensure reliable operation of the GV47L LCD HDTV and to protect it will protect the GV47L LCD HDTV from the type of time. This plug will not be operated only from damage due to power surges...
... can be replaced when using dropped or damaged appliances. Do not install the product close to smoke or moisture may expose you are unplugged before connecting other hazards. To ensure reliable operation of the GV47L LCD HDTV and to protect it will protect the GV47L LCD HDTV from the type of time. This plug will not be operated only from damage due to power surges...
User Guide
Page 5
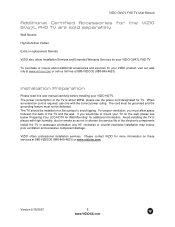
... like to mount your TV on the wall, please see below 'Preparing Your LCD HDTV for Wall Mounting' for TV. VIZIO GV47L FHD TV User Manual Additional Certified Accessories for the VIZIO GV47L FHD TV are sold separately Wall Mounts High Definition Cables Extra or replacement Remote VIZIO also offers Installation Services and Extended Warranty Services for your VIZIO GV47L FHD TV To purchase or inquire about 280W, please use one with...
... like to mount your TV on the wall, please see below 'Preparing Your LCD HDTV for Wall Mounting' for TV. VIZIO GV47L FHD TV User Manual Additional Certified Accessories for the VIZIO GV47L FHD TV are sold separately Wall Mounts High Definition Cables Extra or replacement Remote VIZIO also offers Installation Services and Extended Warranty Services for your VIZIO GV47L FHD TV To purchase or inquire about 280W, please use one with...
User Guide
Page 6
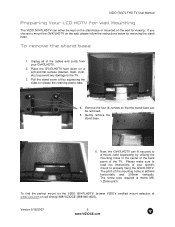
... the back panel of the cables and cords from your specific mount to properly hang the GV47LHDTV. Please make sure to release the retaining plastic tabs. 4. The pitch of your GV47LHDTV. 2. Gently remove the stand base. 6. VIZIO GV47L FHD TV User Manual Preparing Your LCD HDTV for Wall Mounting The VIZIO GV47LHDTV can either be removed. 5. Unplug all of the TV. Remove the four (4) screws so that the stand base can...
... the back panel of the cables and cords from your specific mount to properly hang the GV47LHDTV. Please make sure to release the retaining plastic tabs. 4. The pitch of your GV47LHDTV. 2. Gently remove the stand base. 6. VIZIO GV47L FHD TV User Manual Preparing Your LCD HDTV for Wall Mounting The VIZIO GV47LHDTV can either be removed. 5. Unplug all of the TV. Remove the four (4) screws so that the stand base can...
User Guide
Page 8
... User Manual Table of Contents Chapter 1 Basic Controls and Connections 10 1.1 Front Bezel ...10 1.2 Sensor Touch Controls...10 1.3 Rear Panel Connections ...11 1.4 VIZIO Universal Remote Control ...13 1.4.1 Insertion of Batteries in the Remote Control 15 1.4.2 Remote Control Range ...15 1.4.3 VIZIO Universal Remote Control Precautions 15 Chapter 2 Connecting Equipment 16 2.1 Which Video Connection Should I Use?...16 2.2 Connecting Your Cable or Satellite Box ...17 2.2.1 Using HDMI ...17 2.2.2 Using Component Video...19 2.3 Connecting Coaxial (RF) ...20 2.3.1 Using Your Antenna or Digital...
... User Manual Table of Contents Chapter 1 Basic Controls and Connections 10 1.1 Front Bezel ...10 1.2 Sensor Touch Controls...10 1.3 Rear Panel Connections ...11 1.4 VIZIO Universal Remote Control ...13 1.4.1 Insertion of Batteries in the Remote Control 15 1.4.2 Remote Control Range ...15 1.4.3 VIZIO Universal Remote Control Precautions 15 Chapter 2 Connecting Equipment 16 2.1 Which Video Connection Should I Use?...16 2.2 Connecting Your Cable or Satellite Box ...17 2.2.1 Using HDMI ...17 2.2.2 Using Component Video...19 2.3 Connecting Coaxial (RF) ...20 2.3.1 Using Your Antenna or Digital...
User Guide
Page 9
...Input Special Features ...53 4.15.1 Understanding Viewing Features...54 4.15.2 Viewing Modes ...54 4.15.3 Picture-In-Picture(PIP)/Picture-by-Picture(POP)Mode 55 4.15.4 Adjusting Basic PIP/POP Settings ...55 4.15.5 Setting the Sleep Timer ...56 4.16 Programming the VIZIO Universal Remote Control 57 4.16.1 Programming for VCR ...57 4.16.2 Programming for Cable Set-Top Box...57 4.16.3 Programming for DVD Player ...58 4.16.4 Searching for Component Codes ...58 4.17 Using a Cable or Satellite Remote ...58 Chapter 5 Maintenance and Troubleshooting 59 5.1 Maintenance...59 5.2 Troubleshooting Guide...
...Input Special Features ...53 4.15.1 Understanding Viewing Features...54 4.15.2 Viewing Modes ...54 4.15.3 Picture-In-Picture(PIP)/Picture-by-Picture(POP)Mode 55 4.15.4 Adjusting Basic PIP/POP Settings ...55 4.15.5 Setting the Sleep Timer ...56 4.16 Programming the VIZIO Universal Remote Control 57 4.16.1 Programming for VCR ...57 4.16.2 Programming for Cable Set-Top Box...57 4.16.3 Programming for DVD Player ...58 4.16.4 Searching for Component Codes ...58 4.17 Using a Cable or Satellite Remote ...58 Chapter 5 Maintenance and Troubleshooting 59 5.1 Maintenance...59 5.2 Troubleshooting Guide...
User Guide
Page 13
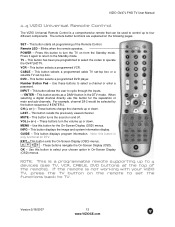
... remote). This button selects a programmed DVD player. When selecting a digital channel directly use this button for DTV. For example, channel 28-2 would be used to control up or down . LAST - EXIT - This button recalls the previously viewed channel. This button displays program information. GUIDE - Use this button is only functional for the On-Screen Display (OSD) menus. Blinks when the remote operates. INPUT - POWER - This button has been pre-programmed to select the codes to cycle through the inputs. - / ENTER - Use these buttons to the Standby mode...
... remote). This button selects a programmed DVD player. When selecting a digital channel directly use this button for DTV. For example, channel 28-2 would be used to control up or down . LAST - EXIT - This button recalls the previously viewed channel. This button displays program information. GUIDE - Use this button is only functional for the On-Screen Display (OSD) menus. Blinks when the remote operates. INPUT - POWER - This button has been pre-programmed to select the codes to cycle through the inputs. - / ENTER - Use these buttons to the Standby mode...
User Guide
Page 16
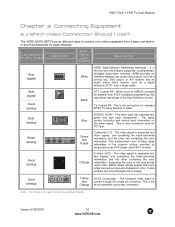
...HDMI provides an interface between any audio/video source, such as a set-top box, DVD player, or A/V receiver and an audio and/or video monitor, such as a digital television (DTV), over S-Video takes advantage of the High Definition content. Component 1/2 - Connection Quality (type) Connector Rear Panel Color Codes Description Best (digital) Best (digital Good (analog) Best (analog) Better (analog) Good (analog) White Black Blue Green and Purple Orange HDMI (High-Definition Multimedia Interface) - DTV Coaxial RF. When used for standard NTSC TV using antenna or cable. S-Video...
...HDMI provides an interface between any audio/video source, such as a set-top box, DVD player, or A/V receiver and an audio and/or video monitor, such as a digital television (DTV), over S-Video takes advantage of the High Definition content. Component 1/2 - Connection Quality (type) Connector Rear Panel Color Codes Description Best (digital) Best (digital Good (analog) Best (analog) Better (analog) Good (analog) White Black Blue Green and Purple Orange HDMI (High-Definition Multimedia Interface) - DTV Coaxial RF. When used for standard NTSC TV using antenna or cable. S-Video...
User Guide
Page 17
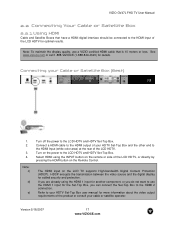
... operator. The HDMI input on the power to the HDMI Input (white color area) at the rear of your Cable or Satellite Box (Best) 1. 2. 3. 4. Refer to the LCD HDTV and HDTV Set-Top Box. Note: To maintain the display quality, use the HDMI 1 input for the Set-Top Box, you are already using the INPUT button on the Remote Control. Select HDMI using the HDMI 1 input for another component, or you do not want to use a VIZIO certified HDMI cable that have a HDMI digital interface should be connected to the HDMI 2 connection...
... operator. The HDMI input on the power to the HDMI Input (white color area) at the rear of your Cable or Satellite Box (Best) 1. 2. 3. 4. Refer to the LCD HDTV and HDTV Set-Top Box. Note: To maintain the display quality, use the HDMI 1 input for the Set-Top Box, you are already using the INPUT button on the Remote Control. Select HDMI using the HDMI 1 input for another component, or you do not want to use a VIZIO certified HDMI cable that have a HDMI digital interface should be connected to the HDMI 2 connection...

User Guide
Page 19
... viewing from the rear of the TV) at the rear of connectors nearest to you can connect the Set-Top Box to the Component 2 connections coded by pressing the Component button on your cable or satellite operator. Turn off the power to the LCD HDTV and HDTV Set-Top Box. 7. row of the LCD HDTV. 5. Connect the Pr (red color) connector on the Remote Control. VIZIO GV47L FHD TV User Manual 2.2.2 Using Component Video Connecting your HDTV Set-Top Box to the corresponding Y (green color) connector in the Component 1 group (green color...
... viewing from the rear of the TV) at the rear of connectors nearest to you can connect the Set-Top Box to the Component 2 connections coded by pressing the Component button on your cable or satellite operator. Turn off the power to the LCD HDTV and HDTV Set-Top Box. 7. row of the LCD HDTV. 5. Connect the Pr (red color) connector on the Remote Control. VIZIO GV47L FHD TV User Manual 2.2.2 Using Component Video Connecting your HDTV Set-Top Box to the corresponding Y (green color) connector in the Component 1 group (green color...
User Guide
Page 29
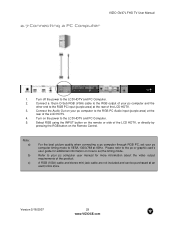
... D-Sub RGB (VGA) cable to the RGB output of your pc computer to the RGB PC input (purple area) at an electronics store. VIZIO GV47L FHD TV User Manual 2.7 Connecting a PC Computer 1. Turn off the power to the LCD HDTV and PC Computer. 5. Turn on the Remote Control. Please refer to the pc or graphic card's user guide for more information about the video output requirements of the LCD HDTV. 4.
... D-Sub RGB (VGA) cable to the RGB output of your pc computer to the RGB PC input (purple area) at an electronics store. VIZIO GV47L FHD TV User Manual 2.7 Connecting a PC Computer 1. Turn off the power to the LCD HDTV and PC Computer. 5. Turn on the Remote Control. Please refer to the pc or graphic card's user guide for more information about the video output requirements of the LCD HDTV. 4.
User Guide
Page 46
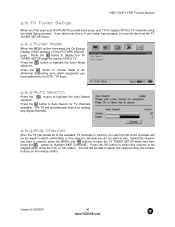
... able to select this channel using the number buttons on the PICTURE ADJUST page. Press the button to display the TV TUNER SETUP page for TV channels available. Select the channel you have setup your setup has changed, you can do not want to see. button. You will still be skipped when using the Initial Setup screens. button to highlight the Tuner Mode Press the button to choose Cable or Air (Antenna) depending upon which...
... able to select this channel using the number buttons on the PICTURE ADJUST page. Press the button to display the TV TUNER SETUP page for TV channels available. Select the channel you have setup your setup has changed, you can do not want to see. button. You will still be skipped when using the Initial Setup screens. button to highlight the Tuner Mode Press the button to choose Cable or Air (Antenna) depending upon which...
User Guide
Page 47
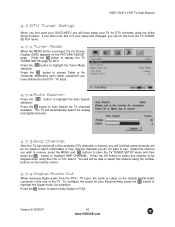
... this channel to display the TV TUNER SETUP page for TV channels available. To configure the output for analog and digital channels. 4.7.3 Skip Channel After the TV has stored all of the TV. Version 5/18/2007 47 www.VIZIOCE.com Press the button to be skipped when using the number buttons on the remote control. 4.7.4 Digital Audio Out When receiving digital audio from the TV TUNER SETUP menu. 4.7.1 Tuner Mode When the MENU button is output on the PICTURE ADJUST page...
... this channel to display the TV TUNER SETUP page for TV channels available. To configure the output for analog and digital channels. 4.7.3 Skip Channel After the TV has stored all of the TV. Version 5/18/2007 47 www.VIZIOCE.com Press the button to be skipped when using the number buttons on the remote control. 4.7.4 Digital Audio Out When receiving digital audio from the TV TUNER SETUP menu. 4.7.1 Tuner Mode When the MENU button is output on the PICTURE ADJUST page...
User Guide
Page 56
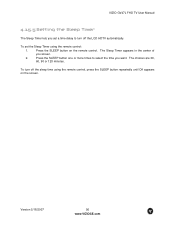
... the SLEEP button on the screen. The choices are 30, 60, 90 or 120 minutes. Version 5/18/2007 56 www.VIZIOCE.com To turn off the sleep time using the remote control: 1. Press the SLEEP button one or more times to turn off the LCD HDTV automatically. VIZIO GV47L FHD TV User Manual 4.15.5 Setting the Sleep Timer The Sleep Timer lets you set the Sleep Timer using the remote control, press the SLEEP button repeatedly until Off appears on the remote control.
... the SLEEP button on the screen. The choices are 30, 60, 90 or 120 minutes. Version 5/18/2007 56 www.VIZIOCE.com To turn off the sleep time using the remote control: 1. Press the SLEEP button one or more times to turn off the LCD HDTV automatically. VIZIO GV47L FHD TV User Manual 4.15.5 Setting the Sleep Timer The Sleep Timer lets you set the Sleep Timer using the remote control, press the SLEEP button repeatedly until Off appears on the remote control.
User Guide
Page 57
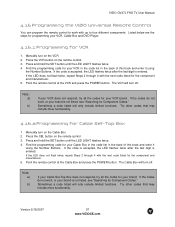
... the codes for your VCR, Cable Box and DVD Player. 4.16.1 Programming for Cable Set-Top Box 1. If the LED does not flash twice, repeat Steps 2 through 4 with up to work , or your brand is entered. VIZIO GV47L FHD TV User Manual 4.16 Programming the VIZIO Universal Remote Control You can program the remote control to four different components. Point the remote control at the Cable Box and press the POWER button. If the codes do not work, or your brand. Listed below...
... the codes for your VCR, Cable Box and DVD Player. 4.16.1 Programming for Cable Set-Top Box 1. If the LED does not flash twice, repeat Steps 2 through 4 with up to work , or your brand is entered. VIZIO GV47L FHD TV User Manual 4.16 Programming the VIZIO Universal Remote Control You can program the remote control to four different components. Point the remote control at the Cable Box and press the POWER button. If the codes do not work, or your brand. Listed below...
User Guide
Page 58
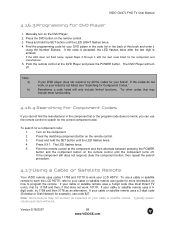
... Component Codes." Point the remote control at the DVD Player and press the POWER button. If the LED does not flash twice, repeat Steps 2 through 4 with the next code listed for DVD Player 1. Press and hold the SET button until the LED LIGHT flashes twice. 4. Press and hold the SET button until the LED flashes twice. 4. VIZIO GV47L FHD TV User Manual 4.16.3 Programming for the component and manufacturer. 5. If the code is accepted, the LED flashes twice after the last digit...
... Component Codes." Point the remote control at the DVD Player and press the POWER button. If the LED does not flash twice, repeat Steps 2 through 4 with the next code listed for DVD Player 1. Press and hold the SET button until the LED LIGHT flashes twice. 4. Press and hold the SET button until the LED flashes twice. 4. VIZIO GV47L FHD TV User Manual 4.16.3 Programming for the component and manufacturer. 5. If the code is accepted, the LED flashes twice after the last digit...

User Guide
Page 59
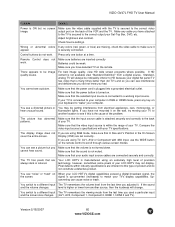
... audio settings, your input connections. 59 www.VIZIOCE.com Problem No power. Check your audio connection Press MUTE on your remote control Make sure that the power cable is securely connected to gently clean the screen. 2. VIZIO GV47L FHD TV User Manual Chapter 5 Maintenance and Troubleshooting 5.1 Maintenance Important 1. Wring water out of the cloth before cleaning to clean the TV. No sound. Version 5/18/2007 Solution Make sure the power button...
... audio settings, your input connections. 59 www.VIZIOCE.com Problem No power. Check your audio connection Press MUTE on your remote control Make sure that the power cable is securely connected to gently clean the screen. 2. VIZIO GV47L FHD TV User Manual Chapter 5 Maintenance and Troubleshooting 5.1 Maintenance Important 1. Wring water out of the cloth before cleaning to clean the TV. No sound. Version 5/18/2007 Solution Make sure the power button...
User Guide
Page 60
... input and the screen size changes. (AV1, AV2, Component 1, Component 2, HDMI 1, HDMI 2 and TV). The picture has abnormal patterns. You switch to your TV's display capabilities. If you have attached to the TV is secured to the correct video output port on the back of your LCD HDTV's digital capabilities exceed a digital broadcast signal, the the screen. Compare the video input source's specifications with the TV is secured to the correct output your audio input source cables are inserted correctly work...
... input and the screen size changes. (AV1, AV2, Component 1, Component 2, HDMI 1, HDMI 2 and TV). The picture has abnormal patterns. You switch to your TV's display capabilities. If you have attached to the TV is secured to the correct video output port on the back of your LCD HDTV's digital capabilities exceed a digital broadcast signal, the the screen. Compare the video input source's specifications with the TV is secured to the correct output your audio input source cables are inserted correctly work...
User Guide
Page 65
... Caption, 45 Closed Caption Style, 45 Language, 44 PIP Position, 45 Reset, 45 Sleep Timer, 44 DTV Tuner Setup Auto Search, 47 Daylight Saving, 48 Digital Audio Out, 47 Skip Channel, 47 Time Zone, 48 Tuner Mode, 47 DVI Connecting your Cable Box, 18 Connecting your DVD Player, 23 Connecting your Satellite Box, 18 E Extended Warranty, 69 G Glossary, 64 H HDMI Connecting your Cable Box, 17 Connecting your DVD Player, 22 Connecting your Satellite Box, 17 I Inputs Antenna, 3 Connectors, 16 Rear Label, 11 Rear Label, 12 Installation Base removal, 6 Preparation, 5 Safety Instructions, 2 Wall Mounting...
... Caption, 45 Closed Caption Style, 45 Language, 44 PIP Position, 45 Reset, 45 Sleep Timer, 44 DTV Tuner Setup Auto Search, 47 Daylight Saving, 48 Digital Audio Out, 47 Skip Channel, 47 Time Zone, 48 Tuner Mode, 47 DVI Connecting your Cable Box, 18 Connecting your DVD Player, 23 Connecting your Satellite Box, 18 E Extended Warranty, 69 G Glossary, 64 H HDMI Connecting your Cable Box, 17 Connecting your DVD Player, 22 Connecting your Satellite Box, 17 I Inputs Antenna, 3 Connectors, 16 Rear Label, 11 Rear Label, 12 Installation Base removal, 6 Preparation, 5 Safety Instructions, 2 Wall Mounting...
User Guide
Page 66
... Remote Control Codes for other devices., 70 Programming to work your DVD Player, 58 Programming to work your Set-Top Box, 57 Programming to work your VCR, 57 Setting the Sleep Timer, 56 Using your Cable or Satellite Remote to Operate your VIZIO TV, 58 RGB Connecting your PC, 29 S Screen Size explanation, 54 Sensor Touch Controls, 10 S-Video Connecting your DVD Player, 25, 26 T Technical Specifications, 63 Troubleshooting Guide, 59 TV VIZIO GV47L FHD TV User Manual Audio Adjustment, 43 Parental Control, 48 Picture Adjustment, 39 Special Features, 44 Tuner Setup, 46 TV Audio Adjust...
... Remote Control Codes for other devices., 70 Programming to work your DVD Player, 58 Programming to work your Set-Top Box, 57 Programming to work your VCR, 57 Setting the Sleep Timer, 56 Using your Cable or Satellite Remote to Operate your VIZIO TV, 58 RGB Connecting your PC, 29 S Screen Size explanation, 54 Sensor Touch Controls, 10 S-Video Connecting your DVD Player, 25, 26 T Technical Specifications, 63 Troubleshooting Guide, 59 TV VIZIO GV47L FHD TV User Manual Audio Adjustment, 43 Parental Control, 48 Picture Adjustment, 39 Special Features, 44 Tuner Setup, 46 TV Audio Adjust...
User Guide
Page 67
... and from shipping or transit accidents, abuse, misuse, operation contrary to furnished instructions, operation on incorrect power supplies, operation with VIZIO's Extended Service Warranty. Before you must provide the model, serial number and date of purchase. You might avoid a service call 1-800-988-4196 to purchase a plan today. Service Labor During a period of one (1) year warranty period, VIZIO will, at excessive brightness levels for extended periods...
... and from shipping or transit accidents, abuse, misuse, operation contrary to furnished instructions, operation on incorrect power supplies, operation with VIZIO's Extended Service Warranty. Before you must provide the model, serial number and date of purchase. You might avoid a service call 1-800-988-4196 to purchase a plan today. Service Labor During a period of one (1) year warranty period, VIZIO will, at excessive brightness levels for extended periods...


