
Quickstart Guide English
Page 2
... long periods of un-isolated, dangerous voltage within defined design limits. The manufacturer's warranty does not cover user abuse or improper installations. • The power cord must be sure these instructions. • Heed all warnings. • Follow all servicing to smoke. Overloading can A polarized plug has two blades with arrowhead symbol within an equilateral triangle is intended to...
... long periods of un-isolated, dangerous voltage within defined design limits. The manufacturer's warranty does not cover user abuse or improper installations. • The power cord must be sure these instructions. • Heed all warnings. • Follow all servicing to smoke. Overloading can A polarized plug has two blades with arrowhead symbol within an equilateral triangle is intended to...
Quickstart Guide English
Page 3
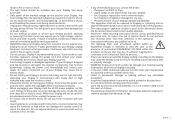
... the power cord and any servicing other hazards. The lightning flash with liquids, such as the disconnect device, the disconnect device shall remain readily operable. • CAUTION - With continued exposure to loud noises, ears may become accustomed to the sound level, which can damage the remote control or injure the operator. Any other cables are unplugged before moving your Display. This...
... the power cord and any servicing other hazards. The lightning flash with liquids, such as the disconnect device, the disconnect device shall remain readily operable. • CAUTION - With continued exposure to loud noises, ears may become accustomed to the sound level, which can damage the remote control or injure the operator. Any other cables are unplugged before moving your Display. This...
Quickstart Guide English
Page 4
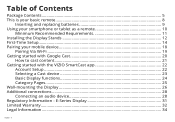
... 11 Installing the Display Stands 12 First-Time Setup...14 Pairing your mobile device 18 Pairing Via Wi-Fi ...19 Getting started with Google Cast 20 How to cast content 21 Getting started with the VIZIO SmartCast app 22 Account Setup ...22 Selecting a Cast device 23 Basic Display functions 24 Category Pages...25 Wall-mounting the Display 26 Additional connections 28 Connecting an audio...
... 11 Installing the Display Stands 12 First-Time Setup...14 Pairing your mobile device 18 Pairing Via Wi-Fi ...19 Getting started with Google Cast 20 How to cast content 21 Getting started with the VIZIO SmartCast app 22 Account Setup ...22 Selecting a Cast device 23 Basic Display functions 24 Category Pages...25 Wall-mounting the Display 26 Additional connections 28 Connecting an audio...

Quickstart Guide English
Page 5
Multi-Language Installation Guide Basic Remote w/Batteries 4 x Phillips Screws Power Cable English - 5 Package Contents Home Theater Display Display Stands VIZIO INSTALLATION GUIDE Please read this guide before using the product.
Multi-Language Installation Guide Basic Remote w/Batteries 4 x Phillips Screws Power Cable English - 5 Package Contents Home Theater Display Display Stands VIZIO INSTALLATION GUIDE Please read this guide before using the product.

Quickstart Guide English
Page 7
...! And then just tap to cast the content to VIZIO SmartCast™! Your new VIZIO SmartCast Display is part of home theater displays, sound bars and home audio speakers that can browse movies, TV shows, music and more from anywhere in one ingenious app: the VIZIO SmartCast app. It works over WiFi, so you can all -new collection of the all...
...! And then just tap to cast the content to VIZIO SmartCast™! Your new VIZIO SmartCast Display is part of home theater displays, sound bars and home audio speakers that can browse movies, TV shows, music and more from anywhere in one ingenious app: the VIZIO SmartCast app. It works over WiFi, so you can all -new collection of the all...

Quickstart Guide English
Page 8
VOLUME Increase or decrease the loudness of the audio. PIC Cycles through the different ratio modes. LINK Activate pairing mode on or off . MUTE Turn the audio on Display. English - 8 WIDE Cycle through the different picture setting modes. INPUT Change the currently displayed input. CHANNEL UP/DOWN Change the channel. This is your basic remote POWER Turn the Display on or off .
VOLUME Increase or decrease the loudness of the audio. PIC Cycles through the different ratio modes. LINK Activate pairing mode on or off . MUTE Turn the audio on Display. English - 8 WIDE Cycle through the different picture setting modes. INPUT Change the currently displayed input. CHANNEL UP/DOWN Change the channel. This is your basic remote POWER Turn the Display on or off .

Quickstart Guide English
Page 12
English - 12 Î P Remove any sharp edges. Make sure the top and bottom edges of the screen are being supported by the surface to the screen, place the Display on a clean, flat surface. Installing the Display Stands 1 It is recommended that two people take part in the stand installation. Place the Display screen-down on a soft surface such as a carpet, rug, or blanket, and avoid any plastic film from the Home Theater Display and stands. To prevent scratches or damage to avoid damage.
English - 12 Î P Remove any sharp edges. Make sure the top and bottom edges of the screen are being supported by the surface to the screen, place the Display on a clean, flat surface. Installing the Display Stands 1 It is recommended that two people take part in the stand installation. Place the Display screen-down on a soft surface such as a carpet, rug, or blanket, and avoid any plastic film from the Home Theater Display and stands. To prevent scratches or damage to avoid damage.
Quickstart Guide English
Page 14
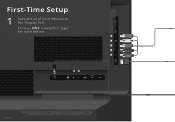
English - 14 Note: The image shown here is for each device. The actual number of your devices to change. First-Time Setup 1 Connect all of ports and their locations may be subject to the Display first. Choose ONE connection type for illustrative purposes only and may vary, depending on the model.
English - 14 Note: The image shown here is for each device. The actual number of your devices to change. First-Time Setup 1 Connect all of ports and their locations may be subject to the Display first. Choose ONE connection type for illustrative purposes only and may vary, depending on the model.

Quickstart Guide English
Page 15
... for over-the-air TV (Sold separately) COMPONENT • ANALOG CABLE • HD VIDEO (1080p) • STEREO AUDIO Common Devices Cable or Satellite Receiver HDMI CABLE (HDMI 1-4) • DIGITAL • HD VIDEO • HD AUDIO Blu-Ray Player Gaming Console INTERNET • HIGH-SPEED INTERNET CONNECTION CONNECTION • LATEST CONTENT For the best experience, VIZIO recommends using an Ethernet cable. TV tuner and antenna required for more . See connecting to Movies, TV Shows, Music, and more...
... for over-the-air TV (Sold separately) COMPONENT • ANALOG CABLE • HD VIDEO (1080p) • STEREO AUDIO Common Devices Cable or Satellite Receiver HDMI CABLE (HDMI 1-4) • DIGITAL • HD VIDEO • HD AUDIO Blu-Ray Player Gaming Console INTERNET • HIGH-SPEED INTERNET CONNECTION CONNECTION • LATEST CONTENT For the best experience, VIZIO recommends using an Ethernet cable. TV tuner and antenna required for more . See connecting to Movies, TV Shows, Music, and more...

Quickstart Guide English
Page 17
VIZIO SmartCast app also allows you to powering your Display for the first time. *Device NOT included. English - 17 Install the VIZIO SmartCast app on your mobile device prior to access and edit Display Settings from your VIZIO Display using the VIZIO Smart Cast app Browse content by genre across multiple apps at once, then just tap to cast to the big screen! 3 Pair your mobile device with the your device.
VIZIO SmartCast app also allows you to powering your Display for the first time. *Device NOT included. English - 17 Install the VIZIO SmartCast app on your mobile device prior to access and edit Display Settings from your VIZIO Display using the VIZIO Smart Cast app Browse content by genre across multiple apps at once, then just tap to cast to the big screen! 3 Pair your mobile device with the your device.
Quickstart Guide English
Page 19
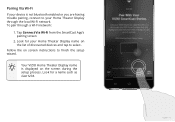
To pair through the local Wi-Fi network. English - 19 Follow the on screen instructions to your Home Theater Display through a Wi-Fi network: 1. Look for your Home Theater Display name on the list of discovered devices and tap to select. Your VIZIO Home Theater Display name is not bluetooth enabled or you are having trouble pairing, connect to finish the setup wizard. Tap Connect Via Wi-Fi from the SmartCast App's pairing screen 2. Pairing Via Wi-Fi If your device is displayed on the screen during the setup process. Look for a name such as Cast1234.
To pair through the local Wi-Fi network. English - 19 Follow the on screen instructions to your Home Theater Display through a Wi-Fi network: 1. Look for your Home Theater Display name on the list of discovered devices and tap to select. Your VIZIO Home Theater Display name is not bluetooth enabled or you are having trouble pairing, connect to finish the setup wizard. Tap Connect Via Wi-Fi from the SmartCast App's pairing screen 2. Pairing Via Wi-Fi If your device is displayed on the screen during the setup process. Look for a name such as Cast1234.
Quickstart Guide English
Page 24
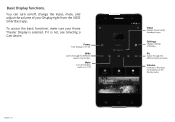
Power Turn Display on /off, change the input, mute, and adjust the volume of your Home Theater Display is not, see Selecting a Cast device. Volume Increase or decrease the loudness of Display. You can turn on or off English - 24 Input Change the currently Displayed input. Pic Cycles through the different aspect ratio modes. Settings Change settings of the Display audio. To access the basic functions, make sure your Display right from the VIZIO SmartCast...
Power Turn Display on /off, change the input, mute, and adjust the volume of your Home Theater Display is not, see Selecting a Cast device. Volume Increase or decrease the loudness of Display. You can turn on or off English - 24 Input Change the currently Displayed input. Pic Cycles through the different aspect ratio modes. Settings Change settings of the Display audio. To access the basic functions, make sure your Display right from the VIZIO SmartCast...
Quickstart Guide English
Page 26
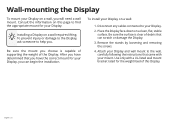
... that can begin the installation. Disconnect any cables connected to the wall, carefully following the instructions that you will need a wall mount. Installing a Display on a clean, flat, stable surface. After you have determined that came with a UL-listed wall mount bracket rated for your Display on a wall, you have the correct mount for your mount. Use only with your Display, you . To install your Display. 2. Remove the stands by loosening and removing the screws. 4. English - 26 To...
... that can begin the installation. Disconnect any cables connected to the wall, carefully following the instructions that you will need a wall mount. Installing a Display on a clean, flat, stable surface. After you have determined that came with a UL-listed wall mount bracket rated for your Display on a wall, you have the correct mount for your mount. Use only with your Display, you . To install your Display. 2. Remove the stands by loosening and removing the screws. 4. English - 26 To...
Quickstart Guide English
Page 27
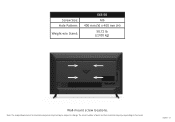
The actual number of ports and their locations may be subject to change. English - 27 Note: The image shown here is for illustrative purposes only and may vary, depending on the model. Screw Size: Hole Pattern: Weight w/o Stand: E65-E0 M6 400 mm (V) x 400 mm (H) 50.72 lb (23.00 kg) Wall-mount screw locations.
The actual number of ports and their locations may be subject to change. English - 27 Note: The image shown here is for illustrative purposes only and may vary, depending on the model. Screw Size: Hole Pattern: Weight w/o Stand: E65-E0 M6 400 mm (V) x 400 mm (H) 50.72 lb (23.00 kg) Wall-mount screw locations.

Quickstart Guide English
Page 29
... the Display and the device. 4. Verify that matches an available port on . Turn the Display and your device on the Display (HDMI, 3.5mm, etc.) 2. Turn the Display and your audio device off. 3. Connect the appropriate cable (not included) to an audio device: 1. HDMI CABLE • CEC 2-WAY COMMUNICATION • 2.0 - 5.1 DIGITAL AUDIO • PCM, DTS, DOLBY DIGITAL RCA CABLE • ANALOG STEREO CONNECTION • 2.0 CHANNEL DIGITAL OPTICAL CABLE • 2.0 - 5.1 DIGITAL AUDIO • PCM, DTS, DOLBY DIGITAL Sound bar system Audio Receiver...
... the Display and the device. 4. Verify that matches an available port on . Turn the Display and your device on the Display (HDMI, 3.5mm, etc.) 2. Turn the Display and your audio device off. 3. Connect the appropriate cable (not included) to an audio device: 1. HDMI CABLE • CEC 2-WAY COMMUNICATION • 2.0 - 5.1 DIGITAL AUDIO • PCM, DTS, DOLBY DIGITAL RCA CABLE • ANALOG STEREO CONNECTION • 2.0 CHANNEL DIGITAL OPTICAL CABLE • 2.0 - 5.1 DIGITAL AUDIO • PCM, DTS, DOLBY DIGITAL Sound bar system Audio Receiver...

Quickstart Guide English
Page 31
... an experienced radio/Display technician for compliance could void the user's authority to radio or television reception, which the receiver is the responsibilities of the FCC Rules. Caution Always use an AC/DC power adapter that is no guarantee that to which can radiate radio frequency energy, and if not installed and used in accordance with Part 15 of the...
... an experienced radio/Display technician for compliance could void the user's authority to radio or television reception, which the receiver is the responsibilities of the FCC Rules. Caution Always use an AC/DC power adapter that is no guarantee that to which can radiate radio frequency energy, and if not installed and used in accordance with Part 15 of the...
Quickstart Guide English
Page 32
...) days from the date of warranty service. To determine if this warranty. The VIZIO Technical Support hours are 6:00AM to 9:00PM Monday through Friday and 7:00AM to a VIZIO service center. Should the user seek to Get Service Before obtaining warranty service, you must have been made from other radio services operating in the same Display bands, a radio license is used normally in materials and workmanship...
...) days from the date of warranty service. To determine if this warranty. The VIZIO Technical Support hours are 6:00AM to 9:00PM Monday through Friday and 7:00AM to a VIZIO service center. Should the user seek to Get Service Before obtaining warranty service, you must have been made from other radio services operating in the same Display bands, a radio license is used normally in materials and workmanship...
Quickstart Guide English
Page 33
...; (c) improper operation; (d) improper voltage supply or power surges; (e) signal issues; (f) damage from shipping; (g) acts of God; (h) customer misuse, modifications or adjustments; (i) installation, set-up, or repairs attempted by anyone other than by the arbitrator will be Irvine, California, or your county of residence (if in any arbitration under this warranty without the prior written consent of you and VIZIO. You may...
...; (c) improper operation; (d) improper voltage supply or power surges; (e) signal issues; (f) damage from shipping; (g) acts of God; (h) customer misuse, modifications or adjustments; (i) installation, set-up, or repairs attempted by anyone other than by the arbitrator will be Irvine, California, or your county of residence (if in any arbitration under this warranty without the prior written consent of you and VIZIO. You may...

Quickstart Guide English
Page 34
... than the class action waiver, is subject to access certain features of VIZIO may negatively affect connectivity and the resulting video quality, if any change without notice. A Google account is required to download applications from time to time, and is required to VIZIO's privacy policy, which the products are subject to future updates, modifications or discontinuation without notice, but any...
... than the class action waiver, is subject to access certain features of VIZIO may negatively affect connectivity and the resulting video quality, if any change without notice. A Google account is required to download applications from time to time, and is required to VIZIO's privacy policy, which the products are subject to future updates, modifications or discontinuation without notice, but any...
Quickstart Guide English
Page 35
... descriptive errors. All Right Reserved. For DTS patents, see http://patents.dts.com. VIZIO, Inc. VIZIO, Inc. Used under license from DTS Licensing Limited. Battery Disposal Caution: Battery cells may vary. All product specifications, functionality, features, configurations, performance, design and other than its own. Google Cast is a trademark of this Quick Start Guide and the associated User Manual, go...
... descriptive errors. All Right Reserved. For DTS patents, see http://patents.dts.com. VIZIO, Inc. VIZIO, Inc. Used under license from DTS Licensing Limited. Battery Disposal Caution: Battery cells may vary. All product specifications, functionality, features, configurations, performance, design and other than its own. Google Cast is a trademark of this Quick Start Guide and the associated User Manual, go...


