
E472VL User Manual
Page 5
...TV away from damage due to power surges. • Do not attempt to high voltages, electric shock, and other moisture. - E472VL / E552VL • Do not overload power strips and extension cords. If repair is dropped or damaged in the operating instructions unless you to repair or ...operable. • CAUTION - The performance of the following occurs, contact the dealer: - Continuous use of time. Overloading can damage the remote control or injure the operator. Operating your TV. Ensure that contained in any smoke or odor becomes apparent, unplug the power cord and ...
...TV away from damage due to power surges. • Do not attempt to high voltages, electric shock, and other moisture. - E472VL / E552VL • Do not overload power strips and extension cords. If repair is dropped or damaged in the operating instructions unless you to repair or ...operable. • CAUTION - The performance of the following occurs, contact the dealer: - Continuous use of time. Overloading can damage the remote control or injure the operator. Operating your TV. Ensure that contained in any smoke or odor becomes apparent, unplug the power cord and ...
E472VL User Manual
Page 8
... USB Media Player 28 Connecting a USB Thumb Drive to the TV 28 Playing USB Media 28 Using VIZIO Internet Apps 31 Using the VIA Shortcut Buttons 31 Using the VIA Dock 31 Moving an App on... is no sound 35 The colors on the TV don't look right 35 The buttons on the remote aren't working 35 The image quality is not good 35 The picture is distorted 36 The display...see "noise" or static on the screen 36 When I change input source, the volume changes 36 E472VL / E552VL When I change input source, the display image changes size 36 Specifications 37 Limited Warranty 39 ON PARTS AND LABOR ...
... USB Media Player 28 Connecting a USB Thumb Drive to the TV 28 Playing USB Media 28 Using VIZIO Internet Apps 31 Using the VIA Shortcut Buttons 31 Using the VIA Dock 31 Moving an App on... is no sound 35 The colors on the TV don't look right 35 The buttons on the remote aren't working 35 The image quality is not good 35 The picture is distorted 36 The display...see "noise" or static on the screen 36 When I change input source, the volume changes 36 E472VL / E552VL When I change input source, the display image changes size 36 Specifications 37 Limited Warranty 39 ON PARTS AND LABOR ...
E472VL User Manual
Page 12
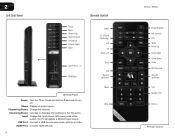
... or decrease the loudness of the button, the TV will display a different input source USB Port: Connect a USB drive to turn off. 2 Left Side Panel Remote Control Power Menu Channel Up Channel Down Volume Up Volume Down Input USB Ports (1, 2) HDMI Port Left Side Panel Power: Turn the TV on -screen... menu. HDMI Port: Connect HDMI devices. 4 Input CC (Closed Captioning) Exit OK Arrow Left Back VIA Volume Up/Down Mute Wide E472VL / E552VL Power/Standby A/V Controls Info Menu Arrow Up Arrow Right Arrow Down Guide VIA Shortcuts Channel Up/Down Last Number Pad Dash...
... or decrease the loudness of the button, the TV will display a different input source USB Port: Connect a USB drive to turn off. 2 Left Side Panel Remote Control Power Menu Channel Up Channel Down Volume Up Volume Down Input USB Ports (1, 2) HDMI Port Left Side Panel Power: Turn the TV on -screen... menu. HDMI Port: Connect HDMI devices. 4 Input CC (Closed Captioning) Exit OK Arrow Left Back VIA Volume Up/Down Mute Wide E472VL / E552VL Power/Standby A/V Controls Info Menu Arrow Up Arrow Right Arrow Down Guide VIA Shortcuts Channel Up/Down Last Number Pad Dash...
E472VL User Manual
Page 13
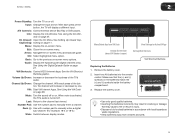
... with number pad to the previous on the batteries match the (+) and (-) symbols inside the battery compartment. 3. E472VL / E552VL 2 Power/Standby: Turn the TV on . See Using the Info Window on -screen menu. CC (Closed: Open the ... VIA Shortcut Buttons graphic. Channel Up/Down: Change the channel. Menu: Display the on page 27. VIA Shortcuts: Control VIZIO Internet Apps. Dash (-): Use with local hazardous waste regulations. • Keep batteries away from VIA Dock Change Screen Size... on-screen menu and episode guide. Insert two AA batteries into the remote control.
... with number pad to the previous on the batteries match the (+) and (-) symbols inside the battery compartment. 3. E472VL / E552VL 2 Power/Standby: Turn the TV on . See Using the Info Window on -screen menu. CC (Closed: Open the ... VIA Shortcut Buttons graphic. Channel Up/Down: Change the channel. Menu: Display the on page 27. VIA Shortcuts: Control VIZIO Internet Apps. Dash (-): Use with local hazardous waste regulations. • Keep batteries away from VIA Dock Change Screen Size... on-screen menu and episode guide. Insert two AA batteries into the remote control.
E472VL User Manual
Page 19
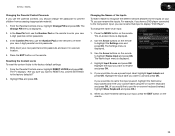
... black bars will not display them . To activate or deactivate closed captions you wish to see, use the Left/ Right Arrow buttons on the remote to select the caption channel you wish to see: • Analog Closed Caption for analog (NTSC) TV channels. • Digital Closed Caption ...for widescreen viewing (1.85:1 or 2.35:1), then black bars will appear on the remote to fill the screen. For example, CC1 may display English captions and CC2 may appear distorted. E472VL / E552VL 5 Changing the Screen Aspect Ratio The TV can display closed captions for programs that include them...
... black bars will not display them . To activate or deactivate closed captions you wish to see, use the Left/ Right Arrow buttons on the remote to select the caption channel you wish to see: • Analog Closed Caption for analog (NTSC) TV channels. • Digital Closed Caption ...for widescreen viewing (1.85:1 or 2.35:1), then black bars will appear on the remote to fill the screen. For example, CC1 may display English captions and CC2 may appear distorted. E472VL / E552VL 5 Changing the Screen Aspect Ratio The TV can display closed captions for programs that include them...
E472VL User Manual
Page 20
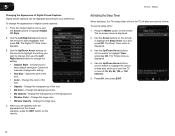
...• Text Size - Change the transparency of digital closed captions: 1. The on the remote to highlight Digital CC Style. 2. The Timers menu is displayed. 3. Change the edge type. 4. E472VL / E552VL Activating the Sleep Timer When activated, the TV's sleep timer will turn off after which you... are satisfied with the appearance of the closed captions, press the EXIT button on the remote. Adjust the size of the text. • ...
...• Text Size - Change the transparency of digital closed captions: 1. The on the remote to highlight Digital CC Style. 2. The Timers menu is displayed. 3. Change the edge type. 4. E472VL / E552VL Activating the Sleep Timer When activated, the TV's sleep timer will turn off after which you... are satisfied with the appearance of the closed captions, press the EXIT button on the remote. Adjust the size of the text. • ...
E472VL User Manual
Page 21
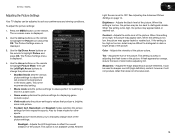
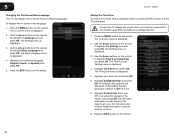
... the picture settings for watching a movie in dark or bright areas of the picture. See Adjusting the Advanced Picture Settings on the remote. Brightness - This is too low, the picture may appear faded or washed out. When this setting is the recommended setting. •... adjusting the flesh tones in the most cases. Adjusts the hue of picture elements. Adjusts the edge sharpness of the picture. E472VL / E552VL Adjusting the Picture Settings Your TV display can be adjusted to suit your preferences and viewing conditions. Tint - Sharpness - To adjust the ...
... the picture settings for watching a movie in dark or bright areas of the picture. See Adjusting the Advanced Picture Settings on the remote. Brightness - This is too low, the picture may appear faded or washed out. When this setting is the recommended setting. •... adjusting the flesh tones in the most cases. Adjusts the hue of picture elements. Adjusts the edge sharpness of the picture. E472VL / E552VL Adjusting the Picture Settings Your TV display can be adjusted to suit your preferences and viewing conditions. Tint - Sharpness - To adjust the ...
E472VL User Manual
Page 22
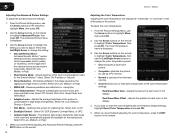
... Low, Medium, Strong, or Extend. • Film Mode - From the Picture Settings Menu, use the Arrow buttons on the remote. 14 E472VL / E552VL Adjusting the Color Temperature Adjusting the color temperature will change the setting: • Smooth Motion Effect Activates Smooth Motion™ motion estimation...backlight for watching film. Adjusts the position of compensation used for .mpeg files. • Color Enhancement - Use the Arrow buttons on the remote to highlight More, then press OK. 2. Select Off, Low, Medium, or High. 4. When you to the factory default settings, ...
... Low, Medium, Strong, or Extend. • Film Mode - From the Picture Settings Menu, use the Arrow buttons on the remote. 14 E472VL / E552VL Adjusting the Color Temperature Adjusting the color temperature will change the setting: • Smooth Motion Effect Activates Smooth Motion™ motion estimation...backlight for watching film. Adjusts the position of compensation used for .mpeg files. • Color Enhancement - Use the Arrow buttons on the remote to highlight More, then press OK. 2. Select Off, Low, Medium, or High. 4. When you to the factory default settings, ...
E472VL User Manual
Page 23
... Arrow to the factory defaults?" 3. When you have finished adjusting the color temperature, press the EXIT button on page 16. 4. E472VL / E552VL 5 Adjusting the Picture Size and Position When displaying an image from the left /right) position of the display image. • Vertical Position ... the equalizer settings yourself, highlight EQ Mode and press OK. • Reset Audio Mode - See Resetting the Audio Settings on the remote. Automatically adjusts display image to the factory default settings: 1. Restores the audio settings to highlight Size & Position, then press OK. ...
... Arrow to the factory defaults?" 3. When you have finished adjusting the color temperature, press the EXIT button on page 16. 4. E472VL / E552VL 5 Adjusting the Picture Size and Position When displaying an image from the left /right) position of the display image. • Vertical Position ... the equalizer settings yourself, highlight EQ Mode and press OK. • Reset Audio Mode - See Resetting the Audio Settings on the remote. Automatically adjusts display image to the factory default settings: 1. Restores the audio settings to highlight Size & Position, then press OK. ...
E472VL User Manual
Page 24
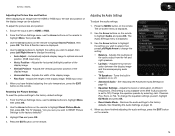
...normalizes volume fluctuations due to highlight Advanced Audio, then press OK. Select Off, Dolby Digital, or PCM. • Analog Audio Out - E472VL / E552VL Resetting the Audio Settings To reset the audio settings to highlight the Audio icon and press OK. Select Surround or Standard. • SRS TruVolume -... Select On or Off. • Digital Audio Out - Use the Arrow buttons on the remote to the factory default settings: 1. The TV displays, "Are you sure you want to RESET Audio Settings to highlight Reset Audio Mode and press...
...normalizes volume fluctuations due to highlight Advanced Audio, then press OK. Select Off, Dolby Digital, or PCM. • Analog Audio Out - E472VL / E552VL Resetting the Audio Settings To reset the audio settings to highlight the Audio icon and press OK. Select Surround or Standard. • SRS TruVolume -... Select On or Off. • Digital Audio Out - Use the Arrow buttons on the remote to the factory default settings: 1. The TV displays, "Are you sure you want to RESET Audio Settings to highlight Reset Audio Mode and press...
E472VL User Manual
Page 25
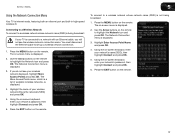
... name (SSID) is not being broadcast: If your wireless network (this is displayed. 4. E472VL / E552VL 5 Using the Network Connection Menu Your TV is displayed. 3. Press the MENU button on the remote. The More Access Points menu, which is a list of your TV is displayed. 2. Press the ... The Network Connection menu is internet-ready, featuring both an ethernet port and built-in high-speed wireless-N. Press the EXIT button on the remote to a network with an Ethernet cable, you do not see the wireless network connection menu. The on -screen keyboard, enter your wireless ...
... name (SSID) is not being broadcast: If your wireless network (this is displayed. 4. E472VL / E552VL 5 Using the Network Connection Menu Your TV is displayed. 3. Press the MENU button on the remote. The More Access Points menu, which is a list of your TV is displayed. 2. Press the ... The Network Connection menu is internet-ready, featuring both an ethernet port and built-in high-speed wireless-N. Press the EXIT button on the remote to a network with an Ethernet cable, you do not see the wireless network connection menu. The on -screen keyboard, enter your wireless ...
E472VL User Manual
Page 26
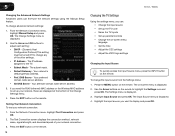
... 3. Your preferred domain name server address. • Alt DNS Server - Highlight Input Source and press OK. Press the MENU button on the remote. 5 E472VL / E552VL Changing the Advanced Network Settings Advanced users can : • Change the input source • Set up the TV tuner • Name the TV...8226; Set the time • Adjust the CEC settings • Adjust the VIZIO logo settings Changing the Input Source To quickly access the Input Source menu, press the INPUT button on the remote. The on the remote to the TV. • Subnet Mask - Use the Arrow buttons on -screen...
... 3. Your preferred domain name server address. • Alt DNS Server - Highlight Input Source and press OK. Press the MENU button on the remote. 5 E472VL / E552VL Changing the Advanced Network Settings Advanced users can : • Change the input source • Set up the TV tuner • Name the TV...8226; Set the time • Adjust the CEC settings • Adjust the VIZIO logo settings Changing the Input Source To quickly access the Input Source menu, press the INPUT button on the remote. The on the remote to the TV. • Subnet Mask - Use the Arrow buttons on -screen...
E472VL User Manual
Page 27
... Before the TV can detect and display channels and their associated information, you are available. 1. Press the EXIT button on the remote. 19 Press the EXIT button on the remote. E472VL / E552VL 5 Setting the Tuner Mode If you must set the tuner mode. 1. Highlight Done and press OK. 3. Press the MENU button on...
... Before the TV can detect and display channels and their associated information, you are available. 1. Press the EXIT button on the remote. 19 Press the EXIT button on the remote. E472VL / E552VL 5 Setting the Tuner Mode If you must set the tuner mode. 1. Highlight Done and press OK. 3. Press the MENU button on...
E472VL User Manual
Page 28
... selected all of new channels: 1. There may need to begin the scan. (Use the Number Pad on the remote. Channels that some channels you do this by using the Number Pad. 5 E472VL / E552VL Adding New Channels Occasionally, you may also be viewed if the channel is entered using the Partial Channel Search...
... selected all of new channels: 1. There may need to begin the scan. (Use the Number Pad on the remote. Channels that some channels you do this by using the Number Pad. 5 E472VL / E552VL Adding New Channels Occasionally, you may also be viewed if the channel is entered using the Partial Channel Search...
E472VL User Manual
Page 29
... you to listen to audio in the language you have not set a custom parental passcode, see Changing the Parental Control Passcode on the remote. From the Tuner Settings menu, highlight Analog MTS and press OK. The Digital MTS menu is displayed. 3. Select your parental passcode.... highlight the Settings icon and press OK. If you select. Use the Arrow buttons on the remote to highlight Parental Controls and press OK. 4. E472VL / E552VL 5 Changing the Audio Language Some digital free-to-air and cable channels broadcast programs in multiple languages. Select Mono, Stereo, or...
... you to listen to audio in the language you have not set a custom parental passcode, see Changing the Parental Control Passcode on the remote. From the Tuner Settings menu, highlight Analog MTS and press OK. The Digital MTS menu is displayed. 3. Select your parental passcode.... highlight the Settings icon and press OK. If you select. Use the Arrow buttons on the remote to highlight Parental Controls and press OK. 4. E472VL / E552VL 5 Changing the Audio Language Some digital free-to-air and cable channels broadcast programs in multiple languages. Select Mono, Stereo, or...
E472VL User Manual
Page 30
5 E472VL / E552VL Enabling or Disabling Program Ratings To manage program content according to its rating: 1. Select On or Off and press OK. Locking ...you must enable the Program Rating feature. Canadian English television program broadcasts. Content with this rating can use the Arrow buttons on the remote to highlight the rating type and press OK. 3. The Channel Locks menu is blocked, the Lock icon appears locked. When the ... audiences. When you want to block or unblock, use the Up/Down and Left/Right Arrow buttons on the remote to block content based on the...
5 E472VL / E552VL Enabling or Disabling Program Ratings To manage program content according to its rating: 1. Select On or Off and press OK. Locking ...you must enable the Program Rating feature. Canadian English television program broadcasts. Content with this rating can use the Arrow buttons on the remote to highlight the rating type and press OK. 3. The Channel Locks menu is blocked, the Lock icon appears locked. When the ... audiences. When you want to block or unblock, use the Up/Down and Left/Right Arrow buttons on the remote to block content based on the...
E472VL User Manual
Page 31
E472VL / E552VL 5 Changing the Parental Control Passcode If you use the Number Pad on the remote to re-enter your new 4-digit parental control passcode. 4. From the... recognize the different devices attached to enter your new 4-digit parental control passcode. 3. The on the remote. If you would like to name the input yourself, highlight the field below Input Labels and enter ...the on-screen keyboard and press OK. (If you would like to use the Number Pad on the remote to the inputs on -screen keyboard instead, highlight Show Keyboard and press OK.) 6. Resetting the Content...
E472VL / E552VL 5 Changing the Parental Control Passcode If you use the Number Pad on the remote to re-enter your new 4-digit parental control passcode. 4. From the... recognize the different devices attached to enter your new 4-digit parental control passcode. 3. The on the remote. If you would like to name the input yourself, highlight the field below Input Labels and enter ...the on-screen keyboard and press OK. (If you would like to use the Number Pad on the remote to the inputs on -screen keyboard instead, highlight Show Keyboard and press OK.) 6. Resetting the Content...
E472VL User Manual
Page 32
... Daylight Savings menu is displayed. 4. The on -screen menu language: 1. The on the remote. Press the EXIT button on -screen menu is displayed. 2. Use the Arrow buttons on the remote. 24 E472VL / E552VL Setting the Time Zone To ensure the correct time is not. 7. Highlight Postal Code. Press... the EXIT button on the remote to the internet via an Ethernet cable or a wireless network. 1. Highlight...
... Daylight Savings menu is displayed. 4. The on -screen menu language: 1. The on the remote. Press the EXIT button on -screen menu is displayed. 2. Use the Arrow buttons on the remote. 24 E472VL / E552VL Setting the Time Zone To ensure the correct time is not. 7. Highlight Postal Code. Press... the EXIT button on the remote to the internet via an Ethernet cable or a wireless network. 1. Highlight...

E472VL User Manual
Page 33
... for the tuner and network Displaying System Information To display a summary of your TV is off, the VIZIO logo will erase any additional programming. Use the Arrow buttons on the remote to highlight CEC Settings and press OK. Use the Arrow and OK buttons to highlight the Settings icon and... The on the remote. Use the Up/Down Arrow buttons to scroll through the system information. 5. Use the Up/Down Arrow buttons to select On or Off, then press OK. Press the MENU button on -screen menu is displayed. 3. The on-screen menu is displayed. 3. E472VL / E552VL 5 Adjusting the ...
... for the tuner and network Displaying System Information To display a summary of your TV is off, the VIZIO logo will erase any additional programming. Use the Arrow buttons on the remote to highlight CEC Settings and press OK. Use the Arrow and OK buttons to highlight the Settings icon and... The on the remote. Use the Up/Down Arrow buttons to scroll through the system information. 5. Use the Up/Down Arrow buttons to select On or Off, then press OK. Press the MENU button on -screen menu is displayed. 3. The on-screen menu is displayed. 3. E472VL / E552VL 5 Adjusting the ...

E472VL User Manual
Page 34
...and press OK. Highlight Guided Setup and press OK. 4. Use the Arrow buttons on the remote to highlight the Help icon and press OK. The TV will erase any custom settings." 5. ... have not yet set up the TV tuner or to connect the TV with your network. E472VL / E552VL Using Guided Setup The TV's Setup App can be used to easily set up the TV tuner. • Network... Setup - The on the remote. Follow the on the remote. 26 When finished, press the EXIT button on -screen instructions. Enter your network. 5. Wait for...
...and press OK. Highlight Guided Setup and press OK. 4. Use the Arrow buttons on the remote to highlight the Help icon and press OK. The TV will erase any custom settings." 5. ... have not yet set up the TV tuner or to connect the TV with your network. E472VL / E552VL Using Guided Setup The TV's Setup App can be used to easily set up the TV tuner. • Network... Setup - The on the remote. Follow the on the remote. 26 When finished, press the EXIT button on -screen instructions. Enter your network. 5. Wait for...


