
E472VL User Manual
Page 4
... an adapter to a power outlet, power is always flowing into your TV. This plug will fit only into the apparatus, the apparatus has been eposed E472VL / E552VL to operate within the inside of your TV that produce heat. • Do not defeat the safety purpose of your TV. To ensure reliable operation...
... an adapter to a power outlet, power is always flowing into your TV. This plug will fit only into the apparatus, the apparatus has been eposed E472VL / E552VL to operate within the inside of your TV that produce heat. • Do not defeat the safety purpose of your TV. To ensure reliable operation...
E472VL User Manual
Page 5
... electric shock. • Do not use in this case may function abnormally. Your TV is damaged, the internal components may result in any abnormality occurs. E472VL / E552VL • Do not overload power strips and extension cords. If water penetrates into your TV if any way. - Continuous use your TV. - Incorrect polarities may...
... electric shock. • Do not use in this case may function abnormally. Your TV is damaged, the internal components may result in any abnormality occurs. E472VL / E552VL • Do not overload power strips and extension cords. If water penetrates into your TV if any way. - Continuous use your TV. - Incorrect polarities may...
E472VL User Manual
Page 6
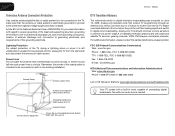
... Service Grounding Electrode System (NEC ART 250, part H) No extra converter box is left unattended or unused for long periods of the grounding electrode. E472VL / E552VL Television Antenna Connection Protection If an outside antenna/satellite dish or cable system is to be connected to provide some protection against voltage surges and...
... Service Grounding Electrode System (NEC ART 250, part H) No extra converter box is left unattended or unused for long periods of the grounding electrode. E472VL / E552VL Television Antenna Connection Protection If an outside antenna/satellite dish or cable system is to be connected to provide some protection against voltage surges and...
E472VL User Manual
Page 8
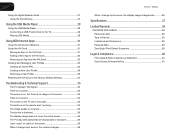
... Using the USB Media Player 28 Using the USB Media Player 28 Connecting a USB Thumb Drive to the TV 28 Playing USB Media 28 Using VIZIO Internet Apps 31 Using the VIA Shortcut Buttons 31 Using the VIA Dock 31 Moving an App on the VIA Dock 31 Adding a New App... (dots) that are always dark or always lit 36 I see "noise" or static on the screen 36 When I change input source, the volume changes 36 E472VL / E552VL When I change input source, the display image changes size 36 Specifications 37 Limited Warranty 39 ON PARTS AND LABOR 39 Parts and Labor 39 Type...
... Using the USB Media Player 28 Using the USB Media Player 28 Connecting a USB Thumb Drive to the TV 28 Playing USB Media 28 Using VIZIO Internet Apps 31 Using the VIA Shortcut Buttons 31 Using the VIA Dock 31 Moving an App on the VIA Dock 31 Adding a New App... (dots) that are always dark or always lit 36 I see "noise" or static on the screen 36 When I change input source, the volume changes 36 E472VL / E552VL When I change input source, the display image changes size 36 Specifications 37 Limited Warranty 39 ON PARTS AND LABOR 39 Parts and Labor 39 Type...
E472VL User Manual
Page 10
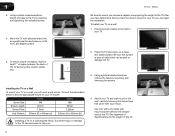
...TV face-down on a wall: 1. See Appendix A Specifications for your TV model: Screw Size: Screw Length: Screw Pitch: Hole Pattern: E472VL M6 20mm 1.0mm 200mm (V) x 400mm (H) E552VL M8 25mm 1.25mm 200mm (V) x 400mm (H) Installing a TV on a wall requires lifting. To ensure proper ventilation, leave at least 1" of... space between the back of the TV. E472VL / E552VL Be sure the mount you have the correct mount for the weight of debris that you choose is clear of this TV. Consult the ...
...TV face-down on a wall: 1. See Appendix A Specifications for your TV model: Screw Size: Screw Length: Screw Pitch: Hole Pattern: E472VL M6 20mm 1.0mm 200mm (V) x 400mm (H) E552VL M8 25mm 1.25mm 200mm (V) x 400mm (H) Installing a TV on a wall requires lifting. To ensure proper ventilation, leave at least 1" of... space between the back of the TV. E472VL / E552VL Be sure the mount you have the correct mount for the weight of debris that you choose is clear of this TV. Consult the ...
E472VL User Manual
Page 12
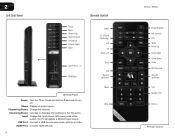
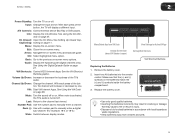
... turn off. Menu: Display on . HDMI Port: Connect HDMI devices. 4 Input CC (Closed Captioning) Exit OK Arrow Left Back VIA Volume Up/Down Mute Wide E472VL / E552VL Power/Standby A/V Controls Info Menu Arrow Up Arrow Right Arrow Down Guide VIA Shortcuts Channel Up/Down Last Number Pad Dash (-) Remote Control Press and...
... turn off. Menu: Display on . HDMI Port: Connect HDMI devices. 4 Input CC (Closed Captioning) Exit OK Arrow Left Back VIA Volume Up/Down Mute Wide E472VL / E552VL Power/Standby A/V Controls Info Menu Arrow Up Arrow Right Arrow Down Guide VIA Shortcuts Channel Up/Down Last Number Pad Dash (-) Remote Control Press and...
E472VL User Manual
Page 13
CC (Closed: Open the CC Menu. Guide: Display the episode guide (digital channels only). VIA Shortcuts: Control VIZIO Internet Apps. See Using the VIA Dock on the batteries match the (+) and (-) symbols inside the battery compartment. 3. Number Pad: Use the number pad to ... in cracking or leakage that the (+) and (-) symbols on page 28. See Using the Info Window on page 27. See the VIA Shortcut Buttons graphic. E472VL / E552VL 2 Power/Standby: Turn the TV on or off or on. Insert two AA batteries into the remote control.
CC (Closed: Open the CC Menu. Guide: Display the episode guide (digital channels only). VIA Shortcuts: Control VIZIO Internet Apps. See Using the VIA Dock on the batteries match the (+) and (-) symbols inside the battery compartment. 3. Number Pad: Use the number pad to ... in cracking or leakage that the (+) and (-) symbols on page 28. See Using the Info Window on page 27. See the VIA Shortcut Buttons graphic. E472VL / E552VL 2 Power/Standby: Turn the TV on or off or on. Insert two AA batteries into the remote control.
E472VL User Manual
Page 15
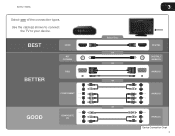
Use the cable(s) shown to connect the TV to your device. BEST BETTER HDMI RF/ COAXIAL RGB COMPONENT GOOD COMPOSITE AV 3 Select One: OR OR OR OR DIGITAL DIGITAL / ANALOG ANALOG ANALOG ANALOG Device Connection Chart 7 E472VL / E552VL Select one of the connection types.
Use the cable(s) shown to connect the TV to your device. BEST BETTER HDMI RF/ COAXIAL RGB COMPONENT GOOD COMPOSITE AV 3 Select One: OR OR OR OR DIGITAL DIGITAL / ANALOG ANALOG ANALOG ANALOG Device Connection Chart 7 E472VL / E552VL Select one of the connection types.

E472VL User Manual
Page 16
.... 3. Use the Guided Network Setup to configure the TV. Use the Guided Network Setup to configure the TV. See Using Guided Setup on page 26. 8 E472VL / E552VL Ensure you have : • A router broadcasting a high-speed wireless signal (wireless-n recommended) • A high-speed internet connection 2. 3 Setting Up Your Network Connection Your TV is...
.... 3. Use the Guided Network Setup to configure the TV. Use the Guided Network Setup to configure the TV. See Using Guided Setup on page 26. 8 E472VL / E552VL Ensure you have : • A router broadcasting a high-speed wireless signal (wireless-n recommended) • A high-speed internet connection 2. 3 Setting Up Your Network Connection Your TV is...
E472VL User Manual
Page 19
... being broadcast with black bars to fit the screen. • Panoramic expands the display image to fill the screen. Caption channels usually display different languages. E472VL / E552VL 5 Changing the Screen Aspect Ratio The TV can display closed captions for digital (ATSC) TV channels. 4. To activate or deactivate closed captions, the TV will...
... being broadcast with black bars to fit the screen. • Panoramic expands the display image to fill the screen. Caption channels usually display different languages. E472VL / E552VL 5 Changing the Screen Aspect Ratio The TV can display closed captions for digital (ATSC) TV channels. 4. To activate or deactivate closed captions, the TV will...
E472VL User Manual
Page 20
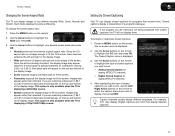
... displayed. 4. Adjust the size of the text. • BG Color - To change each setting. • Text Size - To use the Arrow buttons to your preference. E472VL / E552VL Activating the Sleep Timer When activated, the TV's sleep timer will turn off after which you wish to change, then use the Left/ Right Arrow...
... displayed. 4. Adjust the size of the text. • BG Color - To change each setting. • Text Size - To use the Arrow buttons to your preference. E472VL / E552VL Activating the Sleep Timer When activated, the TV's sleep timer will turn off after which you wish to change, then use the Left/ Right Arrow...
E472VL User Manual
Page 21
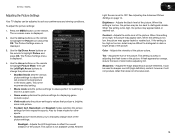
... the picture. Sharpness - The Picture Settings menu is too high or too low, detail may appear faded or washed out. If the setting is displayed. 3. E472VL / E552VL Adjusting the Picture Settings Your TV display can be adjusted to suit your preferences and viewing conditions. Brightness - This setting is the recommended setting. •...
... the picture. Sharpness - The Picture Settings menu is too high or too low, detail may appear faded or washed out. If the setting is displayed. 3. E472VL / E552VL Adjusting the Picture Settings Your TV display can be adjusted to suit your preferences and viewing conditions. Brightness - This setting is the recommended setting. •...
E472VL User Manual
Page 22
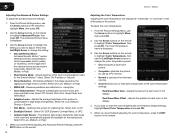
...; Normal is optimized for the Smooth Motion™ effect. When you have finished adjusting the color temperature, press the EXIT button on the remote. 14 E472VL / E552VL Adjusting the Color Temperature Adjusting the color temperature will change the setting: • Smooth Motion Effect Activates Smooth Motion™ motion estimation/motion compensation, which...
...; Normal is optimized for the Smooth Motion™ effect. When you have finished adjusting the color temperature, press the EXIT button on the remote. 14 E472VL / E552VL Adjusting the Color Temperature Adjusting the color temperature will change the setting: • Smooth Motion Effect Activates Smooth Motion™ motion estimation/motion compensation, which...
E472VL User Manual
Page 23
... on the remote. Turns the built-in speakers on page 16. • Equalizer Settings - Restores the audio settings to highlight Size & Position, then press OK. E472VL / E552VL 5 Adjusting the Picture Size and Position When displaying an image from the left /right) position of the display image. • Vertical Position - From the Picture...
... on the remote. Turns the built-in speakers on page 16. • Equalizer Settings - Restores the audio settings to highlight Size & Position, then press OK. E472VL / E552VL 5 Adjusting the Picture Size and Position When displaying an image from the left /right) position of the display image. • Vertical Position - From the Picture...
E472VL User Manual
Page 24
... you have finished adjusting the advanced audio settings, press the EXIT button on the remote. Select Off, Dolby Digital, or PCM. • Analog Audio Out - E472VL / E552VL Resetting the Audio Settings To reset the audio settings to television commercials or channel changes. Press the MENU button on the remote to highlight Reset...
... you have finished adjusting the advanced audio settings, press the EXIT button on the remote. Select Off, Dolby Digital, or PCM. • Analog Audio Out - E472VL / E552VL Resetting the Audio Settings To reset the audio settings to television commercials or channel changes. Press the MENU button on the remote to highlight Reset...
E472VL User Manual
Page 25
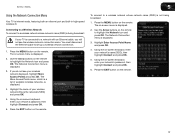
... your network's password, then highlight Connect and press OK. 6. To connect to a wireless network whose network name (SSID) is the network's SSID) and press OK. 5. E472VL / E552VL 5 Using the Network Connection Menu Your TV is displayed. 2. Connecting to a Wireless Network To connect to a wireless network whose network name (SSID) is not being...
... your network's password, then highlight Connect and press OK. 6. To connect to a wireless network whose network name (SSID) is the network's SSID) and press OK. 5. E472VL / E552VL 5 Using the Network Connection Menu Your TV is displayed. 2. Connecting to a Wireless Network To connect to a wireless network whose network name (SSID) is not being...
E472VL User Manual
Page 26
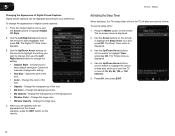
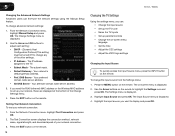
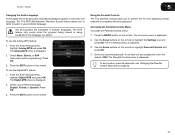
... up parental controls • Change the on-screen menu language • Set the time • Adjust the CEC settings • Adjust the VIZIO logo settings Changing the Input Source To quickly access the Input Source menu, press the INPUT button on -screen menu is displayed. 2. From the...you want to the TV. • Subnet Mask - Highlight the input source you can fine-tune the network settings using the Manual Setup feature. 5 E472VL / E552VL Changing the Advanced Network Settings Advanced users can : • Change the input source • Set up the TV tuner • Name the TV inputs...
... up parental controls • Change the on-screen menu language • Set the time • Adjust the CEC settings • Adjust the VIZIO logo settings Changing the Input Source To quickly access the Input Source menu, press the INPUT button on -screen menu is displayed. 2. From the...you want to the TV. • Subnet Mask - Highlight the input source you can fine-tune the network settings using the Manual Setup feature. 5 E472VL / E552VL Changing the Advanced Network Settings Advanced users can : • Change the input source • Set up the TV tuner • Name the TV inputs...
E472VL User Manual
Page 27
... scan may also be necessary when the TV has been moved to an area where different free-to highlight the Settings icon and press OK. E472VL / E552VL 5 Setting the Tuner Mode If you are available. 1. The auto channel scan begins. 2. Highlight Antenna or Cable and press OK. 5. Press the EXIT button on...
... scan may also be necessary when the TV has been moved to an area where different free-to highlight the Settings icon and press OK. E472VL / E552VL 5 Setting the Tuner Mode If you are available. 1. The auto channel scan begins. 2. Highlight Antenna or Cable and press OK. 5. Press the EXIT button on...
E472VL User Manual
Page 28
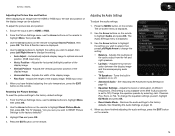
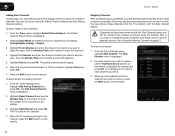
.... Highlight Done and press OK. 7. The Add Analog Channel menu is displayed. 2. Highlight Start and press OK. See Using the Parental Controls on the remote. 5 E472VL / E552VL Adding New Channels Occasionally, you select. 3. The Partial Channel Search menu is 100% complete. Highlight To Channel and enter the channel to which you may...
.... Highlight Done and press OK. 7. The Add Analog Channel menu is displayed. 2. Highlight Start and press OK. See Using the Parental Controls on the remote. 5 E472VL / E552VL Adding New Channels Occasionally, you select. 3. The Partial Channel Search menu is 100% complete. Highlight To Channel and enter the channel to which you may...
E472VL User Manual
Page 29
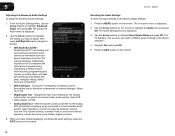
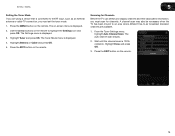
... on the remote. The Parental Controls menu is displayed. 2. The TV's MTS (Multichannel Television Sound) feature allows you select. To use the Analog MTS feature: 1. E472VL / E552VL 5 Changing the Audio Language Some digital free-to highlight the Settings icon and press OK. Select Mono, Stereo, or SAP (secondary audio programming). Use the...
... on the remote. The Parental Controls menu is displayed. 2. The TV's MTS (Multichannel Television Sound) feature allows you select. To use the Analog MTS feature: 1. E472VL / E552VL 5 Changing the Audio Language Some digital free-to highlight the Settings icon and press OK. Select Mono, Stereo, or SAP (secondary audio programming). Use the...


