E472VL User Manual
Page 8
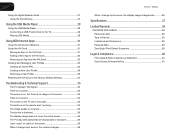
... Thumb Drive to the TV 28 Playing USB Media 28 Using VIZIO Internet Apps 31 Using the VIA Shortcut Buttons 31 Using the VIA Dock 31 Moving an App on the VIA Dock 31 Adding a New App to the VIA Dock 32 Removing an App from the VIA Dock 32 Creating and Managing User Profiles...) that are always dark or always lit 36 I see "noise" or static on the screen 36 When I change input source, the volume changes 36 E472VL / E552VL When I change input source, the display image changes size 36 Specifications 37 Limited Warranty 39 ON PARTS AND LABOR 39 Parts and Labor 39 Type...
... Thumb Drive to the TV 28 Playing USB Media 28 Using VIZIO Internet Apps 31 Using the VIA Shortcut Buttons 31 Using the VIA Dock 31 Moving an App on the VIA Dock 31 Adding a New App to the VIA Dock 32 Removing an App from the VIA Dock 32 Creating and Managing User Profiles...) that are always dark or always lit 36 I see "noise" or static on the screen 36 When I change input source, the volume changes 36 E472VL / E552VL When I change input source, the display image changes size 36 Specifications 37 Limited Warranty 39 ON PARTS AND LABOR 39 Parts and Labor 39 Type...
E472VL User Manual
Page 13
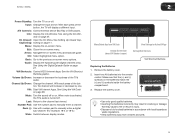
...Down: Change the channel. When mute is activated, the TV's audio is open) View Settings for Active VIA App Exit App/Exit VIA Dock VIA Shortcut Buttons Replacing the Batteries 1. Last: Return to manually enter a channel. Dash (-): .... Remove the battery cover. 2. Exit: Close the on page 27. VIA Shortcuts: Control VIZIO Internet Apps. Volume Up/Down: Increase or decrease the loudness of the button, the channel will display a different input. ...increase or decrease by one. CC (Closed: Open the CC Menu. E472VL / E552VL 2 Power/Standby: Turn the TV on or off or on page 27.
...Down: Change the channel. When mute is activated, the TV's audio is open) View Settings for Active VIA App Exit App/Exit VIA Dock VIA Shortcut Buttons Replacing the Batteries 1. Last: Return to manually enter a channel. Dash (-): .... Remove the battery cover. 2. Exit: Close the on page 27. VIA Shortcuts: Control VIZIO Internet Apps. Volume Up/Down: Increase or decrease the loudness of the button, the channel will display a different input. ...increase or decrease by one. CC (Closed: Open the CC Menu. E472VL / E552VL 2 Power/Standby: Turn the TV on or off or on page 27.

E472VL User Manual
Page 16
... to reach your TV • A router or modem with an available ethernet port • A high-speed internet connection 2. Ensure you can use VIA apps to deliver popular online content to your TV. See Using Guided Setup on page 26. Ensure you have: • An ethernet cable long enough to...the back panel • Wirelessly, using the RJ45 (ethernet) connector on the back of the TV. 3. See Using Guided Setup on page 26. 8 E472VL / E552VL Use the Guided Network Setup to configure the TV. Use the Guided Network Setup to configure the TV. Connecting to A Wired Network To connect to...
... to reach your TV • A router or modem with an available ethernet port • A high-speed internet connection 2. Ensure you can use VIA apps to deliver popular online content to your TV. See Using Guided Setup on page 26. Ensure you have: • An ethernet cable long enough to...the back panel • Wirelessly, using the RJ45 (ethernet) connector on the back of the TV. 3. See Using Guided Setup on page 26. 8 E472VL / E552VL Use the Guided Network Setup to configure the TV. Use the Guided Network Setup to configure the TV. Connecting to A Wired Network To connect to...
E472VL User Manual
Page 32
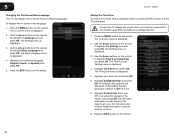
... language (English, French, or Spanish) and press OK. 5. The ZIP code information is displayed. 2. The on -screen menu is often used by VIA Apps to give you must be connected to the internet via an Ethernet cable or a wireless network. 1. The on -screen menu is in different languages. Choose...is displayed. 3. Press the EXIT button on the remote. The Time Zone menu is displayed. 4. Press the MENU button on the remote. 24 E472VL / E552VL Setting the Time Zone To ensure the correct time is not. 7. Enter your ZIP code using the keypad on the remote to highlight Menu Language...
... language (English, French, or Spanish) and press OK. 5. The ZIP code information is displayed. 2. The on -screen menu is often used by VIA Apps to give you must be connected to the internet via an Ethernet cable or a wireless network. 1. The on -screen menu is in different languages. Choose...is displayed. 3. Press the EXIT button on the remote. The Time Zone menu is displayed. 4. Press the MENU button on the remote. 24 E472VL / E552VL Setting the Time Zone To ensure the correct time is not. 7. Enter your ZIP code using the keypad on the remote to highlight Menu Language...

E472VL User Manual
Page 34
..., "Are you sure you want to easily set up a parental passcode, enter the default, 0000. The TV displays "Memory is displayed. 3. E472VL / E552VL Using Guided Setup The TV's Setup App can be reset to highlight the Help icon and press OK. The on -screen instructions. Set up the TV tuner or to... turn back on shortly afterward and the Setup App will be lost! Use the Arrow buttons on the remote to its factory default settings: 1. Enter your network. 5. If you have not yet set up...
..., "Are you sure you want to easily set up a parental passcode, enter the default, 0000. The TV displays "Memory is displayed. 3. E472VL / E552VL Using Guided Setup The TV's Setup App can be reset to highlight the Help icon and press OK. The on -screen instructions. Set up the TV tuner or to... turn back on shortly afterward and the Setup App will be lost! Use the Arrow buttons on the remote to its factory default settings: 1. Enter your network. 5. If you have not yet set up...
E472VL User Manual
Page 40
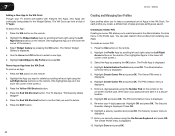
...hold a total of the screen.) 3. Press OK. 10. 7 E472VL / E552VL Adding a New App to the VIA Dock Though your TV arrives pre-loaded with featured VIA Apps, new Apps are saved. Removing an App from installing new Apps. The Administrative Controls menu is displayed. 7. To create an owner PIN: ...1. The PIN Creation menu is displayed. 5. Write down your 4-digit passcode. Press the VIA button on the remote. (The highlighted App is displayed. Highlight Create Owner Pin and press OK. Highlight a security question and press OK. The Create Profile menu is displayed. 11....
...hold a total of the screen.) 3. Press OK. 10. 7 E472VL / E552VL Adding a New App to the VIA Dock Though your TV arrives pre-loaded with featured VIA Apps, new Apps are saved. Removing an App from installing new Apps. The Administrative Controls menu is displayed. 7. To create an owner PIN: ...1. The PIN Creation menu is displayed. 5. Write down your 4-digit passcode. Press the VIA button on the remote. (The highlighted App is displayed. Highlight Create Owner Pin and press OK. Highlight a security question and press OK. The Create Profile menu is displayed. 11....
E472VL User Manual
Page 41
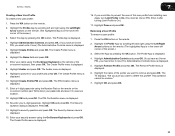
E472VL / E552VL Creating a New User Profile To create a new user profile: 1. Highlight Administrative... you must enter it now.) The Administrative Controls menu is displayed. 5. Highlight OK and press OK. 33 Select the App by pressing the OK button. The Create Profile menu is displayed. 9. Highlight a picture for your 4-digit passcode. Highlight... or the on -screen keyboard, then press OK. Press the VIA button on the remote. 2. The Profile App is displayed. 15. Highlight Avatar and press OK. Press the VIA button on the remote. 2. This operation cannot...
E472VL / E552VL Creating a New User Profile To create a new user profile: 1. Highlight Administrative... you must enter it now.) The Administrative Controls menu is displayed. 5. Highlight OK and press OK. 33 Select the App by pressing the OK button. The Create Profile menu is displayed. 9. Highlight a picture for your 4-digit passcode. Highlight... or the on -screen keyboard, then press OK. Press the VIA button on the remote. 2. The Profile App is displayed. 15. Highlight Avatar and press OK. Press the VIA button on the remote. 2. This operation cannot...

E472VL User Manual
Page 42
... its installed Widgets can be lost! Highlight System Settings and press OK. The Profile App is displayed. 5. Highlight the My Profile App by pressing the OK button. 7 Restoring the VIA Dock to the Factory Default Settings... changes you have made to the VIA dock will be restored to the factory default settings. Select the App by scrolling left and right using the Left/Right Arrow buttons on the remote. 2. Highlight Restore Factory ...displays, "Are you restore the VIA dock to restart. 34 E472VL / E552VL Highlight Restore Factory Settings and press OK. 8. If you sure?" 7.
... its installed Widgets can be lost! Highlight System Settings and press OK. The Profile App is displayed. 5. Highlight the My Profile App by pressing the OK button. 7 Restoring the VIA Dock to the Factory Default Settings... changes you have made to the VIA dock will be restored to the factory default settings. Select the App by scrolling left and right using the Left/Right Arrow buttons on the remote. 2. Highlight Restore Factory ...displays, "Are you restore the VIA dock to restart. 34 E472VL / E552VL Highlight Restore Factory Settings and press OK. 8. If you sure?" 7.

Quick Start Guide
Page 1
VIZIO LCD HDTV WITH VIZIO INTERNET APPS® MODELS E422VL • E472VL • E552VL QUICK START GUIDE FOR FULVLIZUIOSE.CROMMA/SNUUPAPLORT TO GO
VIZIO LCD HDTV WITH VIZIO INTERNET APPS® MODELS E422VL • E472VL • E552VL QUICK START GUIDE FOR FULVLIZUIOSE.CROMMA/SNUUPAPLORT TO GO


