User Manual
Page 8
...Input Source...26 Setting the Tuner Mode...27 Scanning for Channels...27 Adding New Channels...27 Skipping Channels...28 Changing the Audio Language...29 Using the Parental Controls...29 Accessing the Parental Controls Menu...29 Enabling or Disabling Program Ratings...30 Locking ... Panel...6 Front Panel...7 Remote Control...8 Replacing the Batteries...9 Connecting A Device...10 Connecting Your Devices...10 Connecting A PC...11 Connecting an audio device...12 Connecting to your network...13 Connecting to a Wired Network (Best)...13 Connecting to a Wireless Network...13 Completing the First-Time...
...Input Source...26 Setting the Tuner Mode...27 Scanning for Channels...27 Adding New Channels...27 Skipping Channels...28 Changing the Audio Language...29 Using the Parental Controls...29 Accessing the Parental Controls Menu...29 Enabling or Disabling Program Ratings...30 Locking ... Panel...6 Front Panel...7 Remote Control...8 Replacing the Batteries...9 Connecting A Device...10 Connecting Your Devices...10 Connecting A PC...11 Connecting an audio device...12 Connecting to your network...13 Connecting to a Wired Network (Best)...13 Connecting to a Wireless Network...13 Completing the First-Time...
User Manual
Page 12
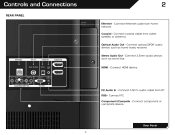
Coaxial - PC Audio In - Rear Panel 5 Connect optical/SPDIF audio device, such as sound bar. Connect 3.5mm audio cable from cable, satellite, or antenna. 2 Optical Audio Out - Connect component or composite device. Stereo Audio Out - Connect HDMI device. Connect 3.5mm audio device, such as home audio receiver. HDMI - Connect coaxial cable from PC RGB - Controls and Connections REAR PANEL Ethernet - Connect ethernet cable from home network. Connect PC Component/Compsite -
Coaxial - PC Audio In - Rear Panel 5 Connect optical/SPDIF audio device, such as sound bar. Connect 3.5mm audio cable from cable, satellite, or antenna. 2 Optical Audio Out - Connect component or composite device. Stereo Audio Out - Connect HDMI device. Connect 3.5mm audio device, such as home audio receiver. HDMI - Connect coaxial cable from PC RGB - Controls and Connections REAR PANEL Ethernet - Connect ethernet cable from home network. Connect PC Component/Compsite -
User Manual
Page 15
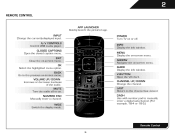
... Open the closed caption menu. V BUTTON Open the VIA dock. A/V CONTROLS Control USB media player. VOLUME UP/DOWN Increase or decrease loudness of the audio. MUTE Turn the audio off . GUIDE Display the info window. 2 REMOTE CONTROL APP LAUNCHER Quickly launch the pictured app. OK Select the highlighted menu option. INFO Display...
... Open the closed caption menu. V BUTTON Open the VIA dock. A/V CONTROLS Control USB media player. VOLUME UP/DOWN Increase or decrease loudness of the audio. MUTE Turn the audio off . GUIDE Display the info window. 2 REMOTE CONTROL APP LAUNCHER Quickly launch the pictured app. OK Select the highlighted menu option. INFO Display...
User Manual
Page 17
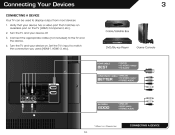
... Cable/Satellite Box 3 HDMI CABLE BEST BETTER • DIGITAL • HD VIDEO (1080p)* • HD AUDIO COMPONENT CABLE • ANALOG • HD VIDEO (1080i)* • STEREO AUDIO AV CABLE GOOD • ANALOG • VIDEO (480i)* • STEREO AUDIO * Maximum Resolution CONNECTING A DEVICE 10 Verify that your device has a video port that matches an...
... Cable/Satellite Box 3 HDMI CABLE BEST BETTER • DIGITAL • HD VIDEO (1080p)* • HD AUDIO COMPONENT CABLE • ANALOG • HD VIDEO (1080i)* • STEREO AUDIO AV CABLE GOOD • ANALOG • VIDEO (480i)* • STEREO AUDIO * Maximum Resolution CONNECTING A DEVICE 10 Verify that your device has a video port that matches an...
User Manual
Page 18
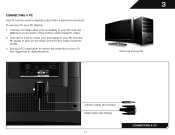
To use your TV. Connect an RGB cable (not included) to display output from a personal computer. Personal Computer 3.5mm Cable (For Audio) RGB Cable (For Video) CONNECTING A PC 11 3 CONNECTING A PC Your TV can be used to your PC and the RGB port on the back of the TV. Connect a 3.5mm cable (not included) to match the resolution of the TV. Set your PC's resolution to your PC and the PC Audio In port on the back of your TV as a PC display: 1. This cable transmits video. 2. This cable transmits audio. 3. See Appendix B - Specifications.
To use your TV. Connect an RGB cable (not included) to display output from a personal computer. Personal Computer 3.5mm Cable (For Audio) RGB Cable (For Video) CONNECTING A PC 11 3 CONNECTING A PC Your TV can be used to your PC and the RGB port on the back of the TV. Connect a 3.5mm cable (not included) to match the resolution of the TV. Set your PC's resolution to your PC and the PC Audio In port on the back of your TV as a PC display: 1. This cable transmits video. 2. This cable transmits audio. 3. See Appendix B - Specifications.
User Manual
Page 19
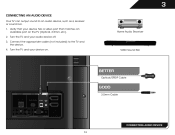
Connect the appropriate cable (not included) to an audio device, such as a receiver or sound bar. 1. Turn the TV and your audio device off. 3. Turn the TV and your device on the TV (Optical, 3.5mm, etc). 2. Verify that your device has a video port that matches an available port on . VIZIO Sound Bar Home Audio Receiver BETTER Optical/SPDIF Cable GOOD 3.5mm Cable CONNECTING AUDIO DEVICE 12 3 CONNECTING AN AUDIO DEVICE Your TV can output sound to the TV and the device. 4.
Connect the appropriate cable (not included) to an audio device, such as a receiver or sound bar. 1. Turn the TV and your audio device off. 3. Turn the TV and your device on the TV (Optical, 3.5mm, etc). 2. Verify that your device has a video port that matches an available port on . VIZIO Sound Bar Home Audio Receiver BETTER Optical/SPDIF Cable GOOD 3.5mm Cable CONNECTING AUDIO DEVICE 12 3 CONNECTING AN AUDIO DEVICE Your TV can output sound to the TV and the device. 4.

User Manual
Page 22
... source • Change the screen aspect ratio • Set up closed captioning • Activate the sleep timer • Adjust the picture settings • Adjust the audio settings • Change network settings • Change TV settings • Access the help menu 5 NAVIGATING THE ON-SCREEN MENU To open the on-screen menu...
... source • Change the screen aspect ratio • Set up closed captioning • Activate the sleep timer • Adjust the picture settings • Adjust the audio settings • Change network settings • Change TV settings • Access the help menu 5 NAVIGATING THE ON-SCREEN MENU To open the on-screen menu...
User Manual
Page 29
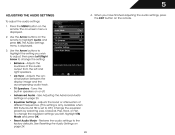
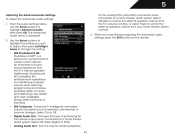
...speakers. • Lip Sync - Press the MENU button on or off. • Advanced Audio - Adjusts the synchronization between the display image and the accompanying audio track. • TV Speakers - Restores the audio settings to Off.) Change the equalizer presets by selecting Jazz, Classical, Pop, Rock, or... Flat. When you wish to adjust, then press Left/Right Arrow to highlight the setting you have finished adjusting the audio settings, press the EXIT button on page 23. • Equalizer Settings - Adjusts the loudness of different frequencies. (This setting is ...
...speakers. • Lip Sync - Press the MENU button on or off. • Advanced Audio - Adjusts the synchronization between the display image and the accompanying audio track. • TV Speakers - Restores the audio settings to Off.) Change the equalizer presets by selecting Jazz, Classical, Pop, Rock, or... Flat. When you wish to adjust, then press Left/Right Arrow to highlight the setting you have finished adjusting the audio settings, press the EXIT button on page 23. • Equalizer Settings - Adjusts the loudness of different frequencies. (This setting is ...
User Manual
Page 30
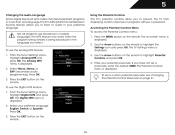
...Select Variable to control the external speakers' volume from the TV's volume controls, or select Fixed to highlight Advanced Audio, then press OK. From the Audio Settings Menu, use the Arrow buttons to control the external speakers' volume from the TV's internal speakers. Select ... or Standard. • SRS TruVolume - TruVolume™ intelligently normalizes volume fluctuations due to a home theater audio system. Select Off, Dolby Digital, or PCM. • Analog Audio Out - Sets the volume control properties 23 for the Optical output when connected to change the setting: ...
...Select Variable to control the external speakers' volume from the TV's volume controls, or select Fixed to highlight Advanced Audio, then press OK. From the Audio Settings Menu, use the Arrow buttons to control the external speakers' volume from the TV's internal speakers. Select ... or Standard. • SRS TruVolume - TruVolume™ intelligently normalizes volume fluctuations due to a home theater audio system. Select Off, Dolby Digital, or PCM. • Analog Audio Out - Sets the volume control properties 23 for the Optical output when connected to change the setting: ...

User Manual
Page 31
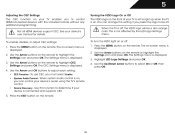
... THE NETWORK CONNECTION MENU Your TV is displayed. 3. The on the remote to a network with an Ethernet cable, you want to RESET Audio Settings to the factory default settings: 1. Highlight Yes and press OK. 5. Highlight the name of available wireless networks, is displayed. 2. ...your wireless network displayed, highlight More Access Points and press OK. Press the EXIT button on the remote. 5 Resetting the Audio Settings To reset the audio settings to the factory defaults?" 4. Press the EXIT button on the remote. 24 Connecting to a Wireless Network To connect...
... THE NETWORK CONNECTION MENU Your TV is displayed. 3. The on the remote to a network with an Ethernet cable, you want to RESET Audio Settings to the factory default settings: 1. Highlight Yes and press OK. 5. Highlight the name of available wireless networks, is displayed. 2. ...your wireless network displayed, highlight More Access Points and press OK. Press the EXIT button on the remote. 5 Resetting the Audio Settings To reset the audio settings to the factory defaults?" 4. Press the EXIT button on the remote. 24 Connecting to a Wireless Network To connect...
User Manual
Page 36
...Accessing the Parental Controls Menu To access the Parental Controls menu: 1. To set a passcode, enter the default, 0000. 5 Changing the Audio Language Some digital free-to prevent the TV from displaying certain channels or programs without a password. The TV Settings menu is displayed. 2. ...The Parental Controls menu is being viewed is displayed. To use the Digital MTS feature: 1. Select Mono, Stereo, or SAP (secondary audio programming). Enter your preferred language: English, French, or Spanish. Not all programs are broadcast in more than one language. The TV's MTS...
...Accessing the Parental Controls Menu To access the Parental Controls menu: 1. To set a passcode, enter the default, 0000. 5 Changing the Audio Language Some digital free-to prevent the TV from displaying certain channels or programs without a password. The TV Settings menu is displayed. 2. ...The Parental Controls menu is being viewed is displayed. To use the Digital MTS feature: 1. Select Mono, Stereo, or SAP (secondary audio programming). Enter your preferred language: English, French, or Spanish. Not all programs are broadcast in more than one language. The TV's MTS...
User Manual
Page 40
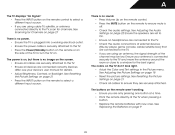
... control HDMI-connected devices with the included remote without any additional programming. Turning the VIZIO Logo On or Off The VIZIO logo on the front of your device's user manual for details. The Settings menu... Highlight LED Logo Settings and press OK. 4. 5 Adjusting the CEC Settings The CEC function on your device's audio using the TV's remote control. Use the Arrow buttons on , you must select Enable. When the TV is ...is displayed. 3. The on the remote. 33 When system audio control is off, the VIZIO logo will be off : 1. The Settings menu is displayed. 2. System...
... control HDMI-connected devices with the included remote without any additional programming. Turning the VIZIO Logo On or Off The VIZIO logo on the front of your device's user manual for details. The Settings menu... Highlight LED Logo Settings and press OK. 4. 5 Adjusting the CEC Settings The CEC function on your device's audio using the TV's remote control. Use the Arrow buttons on , you must select Enable. When the TV is ...is displayed. 3. The on the remote. 33 When system audio control is off, the VIZIO logo will be off : 1. The Settings menu is displayed. 2. System...
User Manual
Page 41
Use the Up/Down Arrow buttons to highlight the Help icon and press OK. Resetting the TV Settings To reset the TV's picture and audio settings: 1. The on -screen menu is displayed. 2. Press the MENU button on the remote. The on -screen menu is displayed. 2. Highlight System Info and press ...
Use the Up/Down Arrow buttons to highlight the Help icon and press OK. Resetting the TV Settings To reset the TV's picture and audio settings: 1. The on -screen menu is displayed. 2. Press the MENU button on the remote. The on -screen menu is displayed. 2. Highlight System Info and press ...
User Manual
Page 44
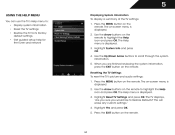
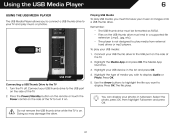
... damage the drive. 37 Connect your music or images onto a USB thumb drive. Use the Arrow buttons to highlight the file you wish to display: Audio or Photo. Press the Power/Standby button on the remote or touch the Power control on the side of media you want to display. Playing...
... damage the drive. 37 Connect your music or images onto a USB thumb drive. Use the Arrow buttons to highlight the file you wish to display: Audio or Photo. Press the Power/Standby button on the remote or touch the Power control on the side of media you want to display. Playing...

User Manual
Page 45
... drive has more files than can move between files using the Arrow and OK buttons on a single screen, you would like to return to control audio playback. Current Folder Playback Controls Use to the previous screen.
... drive has more files than can move between files using the Arrow and OK buttons on a single screen, you would like to return to control audio playback. Current Folder Playback Controls Use to the previous screen.
User Manual
Page 52
... attached to the TV. • Ensure all cables to ensure they are securely attached. See Adjusting the Audio Settings on page 22 Ensure the speakers are set to On. • Ensure no power. • Ensure... the TV is off. • Check the audio settings. The colors on page 9 45 See Replacing the Batteries on the TV don't look right. ...the MUTE button on page 27 There is no headphones are connected to the TV. • Check the audio connections of external devices (Blu-ray player, game console, cable/satellite box) that are connected to the ...
... attached to the TV. • Ensure all cables to ensure they are securely attached. See Adjusting the Audio Settings on page 22 Ensure the speakers are set to On. • Ensure no power. • Ensure... the TV is off. • Check the audio settings. The colors on page 9 45 See Replacing the Batteries on the TV don't look right. ...the MUTE button on page 27 There is no headphones are connected to the TV. • Check the audio connections of external devices (Blu-ray player, game console, cable/satellite box) that are connected to the ...
Brochure
Page 2
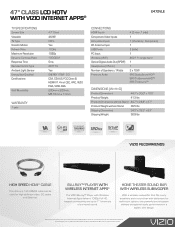
...used for illustration purposes only. CEC, ARC, VIZIO PQA, VIZIO AQA 200mm x 200mm, M6 16mm x 1.0mm CONNECTIONS HDMI Inputs Component Video Inputs Composite Inputs RF Antenna Input USB Ports PC Input Wireless (WiFi) Optical Digital Audio Out (SPDIF) Headphones (3.5mm) Number of surround... sound. product features and specifications are for high definition video, 3D, audio and Ethernet. 47" CLASS LCD HDTV WITH VIZIO INTERNET APPS® E472VLE TV SPECIFICATIONS Screen Size Viewable TV Type Smooth Motion Refresh Rate Maximum Resolution Dynamic Contrast Ratio ...
...used for illustration purposes only. CEC, ARC, VIZIO PQA, VIZIO AQA 200mm x 200mm, M6 16mm x 1.0mm CONNECTIONS HDMI Inputs Component Video Inputs Composite Inputs RF Antenna Input USB Ports PC Input Wireless (WiFi) Optical Digital Audio Out (SPDIF) Headphones (3.5mm) Number of surround... sound. product features and specifications are for high definition video, 3D, audio and Ethernet. 47" CLASS LCD HDTV WITH VIZIO INTERNET APPS® E472VLE TV SPECIFICATIONS Screen Size Viewable TV Type Smooth Motion Refresh Rate Maximum Resolution Dynamic Contrast Ratio ...


