User Manual
Page 5
... the AC/DC power adapter, not the cord. If water penetrates into your TV. - Operating your TV in fire or electric shock. • Do not use by qualified service personnel only. Unplug the power cord immediately and contact your TV to rain or moisture. h If any of electric shock, do so. • T he lightning flash with instructions. Your TV is...
... the AC/DC power adapter, not the cord. If water penetrates into your TV. - Operating your TV in fire or electric shock. • Do not use by qualified service personnel only. Unplug the power cord immediately and contact your TV to rain or moisture. h If any of electric shock, do so. • T he lightning flash with instructions. Your TV is...
User Manual
Page 7
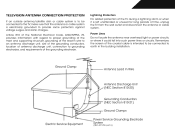
... ART 250, part H) Electric Service Equipment Power Lines Do not locate the antenna near overhead light or power circuits, or where it is electrically grounded to provide some protection against voltage surges and static charges. TELEVISION ANTENNA CONNECTION PROTECTION If an outside antenna/satellite dish or cable system is to be connected to earth in wire to an antenna discharge unit, size of the...
... ART 250, part H) Electric Service Equipment Power Lines Do not locate the antenna near overhead light or power circuits, or where it is electrically grounded to provide some protection against voltage surges and static charges. TELEVISION ANTENNA CONNECTION PROTECTION If an outside antenna/satellite dish or cable system is to be connected to earth in wire to an antenna discharge unit, size of the...
User Manual
Page 8
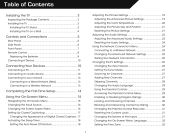
... the Tuner Mode...27 Scanning for Channels...27 Adding New Channels...27 Skipping Channels...28 Changing the Audio Language...29 Using the Parental Controls...29 Accessing the Parental Controls Menu...29 Enabling or Disabling Program Ratings...30 Locking and Unlocking Channels...30 Blocking and Unblocking Content by Rating...30 Changing the Parental Control Passcode...31 Resetting the Content Locks...31 Changing the Names of the Inputs...31 Changing the On-Screen Menu Language...32 Setting the Time Zone...32 1 Controls and Connections...5 Rear Panel...5 Side Panel...6 Front Panel...7 Remote...
... the Tuner Mode...27 Scanning for Channels...27 Adding New Channels...27 Skipping Channels...28 Changing the Audio Language...29 Using the Parental Controls...29 Accessing the Parental Controls Menu...29 Enabling or Disabling Program Ratings...30 Locking and Unlocking Channels...30 Blocking and Unblocking Content by Rating...30 Changing the Parental Control Passcode...31 Resetting the Content Locks...31 Changing the Names of the Inputs...31 Changing the On-Screen Menu Language...32 Setting the Time Zone...32 1 Controls and Connections...5 Rear Panel...5 Side Panel...6 Front Panel...7 Remote...
User Manual
Page 9
... VIZIO Logo On or Off...33 Using the Help Menu...34 Displaying System Information...34 Resetting the TV Settings...34 Restoring the TV to Factory Default Settings...35 Using Guided Setup...35 Using the Info Window...36 Using the USB Media Player...37 Using the USB Media Player...37 Connecting a USB Thumb Drive to the TV...37 Playing USB Media...37 Using the VIA Shortcut Buttons...40 Using the VIA Dock...40 Moving an App on the VIA Dock...40 Using VIZIO Internet...
... VIZIO Logo On or Off...33 Using the Help Menu...34 Displaying System Information...34 Resetting the TV Settings...34 Restoring the TV to Factory Default Settings...35 Using Guided Setup...35 Using the Info Window...36 Using the USB Media Player...37 Using the USB Media Player...37 Connecting a USB Thumb Drive to the TV...37 Playing USB Media...37 Using the VIA Shortcut Buttons...40 Using the VIA Dock...40 Moving an App on the VIA Dock...40 Using VIZIO Internet...
User Manual
Page 11
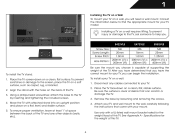
.... Remove the base by inserting and tightening the included screws. 4. E422VLE Screw Size: Screw Length: Screw Pitch: Hole Pattern: M6 20mm 1.0mm 200mm (V) x 200mm (H) E472VLE M6 16mm 1.0mm 200mm (V) x 400mm (H) E552VLE M8 25mm 1.25mm 200mm (V) x 400mm (H) To install the TV stand: 1. Place the TV screen-down on the back of the TV. Move the TV with your mount. Be sure the mount you will need a wall mount. Using...
.... Remove the base by inserting and tightening the included screws. 4. E422VLE Screw Size: Screw Length: Screw Pitch: Hole Pattern: M6 20mm 1.0mm 200mm (V) x 200mm (H) E472VLE M6 16mm 1.0mm 200mm (V) x 400mm (H) E552VLE M8 25mm 1.25mm 200mm (V) x 400mm (H) To install the TV stand: 1. Place the TV screen-down on the back of the TV. Move the TV with your mount. Be sure the mount you will need a wall mount. Using...
User Manual
Page 12
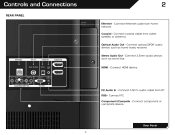
Connect coaxial cable from PC RGB - Connect optical/SPDIF audio device, such as sound bar. Connect 3.5mm audio cable from cable, satellite, or antenna. 2 Optical Audio Out - Stereo Audio Out - PC Audio In - Connect 3.5mm audio device, such as home audio receiver. Connect component or composite device. Connect ethernet cable from home network. Connect HDMI device. Controls and Connections REAR PANEL Ethernet - HDMI - Connect PC Component/Compsite - Coaxial - Rear Panel 5
Connect coaxial cable from PC RGB - Connect optical/SPDIF audio device, such as sound bar. Connect 3.5mm audio cable from cable, satellite, or antenna. 2 Optical Audio Out - Stereo Audio Out - PC Audio In - Connect 3.5mm audio device, such as home audio receiver. Connect component or composite device. Connect ethernet cable from home network. Connect HDMI device. Controls and Connections REAR PANEL Ethernet - HDMI - Connect PC Component/Compsite - Coaxial - Rear Panel 5
User Manual
Page 15
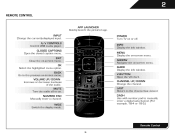
...-5.) Remote Control 8 POWER Turn TV on or off or on. GUIDE Display the info window. INPUT Change the currently-displayed input. WIDE Switch the display mode. INFO Display the info window. MENU Display the on -screen menu. V BUTTON Open the VIA dock. CLOSED CAPTIONS Open the closed caption menu. VOLUME UP/DOWN Increase or decrease loudness of the audio. DASH Use with number pad to the previous on -screen menu. NUMBER PAD Manually enter a channel. EXIT Close the on -screen menu. MUTE Turn the audio off . CHANNEL UP/DOWN Change...
...-5.) Remote Control 8 POWER Turn TV on or off or on. GUIDE Display the info window. INPUT Change the currently-displayed input. WIDE Switch the display mode. INFO Display the info window. MENU Display the on -screen menu. V BUTTON Open the VIA dock. CLOSED CAPTIONS Open the closed caption menu. VOLUME UP/DOWN Increase or decrease loudness of the audio. DASH Use with number pad to the previous on -screen menu. NUMBER PAD Manually enter a channel. EXIT Close the on -screen menu. MUTE Turn the audio off . CHANNEL UP/DOWN Change...
User Manual
Page 17
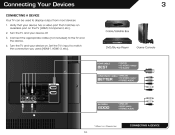
... (HDMI, Component, etc). 2. Turn the TV and your device has a video port that matches an available port on . Set the TV's input to match the connection you used to the TV and the device. 4. DVD/Blu-ray Player Game Console Cable/Satellite Box 3 HDMI CABLE BEST BETTER • DIGITAL • HD VIDEO (1080p)* • HD AUDIO COMPONENT CABLE • ANALOG • HD VIDEO (1080i)* • STEREO AUDIO AV CABLE GOOD • ANALOG • VIDEO (480i)* • STEREO AUDIO * Maximum Resolution CONNECTING A DEVICE...
... (HDMI, Component, etc). 2. Turn the TV and your device has a video port that matches an available port on . Set the TV's input to match the connection you used to the TV and the device. 4. DVD/Blu-ray Player Game Console Cable/Satellite Box 3 HDMI CABLE BEST BETTER • DIGITAL • HD VIDEO (1080p)* • HD AUDIO COMPONENT CABLE • ANALOG • HD VIDEO (1080i)* • STEREO AUDIO AV CABLE GOOD • ANALOG • VIDEO (480i)* • STEREO AUDIO * Maximum Resolution CONNECTING A DEVICE...
User Manual
Page 23
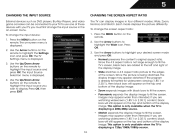
... the MENU button on the remote. 2. The Input Source Selection menu is displayed. 3. Each mode displays the picture differently. CHANGING THE SCREEN ASPECT RATIO The TV can be connected to your desired screen mode and press OK: • Normal preserves the content's original aspect ratio. Press the MENU button on the remote. If you wish to fill the screen. Images may appear wider than intended. If the program is being...
... the MENU button on the remote. 2. The Input Source Selection menu is displayed. 3. Each mode displays the picture differently. CHANGING THE SCREEN ASPECT RATIO The TV can be connected to your desired screen mode and press OK: • Normal preserves the content's original aspect ratio. Press the MENU button on the remote. If you wish to fill the screen. Images may appear wider than intended. If the program is being...
User Manual
Page 25
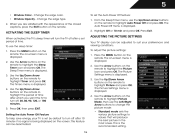
... buttons on the remote to highlight Auto Power Off and press OK. The Timers menu is displayed. 4. This feature can be deactivated. 18 ADJUSTING THE PICTURE SETTINGS Your TV display can be adjusted to suit your TV is set by default to turn off after 10 minutes if no signal is being displayed on the remote to highlight Timer and press OK. The on -screen menu is displayed. 2. The Picture Settings menu is displayed. 4. Change the edge type...
... buttons on the remote to highlight Auto Power Off and press OK. The Timers menu is displayed. 4. This feature can be deactivated. 18 ADJUSTING THE PICTURE SETTINGS Your TV display can be adjusted to suit your TV is set by default to turn off after 10 minutes if no signal is being displayed on the remote to highlight Timer and press OK. The on -screen menu is displayed. 2. The Picture Settings menu is displayed. 4. Change the edge type...
User Manual
Page 26
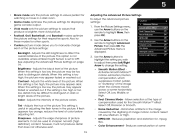
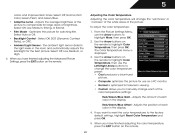
... in a dark room. • Game mode optimizes the picture settings for displaying game console output. • Vivid mode sets the picture settings to values that does not otherwise exist. 19 Adjusting the Advanced Picture Settings To adjust the advanced picture settings: 1. Adjusts the LED brightness to highlight More, then press OK. 2. Adjusts the white level of the picture. When this setting is displayed. 3. Tint - From the Picture Settings menu, use the Arrow buttons on the remote to affect the overall...
... in a dark room. • Game mode optimizes the picture settings for displaying game console output. • Vivid mode sets the picture settings to values that does not otherwise exist. 19 Adjusting the Advanced Picture Settings To adjust the advanced picture settings: 1. Adjusts the LED brightness to highlight More, then press OK. 2. Adjusts the white level of the picture. When this setting is displayed. 3. Tint - From the Picture Settings menu, use the Arrow buttons on the remote to affect the overall...
User Manual
Page 27
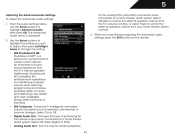
... buttons on the remote to highlight Color Temperature, then use the Left/Right Arrow buttons to the factory default settings, highlight Reset Color Temperature and press OK. 5. Select Auto or Off. • Backlight Control - From the Picture Settings Menu, use as a PC monitor. • Normal is displayed. 3. Adjusts the amount of each color in the room and automatically adjusts the backlight for television viewing. • Custom allows you want to reset the color temperatures to change...
... buttons on the remote to highlight Color Temperature, then use the Left/Right Arrow buttons to the factory default settings, highlight Reset Color Temperature and press OK. 5. Select Auto or Off. • Backlight Control - From the Picture Settings Menu, use as a PC monitor. • Normal is displayed. 3. Adjusts the amount of each color in the room and automatically adjusts the backlight for television viewing. • Custom allows you want to reset the color temperatures to change...
User Manual
Page 30
... (red/white) connectors when connected to change the setting: • SRS StudioSound HD StudioSound HD™ is displayed. 2. Additionally, StudioSound HD completes the entertainment experience by maintaining a steady volume while watching programming and movies, providing deep, rich bass, and delivering crisp details and clear, intelligible dialog. Select Variable to control the external speakers' volume from the TV's volume controls, or select Fixed to television commercials or channel changes...
... (red/white) connectors when connected to change the setting: • SRS StudioSound HD StudioSound HD™ is displayed. 2. Additionally, StudioSound HD completes the entertainment experience by maintaining a steady volume while watching programming and movies, providing deep, rich bass, and delivering crisp details and clear, intelligible dialog. Select Variable to control the external speakers' volume from the TV's volume controls, or select Fixed to television commercials or channel changes...
User Manual
Page 34
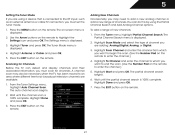
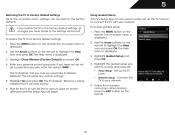
... where different free-to-air broadcast television channels are available. 1. To add a range of channel you are adding: Analog/Digital, Analog, or Digital. 3. Use the Arrow buttons on -screen menu is displayed. 2. 5 Setting the Tuner Mode If you are using a device that is connected to the RF input, such as an external antenna or cable TV connection, you must scan for Channels Before the TV can do this by using the Partial Channel Search and Add Analog Channel options...
... where different free-to-air broadcast television channels are available. 1. To add a range of channel you are adding: Analog/Digital, Analog, or Digital. 3. Use the Arrow buttons on -screen menu is displayed. 2. 5 Setting the Tuner Mode If you are using a device that is connected to the RF input, such as an external antenna or cable TV connection, you must scan for Channels Before the TV can do this by using the Partial Channel Search and Add Analog Channel options...
User Manual
Page 40
... button on the remote. Not all HDMI devices support CEC. To enable, disable, or adjust CEC settings: 1. Press the MENU button on -screen menu is displayed. 3. The CEC Settings menu is displayed. 3. When the TV is off, the VIZIO logo will be off : 1. 5 Adjusting the CEC Settings The CEC function on your TV is set to light up when the TV is on. See your device's user manual for details. Use the Arrow buttons...
... button on the remote. Not all HDMI devices support CEC. To enable, disable, or adjust CEC settings: 1. Press the MENU button on -screen menu is displayed. 3. The CEC Settings menu is displayed. 3. When the TV is off, the VIZIO logo will be off : 1. 5 Adjusting the CEC Settings The CEC function on your TV is set to light up when the TV is on. See your device's user manual for details. Use the Arrow buttons...
User Manual
Page 42
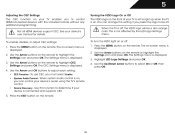
.... 4. Set up the TV tuner or to connect the TV with your network. Network Setup - 5 Restoring the TV to Factory Default Settings All of the on-screen menu settings can be reset to the factory defaults. Highlight Clear Memory (Factory Default) and press OK. 4. The TV will turn off. The Help menu is displayed. 3. Using Guided Setup The TV's Setup App can be used to easily set up a parental passcode, enter the default, 0000. When finished, press the EXIT button...
.... 4. Set up the TV tuner or to connect the TV with your network. Network Setup - 5 Restoring the TV to Factory Default Settings All of the on-screen menu settings can be reset to the factory defaults. Highlight Clear Memory (Factory Default) and press OK. 4. The TV will turn off. The Help menu is displayed. 3. Using Guided Setup The TV's Setup App can be used to easily set up a parental passcode, enter the default, 0000. When finished, press the EXIT button...
User Manual
Page 52
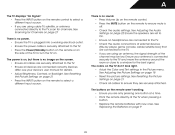
... is securely attached to the TV, scan for the best signal. The colors on page 9 45 See Replacing the Batteries on the TV don't look right. • Adust the Color and Tint settings in the Picture menu. See Adjusting the Audio Settings on page 22 Ensure the speakers are using cable TV, satellite, or antenna connected directly to the TV. • Press the Power/Standby button on the remote or on .
... is securely attached to the TV, scan for the best signal. The colors on page 9 45 See Replacing the Batteries on the TV don't look right. • Adust the Color and Tint settings in the Picture menu. See Adjusting the Audio Settings on page 22 Ensure the speakers are using cable TV, satellite, or antenna connected directly to the TV. • Press the Power/Standby button on the remote or on .
User Manual
Page 53
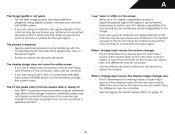
... of the channel may be low. I change input source, the display image changes size. • The TV remembers the viewing mode on the remote to change input source, the volume changes. • The TV remembers the volume level on the screen. • When your antenna is connected securely to the TV and move the antenna around the room or close to a window for the best signal. If the viewing mode on the new input source differs from...
... of the channel may be low. I change input source, the display image changes size. • The TV remembers the viewing mode on the remote to change input source, the volume changes. • The TV remembers the volume level on the screen. • When your antenna is connected securely to the TV and move the antenna around the room or close to a window for the best signal. If the viewing mode on the new input source differs from...
User Manual
Page 56
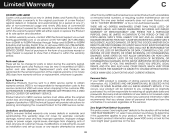
... for transportation costs to the service center, but VIZIO will be no charge for parts or labor during the warranty period. Proof of purchase in materials and workmanship. Product returns to obtain warranty service. This warranty does not cover, for example: cosmetic damage, normal wear and tear, improper operation, improper voltage supply or power surges, signal issues, damages from the unit before...
... for transportation costs to the service center, but VIZIO will be no charge for parts or labor during the warranty period. Proof of purchase in materials and workmanship. Product returns to obtain warranty service. This warranty does not cover, for example: cosmetic damage, normal wear and tear, improper operation, improper voltage supply or power surges, signal issues, damages from the unit before...
Brochure
Page 2
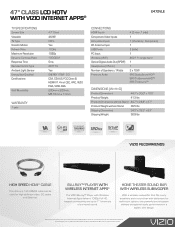
... Maximum Resolution Dynamic Contrast Ratio Response Time Remote Control Type Ambient Light Sensor Energy Star Qualified Certifications Wall Mountable WARRANTY 1 year 47" Class 46.96" CCFL Yes 120Hz 1080p 100,000:1 5ms XRT110 Yes ENERGY STAR® 5.3 CSA, CSA-US, FCC Class B, HDMI V1.4 incl. CEC, ARC, VIZIO PQA, VIZIO AQA 200mm x 200mm, M6 16mm x 1.0mm CONNECTIONS HDMI Inputs Component Video Inputs Composite Inputs RF Antenna Input USB Ports PC Input Wireless (WiFi) Optical Digital Audio Out (SPDIF) Headphones (3.5mm) Number...
... Maximum Resolution Dynamic Contrast Ratio Response Time Remote Control Type Ambient Light Sensor Energy Star Qualified Certifications Wall Mountable WARRANTY 1 year 47" Class 46.96" CCFL Yes 120Hz 1080p 100,000:1 5ms XRT110 Yes ENERGY STAR® 5.3 CSA, CSA-US, FCC Class B, HDMI V1.4 incl. CEC, ARC, VIZIO PQA, VIZIO AQA 200mm x 200mm, M6 16mm x 1.0mm CONNECTIONS HDMI Inputs Component Video Inputs Composite Inputs RF Antenna Input USB Ports PC Input Wireless (WiFi) Optical Digital Audio Out (SPDIF) Headphones (3.5mm) Number...


