E422VL User Manual
Page 8
... Thumb Drive to the TV 29 Playing USB Media 29 Using VIZIO Internet Apps 32 Using the VIA Shortcut Buttons 32 Using the VIA Dock 32 Moving an App on the VIA Dock 32 Adding a New App to the VIA Dock 33 Removing an App from the VIA Dock 33 Creating and Managing User Profiles... aren't working 36 The image quality is not good 36 The picture is distorted 37 The display image does not cover the entire screen 37 E422VL / E472VL / E552VL The TV has pixels (dots) that are always dark or always lit 37 I see "noise" or static on the screen 37 When I change...
... Thumb Drive to the TV 29 Playing USB Media 29 Using VIZIO Internet Apps 32 Using the VIA Shortcut Buttons 32 Using the VIA Dock 32 Moving an App on the VIA Dock 32 Adding a New App to the VIA Dock 33 Removing an App from the VIA Dock 33 Creating and Managing User Profiles... aren't working 36 The image quality is not good 36 The picture is distorted 37 The display image does not cover the entire screen 37 E422VL / E472VL / E552VL The TV has pixels (dots) that are always dark or always lit 37 I see "noise" or static on the screen 37 When I change...

E422VL User Manual
Page 11
...: Connect an Ethernet cable for an HDMI input. RCA Audio Out: Connect RCA audio device (soundbar, home theater, etc). RCA Audio In: Connect audio for VIZIO Internet Apps. Controls and Connections Rear Panel RGB PC Ethernet Cable/Antenna PC Audio In Composite AV Optical Audio Out HDMI (1, 2, 3) RCA Audio In (For use...
...: Connect an Ethernet cable for an HDMI input. RCA Audio Out: Connect RCA audio device (soundbar, home theater, etc). RCA Audio In: Connect audio for VIZIO Internet Apps. Controls and Connections Rear Panel RGB PC Ethernet Cable/Antenna PC Audio In Composite AV Optical Audio Out HDMI (1, 2, 3) RCA Audio In (For use...

E422VL User Manual
Page 13
... device. See Using the Info Window on -screen menu. Menu: Display the on page 28. dow on page 11. VIA Shortcuts: Control VIZIO Internet Apps. Volume Up/Down: Increase or decrease the loudness of the button, the channel will increase or decrease by one. Channel Up/Down: Change ...the channel. Mute: Turn the sound off . Last: Return to manually enter a channel. E422VL / E472VL / E552VL Remote Control (Models E472VL / E552VL Only) Input App Launcher CC Exit OK Back V Button Volume Up/Down Mute Number Pad Wide Power/Standby A/V Controls Info Menu Arrow Guide ...
... device. See Using the Info Window on -screen menu. Menu: Display the on page 28. dow on page 11. VIA Shortcuts: Control VIZIO Internet Apps. Volume Up/Down: Increase or decrease the loudness of the button, the channel will increase or decrease by one. Channel Up/Down: Change ...the channel. Mute: Turn the sound off . Last: Return to manually enter a channel. E422VL / E472VL / E552VL Remote Control (Models E472VL / E552VL Only) Input App Launcher CC Exit OK Back V Button Volume Up/Down Mute Number Pad Wide Power/Standby A/V Controls Info Menu Arrow Guide ...

E422VL User Manual
Page 14
...symbols on the batteries match the (+) and (-) symbols inside the battery compartment. 3. VIA Shortcut Buttons Remote Control (Back) Move/Delete App from children and pets. 6 Make sure that may cause a fire or result in injury. • Dispose of old or dead ...and (-) symbols inside the battery compartment. 6. This is open) View Settings for Active VIA App Exit App/Exit VIA Dock VIA Shortcut Buttons Replacing the Batteries (Model E422VL Only) 4. Arrow QWERTY Keypad App Shortcuts E422VL / E472VL / E552VL Replacing the Batteries (Models E472VL / E552VL Only) 1. Back (Models ...
...symbols on the batteries match the (+) and (-) symbols inside the battery compartment. 3. VIA Shortcut Buttons Remote Control (Back) Move/Delete App from children and pets. 6 Make sure that may cause a fire or result in injury. • Dispose of old or dead ...and (-) symbols inside the battery compartment. 6. This is open) View Settings for Active VIA App Exit App/Exit VIA Dock VIA Shortcut Buttons Replacing the Batteries (Model E422VL Only) 4. Arrow QWERTY Keypad App Shortcuts E422VL / E472VL / E552VL Replacing the Batteries (Models E472VL / E552VL Only) 1. Back (Models ...
E422VL User Manual
Page 17
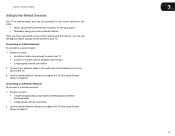
...8226; A router broadcasting a high-speed wireless signal (wireless-n recommended) • A high-speed internet connection 2. See Using Guided Setup on page 27. 9 E422VL / E472VL / E552VL 3 Setting Up Your Network Connection Your TV is internet-ready, and can be connected to your home network in two ways: • ... panel • Wirelessly, using your home wireless network Once you have connected to your home network and the Internet, you can use VIA apps to deliver popular online content to reach your TV • A router or modem with an available ethernet port • A high-speed ...
...8226; A router broadcasting a high-speed wireless signal (wireless-n recommended) • A high-speed internet connection 2. See Using Guided Setup on page 27. 9 E422VL / E472VL / E552VL 3 Setting Up Your Network Connection Your TV is internet-ready, and can be connected to your home network in two ways: • ... panel • Wirelessly, using your home wireless network Once you have connected to your home network and the Internet, you can use VIA apps to deliver popular online content to reach your TV • A router or modem with an available ethernet port • A high-speed ...

E422VL User Manual
Page 18
... have a wireless network, have finished the channel scan, highlight Exit to Live TV and press OK. Press the Power/Standby button on and the Setup App starts. 4. If the TV is complete. Highlight Next and press OK. 2. Use the OK and Arrow Up/Down buttons on the remote to highlight Home... the on-screen keyboard, then highlight Connect and press OK. 4 Completing the First-Time Setup The first time you turn on the TV, the Setup App will guide you through each of the steps necessary to get your network with an ethernet cable, connect it to the ethernet port on the...
... have a wireless network, have finished the channel scan, highlight Exit to Live TV and press OK. Press the Power/Standby button on and the Setup App starts. 4. If the TV is complete. Highlight Next and press OK. 2. Use the OK and Arrow Up/Down buttons on the remote to highlight Home... the on-screen keyboard, then highlight Connect and press OK. 4 Completing the First-Time Setup The first time you turn on the TV, the Setup App will guide you through each of the steps necessary to get your network with an ethernet cable, connect it to the ethernet port on the...

E422VL User Manual
Page 33
... displayed. 5. Highlight Time Zone and press OK. Choose On if daylight savings is often used by VIA Apps to highlight the Settings icon and press OK. The ZIP code information is in different languages. E422VL / 472VL / E552VL Changing the On-Screen Menu Language Your TV can display the on the remote. The...
... displayed. 5. Highlight Time Zone and press OK. Choose On if daylight savings is often used by VIA Apps to highlight the Settings icon and press OK. The ZIP code information is in different languages. E422VL / 472VL / E552VL Changing the On-Screen Menu Language Your TV can display the on the remote. The...

E422VL User Manual
Page 35
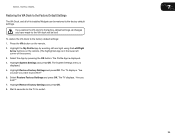
... TV displays, "Are you sure you want to Restore Defaults? The TV will erase any custom settings." 5. The on shortly afterward and the Setup App will turn off. Use the Arrow buttons on -screen instructions. Highlight the guided setup you would like to access and press OK: • Tuner ... 27 Highlight Yes and press OK. The Help menu is displayed. 2. This will reset shortly." 6. When finished, press the EXIT button on the remote. E422VL / 472VL / E552VL Restoring the TV to Factory Default Settings All of the on the remote to highlight the Help icon and press OK. Use the...
... TV displays, "Are you sure you want to Restore Defaults? The TV will erase any custom settings." 5. The on shortly afterward and the Setup App will turn off. Use the Arrow buttons on -screen instructions. Highlight the guided setup you would like to access and press OK: • Tuner ... 27 Highlight Yes and press OK. The Help menu is displayed. 2. This will reset shortly." 6. When finished, press the EXIT button on the remote. E422VL / 472VL / E552VL Restoring the TV to Factory Default Settings All of the on the remote to highlight the Help icon and press OK. Use the...
E422VL User Manual
Page 37
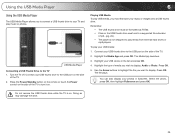
... of the TV. 2. You can also display your music or images onto a USB thumb drive. Doing so may damage the drive. 29 Highlight the Media App and press OK. The file plays. To play USB media, you want to display. Press OK. 5. Do not remove the USB thumb drive while the... the photo, press OK, then highlight Fullscreen and press OK. Connect your TV and play media from external hard drives or mp3 players. The Media App launches. 3. Turn the TV off. Highlight the type of the TV. 2. Using the USB Media Player 6 Using the USB Media Player The USB Media Player...
... of the TV. 2. You can also display your music or images onto a USB thumb drive. Doing so may damage the drive. 29 Highlight the Media App and press OK. The file plays. To play USB media, you want to display. Press OK. 5. Do not remove the USB thumb drive while the... the photo, press OK, then highlight Fullscreen and press OK. Connect your TV and play media from external hard drives or mp3 players. The Media App launches. 3. Turn the TV off. Highlight the type of the TV. 2. Using the USB Media Player 6 Using the USB Media Player The USB Media Player...

E422VL User Manual
Page 40
...Arrow. • Blue - Press the VIA button on the remote. 2. Press the Yellow VIA Shortcut button. 4. 7 VIZIO Internet Apps (VIA) delivers popular online content to your home network. VIA features a selection of Apps that you to watch movies and TV shows, listen to music, get weather and news information, and more...-all of the screen.) 3. Move or delete an App from VIA Dock Change Screen Size (when VIA Sidebar is not yet connected to move an App: 1. Using VIZIO Internet Apps Using the VIA Dock The VIA Dock is where all on page 9 if your TV ...
...Arrow. • Blue - Press the VIA button on the remote. 2. Press the Yellow VIA Shortcut button. 4. 7 VIZIO Internet Apps (VIA) delivers popular online content to your home network. VIA features a selection of Apps that you to watch movies and TV shows, listen to music, get weather and news information, and more...-all of the screen.) 3. Move or delete an App from VIA Dock Change Screen Size (when VIA Sidebar is not yet connected to move an App: 1. Using VIZIO Internet Apps Using the VIA Dock The VIA Dock is where all on page 9 if your TV ...
E422VL User Manual
Page 41
... OK. The Security Question dialog is displayed. 6. To add a new App: 1. Press the Yellow VIA Shortcut button. 4. The PIN Confirmation menu is displayed. 5. E422VL / E472VL / E552VL 7 Adding a New App to the VIA Dock Though your TV arrives pre-loaded with featured VIA Apps, new Apps are saved. Enter your 4-digit passcode. The Administrative Controls menu...
... OK. The Security Question dialog is displayed. 6. To add a new App: 1. Press the Yellow VIA Shortcut button. 4. The PIN Confirmation menu is displayed. 5. E422VL / E472VL / E552VL 7 Adding a New App to the VIA Dock Though your TV arrives pre-loaded with featured VIA Apps, new Apps are saved. Enter your 4-digit passcode. The Administrative Controls menu...

E422VL User Manual
Page 42
... 6. The Security Question dialog is displayed. The Create Profile menu is displayed. If you want to delete this new profile from installing new Apps, turn Limit Profile to prevent the user of this profile? Press the VIA button on the remote. 2. Highlight OK and press OK. ... you must enter it after turning Limit Profile to remove and press OK. This operation cannot be undone." 7. Highlight Create Profile and press OK. E422VL / E472VL / E552VL 16. The Remove Profile menu is displayed. 8. Highlight Administrative Controls and press OK. (If you have an Owner PIN, ...
... 6. The Security Question dialog is displayed. The Create Profile menu is displayed. If you want to delete this new profile from installing new Apps, turn Limit Profile to prevent the user of this profile? Press the VIA button on the remote. 2. Highlight OK and press OK. ... you must enter it after turning Limit Profile to remove and press OK. This operation cannot be undone." 7. Highlight Create Profile and press OK. E422VL / E472VL / E552VL 16. The Remove Profile menu is displayed. 8. Highlight Administrative Controls and press OK. (If you have an Owner PIN, ...
E422VL User Manual
Page 43
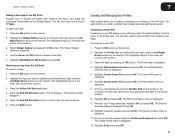
..., all of the screen.) 3. To restore the VIA Dock to the VIA dock will be restored to the factory default settings. Highlight the My Profile App by pressing the OK button. The TV displays, "Are you sure you want to restart. 35 Wait 5 seconds for the TV to proceed?" 6.... buttons on the remote. 2. The TV displays, "Are you sure?" 7. Highlight System Settings and press OK. Highlight Restore Factory Settings and press OK. E422VL / E472VL / E552VL 7 Restoring the VIA Dock to the Factory Default Settings The VIA Dock, and all changes you have made to the factory default settings...
..., all of the screen.) 3. To restore the VIA Dock to the VIA dock will be restored to the factory default settings. Highlight the My Profile App by pressing the OK button. The TV displays, "Are you sure you want to restart. 35 Wait 5 seconds for the TV to proceed?" 6.... buttons on the remote. 2. The TV displays, "Are you sure?" 7. Highlight System Settings and press OK. Highlight Restore Factory Settings and press OK. E422VL / E472VL / E552VL 7 Restoring the VIA Dock to the Factory Default Settings The VIA Dock, and all changes you have made to the factory default settings...

E422VL User Manual
Page 54
The V, VIZIO, VIZIO Internet Apps, Theater 3D, Full Array TruLED, Edge Lit Razor LED, 240Hz SPS, 480Hz SPS, Entertainment Freedom and Entertainment Freedom for All names, logos and phrase are the property of VIZIO, Inc. Other logos and trademarks are registered or unregistered trademarks of their respective owners. © 2011. Subject to change without notice. 110308ST-B All rights reserved.
The V, VIZIO, VIZIO Internet Apps, Theater 3D, Full Array TruLED, Edge Lit Razor LED, 240Hz SPS, 480Hz SPS, Entertainment Freedom and Entertainment Freedom for All names, logos and phrase are the property of VIZIO, Inc. Other logos and trademarks are registered or unregistered trademarks of their respective owners. © 2011. Subject to change without notice. 110308ST-B All rights reserved.

E422VL Quick Start Guide
Page 1
VIZIO LCD HDTV WITH VIZIO INTERNET APPS MODEL E422VL QUICK START GUIDE FOR FULVLIZUIOSE.CROMMA/SNUUPAPLORT TO GO
VIZIO LCD HDTV WITH VIZIO INTERNET APPS MODEL E422VL QUICK START GUIDE FOR FULVLIZUIOSE.CROMMA/SNUUPAPLORT TO GO

E422VL Quick Start Guide
Page 5
... menu. BACK Go to the previous on-screen menu V.I .A. MUTE Turn the sound off . WIDE Switch the display mode. Open the VIZIO Internet Apps dock. DASH Use with number pad to the channel last viewed. A/V CONTROLS Control USB photo slideshow and V.I .A. POWER Turn TV on or...V.I.A. VOLUME UP/DOWN Increase or decrease loudness of the TV audio. USING THE REMOTE INPUT Change the currently-displayed input. SHORTCUT BUTTONS Control VIZIO Internet Apps. NUMBER PAD Manually enter a channel. INFO Display the info window. MENU Display the on . GUIDE Display the info window. LAST Return...
... menu. BACK Go to the previous on-screen menu V.I .A. MUTE Turn the sound off . WIDE Switch the display mode. Open the VIZIO Internet Apps dock. DASH Use with number pad to the channel last viewed. A/V CONTROLS Control USB photo slideshow and V.I .A. POWER Turn TV on or...V.I.A. VOLUME UP/DOWN Increase or decrease loudness of the TV audio. USING THE REMOTE INPUT Change the currently-displayed input. SHORTCUT BUTTONS Control VIZIO Internet Apps. NUMBER PAD Manually enter a channel. INFO Display the info window. MENU Display the on . GUIDE Display the info window. LAST Return...

E422VL Quick Start Guide
Page 9
Use the Arrow buttons on the remote. The Setup App is displayed. If you have a high-speed internet connection, connect an Ethernet cable from a wall outlet, connect it to the TV with an RF/Coaxial cable. Turn the TV on by pressing the Power button on the remote to highlight Home Mode Setup and press OK. 3 Ethernet Cable Coaxial Cable 4 ETHERNET Back of TV If you have an external antenna or a cable connection that extends from your modem or router to the back of the TV as shown.
Use the Arrow buttons on the remote. The Setup App is displayed. If you have a high-speed internet connection, connect an Ethernet cable from a wall outlet, connect it to the TV with an RF/Coaxial cable. Turn the TV on by pressing the Power button on the remote to highlight Home Mode Setup and press OK. 3 Ethernet Cable Coaxial Cable 4 ETHERNET Back of TV If you have an external antenna or a cable connection that extends from your modem or router to the back of the TV as shown.

E422VL Quick Start Guide
Page 14
GETTING STARTED WITH VIZIO INTERNET APPS 1 2 V.I .A. Dock. For the best V.I .A. Use an Ethernet cable or connect wirelessly. The V.I .A. Use the Arrow buttons on the bottom of the screen. experience, a high-speed Internet connection is connected to open it. Highlighted App Be sure your TV is recommended. Press this button to open the V.I .A Dock is displayed on the remote to highlight an app, then press OK to the Internet.
GETTING STARTED WITH VIZIO INTERNET APPS 1 2 V.I .A. Dock. For the best V.I .A. Use an Ethernet cable or connect wirelessly. The V.I .A. Use the Arrow buttons on the bottom of the screen. experience, a high-speed Internet connection is connected to open it. Highlighted App Be sure your TV is recommended. Press this button to open the V.I .A Dock is displayed on the remote to highlight an app, then press OK to the Internet.
E422VL Quick Start Guide
Page 15
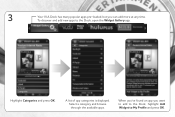
To discover and add new apps to My Profile and press OK. A list of app categories is displayed. Select a category and browse through the available apps. Highlight Categories and press OK. When you've found an app you can add more at any time. 3 Your V.I.A Dock has many popular apps pre-loaded, but you want to add to the Dock, highlight Add Widget to the Dock, open the Widget Gallery app.
To discover and add new apps to My Profile and press OK. A list of app categories is displayed. Select a category and browse through the available apps. Highlight Categories and press OK. When you've found an app you can add more at any time. 3 Your V.I.A Dock has many popular apps pre-loaded, but you want to add to the Dock, highlight Add Widget to the Dock, open the Widget Gallery app.
E422VL Quick Start Guide
Page 16
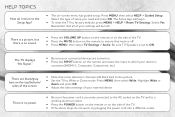
... factory defaults, press MENU > HELP > Reset TV Settings. Be sure TV Speakers is connected (HDMI-1, Composite, Component, etc). Press MENU, then select Wide. The Setup App will be lost! HELP TOPICS How do not work, try plugging the power cord into a different outlet. The TV displays "No Signal." • Be sure... that all of setup you need and press OK. Select the type of your settings will begin. • To reset the TV to the Setup App? • The on-screen menu has guided setup.
... factory defaults, press MENU > HELP > Reset TV Settings. Be sure TV Speakers is connected (HDMI-1, Composite, Component, etc). Press MENU, then select Wide. The Setup App will be lost! HELP TOPICS How do not work, try plugging the power cord into a different outlet. The TV displays "No Signal." • Be sure... that all of setup you need and press OK. Select the type of your settings will begin. • To reset the TV to the Setup App? • The on-screen menu has guided setup.


