
Download
Page 1
USER GUIDE MMODDEELLS // E3D320VX // E3ED44200V1Xi-A2 // E3D470VX INSTALLING YOUR new TV CONTROLS & CONNECTIONS CONNECTING YOUR DEVICES USING THE ON-SCREEN MENU USING THE USB MEDIA PLAYER USING VIZIO INTERNET APPS TROUBLESHOOTING & SUPPORT Help, SPECs, warranty & LEGAL
USER GUIDE MMODDEELLS // E3D320VX // E3ED44200V1Xi-A2 // E3D470VX INSTALLING YOUR new TV CONTROLS & CONNECTIONS CONNECTING YOUR DEVICES USING THE ON-SCREEN MENU USING THE USB MEDIA PLAYER USING VIZIO INTERNET APPS TROUBLESHOOTING & SUPPORT Help, SPECs, warranty & LEGAL

Download
Page 4
... time. Operating your TV close to an area of high temperature, condensation may cause fire or electric shock. • Do not touch the power cord during electrical storms. • Unplug your TV and easily accessible. • Only power of the marked voltage can result in the housing. The manufacturer's warranty does not cover user abuse or improper installations. • The power cord...
... time. Operating your TV close to an area of high temperature, condensation may cause fire or electric shock. • Do not touch the power cord during electrical storms. • Unplug your TV and easily accessible. • Only power of the marked voltage can result in the housing. The manufacturer's warranty does not cover user abuse or improper installations. • The power cord...
Download
Page 5
... power cord and any servicing other cables are unplugged before moving your TV is dropped and the housing is intended to alert the user to repair your TV in the operating instructions unless you are for repair. Continued use by qualified service personnel only. These servicing instructions are qualified to persons. • The exclamation point within an equilateral triangle is damaged, the internal components...
... power cord and any servicing other cables are unplugged before moving your TV is dropped and the housing is intended to alert the user to repair your TV in the operating instructions unless you are for repair. Continued use by qualified service personnel only. These servicing instructions are qualified to persons. • The exclamation point within an equilateral triangle is damaged, the internal components...

Download
Page 6
..., the screen of time, unplug the TV from the wall outlet and disconnect the antenna or cable system. Lightning Protection For added protection of the grounding electrode. Television Antenna Connection Protection If an outside antenna/satellite dish or cable system is to be connected to earth in wire to an antenna discharge unit, size of the grounding conductors, location of antenna discharge unit, connection to...
..., the screen of time, unplug the TV from the wall outlet and disconnect the antenna or cable system. Lightning Protection For added protection of the grounding electrode. Television Antenna Connection Protection If an outside antenna/satellite dish or cable system is to be connected to earth in wire to an antenna discharge unit, size of the grounding conductors, location of antenna discharge unit, connection to...
Download
Page 7
... 7 Rear Panel 7 Side Panel 8 Front Panel 9 Remote Control 10 Replacing the Batteries 11 Connecting Your Devices 12 Connecting A Device 12 Connecting an Audio Device 13 Connecting to your Network 14 Connecting to a Wired Network (Best 14 Connecting to a Wireless Network 14 Completing the First-Time Setup 15 Using the On-Screen Menu 16 Navigating the On-Screen Menu 16 Changing the Input Source 17 Changing the Screen Aspect Ratio 17 Setting Up Closed Captioning 18 Changing the Appearance of Digital Closed Captions.. 18 Activating the Sleep Timer 19 Setting the Auto Power Off...
... 7 Rear Panel 7 Side Panel 8 Front Panel 9 Remote Control 10 Replacing the Batteries 11 Connecting Your Devices 12 Connecting A Device 12 Connecting an Audio Device 13 Connecting to your Network 14 Connecting to a Wired Network (Best 14 Connecting to a Wireless Network 14 Completing the First-Time Setup 15 Using the On-Screen Menu 16 Navigating the On-Screen Menu 16 Changing the Input Source 17 Changing the Screen Aspect Ratio 17 Setting Up Closed Captioning 18 Changing the Appearance of Digital Closed Captions.. 18 Activating the Sleep Timer 19 Setting the Auto Power Off...
Download
Page 8
Turning the Power Indicator On or Off 35 Using the Help Menu 35 Displaying System Information 36 Resetting the TV Settings 36 Restoring the TV to Factory Default Settings 36 Using Guided Setup 37 Using the Info Window 38 Using the USB Media Player 39 Using the USB Media Player 39 Connecting a USB Thumb Drive to the TV 39 Playing USB Media 39 Using VIZIO Internet Apps 42 Using the VIA Shortcut Buttons 42 Using the VIA Dock 42 Moving an App on the...
Turning the Power Indicator On or Off 35 Using the Help Menu 35 Displaying System Information 36 Resetting the TV Settings 36 Restoring the TV to Factory Default Settings 36 Using Guided Setup 37 Using the Info Window 38 Using the USB Media Player 39 Using the USB Media Player 39 Connecting a USB Thumb Drive to the TV 39 Playing USB Media 39 Using VIZIO Internet Apps 42 Using the VIA Shortcut Buttons 42 Using the VIA Dock 42 Moving an App on the...

Download
Page 12
... with your mount. Specifications for your TV, you . Remove the base by loosening and removing the screws. 4. E401i-A2 Screw Size: Screw Length: Hole Pattern: M6 12mm 200mm (V) x 200mm (H) Be sure the mount you will need a wall mount. Place the TV face-down on a wall: 1. Consult the information below to use cables with a UL-listed wall mount bracket rated for your TV on a clean, flat, stable surface. Disconnect any cables connected to the wall. 6 1 Wall Mount Screw Location For some wall mounts, you...
... with your mount. Specifications for your TV, you . Remove the base by loosening and removing the screws. 4. E401i-A2 Screw Size: Screw Length: Hole Pattern: M6 12mm 200mm (V) x 200mm (H) Be sure the mount you will need a wall mount. Place the TV face-down on a wall: 1. Consult the information below to use cables with a UL-listed wall mount bracket rated for your TV on a clean, flat, stable surface. Disconnect any cables connected to the wall. 6 1 Wall Mount Screw Location For some wall mounts, you...
Download
Page 18
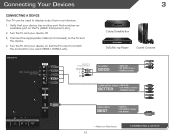
...) to component inputs: Y/V L R Cable/Satellite Box DVD/Blu-ray Player Game Console AV CABLE GOOD • ANALOG • SD VIDEO (480i)* • STEREO AUDIO COMPONENT CABLE • ANALOG BETTER • HD VIDEO (1080p)* • STEREO AUDIO HDMI CABLE BEST • DIGITAL • HD VIDEO (1080p)* • HD AUDIO * Maximum Resolution 12 CONNECTING A DEVICE Connect to the TV and the device. 4. Turn the TV and your device off. 3. Turn the TV and your device on the TV (HDMI, Component, etc...
...) to component inputs: Y/V L R Cable/Satellite Box DVD/Blu-ray Player Game Console AV CABLE GOOD • ANALOG • SD VIDEO (480i)* • STEREO AUDIO COMPONENT CABLE • ANALOG BETTER • HD VIDEO (1080p)* • STEREO AUDIO HDMI CABLE BEST • DIGITAL • HD VIDEO (1080p)* • HD AUDIO * Maximum Resolution 12 CONNECTING A DEVICE Connect to the TV and the device. 4. Turn the TV and your device off. 3. Turn the TV and your device on the TV (HDMI, Component, etc...
Download
Page 26
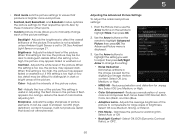
... the Picture menu, use the Arrow buttons on the remote to Off. Reduces pixelation and distortion for watching film. Select Off, Normal, Rich Color, Grn/Flesh, and Grn/Blue. • Adaptive Luma - When this setting is set to highlight More, then press OK. 2. Adjusts the white level of the picture. Adjusts the hue of the picture. Use the Arrow buttons to highlight the setting you to manually change the setting...
... the Picture menu, use the Arrow buttons on the remote to Off. Reduces pixelation and distortion for watching film. Select Off, Normal, Rich Color, Grn/Flesh, and Grn/Blue. • Adaptive Luma - When this setting is set to highlight More, then press OK. 2. Adjusts the white level of the picture. Adjusts the hue of the picture. Use the Arrow buttons to highlight the setting you to manually change the setting...
Download
Page 29
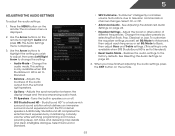
... television commercials or channel changes. 5 Adjusting the Audio Settings To adjust the audio settings: 1. The on the remote to change the setting: • Audio Mode - Use the Arrow buttons on -screen menu is set to highlight the setting you have finished adjusting the audio settings, press the EXIT button on the remote. Use the Arrow buttons to Standard. • Balance - Change the audio mode. Turns the built-in speakers on page 24. • Equalizer Settings - TruVolume® intelligently normalizes volume fluctuations due to the factory defaults...
... television commercials or channel changes. 5 Adjusting the Audio Settings To adjust the audio settings: 1. The on the remote to change the setting: • Audio Mode - Use the Arrow buttons on -screen menu is set to highlight the setting you have finished adjusting the audio settings, press the EXIT button on the remote. Use the Arrow buttons to Standard. • Balance - Change the audio mode. Turns the built-in speakers on page 24. • Equalizer Settings - TruVolume® intelligently normalizes volume fluctuations due to the factory defaults...
Download
Page 30
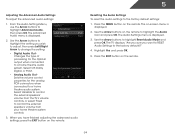
... setting: • Digital Audio Out Changes the type of processing for the analog RCA connectors when connected to a home theatre audio system. When you want to RESET Audio Settings to highlight Advanced Audio, then press OK. Use the Arrow buttons to the factory default settings: 1. The TV displays, "Are you sure you have finished adjusting the advanced audio settings, press the EXIT button on the remote to control the external speakers' volume from the TV's volume controls, or select Fixed...
... setting: • Digital Audio Out Changes the type of processing for the analog RCA connectors when connected to a home theatre audio system. When you want to RESET Audio Settings to highlight Advanced Audio, then press OK. Use the Arrow buttons to the factory default settings: 1. The TV displays, "Are you sure you have finished adjusting the advanced audio settings, press the EXIT button on the remote to control the external speakers' volume from the TV's volume controls, or select Fixed...

Download
Page 40
... Settings menu is not. 7. The ZIP code information is connected and supports CEC. 5. The Settings menu is on, you the most accurate location-based information, such as weather or news. 8. Press the EXIT button on -screen menu is displayed. 2. See your time zone and press OK. 6. The on the remote. 34 Highlight your device's user manual for details. 1. Highlight Postal Code. Enter your device's audio using the keypad on -screen menu is displayed...
... Settings menu is not. 7. The ZIP code information is connected and supports CEC. 5. The Settings menu is on, you the most accurate location-based information, such as weather or news. 8. Press the EXIT button on -screen menu is displayed. 2. See your time zone and press OK. 6. The on the remote. 34 Highlight your device's user manual for details. 1. Highlight Postal Code. Enter your device's audio using the keypad on -screen menu is displayed...
Download
Page 53
... is no power. • Ensure the TV is plugged into a working . • Ensure you are securely attached. Ensure your device's user manual for channels. See Resetting the Picture Settings on page 22. • Check all devices are connected correctly. See Scanning for the best signal. Ensure the speakers are set to On. • Check the audio connections of external devices (Blu-ray player, game console, cable/satellite box) that are connected to the...
... is no power. • Ensure the TV is plugged into a working . • Ensure you are securely attached. Ensure your device's user manual for channels. See Resetting the Picture Settings on page 22. • Check all devices are connected correctly. See Scanning for the best signal. Ensure the speakers are set to On. • Check the audio connections of external devices (Blu-ray player, game console, cable/satellite box) that are connected to the...

Download
Page 54
... best signal. The TV has pixels (dots) that are inherent to this type of technology. Ensure your devices with HDMI cables. • If you switch from , the difference may be noticeable. • See Changing the Screen Aspect Ratio on the remote to change input source, the volume changes. • The TV remembers the volume level on each input source. When I change input source, the display image changes size. • The TV remembers the viewing mode...
... best signal. The TV has pixels (dots) that are inherent to this type of technology. Ensure your devices with HDMI cables. • If you switch from , the difference may be noticeable. • See Changing the Screen Aspect Ratio on the remote to change input source, the volume changes. • The TV remembers the volume level on each input source. When I change input source, the display image changes size. • The TV remembers the viewing mode...
Download
Page 57
... unreadable or removed serial numbers, or requiring routine maintenance are warranted for the remaining portion of customer misuse, modifications or adjustments, as well as installation and set-up issues or any repairs attempted by anyone other information, ALL CONTENTS AND INFORMATION WILL BE DELETED IN THE COURSE OF SOME IN-HOME AND ALL SHIP-IN WARANTY SERVICE. Replacement parts and Products...
... unreadable or removed serial numbers, or requiring routine maintenance are warranted for the remaining portion of customer misuse, modifications or adjustments, as well as installation and set-up issues or any repairs attempted by anyone other information, ALL CONTENTS AND INFORMATION WILL BE DELETED IN THE COURSE OF SOME IN-HOME AND ALL SHIP-IN WARANTY SERVICE. Replacement parts and Products...

Download
Page 2
... constitute a risk of the marked voltage can damage the remote control or injure the operator. When your TV, hold the AC/DC power adapter, not the cord. h The lightning flash with liquids, such as when the power-supply cord or plug is used as a radiator, heater, oven, amplifier etc. To ensure reliable operation of uninsulated DANGEROUS VOLTAGE within defined design limits. This will...
... constitute a risk of the marked voltage can damage the remote control or injure the operator. When your TV, hold the AC/DC power adapter, not the cord. h The lightning flash with liquids, such as when the power-supply cord or plug is used as a radiator, heater, oven, amplifier etc. To ensure reliable operation of uninsulated DANGEROUS VOLTAGE within defined design limits. This will...

Download
Page 11
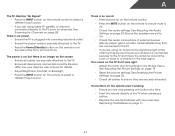
Table of Contents Installing the TV Controls and Connections Connecting your Devices Completing the First-Time Setup Using the On-Screen Menu Using the USB Media Player Using the USB Media Player Using VIZIO Internet Apps Troubleshooting & Technical Support Specifications Limited Warranty Legal & Compliance LCD HDTV WITH VIZIO INTERNET APPS® Press the EXIT button to browse through the pages in each chapter. Use the Left and Right Arrow buttons to exit the on-screen User Manual. USER MANUAL USER YOUR REMOTE Previous Page Next Page Menu Open TV Menu PAGE NUMBER 1 OF...
Table of Contents Installing the TV Controls and Connections Connecting your Devices Completing the First-Time Setup Using the On-Screen Menu Using the USB Media Player Using the USB Media Player Using VIZIO Internet Apps Troubleshooting & Technical Support Specifications Limited Warranty Legal & Compliance LCD HDTV WITH VIZIO INTERNET APPS® Press the EXIT button to browse through the pages in each chapter. Use the Left and Right Arrow buttons to exit the on-screen User Manual. USER MANUAL USER YOUR REMOTE Previous Page Next Page Menu Open TV Menu PAGE NUMBER 1 OF...
Download
Page 17
... remote or on the remote to close the App, then open the App. • Restart your TV by pressing the POWER button on the remote, then turn it back on. Remember that some television channels add black bars to the picture. • Set the TV to factory defaults, press MENU, then select Help > Reset TV Settings. There is a picture, but there is no power. • Be sure the power cord is securely connected...
... remote or on the remote to close the App, then open the App. • Restart your TV by pressing the POWER button on the remote, then turn it back on. Remember that some television channels add black bars to the picture. • Set the TV to factory defaults, press MENU, then select Help > Reset TV Settings. There is a picture, but there is no power. • Be sure the power cord is securely connected...

Download
Page 19
... that a Product is within the warranty period, VIZIO will either the original carton box and shipping material or packaging that you configured as installation and set-up issues or any type of customer misuse, modifications or adjustments, as well as originally purchased. PRE-AUTHORIZATION MUST BE OBTAINED BEFORE SENDING ANY PRODUCT TO A VIZIO SERVICE CENTER. Proof of purchase in United...
... that a Product is within the warranty period, VIZIO will either the original carton box and shipping material or packaging that you configured as installation and set-up issues or any type of customer misuse, modifications or adjustments, as well as originally purchased. PRE-AUTHORIZATION MUST BE OBTAINED BEFORE SENDING ANY PRODUCT TO A VIZIO SERVICE CENTER. Proof of purchase in United...

Download
Page 2
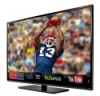
... used for illustration purposes only. 40" CLASS LED SMART TV TV SPECIFICATIONS Screen Size 40" Class Diagonal Viewable TV Type Smart TV Built-in WiFi Refresh Rate Maximum Resolution Dynamic Contrast Ratio Remote Control Type Energy Star Qualified Power Wall Mount & Screw Size 40.00" Razor LED™ Yes Yes 120Hz 1080p 200,000:1 XRT112 ENERGY STAR® 5.3 62W 400mm (V) x 400mm (H), M6 x 1.0mm x 20mm CONNECTIONS HDMI Inputs 3 Component Video Inputs 1 Composite Inputs 1 (shared with Wireless Internet...
... used for illustration purposes only. 40" CLASS LED SMART TV TV SPECIFICATIONS Screen Size 40" Class Diagonal Viewable TV Type Smart TV Built-in WiFi Refresh Rate Maximum Resolution Dynamic Contrast Ratio Remote Control Type Energy Star Qualified Power Wall Mount & Screw Size 40.00" Razor LED™ Yes Yes 120Hz 1080p 200,000:1 XRT112 ENERGY STAR® 5.3 62W 400mm (V) x 400mm (H), M6 x 1.0mm x 20mm CONNECTIONS HDMI Inputs 3 Component Video Inputs 1 Composite Inputs 1 (shared with Wireless Internet...


