
E3D470VX Quick Start Guide
Page 3
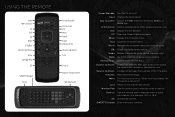
... QWERTY Keypad Arrow Power/Standby A/V Controls Info Menu Arrow Guide VIA Shortcuts Channel Up/Down Last Dash (-) Battery Compartment VIA Shortcuts Power/Standby: Turn the TV on or off . Menu: Display the on -screen menu. Back: Go to the channel last viewed. QWERTY Keypad: Enter letters...: Return to the previous on-screen menu options. Arrow: Navigate the on . VIA Shortcuts: Control VIZIO Internet Apps. Channel Up/Down: Change the channel. V Button: Start VIA Internet Apps. Mute: Turn the sound off or on -screen menu and episode guide. Info: Display the Info Window. Guide:...
... QWERTY Keypad Arrow Power/Standby A/V Controls Info Menu Arrow Guide VIA Shortcuts Channel Up/Down Last Dash (-) Battery Compartment VIA Shortcuts Power/Standby: Turn the TV on or off . Menu: Display the on -screen menu. Back: Go to the channel last viewed. QWERTY Keypad: Enter letters...: Return to the previous on-screen menu options. Arrow: Navigate the on . VIA Shortcuts: Control VIZIO Internet Apps. Channel Up/Down: Change the channel. V Button: Start VIA Internet Apps. Mute: Turn the sound off or on -screen menu and episode guide. Info: Display the Info Window. Guide:...

E3D470VX Quick Start Guide
Page 7
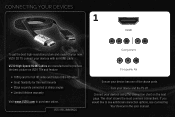
If you have a high-speed internet connection and would like to connect the TV with an RF/Coaxial cable. Use the Arrow buttons on the remote. The Setup App is displayed. 3 4 If you have an external antenna or a cable connection that extends from a wall outlet, connect it to the TV with an ethernet cable, connect it to the back of the TV as shown. Turn the TV on by pressing the Power/Standby button on the remote to highlight Home Mode Setup and press OK.
If you have a high-speed internet connection and would like to connect the TV with an RF/Coaxial cable. Use the Arrow buttons on the remote. The Setup App is displayed. 3 4 If you have an external antenna or a cable connection that extends from a wall outlet, connect it to the TV with an ethernet cable, connect it to the back of the TV as shown. Turn the TV on by pressing the Power/Standby button on the remote to highlight Home Mode Setup and press OK.
E3D470VX Quick Start Guide
Page 10
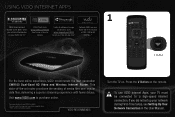
...your devices with an HDMI cable. Turn your device has one of the above ports. VIZIO RECOMMENDS Component Composite AV Ensure your device and the TV off. If you would like to see additional connection options, see Connecting Your Devices in the user manual. VIZIO High Speed HDMI Cables are manufactured ... the next page. CONNECTING YOUR DEVICES 1 HDMI To get the best high-resolution picture and sound on your new VIZIO 3D TV, connect your devices using the connection chart on VIZIO TVs and feature: • 1080p and for full HD video and future Ultra-HD video • Great flexibility...
...your devices with an HDMI cable. Turn your device has one of the above ports. VIZIO RECOMMENDS Component Composite AV Ensure your device and the TV off. If you would like to see additional connection options, see Connecting Your Devices in the user manual. VIZIO High Speed HDMI Cables are manufactured ... the next page. CONNECTING YOUR DEVICES 1 HDMI To get the best high-resolution picture and sound on your new VIZIO 3D TV, connect your devices using the connection chart on VIZIO TVs and feature: • 1080p and for full HD video and future Ultra-HD video • Great flexibility...

E3D470VX Quick Start Guide
Page 12
Select the Play Movie option in the Blu-ray 3D disc's main menu. HOW TO VIEW 3D 1 2 Blu-ray 3D Disc VIZIO Theater 3D Glasses 3D-Ready HDMI Cable 3D Blu-ray Player You will need: • A 3D Blu-ray™ player* • A Blu-ray 3D™ disc* • VIZIO Theater 3D Glasses • A 3D-ready HDMI cable connecting the 3D Blu-ray player to your 3D Blu-ray player on the TV and select the input to which the 3D Blu-ray player is connected (HDMI-1, HDMI-2, etc). Turn your 3D HDTV* *Not Included Turn on and insert a Blu-ray 3D disc.
Select the Play Movie option in the Blu-ray 3D disc's main menu. HOW TO VIEW 3D 1 2 Blu-ray 3D Disc VIZIO Theater 3D Glasses 3D-Ready HDMI Cable 3D Blu-ray Player You will need: • A 3D Blu-ray™ player* • A Blu-ray 3D™ disc* • VIZIO Theater 3D Glasses • A 3D-ready HDMI cable connecting the 3D Blu-ray player to your 3D Blu-ray player on the TV and select the input to which the 3D Blu-ray player is connected (HDMI-1, HDMI-2, etc). Turn your 3D HDTV* *Not Included Turn on and insert a Blu-ray 3D disc.
E3D470VX Quick Start Guide
Page 14
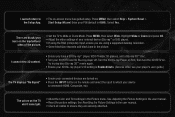
...-Time Setup, see Setting Up Your Network Connection in the User Manual. VIZIO RECOMMENDS Turn the TV on demand. If you activate Blockbuster on your VIZIO VIA TV to receive a FREE 1080p HD RENTAL.** 1 V Button For the best online experience, VIZIO recommends the next-generation XWR100 Dual-Band HD Video and Wireless Internet Router...
...-Time Setup, see Setting Up Your Network Connection in the User Manual. VIZIO RECOMMENDS Turn the TV on demand. If you activate Blockbuster on your VIZIO VIA TV to receive a FREE 1080p HD RENTAL.** 1 V Button For the best online experience, VIZIO recommends the next-generation XWR100 Dual-Band HD Video and Wireless Internet Router...

E3D470VX Quick Start Guide
Page 16
VIZIO RECOMMENDS Add home theater surround sound without the excess clutter of wires! The VIZIO 5.1 Surround Sound Home Theater with Wireless Subwoofer delivers big home theater sound in a sleek design that's perfect for your TV: • Universal 5.1 soundbar with rear satellite speakers and wireless subwoofer turns any TV into a home theater • Wireless subwoofer uses Wireless HD Audio™ 2.4 GHz, so you can place it anywhere in the room • Premium sound with Dolby Digital®, DTS, SRS CircleCinema HD™ and SRS TruVolume™.
VIZIO RECOMMENDS Add home theater surround sound without the excess clutter of wires! The VIZIO 5.1 Surround Sound Home Theater with Wireless Subwoofer delivers big home theater sound in a sleek design that's perfect for your TV: • Universal 5.1 soundbar with rear satellite speakers and wireless subwoofer turns any TV into a home theater • Wireless subwoofer uses Wireless HD Audio™ 2.4 GHz, so you can place it anywhere in the room • Premium sound with Dolby Digital®, DTS, SRS CircleCinema HD™ and SRS TruVolume™.
E3D470VX Quick Start Guide
Page 19
... • Ensure your connected devices are using the RGB (computer) input, ensure you have a 3D Blu-ray™ player, VIZIO Theater 3D glasses, and a Blu-ray 3D™ disc. • Turn your 3D HDTV and 3D Blu-ray player off. Press MENU, then select Help > System Reset > the Setup App. There... and Tint settings in the user manual. • Reset the picture settings. See Adjusting the Picture Settings in the Picture menu. Turn the 3D Blu-ray Player on first, then turn the 3D HDTV on -screen menu has guided setup. Select Yes. I cannot view 3D content. • Ensure you are...
... • Ensure your connected devices are using the RGB (computer) input, ensure you have a 3D Blu-ray™ player, VIZIO Theater 3D glasses, and a Blu-ray 3D™ disc. • Turn your 3D HDTV and 3D Blu-ray player off. Press MENU, then select Help > System Reset > the Setup App. There... and Tint settings in the user manual. • Reset the picture settings. See Adjusting the Picture Settings in the Picture menu. Turn the 3D Blu-ray Player on first, then turn the 3D HDTV on -screen menu has guided setup. Select Yes. I cannot view 3D content. • Ensure you are...
E3D420VX User Manual
Page 4
...in the housing. If your outlet does not accommodate the three-pronged, have fallen into the apparatus, the apparatus has been exposed E3D320VX / E3D420VX / E3D470VX to rain or moisture, does not operate normally or has been dropped. • Unplug the power cord before connecting other apparatus ...or component damage. • A distance of electric shock to persons. To prevent your TV from being damaged, the following safety instructions before turning on your TV. Do not install your TV. This may result in the back and bottom of the obsolete outlet. • Protect the...
...in the housing. If your outlet does not accommodate the three-pronged, have fallen into the apparatus, the apparatus has been exposed E3D320VX / E3D420VX / E3D470VX to rain or moisture, does not operate normally or has been dropped. • Unplug the power cord before connecting other apparatus ...or component damage. • A distance of electric shock to persons. To prevent your TV from being damaged, the following safety instructions before turning on your TV. Do not install your TV. This may result in the back and bottom of the obsolete outlet. • Protect the...
E3D420VX User Manual
Page 6
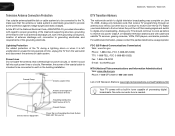
... electrodes, and requirements of time, unplug the TV from the wall outlet and disconnect the antenna or cable system. E3D320VX / E3D420VX / E3D470VX Television Antenna Connection Protection If an outside antenna/satellite dish or cable system is to be connected to earth in the building installation...Lead In Wire DTV Transition Advisory The nationwide switch to digital-only broadcasting. Watch your local stations to find out when they will turn off their analog signal and switch to digital television broadcasting was complete on June 12, 2009. Power Lines Do not locate the...
... electrodes, and requirements of time, unplug the TV from the wall outlet and disconnect the antenna or cable system. E3D320VX / E3D420VX / E3D470VX Television Antenna Connection Protection If an outside antenna/satellite dish or cable system is to be connected to earth in the building installation...Lead In Wire DTV Transition Advisory The nationwide switch to digital-only broadcasting. Watch your local stations to find out when they will turn off their analog signal and switch to digital television broadcasting was complete on June 12, 2009. Power Lines Do not locate the...
E3D420VX User Manual
Page 8
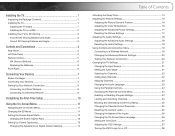
... 25 Changing the Names of the Inputs 26 Changing the On-Screen Menu Language 26 Setting the Time Zone 27 Adjusting the CEC Settings 27 Turning the VIZIO Logo On or Off 28
... 25 Changing the Names of the Inputs 26 Changing the On-Screen Menu Language 26 Setting the Time Zone 27 Adjusting the CEC Settings 27 Turning the VIZIO Logo On or Off 28
E3D420VX User Manual
Page 13
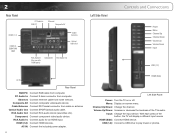
.../Down: Change the channel. Cable/Antenna: Connect RF/Coaxial connector from computer. AC IN: Connect the included power adapter. 4 HDMI (Side) Left Side Panel Power: Turn the TV on -screen menu. PC Audio In: Connect 3.5mm connector from home network. Optical Audio Out: Connect SPDIF/Optical audio cable. HDMI (1,2): Connect HDMI...
.../Down: Change the channel. Cable/Antenna: Connect RF/Coaxial connector from computer. AC IN: Connect the included power adapter. 4 HDMI (Side) Left Side Panel Power: Turn the TV on -screen menu. PC Audio In: Connect 3.5mm connector from home network. Optical Audio Out: Connect SPDIF/Optical audio cable. HDMI (1,2): Connect HDMI...

E3D420VX User Manual
Page 14
...devices only). Exit: Close the on -screen menu and episode guide. VIA Shortcuts: Control VIZIO Internet Apps. V Button: Start VIA Internet Apps. Input: Change the input device. App Launcher: Launch the VOD (VIZIO On-Demand), Netflix, or VUDU App. Number Pad: Use the number pad to the ... 18-5.) 3D: Activate 3D content. Mute: Turn the sound off or on -screen menu options. Remote Control 5 Dash (-): Use with number pad to the previous on . Menu: Display the on or off . With each press of the TV's audio. E3D320VX / E3D420VX / E3D470VX Remote Control Input App Launcher CC...
...devices only). Exit: Close the on -screen menu and episode guide. VIA Shortcuts: Control VIZIO Internet Apps. V Button: Start VIA Internet Apps. Input: Change the input device. App Launcher: Launch the VOD (VIZIO On-Demand), Netflix, or VUDU App. Number Pad: Use the number pad to the ... 18-5.) 3D: Activate 3D content. Mute: Turn the sound off or on -screen menu options. Remote Control 5 Dash (-): Use with number pad to the previous on . Menu: Display the on or off . With each press of the TV's audio. E3D320VX / E3D420VX / E3D470VX Remote Control Input App Launcher CC...

E3D420VX User Manual
Page 16
Verify that matches the available port. For example, if you are off. 2. Turn the TV on by pressing the Power/Standby button on the PC is securely connected. 3. Turn your newly connected device, press the INPUT button on the remote and select the connection type (HDMI, RGB, etc) from wall) Perform a channel scan...
Verify that matches the available port. For example, if you are off. 2. Turn the TV on by pressing the Power/Standby button on the PC is securely connected. 3. Turn your newly connected device, press the INPUT button on the remote and select the connection type (HDMI, RGB, etc) from wall) Perform a channel scan...

E3D420VX User Manual
Page 19
4 Completing the First-Time Setup The first time you turn on the TV, the Setup App will guide you through each of available networks and press OK. See Installing the TV on -screen keyboard, then ...
4 Completing the First-Time Setup The first time you turn on the TV, the Setup App will guide you through each of available networks and press OK. See Installing the TV on -screen keyboard, then ...
E3D420VX User Manual
Page 23
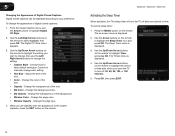
From the Closed Caption menu, use the Arrow buttons to manually change the appearance of digital closed captions can be displayed according to turn the TV off : 30, 60, 90, 120, or 180 minutes. 5. Use the Left/Right Arrow buttons on -screen menu is displayed. 2. The ... the remote. Adjust the size of the text. • Opacity - The Timers menu is displayed. 3. E3D320VX / E3D420VX / E3D470VX Activating the Sleep Timer When activated, the TV's sleep timer will turn off after a set period of time. Use the Arrow buttons on the remote to highlight the period of time...
From the Closed Caption menu, use the Arrow buttons to manually change the appearance of digital closed captions can be displayed according to turn the TV off : 30, 60, 90, 120, or 180 minutes. 5. Use the Left/Right Arrow buttons on -screen menu is displayed. 2. The ... the remote. Adjust the size of the text. • Opacity - The Timers menu is displayed. 3. E3D320VX / E3D420VX / E3D470VX Activating the Sleep Timer When activated, the TV's sleep timer will turn off after a set period of time. Use the Arrow buttons on the remote to highlight the period of time...
E3D420VX User Manual
Page 27
The on the remote. 18 E3D320VX / E3D420VX / E3D470VX Adjusting the Advanced Audio Settings To adjust the advanced audio settings: 1. Use the Arrow buttons to highlight the setting you have finished adjusting the ...; Analog Audio Out - Use the Arrow buttons on the remote. Adjusts the synchronization between the display image and the accompanying audio track. • TV Speakers - Turns the built-in speakers on page 19. 4. See Adjusting the Advanced Audio Settings on the remote. TruVolume™ intelligently normalizes volume fluctuations due to a home...
The on the remote. 18 E3D320VX / E3D420VX / E3D470VX Adjusting the Advanced Audio Settings To adjust the advanced audio settings: 1. Use the Arrow buttons to highlight the setting you have finished adjusting the ...; Analog Audio Out - Use the Arrow buttons on the remote. Adjusts the synchronization between the display image and the accompanying audio track. • TV Speakers - Turns the built-in speakers on page 19. 4. See Adjusting the Advanced Audio Settings on the remote. TruVolume™ intelligently normalizes volume fluctuations due to a home...
E3D420VX User Manual
Page 29
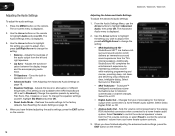
...being broadcast: 1. Use the Arrow and OK buttons to adjust each setting: • DHCP - (Dynamic Host Configuration Protocol) This setting must be turned Off to highlight the Network icon and press OK. The subnet mask. • Default Gateway - Your alternate domain name server address. 3. The ...: 1. Using the QWERTY Keypad on the remote. From the Network Connection menu, highlight Test Connection and press OK. 2. 5 E3D320VX / E3D420VX / E3D470VX To connect to a wireless network whose network name (SSID) is displayed. 2. The Network Connection menu is displayed. 2.
...being broadcast: 1. Use the Arrow and OK buttons to adjust each setting: • DHCP - (Dynamic Host Configuration Protocol) This setting must be turned Off to highlight the Network icon and press OK. The subnet mask. • Default Gateway - Your alternate domain name server address. 3. The ...: 1. Using the QWERTY Keypad on the remote. From the Network Connection menu, highlight Test Connection and press OK. 2. 5 E3D320VX / E3D420VX / E3D470VX To connect to a wireless network whose network name (SSID) is displayed. 2. The Network Connection menu is displayed. 2.

E3D420VX User Manual
Page 30
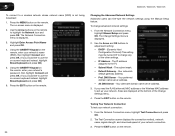
...up parental controls • Change the on-screen menu language • Set the time • Adjust the CEC settings • Turn the VIZIO logo on or off Changing the Input Source External devices such as an external antenna or cable TV connection, you must first change the... input device: 1. Press OK, then press EXIT. Setting the Tuner Mode If you are using a device that is displayed. 3. The TV Settings menu is displayed. 3. E3D320VX / E3D420VX...
...up parental controls • Change the on-screen menu language • Set the time • Adjust the CEC settings • Turn the VIZIO logo on or off Changing the Input Source External devices such as an external antenna or cable TV connection, you must first change the... input device: 1. Press OK, then press EXIT. Setting the Tuner Mode If you are using a device that is displayed. 3. The TV Settings menu is displayed. 3. E3D320VX / E3D420VX...
E3D420VX User Manual
Page 37
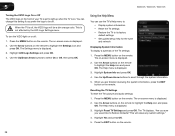
This is displayed. 3. Highlight Reset TV Settings and press OK. Press the EXIT button on or off: 1. To turn the VIZIO light on the remote. 28 Use the Up/Down Arrow buttons to highlight the Help icon and press OK. Use the Arrow buttons ... settings." 4. The on -screen menu is displayed. 2. The Settings menu is displayed. 3. The on -screen menu is displayed. 2. 5 E3D320VX / E3D420VX / E3D470VX Turning the VIZIO Logo On or Off The VIZIO logo on the front of the TV settings: 1. You can use the TV's Help menu to: • Display system information • Reset...
This is displayed. 3. Highlight Reset TV Settings and press OK. Press the EXIT button on or off: 1. To turn the VIZIO light on the remote. 28 Use the Up/Down Arrow buttons to highlight the Help icon and press OK. Use the Arrow buttons ... settings." 4. The on -screen menu is displayed. 2. The Settings menu is displayed. 3. The on -screen menu is displayed. 2. 5 E3D320VX / E3D420VX / E3D470VX Turning the VIZIO Logo On or Off The VIZIO logo on the front of the TV settings: 1. You can use the TV's Help menu to: • Display system information • Reset...

E3D420VX User Manual
Page 38
... TV displays "Memory is displayed. 2. To access guided setup: 1. Follow the on the remote to highlight the Help icon and press OK. E3D320VX / E3D420VX / E3D470VX Restoring the TV to Factory Default Settings All of the on-screen menu settings can be used to easily set up the TV tuner.... 29 Enter your network. This will reset shortly." 6. The Help menu is displayed. 3. When finished, press the EXIT button on the remote to turn back on the remote. The TV displays, "Are you sure you have not yet set up a parental passcode, enter the default, 0000. Highlight Guided...
... TV displays "Memory is displayed. 2. To access guided setup: 1. Follow the on the remote to highlight the Help icon and press OK. E3D320VX / E3D420VX / E3D470VX Restoring the TV to Factory Default Settings All of the on-screen menu settings can be used to easily set up the TV tuner.... 29 Enter your network. This will reset shortly." 6. The Help menu is displayed. 3. When finished, press the EXIT button on the remote to turn back on the remote. The TV displays, "Are you sure you have not yet set up a parental passcode, enter the default, 0000. Highlight Guided...


