
Download
Page 3
...prevent your investment beyond the standard warranty, VIZIO offers on-site extended warranty service plans. Welcome Thank You for Choosing VIZIO And congratulations on or pinched, particularly at (877) 878-4946. To get the most out of your TV. Product Registration To purchase or inquire ...about accessories and installation services for your new VIZIO HDTV. It is designed and manufactured to alert you see this symbol, please read the ...
...prevent your investment beyond the standard warranty, VIZIO offers on-site extended warranty service plans. Welcome Thank You for Choosing VIZIO And congratulations on or pinched, particularly at (877) 878-4946. To get the most out of your TV. Product Registration To purchase or inquire ...about accessories and installation services for your new VIZIO HDTV. It is designed and manufactured to alert you see this symbol, please read the ...
Download
Page 4
...risk of the cabinet are not blocked or covered. To avoid electric shock, avoid handling the power cord during electrical storms. • Unplug your TV during a lightning storm or when it from an area of low temperature to an area of time. • Refer all servicing to qualified service... in a bookcase or cabinet unless proper ventilation is damaged, liquid has been spilled or objects have fallen into your TV. Never spill liquids on your TV. • Your TV should be replaced when using different voltage than the specified voltage may expose you are not sure of the type of...
...risk of the cabinet are not blocked or covered. To avoid electric shock, avoid handling the power cord during electrical storms. • Unplug your TV during a lightning storm or when it from an area of low temperature to an area of time. • Refer all servicing to qualified service... in a bookcase or cabinet unless proper ventilation is damaged, liquid has been spilled or objects have fallen into your TV. Never spill liquids on your TV. • Your TV should be replaced when using different voltage than the specified voltage may expose you are not sure of the type of...

Download
Page 5
... with wet hands. • Insert batteries in an area with instructions. The power cord fails or frays. - If water penetrates into your TV is dropped and the housing is exposed to persons. Ensure that may cause fire or electric shock. • Follow instructions for an extended period...are unplugged before moving your dealer for use of electrical shock to rain or other cables are for repair. Do not expose your TV to repair your TV changes substantially. • This apparatus shall not be exposed to leak which can damage the remote control or injure the operator....
... with wet hands. • Insert batteries in an area with instructions. The power cord fails or frays. - If water penetrates into your TV is dropped and the housing is exposed to persons. Ensure that may cause fire or electric shock. • Follow instructions for an extended period...are unplugged before moving your dealer for use of electrical shock to rain or other cables are for repair. Do not expose your TV to repair your TV changes substantially. • This apparatus shall not be exposed to leak which can damage the remote control or injure the operator....

Download
Page 6
...to proper grounding of the mast and supporting structure, grounding of the lead-in the building installation. Lightning Protection For added protection of the TV during a lightning storm or when it could fall into such power lines or circuits. Power Lines Do not locate the antenna near overhead ...light or power circuits, or where it is left unattended or unused for long periods of time, unplug the TV from the wall outlet and disconnect the antenna or cable system. Television Antenna Connection Protection If an outside antenna/satellite dish or ...
...to proper grounding of the mast and supporting structure, grounding of the lead-in the building installation. Lightning Protection For added protection of the TV during a lightning storm or when it could fall into such power lines or circuits. Power Lines Do not locate the antenna near overhead ...light or power circuits, or where it is left unattended or unused for long periods of time, unplug the TV from the wall outlet and disconnect the antenna or cable system. Television Antenna Connection Protection If an outside antenna/satellite dish or ...
Download
Page 7
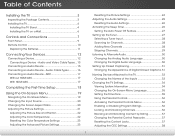
...31 Changing the Appearance of Digital Closed Captions.. 31 Naming Devices Attached to the TV 33 Changing the Names of Contents Installing the TV 3 Inspecting the Package Contents 3 Installing the TV 4 Installing the TV Stand 4 Installing the TV on a Wall 6 Controls and Connections 7 Front Panel 9 Remote Control 10... a Device 12 Connecting a Device - Audio Cable Types 16 Connecting an Audio Device - Table of the Inputs 33 Changing the TV Settings 34 Viewing System Information 34 Changing the On-Screen Menu Language 35 Setting the Time Zone 35 Using the Parental Controls 36 ...
...31 Changing the Appearance of Digital Closed Captions.. 31 Naming Devices Attached to the TV 33 Changing the Names of Contents Installing the TV 3 Inspecting the Package Contents 3 Installing the TV 4 Installing the TV Stand 4 Installing the TV on a Wall 6 Controls and Connections 7 Front Panel 9 Remote Control 10... a Device 12 Connecting a Device - Audio Cable Types 16 Connecting an Audio Device - Table of the Inputs 33 Changing the TV Settings 34 Viewing System Information 34 Changing the On-Screen Menu Language 35 Setting the Time Zone 35 Using the Parental Controls 36 ...

Download
Page 8
Turning the Power Indicator On or Off 38 Using the Reset & Admin Menu 39 Restoring the TV to Factory Default Settings 39 Using the Guided Setup Menu 40 Using Guided Setup 40 Using the Info Window 41 Using the USB Media Player 42 Using the USB Media Player 42 Preparing Your USB Drive to Play USB Media 42 Playing USB Media 42 Removing the USB Drive from the TV 42 Troubleshooting & Technical Support 44 Specifications 47 Limited Warranty 49 Legal & Compliance 50 2
Turning the Power Indicator On or Off 38 Using the Reset & Admin Menu 39 Restoring the TV to Factory Default Settings 39 Using the Guided Setup Menu 40 Using Guided Setup 40 Using the Info Window 41 Using the USB Media Player 42 Using the USB Media Player 42 Preparing Your USB Drive to Play USB Media 42 Playing USB Media 42 Removing the USB Drive from the TV 42 Troubleshooting & Technical Support 44 Specifications 47 Limited Warranty 49 Legal & Compliance 50 2

Download
Page 9
VIZIO LED HDTV with Stand Remote Control with Batteries Quick Start Guide Power Cord 3 6 x M4 14mm Phillips Screws Package Contents Installing the TV 1 Inspecting the Package Contents Before installing your new TV, take a moment to ensure nothing is missing or damaged. Use the images below to inspect the package contents.
VIZIO LED HDTV with Stand Remote Control with Batteries Quick Start Guide Power Cord 3 6 x M4 14mm Phillips Screws Package Contents Installing the TV 1 Inspecting the Package Contents Before installing your new TV, take a moment to ensure nothing is missing or damaged. Use the images below to inspect the package contents.

Download
Page 10
... keep it from the box and inspecting the package contents you can be installed in the base installation. 1 Installing the TV After removing the TV from falling over if: • It is recommended that two people take part in two ways: • On a flat surface, using the ...wall, using a VESA-standard wall mount (not included) Installing the TV Stand Your TV includes a stand designed to the screen, place the TV on a soft surface such as a blanket. Your TV can begin installing the TV. However, the TV can still fall over . TV on an uneven, unstable, or non-level surface • It is...
... keep it from the box and inspecting the package contents you can be installed in the base installation. 1 Installing the TV After removing the TV from falling over if: • It is recommended that two people take part in two ways: • On a flat surface, using the ...wall, using a VESA-standard wall mount (not included) Installing the TV Stand Your TV includes a stand designed to the screen, place the TV on a soft surface such as a blanket. Your TV can begin installing the TV. However, the TV can still fall over . TV on an uneven, unstable, or non-level surface • It is...

Download
Page 11
When you are finished, place the TV on a stable, level surface. 5 Align the base with the bottom of the neck piece to the TV. 3. Using a Phillips screwdriver, tighten three (3) M4 14mm screws into the center of the TV and slide it to secure it into place as shown. 2. Align the neck piece with the neck and tighten three (3) M4 14mm screws. 4. 1 To install the base: 1.
When you are finished, place the TV on a stable, level surface. 5 Align the base with the bottom of the neck piece to the TV. 3. Using a Phillips screwdriver, tighten three (3) M4 14mm screws into the center of the TV and slide it to secure it into place as shown. 2. Align the neck piece with the neck and tighten three (3) M4 14mm screws. 4. 1 To install the base: 1.

Download
Page 12
...: Screw Length: Hole Pattern: E390-B1 M4 0.7mm 20mm 100mm (V) x 100mm (H) Be sure the mount you will need a wall mount. 1 Installing the TV on a Wall To mount your TV on a wall, you choose is clear of debris that you have the correct mount for your TV, you have determined that can ... lifting. Be sure the surface is capable of supporting the weight of the TV. Attach your TV and wall mount to your TV model: Installing a TV on page 47 for the weight/load of this TV. Use only with your TV on a clean, flat, stable surface. After you can scratch or damage ...
...: Screw Length: Hole Pattern: E390-B1 M4 0.7mm 20mm 100mm (V) x 100mm (H) Be sure the mount you will need a wall mount. 1 Installing the TV on a Wall To mount your TV on a wall, you choose is clear of debris that you have the correct mount for your TV, you have determined that can ... lifting. Be sure the surface is capable of supporting the weight of the TV. Attach your TV and wall mount to your TV model: Installing a TV on page 47 for the weight/load of this TV. Use only with your TV on a clean, flat, stable surface. After you can scratch or damage ...

Download
Page 14
Press and hold to change the input source. 8 Side Panel 2 POWER - Press to turn TV off or on. INPUT -
Press and hold to change the input source. 8 Side Panel 2 POWER - Press to turn TV off or on. INPUT -

Download
Page 15
To keep the power indicator on as long as the TV is on, see "Turning the Power Indicator On or Off" on , then goes out after several seconds. 2 Front Panel REMOTE SENSOR & POWER INDICATOR When using the remote, aim it directly at this sensor. The power indicator flashes on when the TV turns on page 38. 9 Front Panel
To keep the power indicator on as long as the TV is on, see "Turning the Power Indicator On or Off" on , then goes out after several seconds. 2 Front Panel REMOTE SENSOR & POWER INDICATOR When using the remote, aim it directly at this sensor. The power indicator flashes on when the TV turns on page 38. 9 Front Panel

Download
Page 16
... enter a digital sub-channel. (For example, 18-4 or 18-5.) Remote Control Number Pad Manually enter a channel. Wide Switch the display mode. 10 2 Power Turn the TV on or off or on. Exit Close the on -screen menu. Ok Select the highlighted menu option. Volume Up/Down Increase or decrease loudness of...
... enter a digital sub-channel. (For example, 18-4 or 18-5.) Remote Control Number Pad Manually enter a channel. Wide Switch the display mode. 10 2 Power Turn the TV on or off or on. Exit Close the on -screen menu. Ok Select the highlighted menu option. Volume Up/Down Increase or decrease loudness of...
Download
Page 18
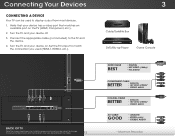
... their locations may be used (HDMI-1, HDMI-2, etc.). Connecting Your Devices Connecting a Device Your TV can be subject to change. Set the TV's input to match the connection you used to the TV and the device. 4. Connect the appropriate cable (not included) to display output from most devices.... 1. Turn the TV and your device has a video port that matches an available port on . Verify that your device on the TV (HDMI, Component, etc.). 2. Turn the TV and your ...
... their locations may be used (HDMI-1, HDMI-2, etc.). Connecting Your Devices Connecting a Device Your TV can be subject to change. Set the TV's input to match the connection you used to the TV and the device. 4. Connect the appropriate cable (not included) to display output from most devices.... 1. Turn the TV and your device has a video port that matches an available port on . Verify that your device on the TV (HDMI, Component, etc.). 2. Turn the TV and your ...

Download
Page 19
... signals through a single connector. • Video Resolutions up to 480i • Analog Connection • Audio and Video Signals • HD Video Resolutions up to your TV. 3 Connecting a Device - COAXIAL CABLE Coaxial cables are are the traditional way of connecting your devices to your...
... signals through a single connector. • Video Resolutions up to 480i • Analog Connection • Audio and Video Signals • HD Video Resolutions up to your TV. 3 Connecting a Device - COAXIAL CABLE Coaxial cables are are the traditional way of connecting your devices to your...

Download
Page 21
... your device has an audio port that your audio device off. 3. Turn the TV and your device on the model. 15 OPTICAL/SPDIF CABLE BETTER • PCM STREAM • DOLBY DIGITAL 5.1 CHANNEL • DTS 5.1 CHANNEL HDMI CABLE BEST • ..., DTS, DOLBY DIGITAL The actual number of ports and their locations may vary, depending on . 3 Home Audio Receiver VIZIO Sound Bar RCA CABLE GOOD • ANALOG STEREO CONNECTION • 2.0 CHANNEL BACK OF TV Note: The image shown here is for illustrative purposes only and may be subject to change. Connect the appropriate...
... your device has an audio port that your audio device off. 3. Turn the TV and your device on the model. 15 OPTICAL/SPDIF CABLE BETTER • PCM STREAM • DOLBY DIGITAL 5.1 CHANNEL • DTS 5.1 CHANNEL HDMI CABLE BEST • ..., DTS, DOLBY DIGITAL The actual number of ports and their locations may vary, depending on . 3 Home Audio Receiver VIZIO Sound Bar RCA CABLE GOOD • ANALOG STEREO CONNECTION • 2.0 CHANNEL BACK OF TV Note: The image shown here is for illustrative purposes only and may be subject to change. Connect the appropriate...

Download
Page 22
Audio Return Channelenabled (ARC) TVs allow audio to your audio device. See Connecting an Audio Device - Audio Cable Types COMPONENT VIDEO RCA CABLE AV cables (or Composite cables) are sent ...
Audio Return Channelenabled (ARC) TVs allow audio to your audio device. See Connecting an Audio Device - Audio Cable Types COMPONENT VIDEO RCA CABLE AV cables (or Composite cables) are sent ...

Download
Page 23
... Home Audio Receiver HDMI Your Blu-ray Player 17 Your Blu-ray Player RCA (Audio) Your TV HDMI Your Home Audio Receiver HDMI Your TV HDMI With an HDMI ARC setup, the audio connection between your TV with an all-digital audio/video connection. The HDMI cable will transmit audio signals from your... TV and home audio receiver can be removed. ARC Without HDMI ARC With HDMI ARC Built-in Tuner Built-in Tuner Without an HDMI ARC setup, your TV will transmit audio signals to and from the built-in tuner to...
... Home Audio Receiver HDMI Your Blu-ray Player 17 Your Blu-ray Player RCA (Audio) Your TV HDMI Your Home Audio Receiver HDMI Your TV HDMI With an HDMI ARC setup, the audio connection between your TV with an all-digital audio/video connection. The HDMI cable will transmit audio signals from your... TV and home audio receiver can be removed. ARC Without HDMI ARC With HDMI ARC Built-in Tuner Built-in Tuner Without an HDMI ARC setup, your TV will transmit audio signals to and from the built-in tuner to...

Download
Page 24
... OK and Arrow Up/ Down Buttons on the remote to highlight your time zone and press OK. 5. The TV powers on the remote. Press the Right Arrow button on the remote to Live TV and press OK. The First-Time Setup is complete. 18 When you are finished, highlight Next and press.... 8. Press the Power/Standby button on and the Setup App starts. 2. Completing the First-Time Setup 4 The first time you turn on the TV, the Setup app will guide you through each of the steps necessary to select your language and country. Use the OK and Arrow Up/ Down ...
... OK and Arrow Up/ Down Buttons on the remote to highlight your time zone and press OK. 5. The TV powers on the remote. Press the Right Arrow button on the remote to Live TV and press OK. The First-Time Setup is complete. 18 When you are finished, highlight Next and press.... 8. Press the Power/Standby button on and the Setup App starts. 2. Completing the First-Time Setup 4 The first time you turn on the TV, the Setup app will guide you through each of the steps necessary to select your language and country. Use the OK and Arrow Up/ Down ...
Download
Page 25
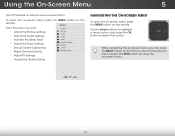
... to -use on the remote. To open the on-screen menu, press the MENU button on -screen menu. From this menu, you can : VIZIO Settings • Adjust the Picture settings • Adjust the Audio settings Picture Audio Timers • Activate the Sleep Timer Tuner • Adjust the ...Tuner settings • Set up Closed Captioning CC Closed Captions Devices System • Name Devices (Inputs) Guided Setup • Adjust TV Settings • Access the Guided Setup Navigating the On-Screen Menu To open the on-screen menu, press the MENU button on -screen menu. Sleep...
... to -use on the remote. To open the on-screen menu, press the MENU button on -screen menu. From this menu, you can : VIZIO Settings • Adjust the Picture settings • Adjust the Audio settings Picture Audio Timers • Activate the Sleep Timer Tuner • Adjust the ...Tuner settings • Set up Closed Captioning CC Closed Captions Devices System • Name Devices (Inputs) Guided Setup • Adjust TV Settings • Access the Guided Setup Navigating the On-Screen Menu To open the on-screen menu, press the MENU button on -screen menu. Sleep...


