Download
Page 4
... not install your TV close to smoke or moisture may form in the back and bottom of the cabinet are not sure of the type of time. Overloading can be operated only from damage due to power surges. • Do not attempt to repair or service your TV yourself. • Use only with the cart, stand, tripod, bracket, or table specified...
... not install your TV close to smoke or moisture may form in the back and bottom of the cabinet are not sure of the type of time. Overloading can be operated only from damage due to power surges. • Do not attempt to repair or service your TV yourself. • Use only with the cart, stand, tripod, bracket, or table specified...

Download
Page 5
... which can damage the remote control or injure the operator. The power cord fails or frays. - Do not expose your TV if any other cables are unplugged before moving your TV will not be placed on the power cord may cause fire or electric shock. • Follow instructions for an extended period of time, unplug the power cord. • To reduce risk...
... which can damage the remote control or injure the operator. The power cord fails or frays. - Do not expose your TV if any other cables are unplugged before moving your TV will not be placed on the power cord may cause fire or electric shock. • Follow instructions for an extended period of time, unplug the power cord. • To reduce risk...

Download
Page 6
... and supporting structure, grounding of the lead-in the building installation. Power Lines Do not locate the antenna near overhead light or power circuits, or where it is left unattended or unused for long periods of time, unplug the TV from the wall outlet and disconnect the antenna or cable system. Remember, the screen of the coaxial cable is intended to be connected to...
... and supporting structure, grounding of the lead-in the building installation. Power Lines Do not locate the antenna near overhead light or power circuits, or where it is left unattended or unused for long periods of time, unplug the TV from the wall outlet and disconnect the antenna or cable system. Remember, the screen of the coaxial cable is intended to be connected to...
Download
Page 7
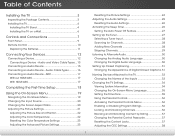
... the Package Contents 3 Installing the TV 4 Installing the TV Stand 4 Installing the TV on a Wall 6 Controls and Connections 7 Front Panel 9 Remote Control 10 Replacing the Batteries 11 Connecting Your Devices 12 Connecting a Device 12 Connecting a Device - Table of the Inputs 33 Changing the TV Settings 34 Viewing System Information 34 Changing the On-Screen Menu Language 35 Setting the Time Zone 35 Using the Parental Controls 36 Accessing the Parental Controls Menu 36 Enabling or Disabling Program Ratings 36 Locking and Unlocking Channels 36 Blocking and...
... the Package Contents 3 Installing the TV 4 Installing the TV Stand 4 Installing the TV on a Wall 6 Controls and Connections 7 Front Panel 9 Remote Control 10 Replacing the Batteries 11 Connecting Your Devices 12 Connecting a Device 12 Connecting a Device - Table of the Inputs 33 Changing the TV Settings 34 Viewing System Information 34 Changing the On-Screen Menu Language 35 Setting the Time Zone 35 Using the Parental Controls 36 Accessing the Parental Controls Menu 36 Enabling or Disabling Program Ratings 36 Locking and Unlocking Channels 36 Blocking and...

Download
Page 8
Turning the Power Indicator On or Off 38 Using the Reset & Admin Menu 39 Restoring the TV to Factory Default Settings 39 Using the Guided Setup Menu 40 Using Guided Setup 40 Using the Info Window 41 Using the USB Media Player 42 Using the USB Media Player 42 Preparing Your USB Drive to Play USB Media 42 Playing USB Media 42 Removing the USB Drive from the TV 42 Troubleshooting & Technical Support 44 Specifications 47 Limited Warranty 49 Legal & Compliance 50 2
Turning the Power Indicator On or Off 38 Using the Reset & Admin Menu 39 Restoring the TV to Factory Default Settings 39 Using the Guided Setup Menu 40 Using Guided Setup 40 Using the Info Window 41 Using the USB Media Player 42 Using the USB Media Player 42 Preparing Your USB Drive to Play USB Media 42 Playing USB Media 42 Removing the USB Drive from the TV 42 Troubleshooting & Technical Support 44 Specifications 47 Limited Warranty 49 Legal & Compliance 50 2

Download
Page 12
... Pattern: E390-B1 M4 0.7mm 20mm 100mm (V) x 100mm (H) Be sure the mount you . After you have the correct mount for your TV on a wall: 1. Be sure the surface is capable of supporting the weight of this TV. 6 Use only with your TV. 2. Remove the base by loosening and removing the screws. 4. Disconnect any cables connected to the wall, carefully following the instructions that came with a UL-listed wall mount bracket rated...
... Pattern: E390-B1 M4 0.7mm 20mm 100mm (V) x 100mm (H) Be sure the mount you . After you have the correct mount for your TV on a wall: 1. Be sure the surface is capable of supporting the weight of this TV. 6 Use only with your TV. 2. Remove the base by loosening and removing the screws. 4. Disconnect any cables connected to the wall, carefully following the instructions that came with a UL-listed wall mount bracket rated...
Download
Page 18
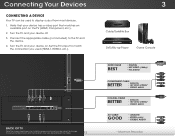
... model. 12 3 Cable/Satellite Box DVD/Blu-ray Player Game Console HDMI CABLE BEST • DIGITAL • HD VIDEO (1080p)* • HD AUDIO COMPONENT CABLE BETTER • ANALOG • HD VIDEO (1080i)* • STEREO AUDIO COAXIAL CABLE BETTER • ANALOG • HD VIDEO (1080i)* • STEREO AUDIO AV CABLE GOOD • ANALOG • VIDEO (480i)* • STEREO AUDIO * Maximum Resolution Set the TV's input to match the connection you used to display output from most devices. 1. Turn the TV and your device has a video port...
... model. 12 3 Cable/Satellite Box DVD/Blu-ray Player Game Console HDMI CABLE BEST • DIGITAL • HD VIDEO (1080p)* • HD AUDIO COMPONENT CABLE BETTER • ANALOG • HD VIDEO (1080i)* • STEREO AUDIO COAXIAL CABLE BETTER • ANALOG • HD VIDEO (1080i)* • STEREO AUDIO AV CABLE GOOD • ANALOG • VIDEO (480i)* • STEREO AUDIO * Maximum Resolution Set the TV's input to match the connection you used to display output from most devices. 1. Turn the TV and your device has a video port...
Download
Page 26
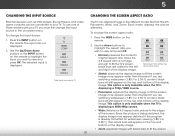
... these devices with black bars to view and press OK. This option is only available when the TV is displaying a 720p/1080i source. • Panoramic expands the display image to the edges of the display image. 5 Changing the Input Source Changing the Screen Aspect Ratio External devices such as DVD players, Blu-ray Players, and video game consoles can display images in the on-screen menu. To change the screen aspect ratio...
... these devices with black bars to view and press OK. This option is only available when the TV is displaying a 720p/1080i source. • Panoramic expands the display image to the edges of the display image. 5 Changing the Input Source Changing the Screen Aspect Ratio External devices such as DVD players, Blu-ray Players, and video game consoles can display images in the on-screen menu. To change the screen aspect ratio...

Download
Page 27
...; Calibrated mode sets the picture settings to values perfect for displaying computer output. 4. Sharpness - If the setting is displayed. 3. Adjusts the LED brightness to suit your preferences and viewing conditions. To adjust the picture settings: 1. Brightness - For the best picture, use Game mode. • Calibrated Dark mode sets the picture settings to values perfect for the best picture. To reduce video delay (lag) when gaming, use Calibrated mode. Press the MENU button on the remote. 21 Contrast - Adjusts the intensity of the picture. The Picture...
...; Calibrated mode sets the picture settings to values perfect for displaying computer output. 4. Sharpness - If the setting is displayed. 3. Adjusts the LED brightness to suit your preferences and viewing conditions. To adjust the picture settings: 1. Brightness - For the best picture, use Game mode. • Calibrated Dark mode sets the picture settings to values perfect for the best picture. To reduce video delay (lag) when gaming, use Calibrated mode. Press the MENU button on the remote. 21 Contrast - Adjusts the intensity of the picture. The Picture...
Download
Page 31
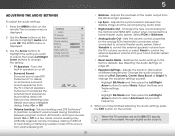
...; Digital Audio Out - Press the MENU button on page 26. • Sleep Timer Equalizer Settings - The on the remote. Digital Audio Out Analog Audio Out Reset Audio Mode On On On +0 +0 PCM Fixed • TV Speakers - TruSurround completes the entertainment experience by providing deep, rich bass and by selecting Flat, Dynamic, Center, Bass Boost, or Bright. Sets the volume control properties for the Optical and HDMI ARC output when connected to a Wide hoZomome thNeoarmtealr aPaundoriaomiscystem. Change the audio mode...
...; Digital Audio Out - Press the MENU button on page 26. • Sleep Timer Equalizer Settings - The on the remote. Digital Audio Out Analog Audio Out Reset Audio Mode On On On +0 +0 PCM Fixed • TV Speakers - TruSurround completes the entertainment experience by providing deep, rich bass and by selecting Flat, Dynamic, Center, Bass Boost, or Bright. Sets the volume control properties for the Optical and HDMI ARC output when connected to a Wide hoZomome thNeoarmtealr aPaundoriaomiscystem. Change the audio mode...

Download
Page 32
The TV displays,"Select Reset to the factory default settings: 1. Use the Left/Right Arrow buttons on the remote to highlight Audio and press OK. To use the sleep timer: 1. Press the MENU button on the remote. VIZIO Timers Sleep Timer Auto Power Off Off 10 minutes 3. 5 Resetting the Audio Settings To reset the audio settings to restore factory default audio settings." 4. Press the MENU button on the remote. The on -screen menu is displayed. The Audio menu is displayed. 2. Use the Arrow buttons to Off. 4. The on -screen menu is displayed. 3. Use the Arrow ...
The TV displays,"Select Reset to the factory default settings: 1. Use the Left/Right Arrow buttons on the remote to highlight Audio and press OK. To use the sleep timer: 1. Press the MENU button on the remote. VIZIO Timers Sleep Timer Auto Power Off Off 10 minutes 3. 5 Resetting the Audio Settings To reset the audio settings to restore factory default audio settings." 4. Press the MENU button on the remote. The on -screen menu is displayed. The Audio menu is displayed. 2. Use the Arrow buttons to Off. 4. The on -screen menu is displayed. 3. Use the Arrow ...
Download
Page 37
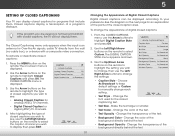
Press the MENU button on -screen menu is an antenna for the closed captioning text. • Text Size - The Closed Caption menu is not being broadcast with a composite video connection. After highlighting the type of the closed captions you wish to see, use the Arrow buttons to select Custom. See the diagram on the remote to highlight the setting you wish to display, then press EXIT. To change the settings: VIZIO Digital Caption Settings Caption Style Custom Text Style As...
Press the MENU button on -screen menu is an antenna for the closed captioning text. • Text Size - The Closed Caption menu is not being broadcast with a composite video connection. After highlighting the type of the closed captions you wish to see, use the Arrow buttons to select Custom. See the diagram on the remote to highlight the setting you wish to display, then press EXIT. To change the settings: VIZIO Digital Caption Settings Caption Style Custom Text Style As...
Download
Page 44
... OK. The System menu is connected and supports CEC. 5. Use the Up/Down Arrow buttons to adjust each setting: • CEC Function - The System menu is on or off: 1. Highlight Power Indicator and press OK. The on the remote to be on. Use the Arrow buttons on -screen menu is on the remote. To turn the Power Indicator Light on . Not all HDMI devices support CEC. Turning the Power Indicator On or...
... OK. The System menu is connected and supports CEC. 5. Use the Up/Down Arrow buttons to adjust each setting: • CEC Function - The System menu is on or off: 1. Highlight Power Indicator and press OK. The on the remote to be on. Use the Arrow buttons on -screen menu is on the remote. To turn the Power Indicator Light on . Not all HDMI devices support CEC. Turning the Power Indicator On or...

Download
Page 46
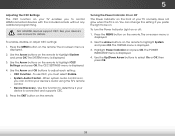
The on -screen instructions. Highlight Guided Setup and press OK. Wide Zoom Normal Panoramic Exit 2D 3D ABC Input Wide CC Sleep Timer Picture Audio Network Settings Help 40 The Guided Setup menu appears. VIZIO Guided Setup Tuner Setup 3. 5 Using the Guided Setup Menu Using Guided Setup The TV's Setup App can be used to easily set up the TV tuner. Follow the on -screen menu is displayed. 2. When finished, press the EXIT button on the remote. Press OK with Tuner Setup highlighted. 4. To use guided setup: 1. Press the MENU button on the remote.
The on -screen instructions. Highlight Guided Setup and press OK. Wide Zoom Normal Panoramic Exit 2D 3D ABC Input Wide CC Sleep Timer Picture Audio Network Settings Help 40 The Guided Setup menu appears. VIZIO Guided Setup Tuner Setup 3. 5 Using the Guided Setup Menu Using Guided Setup The TV's Setup App can be used to easily set up the TV tuner. Follow the on -screen menu is displayed. 2. When finished, press the EXIT button on the remote. Press OK with Tuner Setup highlighted. 4. To use guided setup: 1. Press the MENU button on the remote.

Download
Page 51
... you are using an antenna, the signal strength of external devices (Blu-ray player, game console, cable/satellite box) that are connected to select a different input source. See Adjusting the Audio Settings on page 25. • Ensure the speakers are set to On. • Ensure no sound. • Press Volume Up on the remote control. • Press the MUTE button on the remote to a window for Channels on page 28. See Resetting the Picture Settings on...
... you are using an antenna, the signal strength of external devices (Blu-ray player, game console, cable/satellite box) that are connected to select a different input source. See Adjusting the Audio Settings on page 25. • Ensure the speakers are set to On. • Ensure no sound. • Press Volume Up on the remote control. • Press the MUTE button on the remote to a window for Channels on page 28. See Resetting the Picture Settings on...
Download
Page 52
... lit. • Your HDTV is not good. • For the best image quality, view high-definition programs using an antenna, the signal strength of occurrences are securely attached. These types of the channel may be interfering with new ones. When I change input source, the display image changes size. • The TV remembers the viewing mode on each input source. See Replacing the Batteries on each input source. The picture is up -converting can...
... lit. • Your HDTV is not good. • For the best image quality, view high-definition programs using an antenna, the signal strength of occurrences are securely attached. These types of the channel may be interfering with new ones. When I change input source, the display image changes size. • The TV remembers the viewing mode on each input source. See Replacing the Batteries on each input source. The picture is up -converting can...
Download
Page 55
... wear and tear, improper operation, improper voltage supply or power surges, signal issues, damages from 5:00AM to 8:00PM Monday through Friday and 7:00AM to 4:00PM Saturday and Sunday, Pacific Time, or visit www.VIZIO.com. Type of Service Defective Products must utilize either repair or replace the Product at its sole option and discretion. THIS WARRANTY GIVES YOU SPECIFIC LEGAL RIGHTS, AND YOU...
... wear and tear, improper operation, improper voltage supply or power surges, signal issues, damages from 5:00AM to 8:00PM Monday through Friday and 7:00AM to 4:00PM Saturday and Sunday, Pacific Time, or visit www.VIZIO.com. Type of Service Defective Products must utilize either repair or replace the Product at its sole option and discretion. THIS WARRANTY GIVES YOU SPECIFIC LEGAL RIGHTS, AND YOU...

Download
Page 2
... to rain or moisture, does not operate normally or has been dropped. • Unplug the power cord before turning on the power cord may cause fire or electric shock. • Follow instructions for the installation, use attachments/accessories specified by the manufacturer. • Use only with the cart, stand, tripod, bracket, or table specified by qualified service personnel only.To reduce the risk of...
... to rain or moisture, does not operate normally or has been dropped. • Unplug the power cord before turning on the power cord may cause fire or electric shock. • Follow instructions for the installation, use attachments/accessories specified by the manufacturer. • Use only with the cart, stand, tripod, bracket, or table specified by qualified service personnel only.To reduce the risk of...

Download
Page 14
... to factory defaults, press MENU > System > Reset & Admin > Reset TV to On. Select Reset. The TV displays "No Signal." • Be sure your connected devices are black/ gray bars on the remote until the screen is connected (TV, HDMI-1, COMP, etc.). Press the WIDE button on the top/ bottom/sides of setup you need and press OK. Enter the Parental Control Passcode (the default code is set to Factory Defaults. Remember that some television channels add black...
... to factory defaults, press MENU > System > Reset & Admin > Reset TV to On. Select Reset. The TV displays "No Signal." • Be sure your connected devices are black/ gray bars on the remote until the screen is connected (TV, HDMI-1, COMP, etc.). Press the WIDE button on the top/ bottom/sides of setup you need and press OK. Enter the Parental Control Passcode (the default code is set to Factory Defaults. Remember that some television channels add black...
Download
Page 15
... service center. VIZIO provides a warranty to the original purchaser of a new Product against harmful interference in materials and workmanship.This warranty does not cover, for example: cosmetic damage, normal wear and tear, improper operation, improper voltage supply or power surges, signal issues, damages from shipping, acts of God, any type of customer misuse, modifications or adjustments, as well as originally purchased. Replacement parts...
... service center. VIZIO provides a warranty to the original purchaser of a new Product against harmful interference in materials and workmanship.This warranty does not cover, for example: cosmetic damage, normal wear and tear, improper operation, improper voltage supply or power surges, signal issues, damages from shipping, acts of God, any type of customer misuse, modifications or adjustments, as well as originally purchased. Replacement parts...


