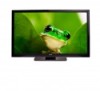
E240AR User Manual
Page 3
...-type plug. It is designed and manufactured to operate within defined design limits. Misuse may result in electric shock or fire.To prevent your TV from the apparatus. • Only use this symbol, please read the accompanying important warning or notice. Keep these instructions. • Heed .... A polarized plug has two blades and a third grounding prong. When Reading this Manual When you see this symbol, please read these instructions before operating your VIZIO product, visit our website at www.VIZIO.com or call toll free at plugs, convenience receptacles, and the point where they...
...-type plug. It is designed and manufactured to operate within defined design limits. Misuse may result in electric shock or fire.To prevent your TV from the apparatus. • Only use this symbol, please read the accompanying important warning or notice. Keep these instructions. • Heed .... A polarized plug has two blades and a third grounding prong. When Reading this Manual When you see this symbol, please read these instructions before operating your VIZIO product, visit our website at www.VIZIO.com or call toll free at plugs, convenience receptacles, and the point where they...
E240AR User Manual
Page 16
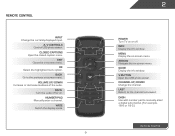
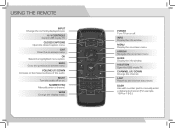
Remote Control Input Change the currently-displayed input. Ok Select the highlighted menu option. Back Go to the channel last viewed. Number Pad Manually enter a channel. V Button Open the USB photo viewer. Closed Captions Open the closed caption menu. Arrow Navigate the on -screen menu. ...of the audio. A/V Controls Control USB photo viewer. Dash Use with number pad to manually enter a digital sub-channel. (For example, 18-4 or 18-5.) Remote Control WIDE Switch the display mode. 9 2 Power Turn TV on or off or on -screen menu. Channel Up/Down Change the channel. Exit ...
Remote Control Input Change the currently-displayed input. Ok Select the highlighted menu option. Back Go to the channel last viewed. Number Pad Manually enter a channel. V Button Open the USB photo viewer. Closed Captions Open the closed caption menu. Arrow Navigate the on -screen menu. ...of the audio. A/V Controls Control USB photo viewer. Dash Use with number pad to manually enter a digital sub-channel. (For example, 18-4 or 18-5.) Remote Control WIDE Switch the display mode. 9 2 Power Turn TV on or off or on -screen menu. Channel Up/Down Change the channel. Exit ...
E240AR User Manual
Page 27
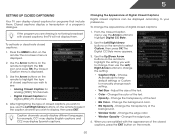
...buttons to change the appearance of closed captions can display closed captions for digital (ATSC) TV channels. 4. Change the transparency of the text. • Color - 5 Setting Up Closed Captioning Your TV can be displayed according to your preference. Use the Arrow buttons on -screen menu ...to see : • Analog Closed Caption for analog (NTSC) TV channels. • Digital Closed Caption for programs that include them . Change the edge type. 4. Choose As Broadcast to keep default settings or Custom to manually change , then use the Arrow buttons to display, then press EXIT...
...buttons to change the appearance of closed captions can display closed captions for digital (ATSC) TV channels. 4. Change the transparency of the text. • Color - 5 Setting Up Closed Captioning Your TV can be displayed according to your preference. Use the Arrow buttons on -screen menu ...to see : • Analog Closed Caption for analog (NTSC) TV channels. • Digital Closed Caption for programs that include them . Change the edge type. 4. Choose As Broadcast to keep default settings or Custom to manually change , then use the Arrow buttons to display, then press EXIT...

E240AR User Manual
Page 28
...in the most cases. The on the remote to highlight Auto Power Off and press OK. To set period of time after which you to manually change the picture mode: • Standard mode sets the various picture settings to values that produce a brighter, more vivid picture. •...menu is being displayed on the remote to highlight the period of time. 5 Activating the Sleep Timer Adjusting the Picture Settings When activated, the TV's sleep timer will produce the best picture in a dark room. • Game mode optimizes the picture settings for displaying game console output....
...in the most cases. The on the remote to highlight Auto Power Off and press OK. To set period of time after which you to manually change the picture mode: • Standard mode sets the various picture settings to values that produce a brighter, more vivid picture. •...menu is being displayed on the remote to highlight the period of time. 5 Activating the Sleep Timer Adjusting the Picture Settings When activated, the TV's sleep timer will produce the best picture in a dark room. • Game mode optimizes the picture settings for displaying game console output....
E240AR User Manual
Page 40
...CEC. Highlight Time Zone and press OK. To enable, disable, or adjust CEC settings: 1. Highlight your ZIP code using the TV's remote control. • Device Discovery - Adjusting the CEC Settings The CEC function on the remote, then press OK. 8. ... when you to determine if your device is on -screen menu is displayed. 2. See your TV enables you press the INFO button, set the TV's time zone: 1. When system audio control is connected and supports CEC. 5. Use this function... you can control your device's audio using the keypad on your device's user manual for details.
...CEC. Highlight Time Zone and press OK. To enable, disable, or adjust CEC settings: 1. Highlight your ZIP code using the TV's remote control. • Device Discovery - Adjusting the CEC Settings The CEC function on the remote, then press OK. 8. ... when you to determine if your device is on -screen menu is displayed. 2. See your TV enables you press the INFO button, set the TV's time zone: 1. When system audio control is connected and supports CEC. 5. Use this function... you can control your device's audio using the keypad on your device's user manual for details.
E240AR User Manual
Page 47
... off. • Check the audio settings. See Adjusting the Audio Settings on the TV don't look right. • Adjust the Color and Tint settings in the Picture menu. Ensure your device's user manual for the best signal. The colors on page 24. The power is on, but there is connected securely to... the TV and move the antenna around the room or close to a window for details. • Adjust...
... off. • Check the audio settings. See Adjusting the Audio Settings on the TV don't look right. • Adjust the Color and Tint settings in the Picture menu. Ensure your device's user manual for the best signal. The colors on page 24. The power is on, but there is connected securely to... the TV and move the antenna around the room or close to a window for details. • Adjust...
E320AR Quick Start Guide
Page 4
... or off or on. Arrow Navigate the on -screen menu. V Button Open the USB media TV. Menu Display the on -screen menu. Channel Up/Down Change the channel. Dash Use with number pad to the previous on -screen menu. using the ... currently-displayed input. Volume Up/Down Increase or decrease loudness of the audio. Guide Display the info window. Mute Turn the audio off . Number Pad Manually enter a channel. Exit Close the on -screen menu. Info Display the info window. Closed Captions Open the closed caption menu. Back Go to...
... or off or on. Arrow Navigate the on -screen menu. V Button Open the USB media TV. Menu Display the on -screen menu. Channel Up/Down Change the channel. Dash Use with number pad to the previous on -screen menu. using the ... currently-displayed input. Volume Up/Down Increase or decrease loudness of the audio. Guide Display the info window. Mute Turn the audio off . Number Pad Manually enter a channel. Exit Close the on -screen menu. Info Display the info window. Closed Captions Open the closed caption menu. Back Go to...


