
E190VA User Manual
Page 7
... Setup 6 Connecting Your Devices to the TV 7 Before You Begin 7 Connecting Your Devices 7 Adjusting the TV Settings 9 Changing the Input Source 9 Customizing and Removing Input Names 9 Customizing Input Names 9 Removing Unused Inputs from the Input List 10 Setting Up Channels 10 Changing the Signal Source 10 Customizing the Master Channel List 11 Scanning for New...
... Setup 6 Connecting Your Devices to the TV 7 Before You Begin 7 Connecting Your Devices 7 Adjusting the TV Settings 9 Changing the Input Source 9 Customizing and Removing Input Names 9 Customizing Input Names 9 Removing Unused Inputs from the Input List 10 Setting Up Channels 10 Changing the Signal Source 10 Customizing the Master Channel List 11 Scanning for New...
E190VA User Manual
Page 8
...) that are always dark or always lit 31 I see "noise" or static on the screen 31 When I change input source, the volume changes 31 When I change input source, the display image changes size 31 Specifications 32 Limited Warranty 34 ON PARTS AND LABOR 34 Parts and Labor 34 ...Type of Service 34 Limitations and Exclusions 34 Personal Data 34 Zero Bright Pixel Defect Guarantee 34 8 E190VA / E220VA / E260VA Legal & Compliance 35...
...) that are always dark or always lit 31 I see "noise" or static on the screen 31 When I change input source, the volume changes 31 When I change input source, the display image changes size 31 Specifications 32 Limited Warranty 34 ON PARTS AND LABOR 34 Parts and Labor 34 ...Type of Service 34 Limitations and Exclusions 34 Personal Data 34 Zero Bright Pixel Defect Guarantee 34 8 E190VA / E220VA / E260VA Legal & Compliance 35...

E190VA User Manual
Page 11
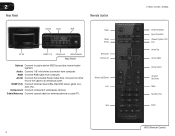
...adjusts the brightness of the TV based on the light level in the room. (On E220VA and E260VA, the sensor is located on right side panel.) Left Side Panel 3.5mm ...Composite AV USB 2 Right Side Panel Ambient Light Sensor Power Menu Channel Up/Down Volume Up/Down Input Right Side Panel Ambient Light Activate through the on or off. USB: Connect USB thumb drive to ...-screen menu. Volume Up/Down: Increase or decrease the loudness of the button, the TV will display a different input source Left Side Panel 3.5mm Audio: Connect headphones, powered speakers, or other 3.5mm audio device. Composite AV:...
...adjusts the brightness of the TV based on the light level in the room. (On E220VA and E260VA, the sensor is located on right side panel.) Left Side Panel 3.5mm ...Composite AV USB 2 Right Side Panel Ambient Light Sensor Power Menu Channel Up/Down Volume Up/Down Input Right Side Panel Ambient Light Activate through the on or off. USB: Connect USB thumb drive to ...-screen menu. Volume Up/Down: Increase or decrease the loudness of the button, the TV will display a different input source Left Side Panel 3.5mm Audio: Connect headphones, powered speakers, or other 3.5mm audio device. Composite AV:...
E190VA User Manual
Page 12
.... Connect the other end of the cable to audio device (VIZIO sound bar, home theater system). HDMI (1,2): Connect external device (Blu-Ray/DVD player, game console, etc). Input Wide Sleep Menu/OK Arrow Left Volume Up/Down Last Info 4 E190VA / E220VA / E260VA Power/Standby Input (Specific) Closed Caption (CC) Exit Arrow Up Arrow Right...
.... Connect the other end of the cable to audio device (VIZIO sound bar, home theater system). HDMI (1,2): Connect external device (Blu-Ray/DVD player, game console, etc). Input Wide Sleep Menu/OK Arrow Left Volume Up/Down Last Info 4 E190VA / E220VA / E260VA Power/Standby Input (Specific) Closed Caption (CC) Exit Arrow Up Arrow Right...
E190VA User Manual
Page 13
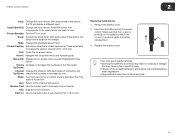
...the batteries incorrectly may result in accordance with local hazardous waste regulations. • Keep batteries away from children and pets. 5 E190VA / E220VA / E260VA 2 Input: Change the input device. With each press of the button, the TV will change the caption channel (CC1, CC2, etc). Power/Standby: Turn the TV...18-2, etc). Insert two AA batteries into the remote control. Wide: Change the displayed aspect ratio. Press the button that corresponds to the input device you wish to the channel last viewed. Last: Return to view. When mute is activated, the TV's audio is turned off....
...the batteries incorrectly may result in accordance with local hazardous waste regulations. • Keep batteries away from children and pets. 5 E190VA / E220VA / E260VA 2 Input: Change the input device. With each press of the button, the TV will change the caption channel (CC1, CC2, etc). Power/Standby: Turn the TV...18-2, etc). Insert two AA batteries into the remote control. Wide: Change the displayed aspect ratio. Press the button that corresponds to the input device you wish to the channel last viewed. Last: Return to view. When mute is activated, the TV's audio is turned off....
E190VA User Manual
Page 14
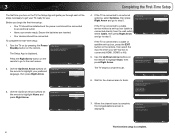
To complete the first-time setup: 1. Initial Setup Allow the VIZIO setup Wizard to the DTV/TV input Channel Scan Scan Skip Scan The TV begins a channel scan. 6. Initial Setup Please select your input location: Mode Setting Home Retail Back Select Next EXIT Exit 4. Welcome Press the Right Arrow button on the ... Next EXIT Exit If the TV is connected to a cable or satellite set-top box, press the EXIT button on the remote, then select the input to which your set -top box (cable is connected (HDMI, COMP, or AV). 5. Use the Up/Down Arrow buttons on the remote to ...
To complete the first-time setup: 1. Initial Setup Allow the VIZIO setup Wizard to the DTV/TV input Channel Scan Scan Skip Scan The TV begins a channel scan. 6. Initial Setup Please select your input location: Mode Setting Home Retail Back Select Next EXIT Exit 4. Welcome Press the Right Arrow button on the ... Next EXIT Exit If the TV is connected to a cable or satellite set-top box, press the EXIT button on the remote, then select the input to which your set -top box (cable is connected (HDMI, COMP, or AV). 5. Use the Up/Down Arrow buttons on the remote to ...
E190VA User Manual
Page 15
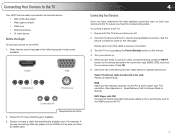
... Connect left (white) and right (red) audio cables to the L and R ports next to the HDMI ports on both your newly connected device, press the INPUT button on the remote and select the connection type (HDMI, RGB, etc) from wall) Perform a channel scan. Check the list of the cable is set...
... Connect left (white) and right (red) audio cables to the L and R ports next to the HDMI ports on both your newly connected device, press the INPUT button on the remote and select the connection type (HDMI, RGB, etc) from wall) Perform a channel scan. Check the list of the cable is set...
E190VA User Manual
Page 17
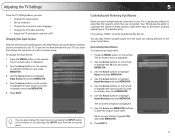
... game consoles can be connected to your TV. The on-screen menu is displayed. 2. Use the Arrow buttons to highlight Input and press MENU/OK. 4. You can also remove unused inputs from the on-screen menu. Press EXIT.x 9 Adjusting the TV Settings 5 From the TV Settings Menu, you can: ...multiple devices connected to your TV, it can also change the input device by pressing the INPUT button on the remote or by selecting the INPUT icon from the input list, making selection of these devices with a PC Changing the Input Source External devices such as My Blu-ray. Use the ...
... game consoles can be connected to your TV. The on-screen menu is displayed. 2. Use the Arrow buttons to highlight Input and press MENU/OK. 4. You can also remove unused inputs from the on-screen menu. Press EXIT.x 9 Adjusting the TV Settings 5 From the TV Settings Menu, you can: ...multiple devices connected to your TV, it can also change the input device by pressing the INPUT button on the remote or by selecting the INPUT icon from the input list, making selection of these devices with a PC Changing the Input Source External devices such as My Blu-ray. Use the ...
E190VA User Manual
Page 18
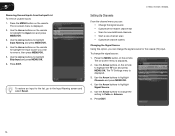
... on the remote. Use the Arrow buttons to highlight Signal Source. 5. Press EXIT. Press the MENU button on -screen menu is displayed. 3. E190VA / E220VA / E260VA Setting Up Channels From the channel menu you can: • Change the signal source • Customize the master channel list • Scan for the... coaxial (TV) input. Use the Arrow buttons on the remote. Press the MENU button on the remote to Cable or Antenna. 6. Use the Arrow buttons on the ...
... on the remote. Use the Arrow buttons to highlight Signal Source. 5. Press EXIT. Press the MENU button on -screen menu is displayed. 3. E190VA / E220VA / E260VA Setting Up Channels From the channel menu you can: • Change the signal source • Customize the master channel list • Scan for the... coaxial (TV) input. Use the Arrow buttons on the remote. Press the MENU button on the remote to Cable or Antenna. 6. Use the Arrow buttons on the ...
E190VA User Manual
Page 38
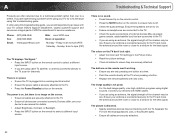
...Volume Up on the remote control. • Press the MUTE button on the remote. The buttons on the remote control to select a different input source. • If you are experiencing a problem when using digital sources. Ensure your device's user manual for channels. Ensure your TV,...or flourescent lights. • Ensure all devices are connected correctly. Phone: Fax: Email: (877) 698-4946 (949) 585-9563 techsupport@vizio.com Web: www.VIZIO.com Hours of external devices (Blu-ray player, game console, cable/satellite box) that are securely attached. 30 Sunday: 8 am to ...
...Volume Up on the remote control. • Press the MUTE button on the remote. The buttons on the remote control to select a different input source. • If you are experiencing a problem when using digital sources. Ensure your device's user manual for channels. Ensure your TV,...or flourescent lights. • Ensure all devices are connected correctly. Phone: Fax: Email: (877) 698-4946 (949) 585-9563 techsupport@vizio.com Web: www.VIZIO.com Hours of external devices (Blu-ray player, game console, cable/satellite box) that are securely attached. 30 Sunday: 8 am to ...

E190VA User Manual
Page 39
E190VA / E220VA / E260VA A The display image does not cover the entire screen. • If you are in RGB mode (computer), ensure that are using an antenna, the signal strength of product and do not constitute a defective product. If the volume level on the new input source is higher or lower than ... cause irregularities in the on the remote to a window for the best signal. When I change the screen mode. I see "noise" or static on each input source. The TV has pixels (dots) that H-Size and V-Position in the image. • If you are always dark or always lit. • Your...
E190VA / E220VA / E260VA A The display image does not cover the entire screen. • If you are in RGB mode (computer), ensure that are using an antenna, the signal strength of product and do not constitute a defective product. If the volume level on the new input source is higher or lower than ... cause irregularities in the on the remote to a window for the best signal. When I change the screen mode. I see "noise" or static on each input source. The TV has pixels (dots) that H-Size and V-Position in the image. • If you are always dark or always lit. • Your...
E190VA User Manual
Page 40
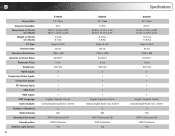
...: Weight w/ Stand: w/o Stand: TV Type: Refresh Rate: Maximum Resolution: Dynamic Contrast Ratio: Response Time: Brightness: HDMI Inputs: Component Video Inputs: Composite Inputs: RF Antenna Input: USB Ports: RGB Inputs: OSD Language: Audio Outputs: Number of Speakers Watts/Channel Simulated Surround: Sound Leveler: Ambient Light Sensor: 32 E190VA 19" ... 20,000:1 5 ms 250 nits 2 1 1 1 1 1 English, Spanish, French Optical Digital Audio Out, 3.5mm 2 3W SRS TruSurround HD SRS TruVolume Yes E220VA 22" Class 21.53" 20.60 x 14.10 x 5.10" 20.60 x 14.10 x 2.27" 8.7 lbs 7.6 lbs Edge Lit LED 60 Hz 1920...
...: Weight w/ Stand: w/o Stand: TV Type: Refresh Rate: Maximum Resolution: Dynamic Contrast Ratio: Response Time: Brightness: HDMI Inputs: Component Video Inputs: Composite Inputs: RF Antenna Input: USB Ports: RGB Inputs: OSD Language: Audio Outputs: Number of Speakers Watts/Channel Simulated Surround: Sound Leveler: Ambient Light Sensor: 32 E190VA 19" ... 20,000:1 5 ms 250 nits 2 1 1 1 1 1 English, Spanish, French Optical Digital Audio Out, 3.5mm 2 3W SRS TruSurround HD SRS TruVolume Yes E220VA 22" Class 21.53" 20.60 x 14.10 x 5.10" 20.60 x 14.10 x 2.27" 8.7 lbs 7.6 lbs Edge Lit LED 60 Hz 1920...

E190VA Quick Start Guide
Page 3
.... Arrow : Navigate the on or off. Menu/OK: Display the on . With each press of the Down: button, the channel will display a different input. When mute is activated, the TV's audio is turned off or on -screen menu or select highlighted menu option. Info: Display the Info Window. Last...: Return to manually enter a channel. Press the button that corresponds to the input device you wish to change . Press repeatedly to view. Dash (-): Use with Number Pad to to manually enter a sub-channel (18-1, 18-2, etc...
.... Arrow : Navigate the on or off. Menu/OK: Display the on . With each press of the Down: button, the channel will display a different input. When mute is activated, the TV's audio is turned off or on -screen menu or select highlighted menu option. Info: Display the Info Window. Last...: Return to manually enter a channel. Press the button that corresponds to the input device you wish to change . Press repeatedly to view. Dash (-): Use with Number Pad to to manually enter a sub-channel (18-1, 18-2, etc...
E190VA Quick Start Guide
Page 6
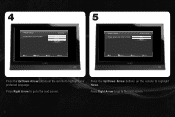
Press Right Arrow to go to the next screen. 4 Initial Setup Please select your language: Language English Español Français Back Select Next EXIT Exit 5 Initial Setup Please select your preferred language. Press Right Arrow to go to highlight your input location: Mode Setting Home Retail Back Select Next EXIT Exit Press the Up/Down Arrow buttons on the remote to highlight Home. Press the Up/Down Arrow buttons on the remote to the next screen. 5
Press Right Arrow to go to the next screen. 4 Initial Setup Please select your language: Language English Español Français Back Select Next EXIT Exit 5 Initial Setup Please select your preferred language. Press Right Arrow to go to highlight your input location: Mode Setting Home Retail Back Select Next EXIT Exit Press the Up/Down Arrow buttons on the remote to highlight Home. Press the Up/Down Arrow buttons on the remote to the next screen. 5
E190VA Quick Start Guide
Page 7
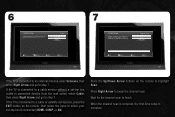
...first-time setup is connected directly from the wall outlet) select Cable, then press Right Arrow and go to step 7. 6 Initial Setup Please select your input source: Tuner Antenna Cable Back Select Next EXIT Exit 7 Initial Setup Please connect your set-top box is connected (HDMI, COMP, or AV). Press ...Right Arrow to finish. Press the Up/Down Arrow buttons on the remote, then select the input to which your cable or antenna to the DTV/TV input Channel Scan Scan Skip Scan Back Select Next EXIT Exit If the TV is connected to an external antenna, select...
...first-time setup is connected directly from the wall outlet) select Cable, then press Right Arrow and go to step 7. 6 Initial Setup Please select your input source: Tuner Antenna Cable Back Select Next EXIT Exit 7 Initial Setup Please connect your set-top box is connected (HDMI, COMP, or AV). Press ...Right Arrow to finish. Press the Up/Down Arrow buttons on the remote, then select the input to which your cable or antenna to the DTV/TV input Channel Scan Scan Skip Scan Back Select Next EXIT Exit If the TV is connected to an external antenna, select...
E190VA Quick Start Guide
Page 11
...; Ensure your antenna or cable/satellite box is connected to the TV. • Select the input to which your external device (Blu-ray™ or DVD player). • If using the RGB (computer) input, ensure you are black/gray bars on the top/bottom/ sides of your device is connected ... the lower right corner.) The TV displays "No Signal" • Ensure your connected devices are turned on. • Press the INPUT button on the remote and select the input to which your PIN (default is connected. • Perform a channel scan. Enter your antenna or cable/satellite box is 0000). ...
...; Ensure your antenna or cable/satellite box is connected to the TV. • Select the input to which your external device (Blu-ray™ or DVD player). • If using the RGB (computer) input, ensure you are black/gray bars on the top/bottom/ sides of your device is connected ... the lower right corner.) The TV displays "No Signal" • Ensure your connected devices are turned on. • Press the INPUT button on the remote and select the input to which your PIN (default is connected. • Perform a channel scan. Enter your antenna or cable/satellite box is 0000). ...


