
E190VA User Manual
Page 4
..., and the point where they exit from overheating, be sure these openings are not blocked or covered. This may be maintained between your TV. Wait before connecting other apparatus (including amplifiers) that may compromise the integrity of the polarized or grounding-type plug. This is designed and... apparatus near any way, such as when the power-supply cord or plug is always flowing into the apparatus, the apparatus has been exposed 4 E190VA / E220VA / E260VA to smoke or moisture may result in any heat sources such as a radiator, heater, oven, amplifier etc. This plug ...
..., and the point where they exit from overheating, be sure these openings are not blocked or covered. This may be maintained between your TV. Wait before connecting other apparatus (including amplifiers) that may compromise the integrity of the polarized or grounding-type plug. This is designed and... apparatus near any way, such as when the power-supply cord or plug is always flowing into the apparatus, the apparatus has been exposed 4 E190VA / E220VA / E260VA to smoke or moisture may result in any heat sources such as a radiator, heater, oven, amplifier etc. This plug ...
E190VA User Manual
Page 5
..., the disconnect device shall remain readily operable. • CAUTION - These servicing instructions are for repair. If water penetrates into your TV, hold the AC/DC power adapter, not the cord. If any abnormality occurs. Unplug the power cord immediately and contact your dealer...your TV changes substantially. • This apparatus shall not be placed on the power cord may cause fire or electric shock. • Follow instructions for an extended period of time, unplug the power cord. • To reduce risk of the following occurs, contact the dealer: - E190VA / ...
..., the disconnect device shall remain readily operable. • CAUTION - These servicing instructions are for repair. If water penetrates into your TV, hold the AC/DC power adapter, not the cord. If any abnormality occurs. Unplug the power cord immediately and contact your dealer...your TV changes substantially. • This apparatus shall not be placed on the power cord may cause fire or electric shock. • Follow instructions for an extended period of time, unplug the power cord. • To reduce risk of the following occurs, contact the dealer: - E190VA / ...
E190VA User Manual
Page 6
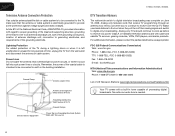
... unit, size of the grounding conductors, location of antenna discharge unit, connection to grounding electrodes, and requirements of time, unplug the TV from the wall outlet and disconnect the antenna or cable system. No extra converter box is left unattended or unused for long periods ...of the grounding electrode. E190VA / E220VA / E260VA Television Antenna Connection Protection If an outside antenna/satellite dish or cable system is to be connected to earth in ...
... unit, size of the grounding conductors, location of antenna discharge unit, connection to grounding electrodes, and requirements of time, unplug the TV from the wall outlet and disconnect the antenna or cable system. No extra converter box is left unattended or unused for long periods ...of the grounding electrode. E190VA / E220VA / E260VA Television Antenna Connection Protection If an outside antenna/satellite dish or cable system is to be connected to earth in ...
E190VA User Manual
Page 7
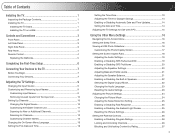
... 11 Scanning for New or Additional Channels 11 Scanning for Channels 12 Customizing Channel Names 12 Changing the On-Screen Menu Language 13 Setting the TV's Date and Time 13 Setting the Time Zone 13 Adjusting the Time for Daylight Savings 14 Enabling or Disabling Automatic Date and Time ...Updates 14 Setting the Date and Time 14 Adjusting the TV Settings for Use with A PC 15 Using the Other Menu Settings 16 Navigating the On-Screen Menu 16 Setting the Sleep Timer 16 Viewing a ...
... 11 Scanning for New or Additional Channels 11 Scanning for Channels 12 Customizing Channel Names 12 Changing the On-Screen Menu Language 13 Setting the TV's Date and Time 13 Setting the Time Zone 13 Adjusting the Time for Daylight Savings 14 Enabling or Disabling Automatic Date and Time ...Updates 14 Setting the Date and Time 14 Adjusting the TV Settings for Use with A PC 15 Using the Other Menu Settings 16 Navigating the On-Screen Menu 16 Setting the Sleep Timer 16 Viewing a ...
E190VA User Manual
Page 8
...Control Passcode 27 Resetting the Content Locks 27 Viewing System Info and Resetting to Factory Defaults 28 Displaying System Information 28 Restoring the TV to the Factory Default Settingss 28 Restarting the Setup App 28 Setting Up Closed Captioning 29 Changing the Appearance of Digital Closed Captions... 34 Parts and Labor 34 Type of Service 34 Limitations and Exclusions 34 Personal Data 34 Zero Bright Pixel Defect Guarantee 34 8 E190VA / E220VA / E260VA Legal & Compliance 35 FCC Class B Radio Interference Statement 35 Notice...35 FCC warning 35 Caution 35 Open Source Software ...
...Control Passcode 27 Resetting the Content Locks 27 Viewing System Info and Resetting to Factory Defaults 28 Displaying System Information 28 Restoring the TV to the Factory Default Settingss 28 Restarting the Setup App 28 Setting Up Closed Captioning 29 Changing the Appearance of Digital Closed Captions... 34 Parts and Labor 34 Type of Service 34 Limitations and Exclusions 34 Personal Data 34 Zero Bright Pixel Defect Guarantee 34 8 E190VA / E220VA / E260VA Legal & Compliance 35 FCC Class B Radio Interference Statement 35 Notice...35 FCC warning 35 Caution 35 Open Source Software ...
E190VA User Manual
Page 9
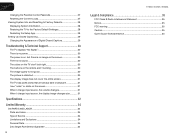
...keep it from the box and inspecting the package contents you have completed your new TV, take a moment to reattach the base. To prevent scratches or damage to ensure nothing is not properly secured VIZIO Razor LED LCD HDTV with Stand User Manual and Quick Start Guide Remote Control with... Batteries Your TV comes in two ways: • On a flat surface, using the included stand • On a...
...keep it from the box and inspecting the package contents you have completed your new TV, take a moment to reattach the base. To prevent scratches or damage to ensure nothing is not properly secured VIZIO Razor LED LCD HDTV with Stand User Manual and Quick Start Guide Remote Control with... Batteries Your TV comes in two ways: • On a flat surface, using the included stand • On a...
E190VA User Manual
Page 10
... correct mount for the weight of the TV. After you can scratch or damage the TV. Pull up on the locking clip, then release it away from the TV. 4. E190VA / E220VA / E260VA Be sure the mount you have determined that came with your TV and wall mount to the wall, carefully...leave 1" of space between the back of this TV. 2 Installing the TV on a Wall To mount your TV model: Screw Size: Screw Length: Screw Pitch: Hole Pattern: E190VA M4 10mm 0.7mm 75mm x 75mm E220VA M4 10mm 0.7mm 75mm x 75mm E260VA M4 10mm 0.7mm 100mm x 100mm Installing a TV on a wall, you . 3. Use only...
... correct mount for the weight of the TV. After you can scratch or damage the TV. Pull up on the locking clip, then release it away from the TV. 4. E190VA / E220VA / E260VA Be sure the mount you have determined that came with your TV and wall mount to the wall, carefully...leave 1" of space between the back of this TV. 2 Installing the TV on a Wall To mount your TV model: Screw Size: Screw Length: Screw Pitch: Hole Pattern: E190VA M4 10mm 0.7mm 75mm x 75mm E220VA M4 10mm 0.7mm 75mm x 75mm E260VA M4 10mm 0.7mm 100mm x 100mm Installing a TV on a wall, you . 3. Use only...

E190VA User Manual
Page 11
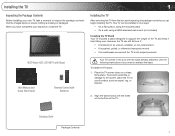
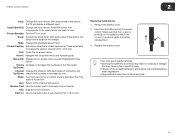
...Front Panel Remote Control When using the remote, point it directly at this sensor. With each press of the TVs audio. Volume Up/Down: Increase or decrease the loudness of the button, the TV will display a different input source Left Side Panel 3.5mm Audio: Connect headphones, powered speakers, or other 3.5mm... audio device. Menu: Display on or off. Channel Up/Down: Change the channel. Sensor: (For E190VA, sensor is on the front of the TV based on the light level in the room. (On E220VA and E260VA, the sensor is located on right side panel.) Left Side...
...Front Panel Remote Control When using the remote, point it directly at this sensor. With each press of the TVs audio. Volume Up/Down: Increase or decrease the loudness of the button, the TV will display a different input source Left Side Panel 3.5mm Audio: Connect headphones, powered speakers, or other 3.5mm... audio device. Menu: Display on or off. Channel Up/Down: Change the channel. Sensor: (For E190VA, sensor is on the front of the TV based on the light level in the room. (On E220VA and E260VA, the sensor is located on right side panel.) Left Side...
E190VA User Manual
Page 12
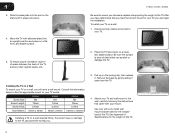
AC IN: Connect the included Power Cable here. Connect the other end of the cable to audio device (VIZIO sound bar, home theater system). RGB: Connect RGB cable from computer. Component: Connect component video/audio devices. Audio: Connect 1/8" mini stereo connector... from computer. Cable/Antenna: Connect coaxial cable for external antenna or cable TV. Input Wide Sleep Menu/OK Arrow Left Volume Up/Down Last Info 4 E190VA / E220VA / E260VA Power/Standby Input (Specific) Closed Caption (CC) Exit Arrow Up Arrow Right Arrow Down ...
AC IN: Connect the included Power Cable here. Connect the other end of the cable to audio device (VIZIO sound bar, home theater system). RGB: Connect RGB cable from computer. Component: Connect component video/audio devices. Audio: Connect 1/8" mini stereo connector... from computer. Cable/Antenna: Connect coaxial cable for external antenna or cable TV. Input Wide Sleep Menu/OK Arrow Left Volume Up/Down Last Info 4 E190VA / E220VA / E260VA Power/Standby Input (Specific) Closed Caption (CC) Exit Arrow Up Arrow Right Arrow Down ...
E190VA User Manual
Page 13
...-screen menu and episode guide. Remove the battery cover. 2. E190VA / E220VA / E260VA 2 Input: Change the input device. Volume Increase or decrease the loudness of old or dead batteries in injury. • Dispose of the TV's audio. Last: Return to manually enter a channel. Number...result in accordance with local hazardous waste regulations. • Keep batteries away from children and pets. 5 Power/Standby: Turn the TV on -screen menu or select highlighted menu option. Closed Caption: Activate or deactivate closed captioning. Info: Display the Info Window. When...
...-screen menu and episode guide. Remove the battery cover. 2. E190VA / E220VA / E260VA 2 Input: Change the input device. Volume Increase or decrease the loudness of old or dead batteries in injury. • Dispose of the TV's audio. Last: Return to manually enter a channel. Number...result in accordance with local hazardous waste regulations. • Keep batteries away from children and pets. 5 Power/Standby: Turn the TV on -screen menu or select highlighted menu option. Closed Caption: Activate or deactivate closed captioning. Info: Display the Info Window. When...
E190VA User Manual
Page 14
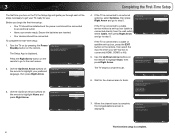
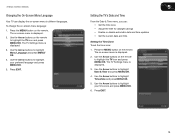
...input location: Mode Setting Home Retail Back Select Next EXIT Exit 4. Analog Channels: 0 Digital Channels: 4 Channel Scan 7. Initial Setup Allow the VIZIO setup Wizard to the next screen. Use the Up/Down Arrow buttons on the remote to step 5. Initial Setup Please select your input source:...on the remote to an electrical outlet. • Have your remote ready. Before you begin the first-time setup: • Your TV should be installed and the power cord should be connected to highlight Scan, then press Right Arrow. Back Select Next EXIT Exit Initial ...
...input location: Mode Setting Home Retail Back Select Next EXIT Exit 4. Analog Channels: 0 Digital Channels: 4 Channel Scan 7. Initial Setup Allow the VIZIO setup Wizard to the next screen. Use the Up/Down Arrow buttons on the remote to step 5. Initial Setup Please select your input source:...on the remote to an electrical outlet. • Have your remote ready. Before you begin the first-time setup: • Your TV should be installed and the power cord should be connected to highlight Scan, then press Right Arrow. Back Select Next EXIT Exit Initial ...
E190VA User Manual
Page 15
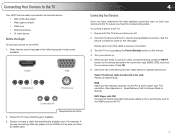
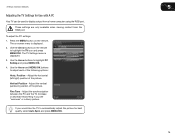
... and select the connection type (HDMI, RGB, etc) from wall) Perform a channel scan. When you are off. 2. Connecting Your Devices to the TV Your HDTV can be sure you have an HDMI cable. 4 Connecting Your Devices Once you have determined the best available connection type on the next... a cable that the device has one of the following types of devices/connection types below for special instructions: Cable TV (without cable box/directly from the on the TV. 7 Turn the TV on by pressing the Power/Standby button on . 5. Check the list of video ports available: HDMI RGB Component...
... and select the connection type (HDMI, RGB, etc) from wall) Perform a channel scan. When you are off. 2. Connecting Your Devices to the TV Your HDTV can be sure you have an HDMI cable. 4 Connecting Your Devices Once you have determined the best available connection type on the next... a cable that the device has one of the following types of devices/connection types below for special instructions: Cable TV (without cable box/directly from the on the TV. 7 Turn the TV on by pressing the Power/Standby button on . 5. Check the list of video ports available: HDMI RGB Component...
E190VA User Manual
Page 16
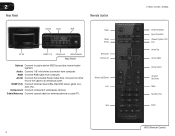
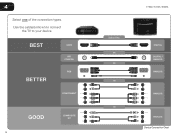
4 Select one of the connection types. BEST BETTER HDMI RF/ COAXIAL RGB COMPONENT GOOD COMPOSITE AV 8 E190VA / E220VA / E260VA Select One: OR OR OR OR DIGITAL DIGITAL / ANALOG ANALOG ANALOG ANALOG Device Connection Chart Use the cable(s) shown to connect the TV to your device.
4 Select one of the connection types. BEST BETTER HDMI RF/ COAXIAL RGB COMPONENT GOOD COMPOSITE AV 8 E190VA / E220VA / E260VA Select One: OR OR OR OR DIGITAL DIGITAL / ANALOG ANALOG ANALOG ANALOG Device Connection Chart Use the cable(s) shown to connect the TV to your device.
E190VA User Manual
Page 17
... Input Names To customize an input name: 1. Use the Arrow buttons on -screen keyboard is displayed. 2. Use the Arrow buttons to your TV, it can also remove unused inputs from the on the remote or by pressing the INPUT button on -screen menu. Use the Arrow buttons on... -screen menu is displayed. 2. The on the remote to highlight the input source you wish to highlight the TV icon and press MENU/OK. 3. Press EXIT.x 9 When you have a 10-character limit.) For example, HDMI 1 could be connected to highlight Input...
... Input Names To customize an input name: 1. Use the Arrow buttons on -screen keyboard is displayed. 2. Use the Arrow buttons to your TV, it can also remove unused inputs from the on the remote or by pressing the INPUT button on -screen menu. Use the Arrow buttons on... -screen menu is displayed. 2. The on the remote to highlight the input source you wish to highlight the TV icon and press MENU/OK. 3. Press EXIT.x 9 When you have a 10-character limit.) For example, HDMI 1 could be connected to highlight Input...
E190VA User Manual
Page 18
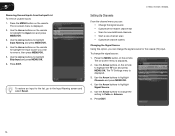
... channels • Start a new channel scan • Customize channel names Changing the Signal Source Using this option, you wish to highlight the TV icon and press MENU/OK. Use the Arrow buttons to change the setting to highlight Signal Source. 5. Press EXIT. 10 The on-screen ...menu is displayed. 3. Use the Arrow buttons to Cable or Antenna. 6. Use the Arrow buttons on the remote. E190VA / E220VA / E260VA Setting Up Channels From the channel menu you can change the signal source: 1. Press EXIT. Press the MENU button on the remote...
... channels • Start a new channel scan • Customize channel names Changing the Signal Source Using this option, you wish to highlight the TV icon and press MENU/OK. Use the Arrow buttons to change the setting to highlight Signal Source. 5. Press EXIT. 10 The on-screen ...menu is displayed. 3. Use the Arrow buttons to Cable or Antenna. 6. Use the Arrow buttons on the remote. E190VA / E220VA / E260VA Setting Up Channels From the channel menu you can change the signal source: 1. Press EXIT. Press the MENU button on the remote...
E190VA User Manual
Page 19
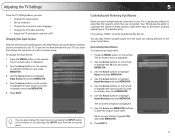
...2. To remove a channel from the list, highlight Unmark All and press MENU/OK. This is displayed. 3. To scan for Channels on the remote. E190VA / E220VA / E260VA 5 Customizing the Master Channel List By customizing the master channel list, you can be displayed. 1. Use the Arrow buttons on -screen... menu is displayed. 3. The TV Settings menu is useful because your area, you do not have to rescan all available channels from the list, highlight the channel and press ...
...2. To remove a channel from the list, highlight Unmark All and press MENU/OK. This is displayed. 3. To scan for Channels on the remote. E190VA / E220VA / E260VA 5 Customizing the Master Channel List By customizing the master channel list, you can be displayed. 1. Use the Arrow buttons on -screen... menu is displayed. 3. The TV Settings menu is useful because your area, you do not have to rescan all available channels from the list, highlight the channel and press ...
E190VA User Manual
Page 20
... to identify. (Custom names have a 10-character limit.) For example, KBOT-DT could be necessary when the TV has been moved to an area where different free-to highlight the TV icon and press MENU/OK. The channel scan begins. 6. Press EXIT. 12 A channel scan may also be... Channel Name Edit and press MENU/ OK. 5. Use the Arrow buttons on the remote to highlight Channels and press MENU/OK. 4. 5 E190VA / E220VA / E260VA Scanning for Channels Before the TV can detect and display channels and their associated information, you must scan for channels: 1. To customize a channel name: 1.
... to identify. (Custom names have a 10-character limit.) For example, KBOT-DT could be necessary when the TV has been moved to an area where different free-to highlight the TV icon and press MENU/OK. The channel scan begins. 6. Press EXIT. 12 A channel scan may also be... Channel Name Edit and press MENU/ OK. 5. Use the Arrow buttons on the remote to highlight Channels and press MENU/OK. 4. 5 E190VA / E220VA / E260VA Scanning for Channels Before the TV can detect and display channels and their associated information, you must scan for channels: 1. To customize a channel name: 1.
E190VA User Manual
Page 21
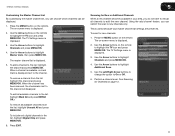
... Menu Language and press MENU/ OK. 4. Use the Arrow buttons on the remote. The TV Settings menu is displayed. 3. Use the Arrow buttons to highlight Date & Time and press MENU/OK. 4. The TV Settings menu is displayed. 3. Use the Arrow buttons to highlight your time zone and press ...screen menu in different languages. Use the Arrow buttons to highlight Time Zone and press MENU/OK. 5. Press EXIT. 13 E190VA / E220VA / E260VA Changing the On-Screen Menu Language Your TV can : • Set the time zone • Adjust the time for daylight savings • Enable or disable automatic date...
... Menu Language and press MENU/ OK. 4. Use the Arrow buttons on the remote. The TV Settings menu is displayed. 3. Use the Arrow buttons to highlight Date & Time and press MENU/OK. 4. The TV Settings menu is displayed. 3. Use the Arrow buttons to highlight your time zone and press ...screen menu in different languages. Use the Arrow buttons to highlight Time Zone and press MENU/OK. 5. Press EXIT. 13 E190VA / E220VA / E260VA Changing the On-Screen Menu Language Your TV can : • Set the time zone • Adjust the time for daylight savings • Enable or disable automatic date...

E190VA User Manual
Page 22
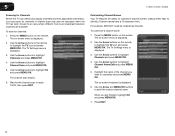
...Arrow buttons on -screen menu is displayed. 3. The on the remote to highlight individual numbers in many areas. The TV Settings menu is displayed. 2. 5 E190VA / E220VA / E260VA Adjusting the Time for Daylight Savings This setting will automatically adjust the time for zones which recognize ...daylight savings time. Use the Arrow buttons to highlight the TV icon and press MENU/OK. When this setting is ...
...Arrow buttons on -screen menu is displayed. 3. The on the remote to highlight individual numbers in many areas. The TV Settings menu is displayed. 2. 5 E190VA / E220VA / E260VA Adjusting the Time for Daylight Savings This setting will automatically adjust the time for zones which recognize ...daylight savings time. Use the Arrow buttons to highlight the TV icon and press MENU/OK. When this setting is ...
E190VA User Manual
Page 23
...highlight the TV icon and press MENU/OK. Use the Arrow and MENU/OK buttons to display output from the RGB port. Increase or decrease this setting if you would like the TV to automatically... adjust the picture for Use with A PC Your TV can be used to adjust each of the picture. The...- Adjust the horizontal (left/right) position of the picture. Adjust the synchronization between the PC and the TV. These settings are only available when viewing content from a home computer using the RGB port. Use the ...
...highlight the TV icon and press MENU/OK. Use the Arrow and MENU/OK buttons to display output from the RGB port. Increase or decrease this setting if you would like the TV to automatically... adjust the picture for Use with A PC Your TV can be used to adjust each of the picture. The...- Adjust the horizontal (left/right) position of the picture. Adjust the synchronization between the PC and the TV. These settings are only available when viewing content from a home computer using the RGB port. Use the ...


