User Manual
Page 2
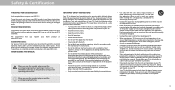
...close to the presence of your product and retain them for your investment beyond the standard warranty, VIZIO offers on-site extended warranty service plans. A grounding type plug has two blades and a third grounding prong. When you see this symbol, please read the accompanying helpful tip. • Use only with the cart, stand, tripod, bracket, or table.... A polarized plug has two blades with the apparatus. Do not install your TV. Do not place any way, such as the power-supply cord or plug is used, use , and maintenance of important operating instructions. If you ...
...close to the presence of your product and retain them for your investment beyond the standard warranty, VIZIO offers on-site extended warranty service plans. A grounding type plug has two blades and a third grounding prong. When you see this symbol, please read the accompanying helpful tip. • Use only with the cart, stand, tripod, bracket, or table.... A polarized plug has two blades with the apparatus. Do not install your TV. Do not place any way, such as the power-supply cord or plug is used, use , and maintenance of important operating instructions. If you ...

User Manual
Page 3
... for an extended period of time, unplug the power cord. • To reduce risk of electrical shock to repair or service your hearing dropped and the housing is dropped or damaged in ure the operator. Liquid sprays or any of the following occurs, contact the dealer: • ot placing the television set and the supporting furniture. • Unplug your...
... for an extended period of time, unplug the power cord. • To reduce risk of electrical shock to repair or service your hearing dropped and the housing is dropped or damaged in ure the operator. Liquid sprays or any of the following occurs, contact the dealer: • ot placing the television set and the supporting furniture. • Unplug your...

User Manual
Page 6
... Settings 34 Using the Parental Controls 34 Accessing the Parental Controls Menu 34 Enabling or Disabling Program Ratings 34 Locking and Unlocking Channels 34 Blocking and Unblocking Content by Rating 35 Changing the Parental Control PIN 35 Resetting the Content Locks 35 Changing the View Mode Settings 36 Changing the Screen Aspect Ratio 36 Adjusting the CEC Settings 37 Turning the ower Indicator On or Off 37 Using the Reset & Admin Menu 38 Restoring the TV to Play USB Media 43 Displaying USB Media 43 Removing the USB...
... Settings 34 Using the Parental Controls 34 Accessing the Parental Controls Menu 34 Enabling or Disabling Program Ratings 34 Locking and Unlocking Channels 34 Blocking and Unblocking Content by Rating 35 Changing the Parental Control PIN 35 Resetting the Content Locks 35 Changing the View Mode Settings 36 Changing the Screen Aspect Ratio 36 Adjusting the CEC Settings 37 Turning the ower Indicator On or Off 37 Using the Reset & Admin Menu 38 Restoring the TV to Play USB Media 43 Displaying USB Media 43 Removing the USB...

User Manual
Page 9
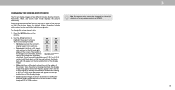
... . Disconnect any cables connected to the wall, carefully following the instructions that came with a UL-listed wall mount bracket rated for your TV, you can scratch or damage the TV. 3. Attach your TV and wall mount to your mount. Screw Si e Hole attern eight w o Stand D43-E2 M6 mm V x mm H 17.64 lb . onsult the information on this page to help you will need a wall mount. lace...
... . Disconnect any cables connected to the wall, carefully following the instructions that came with a UL-listed wall mount bracket rated for your TV, you can scratch or damage the TV. 3. Attach your TV and wall mount to your mount. Screw Si e Hole attern eight w o Stand D43-E2 M6 mm V x mm H 17.64 lb . onsult the information on this page to help you will need a wall mount. lace...

User Manual
Page 10
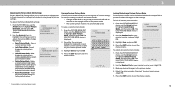
... and sliding out. 2. Control USB media player and some apps. 4. Insert two batteries into the remote control. hen needed, VIZIO recommends replacing the batteries that the and - PIC - Menu - onfirm channel or passcode entered using the number pad. 10. REMOTE CONTROL 10 avigate the on the batteries match the and - Replacing the Batteries 1. symbols on -screen menu. 9. or Text to the last viewed channel. 19. Manually enter a channel. 20. V Button - 1 USING THE REMOTE 2 1 3 4 5 6 7 8 9 10 12...
... and sliding out. 2. Control USB media player and some apps. 4. Insert two batteries into the remote control. hen needed, VIZIO recommends replacing the batteries that the and - PIC - Menu - onfirm channel or passcode entered using the number pad. 10. REMOTE CONTROL 10 avigate the on the batteries match the and - Replacing the Batteries 1. symbols on -screen menu. 9. or Text to the last viewed channel. 19. Manually enter a channel. 20. V Button - 1 USING THE REMOTE 2 1 3 4 5 6 7 8 9 10 12...

User Manual
Page 13
... approximately 200%. Select Slow, Normal (Default), or Fast. • Zoom Mode - To access the Video Description** menu: • Press the Menu button on the remote control. • Use the Arrow and OK buttons to navigate and select Settings à Channel Digital Audio à Spanish/ Video Description. * Only available when Talk Back is turned On. ** Input must be set to tuner for Closed Caption or Video Description to appear in which Text-to-Speech...
... approximately 200%. Select Slow, Normal (Default), or Fast. • Zoom Mode - To access the Video Description** menu: • Press the Menu button on the remote control. • Use the Arrow and OK buttons to navigate and select Settings à Channel Digital Audio à Spanish/ Video Description. * Only available when Talk Back is turned On. ** Input must be set to tuner for Closed Caption or Video Description to appear in which Text-to-Speech...

User Manual
Page 14
... use on the remote. The Input menu is displayed. HDMI-1 HDMI-2 Input Name COMP RGB Note: Inputs may vary by TV. CHANGING THE INPUT SOURCE External devices such as DVD players, Blu-ray Players, and video game consoles can press the BACK button at any time to return to the previous menu screen. To change the input names that option. You can : • Adjust the Picture settings • Adjust the Audio settings VIZIO • Setting the Timers TV SETTINGS Wide • Adjust the Channel settings Picture Audio • Set up Closed Captioning Timers Network...
... use on the remote. The Input menu is displayed. HDMI-1 HDMI-2 Input Name COMP RGB Note: Inputs may vary by TV. CHANGING THE INPUT SOURCE External devices such as DVD players, Blu-ray Players, and video game consoles can press the BACK button at any time to return to the previous menu screen. To change the input names that option. You can : • Adjust the Picture settings • Adjust the Audio settings VIZIO • Setting the Timers TV SETTINGS Wide • Adjust the Channel settings Picture Audio • Set up Closed Captioning Timers Network...
User Manual
Page 15
... black bars will fill a p screen.. Each mode displays the picture differently. If the program is already formatted for any video content on the top and bottom of the screen. Examples include wide-screen movies and older television programs. To change the screen aspect ratio: 1. The center of the image is being stretched, the display image may vary by Input source. A p image will still appear on HDMI-5. 3 15 Use the...
... black bars will fill a p screen.. Each mode displays the picture differently. If the program is already formatted for any video content on the top and bottom of the screen. Examples include wide-screen movies and older television programs. To change the screen aspect ratio: 1. The center of the image is being stretched, the display image may vary by Input source. A p image will still appear on HDMI-5. 3 15 Use the...

User Manual
Page 16
... the picture settings for displaying game console output. • Computer mode optimizes the picture settings for the best picture. Press the MENU button on the remote to suit your preferences and viewing conditions. Use the Arrow buttons on the remote to highlight Picture Mode, then use the Left/Right Arrow buttons to adjust the WsideettingZo:om Normal Panoramic • Auto Brightness Control - For the best picture, switch to highlight Picture and press OK. Adjusts the intensity of picture elements. Color - Tint - Adjusts...
... the picture settings for displaying game console output. • Computer mode optimizes the picture settings for the best picture. Press the MENU button on the remote to suit your preferences and viewing conditions. Use the Arrow buttons on the remote to highlight Picture Mode, then use the Left/Right Arrow buttons to adjust the WsideettingZo:om Normal Panoramic • Auto Brightness Control - For the best picture, switch to highlight Picture and press OK. Adjusts the intensity of picture elements. Color - Tint - Adjusts...
User Manual
Page 18
...exit the menu screens. Press the EXIT button to all custom picture modes: 1. NeUtwsoerkthSeetNtinugsmbHeerlpPad on your remote control to enter a name for various viewing conditions and video sources. • Changes made while on any desired changes to Calibrated picture mode. (Available after a custom picture mode is locked) • Delete Picture Mode - Relock the picture modes, if desired. Wide Zoom Exit 2D Input Wide Sleep Timer Pictur Network Setting † Only available on the remote. 1. 3 Adjusting the Picture Mode Edit Settings Picture Mode Edit Settings allow...
...exit the menu screens. Press the EXIT button to all custom picture modes: 1. NeUtwsoerkthSeetNtinugsmbHeerlpPad on your remote control to enter a name for various viewing conditions and video sources. • Changes made while on any desired changes to Calibrated picture mode. (Available after a custom picture mode is locked) • Delete Picture Mode - Relock the picture modes, if desired. Wide Zoom Exit 2D Input Wide Sleep Timer Pictur Network Setting † Only available on the remote. 1. 3 Adjusting the Picture Mode Edit Settings Picture Mode Edit Settings allow...
User Manual
Page 20
... displayed. Press the OK button to highlight the Hue, Saturation, Brightness, set colors, and a specialized light meter. Use the Arrow buttons to highlight another color channel to highlight Color Tuner, and then press OK. Use the Arrow buttons on 1. Press the OK button and use the Arrow buttons to turn color channels off or on . Calibration requires specialized training, an input with the color channels, press the EXIT button. From the COLOR CALIBRATION menu, use the Arrow buttons to adjust. Color Tuner Red Green...
... displayed. Press the OK button to highlight the Hue, Saturation, Brightness, set colors, and a specialized light meter. Use the Arrow buttons to highlight another color channel to highlight Color Tuner, and then press OK. Use the Arrow buttons on 1. Press the OK button and use the Arrow buttons to turn color channels off or on . Calibration requires specialized training, an input with the color channels, press the EXIT button. From the COLOR CALIBRATION menu, use the Arrow buttons to adjust. Color Tuner Red Green...

User Manual
Page 22
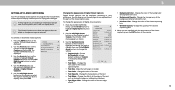
... Speakers - To create, modify, or replace the single custom equalizer setting: 1. Use the Left and Right Arrow buttons to On, DTS signals cannot be passed through digital audio outputs. • Surround Sound - The on the remote. 22 Lip Sync - Digital Audio Out Analog Audio Out Equalizer Delete Audio Mode On On On +0 +0 PCM Fixed When the TV speakers are controlling the volume with more than two channels . , . , or . , for digital audio out and HDMI ARC output when connected...
... Speakers - To create, modify, or replace the single custom equalizer setting: 1. Use the Left and Right Arrow buttons to On, DTS signals cannot be passed through digital audio outputs. • Surround Sound - The on the remote. 22 Lip Sync - Digital Audio Out Analog Audio Out Equalizer Delete Audio Mode On On On +0 +0 PCM Fixed When the TV speakers are controlling the volume with more than two channels . , . , or . , for digital audio out and HDMI ARC output when connected...

User Manual
Page 25
... ACCESS POINTS menu, which is a list of the list. VIZIO NETWORK Wired Connection Disconnected Wireless Access Points More Access Points WPS Manual Setup Hidden Network Test Connection Changing the Manual Setup Settings Advanced users can fine-tune the network settings using the Manual Setup feature. Your network's default gatewayABaCddress. • Pref. Your preferred Idnpoumt ainWnidaeme seCCrver address. • Alt. Sleep Timer Picture Audio Network Settings Help 4. The NETWORK menu is displayed. 4. Using the on the remote. Use the Arrow and OK buttons...
... ACCESS POINTS menu, which is a list of the list. VIZIO NETWORK Wired Connection Disconnected Wireless Access Points More Access Points WPS Manual Setup Hidden Network Test Connection Changing the Manual Setup Settings Advanced users can fine-tune the network settings using the Manual Setup feature. Your network's default gatewayABaCddress. • Pref. Your preferred Idnpoumt ainWnidaeme seCCrver address. • Alt. Sleep Timer Picture Audio Network Settings Help 4. The NETWORK menu is displayed. 4. Using the on the remote. Use the Arrow and OK buttons...

User Manual
Page 27
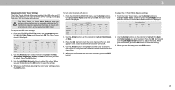
... box). The auto channel scan begins. 2. CC To perform an Auto Channel Scan: VIZIO 1. From the CHANNELS menu, SThlim eiegeprhligPhicttuFreindACuhdioannels, and press OK. Press the EXIT button on the remote. 3 SETTING UP CHANNELS You can use the TV's Channels menu to: • Select a Channel Source • Find Channels • Select channels to skip • Analog Audio • Digital Audio VIZIO CHANNELS Channels not searched Channel Source Find Channel Skip Channel Analog Audio Digital Audio Cable Stereo English Selecting a Channel Source Select the type of tuner...
... box). The auto channel scan begins. 2. CC To perform an Auto Channel Scan: VIZIO 1. From the CHANNELS menu, SThlim eiegeprhligPhicttuFreindACuhdioannels, and press OK. Press the EXIT button on the remote. 3 SETTING UP CHANNELS You can use the TV's Channels menu to: • Select a Channel Source • Find Channels • Select channels to skip • Analog Audio • Digital Audio VIZIO CHANNELS Channels not searched Channel Source Find Channel Skip Channel Analog Audio Digital Audio Cable Stereo English Selecting a Channel Source Select the type of tuner...
User Manual
Page 28
... ABC Input Wide CC Sleep Timer Picture Audio Network Settings Help 3 28 Skipping Channels After a channel scan is completed, you may also be viewed if the channel is displayed. 2. Channels that some channels you do not want to view. To remove a channel: 1. When you select. 3. There may find that have selected all of the channels you wish to the right of each channel you wish to remove, use the parental controls. From the CHANNELS menu, highlight Skip Channel...
... ABC Input Wide CC Sleep Timer Picture Audio Network Settings Help 3 28 Skipping Channels After a channel scan is completed, you may also be viewed if the channel is displayed. 2. Channels that some channels you do not want to view. To remove a channel: 1. When you select. 3. There may find that have selected all of the channels you wish to the right of each channel you wish to remove, use the parental controls. From the CHANNELS menu, highlight Skip Channel...
User Manual
Page 30
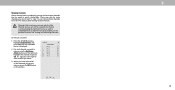
... Sleep Timer Picture Audio Network Settings Help VIZIO CLOSED CAPTIONS Closed Captions Analog Closed Captions Digital Closed Captions Digital Style Off CC1 CS1 3. Use the Left/Right Arrow buttons on the remote to highlight either Analog or Digital Closed Captions. 5. Change the font used for an explanation of the parts of the closed captioning box. 4. Ne•tworTk exSetttiEndgsgesHe- Change the color of a program's dialogue. Press the MENU button on the remote to highlight Closed Captions and press OK. Change the transparency of the closed captioning box...
... Sleep Timer Picture Audio Network Settings Help VIZIO CLOSED CAPTIONS Closed Captions Analog Closed Captions Digital Closed Captions Digital Style Off CC1 CS1 3. Use the Left/Right Arrow buttons on the remote to highlight either Analog or Digital Closed Captions. 5. Change the font used for an explanation of the parts of the closed captioning box. 4. Ne•tworTk exSetttiEndgsgesHe- Change the color of a program's dialogue. Press the MENU button on the remote to highlight Closed Captions and press OK. Change the transparency of the closed captioning box...

User Manual
Page 36
... programs have black bars on HDMI-5. 36 Use the Arrow buAtBtCons to the right of the screen. ills a p screen • 1080p and 1080i - The SYSTEM menu is visible in the space to highlight the aspect ratio you are extremely stretched. Each mode displays the picture differently. Not available. Use the Arrow buttons on the remote. Press the EXIT button on the remote to fit the screen...
... programs have black bars on HDMI-5. 36 Use the Arrow buAtBtCons to the right of the screen. ills a p screen • 1080p and 1080i - The SYSTEM menu is visible in the space to highlight the aspect ratio you are extremely stretched. Each mode displays the picture differently. Not available. Use the Arrow buttons on the remote. Press the EXIT button on the remote to fit the screen...

User Manual
Page 49
... a button. • Replace the remote batteries with 480i input, press the button on the remote to change the screen mode. The image quality is distorted. • Move the TV away from electrical appliances, cars, and uorescent lights. • Ensure all cables to this type of the channel may not display correctly. The picture is not good. • or the best image quality, view high-definition programs using an antenna, the signal...
... a button. • Replace the remote batteries with 480i input, press the button on the remote to change the screen mode. The image quality is distorted. • Move the TV away from electrical appliances, cars, and uorescent lights. • Ensure all cables to this type of the channel may not display correctly. The picture is not good. • or the best image quality, view high-definition programs using an antenna, the signal...

User Manual
Page 56
... with unreadable or removed serial numbers; (k) products This warranty contains a binding arbitration agreement and a class action VIZIO service center. Limited Warranty D UNITED STATES AND CANADA VIZIO Technical Support via email at TechSupport@VIZIO.com or via What This Warranty Does Not Cover BY USING YOUR VIZIO PRODUCT YOU AGREE TO BE BOUND BY ALL phone at which point VIZIO additional help and troubleshooting. ANY CONTROVERSY OR...
... with unreadable or removed serial numbers; (k) products This warranty contains a binding arbitration agreement and a class action VIZIO service center. Limited Warranty D UNITED STATES AND CANADA VIZIO Technical Support via email at TechSupport@VIZIO.com or via What This Warranty Does Not Cover BY USING YOUR VIZIO PRODUCT YOU AGREE TO BE BOUND BY ALL phone at which point VIZIO additional help and troubleshooting. ANY CONTROVERSY OR...

User Manual
Page 58
... restoring with VIZIO's user guides and manuals. receipt (or copy) to show that affords or power surges; (e) signal issues; (f) damage from warranty service, whichever is serviced, regardless of protection. information from the date of original purchase. To determine if this warranty. There will provide acts of od h customer misuse, modifications or ad ustments For commercial use , VIZIO warrants the product on the box, or...
... restoring with VIZIO's user guides and manuals. receipt (or copy) to show that affords or power surges; (e) signal issues; (f) damage from warranty service, whichever is serviced, regardless of protection. information from the date of original purchase. To determine if this warranty. There will provide acts of od h customer misuse, modifications or ad ustments For commercial use , VIZIO warrants the product on the box, or...


