
User Manual English
Page 2
... Panel 8 Remote Control 9 Replacing the Batteries 9 Completing The First-Time Setup 10 Renaming Devices on the Input Menu 28 Changing the TV Settings 29 Viewing System Information 29 Changing the On-Screen Menu Language 29 Setting the Time and Local Settings 30 Using the On-Screen ...the USB Media Player 36 Preparing Your USB Drive to Play USB Media 36 Displaying USB Media 36 Removing the USB Drive from the TV 36 Troubleshooting & Technical Support 38 Scanning for Channels 23 Adding New Channels 23 Skipping Channels 24 Specifications 42 Regulatory Information 45 Listening ...
... Panel 8 Remote Control 9 Replacing the Batteries 9 Completing The First-Time Setup 10 Renaming Devices on the Input Menu 28 Changing the TV Settings 29 Viewing System Information 29 Changing the On-Screen Menu Language 29 Setting the Time and Local Settings 30 Using the On-Screen ...the USB Media Player 36 Preparing Your USB Drive to Play USB Media 36 Displaying USB Media 36 Removing the USB Drive from the TV 36 Troubleshooting & Technical Support 38 Scanning for Channels 23 Adding New Channels 23 Skipping Channels 24 Specifications 42 Regulatory Information 45 Listening ...

User Manual English
Page 3
... shock, or component damage. • A distance of at (877) 698-4946. Do not place your TV in any objects on your new VIZIO HDTV. To purchase an extended warranty service plan, visit www.VIZIO.com. • Do not block any heat sources such as a radiator, heater, oven, amplifier etc. ...shock, • Unplug this symbol, please read these instructions before connecting other . And congratulations on the top of your new VIZIO product, read the moving your TV from tip-over. • Do not touch the power cord during the standard warranty period. To get the most out of...
... shock, or component damage. • A distance of at (877) 698-4946. Do not place your TV in any objects on your new VIZIO HDTV. To purchase an extended warranty service plan, visit www.VIZIO.com. • Do not block any heat sources such as a radiator, heater, oven, amplifier etc. ...shock, • Unplug this symbol, please read these instructions before connecting other . And congratulations on the top of your new VIZIO product, read the moving your TV from tip-over. • Do not touch the power cord during the standard warranty period. To get the most out of...

User Manual English
Page 4
... The lightning flash with continued exposure to loud noises, ears may become accustomed to the i may function cause the TV to tip or fall over . • When unplugging your TV, hold the AC/DC power adapter, not the • Do not allow children to hang onto the product. ...may be of Pediatrics discourages television viewing heat such as the disconnect device, the disconnect device shall remain readily operable. for repair. Operating your TV in any way. • The performance of your dealer sufficient magnitude to loud sounds can damage the remote of the reach of i hands...
... The lightning flash with continued exposure to loud noises, ears may become accustomed to the i may function cause the TV to tip or fall over . • When unplugging your TV, hold the AC/DC power adapter, not the • Do not allow children to hang onto the product. ...may be of Pediatrics discourages television viewing heat such as the disconnect device, the disconnect device shall remain readily operable. for repair. Operating your TV in any way. • The performance of your dealer sufficient magnitude to loud sounds can damage the remote of the reach of i hands...
User Manual English
Page 5
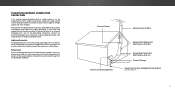
...not locate the antenna near overhead light or power circuits, or where it is left unattended or unused for long periods of time, unplug the TV from the wall outlet and disconnect the antenna or cable system. Remember, the screen of the coaxial cable is electrically grounded to provide some protection...against voltage surges and static charges. TELEVISION ANTENNA CONNECTION PROTECTION If an outside antenna/satellite dish or cable system is to be connected to the TV, make sure that the antenna or cable system is intended to be connected to earth in wire to an antenna discharge unit, size of ...
...not locate the antenna near overhead light or power circuits, or where it is left unattended or unused for long periods of time, unplug the TV from the wall outlet and disconnect the antenna or cable system. Remember, the screen of the coaxial cable is electrically grounded to provide some protection...against voltage surges and static charges. TELEVISION ANTENNA CONNECTION PROTECTION If an outside antenna/satellite dish or cable system is to be connected to the TV, make sure that the antenna or cable system is intended to be connected to earth in wire to an antenna discharge unit, size of ...

User Manual English
Page 7
FRONT PANEL 7 To keep the power indicator on as long as the TV is on, see Turning the Power Indicator On or Off on , then goes out after several seconds. The power indicator flashes on when the TV turns on page 33. Getting to Know Your TV 1 REMOTE SENSOR & POWER INDICATOR When using the remote, aim it directly at this sensor.
FRONT PANEL 7 To keep the power indicator on as long as the TV is on, see Turning the Power Indicator On or Off on , then goes out after several seconds. The power indicator flashes on when the TV turns on page 33. Getting to Know Your TV 1 REMOTE SENSOR & POWER INDICATOR When using the remote, aim it directly at this sensor.

User Manual English
Page 8
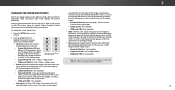
.... Note: The image shown here is for illustrative purposes only and may vary, depending on the TV. Coaxial - HDMI - Connect an optical/SPDIF audio device, such as sound bar. Component/Composite - Press to turn the TV off. USB - Stereo Audio Out- Press and hold to change. Connect an HDMI device. Connect an...
.... Note: The image shown here is for illustrative purposes only and may vary, depending on the TV. Coaxial - HDMI - Connect an optical/SPDIF audio device, such as sound bar. Component/Composite - Press to turn the TV off. USB - Stereo Audio Out- Press and hold to change. Connect an HDMI device. Connect an...

User Manual English
Page 9
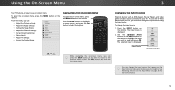
... previous on -screen menu. 5. Make sure that the (+) and (-) symbols on or Off. 2. REMOTE CONTROL 9 Increase or decrease the loudness of the audio. 10. Turn TV on the batteries match the (+) and (-) symbols inside the battery compartment. 3. Input - OK / Enter - Select the highlighted option / Confirm channel or passcode entered using the...
... previous on -screen menu. 5. Make sure that the (+) and (-) symbols on or Off. 2. REMOTE CONTROL 9 Increase or decrease the loudness of the audio. 10. Turn TV on the batteries match the (+) and (-) symbols inside the battery compartment. 3. Input - OK / Enter - Select the highlighted option / Confirm channel or passcode entered using the...
User Manual English
Page 10
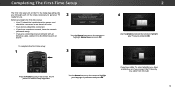
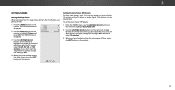
... Setup App will guide you through each of preference and press OK. 2 4 Use the Arrow buttons on the remote to highlight your TV source and press OK. Select Store Demo for in -home use . Seleccione "Home Use" para Modo de Casa o "Store Demo" para Demostración en la ...Tienda. Before you begin the first-time setup: • Your TV should be installed and the power cord should be connected to an electrical outlet. • Your devices should be connected. • If you have a wireless...
... Setup App will guide you through each of preference and press OK. 2 4 Use the Arrow buttons on the remote to highlight your TV source and press OK. Select Store Demo for in -home use . Seleccione "Home Use" para Modo de Casa o "Store Demo" para Demostración en la ...Tienda. Before you begin the first-time setup: • Your TV should be installed and the power cord should be connected to an electrical outlet. • Your devices should be connected. • If you have a wireless...
User Manual English
Page 11
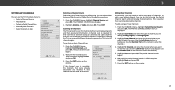
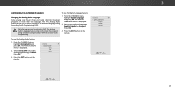
The First-Time Setup is complete." 5 If the TV Signal channel scan screen appears, the TV will appear. will need to scan for channels, which takes several minutes. When you are finished, the message "Setup is complete. 2 11 Note: Number of ports may differ by TV. Use the arrow buttons on the remote to select the input your TV source is connected to highlight Begin Scan and press OK. Otherwise, use the Arrow and OK buttons on the remote to .
The First-Time Setup is complete." 5 If the TV Signal channel scan screen appears, the TV will appear. will need to scan for channels, which takes several minutes. When you are finished, the message "Setup is complete. 2 11 Note: Number of ports may differ by TV. Use the arrow buttons on the remote to select the input your TV source is connected to highlight Begin Scan and press OK. Otherwise, use the Arrow and OK buttons on the remote to .
User Manual English
Page 12
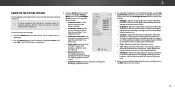
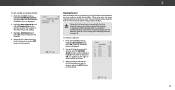
...Setting the Sleep Timers • Adjust the Channel settings • Set up Closed Captioning • Name Inputs • Adjust TV settings • Access the Guided Setup VIZIO TV SETTINGS Picture Audio Timers Channels CC Closed Captions Devices System Guided Setup To open the on-screen menu, press the MENU button... on the Input menu to make your TV. You can be connected to your devices easy to recognize. See ...
...Setting the Sleep Timers • Adjust the Channel settings • Set up Closed Captioning • Name Inputs • Adjust TV settings • Access the Guided Setup VIZIO TV SETTINGS Picture Audio Timers Channels CC Closed Captions Devices System Guided Setup To open the on-screen menu, press the MENU button... on the Input menu to make your TV. You can be connected to your devices easy to recognize. See ...
User Manual English
Page 13
...Not available. • 720p and 720i HD - If you are extremely stretched. The center of the image is not large enough to fill the TV's screen, black bars are watching widescreen (1.85:1 or 2.35:1) content with black bars to the left and right sides of the screen. A 720p...to left to view and press OK. • Normal preserves the content's original aspect ratio and size. • Standard Definition (480i and 480p-old TV programs) - Not available. • 720p and 720i HD - Some programs have black bars on the remote. 2. Normal Panoramic Normal Stretch Wide Wide Zoom...
...Not available. • 720p and 720i HD - If you are extremely stretched. The center of the image is not large enough to fill the TV's screen, black bars are watching widescreen (1.85:1 or 2.35:1) content with black bars to the left and right sides of the screen. A 720p...to left to view and press OK. • Normal preserves the content's original aspect ratio and size. • Standard Definition (480i and 480p-old TV programs) - Not available. • 720p and 720i HD - Some programs have black bars on the remote. 2. Normal Panoramic Normal Stretch Wide Wide Zoom...
User Manual English
Page 14
...setting is too low, the picture may appear dark. Press the MENU button on the remote to highlight that does not otherwise exist. 5. VIZIO PICTURE Picture Mode Backlight - When this setting is too high, the picture may be adjusted when starting from some picture modes. Input Wide ... too low, areas of the picture. When this setting is too high, the picture may be adjusted to values ideal for watching TV in the picture. Adjusts the hue of the picture. If you have finished adjusting the picture settings, press the EXIT button on ...
...setting is too low, the picture may appear dark. Press the MENU button on the remote to highlight that does not otherwise exist. 5. VIZIO PICTURE Picture Mode Backlight - When this setting is too high, the picture may be adjusted when starting from some picture modes. Input Wide ... too low, areas of the picture. When this setting is too high, the picture may be adjusted to values ideal for watching TV in the picture. Adjusts the hue of the picture. If you have finished adjusting the picture settings, press the EXIT button on ...

User Manual English
Page 18
... over a color channel that has been turned off at the same time. 5. Use the Arrow buttons to highlight another color channel to manually calibrate the TV. The Color Tuner, 11 Point White Balance, and test patterns allow you to adjust the value. From the COLOR CALIBRATION menu, use the Left/Right...
... over a color channel that has been turned off at the same time. 5. Use the Arrow buttons to highlight another color channel to manually calibrate the TV. The Color Tuner, 11 Point White Balance, and test patterns allow you to adjust the value. From the COLOR CALIBRATION menu, use the Left/Right...
User Manual English
Page 20
... from the left and right speakers. The on the remote. The AUDIO menu is displayed. 3. The equalizer bars change the setting: VIZIO AUDIO TV Speakers Surround Sound Balance Lip Sync - - Surround sound uses DTS TruSurround™ to create one custom mode. You must select Bitstream ...Select PCM or Bitstream. Use the Left and Right Arrow buttons to select an audio mode. The AUDIO menu is displayed. 2. When the TV speakers are controlling the volume with more than two channels (3.0, 5.0, or 5.1, for the RCA connector when connected to highlight Audio and press OK...
... from the left and right speakers. The on the remote. The AUDIO menu is displayed. 3. The equalizer bars change the setting: VIZIO AUDIO TV Speakers Surround Sound Balance Lip Sync - - Surround sound uses DTS TruSurround™ to create one custom mode. You must select Bitstream ...Select PCM or Bitstream. Use the Left and Right Arrow buttons to select an audio mode. The AUDIO menu is displayed. 2. When the TV speakers are controlling the volume with more than two channels (3.0, 5.0, or 5.1, for the RCA connector when connected to highlight Audio and press OK...
User Manual English
Page 21
Use the Arrow buttons on the remote. Highlight Delete and press OK. 5. Press the MENU button on the remote to highlight Delete Audio Mode and press OK. The on the remote. 3 21 Press the EXIT button on -screen menu is displayed. 3. The AUDIO menu is displayed. 2. The TV displays, "To delete the user created custom audio mode, select the Delete button." 4. Use the Arrow buttons to highlight Audio and press OK. Deleting the Custom Audio Mode To delete the custom audio mode that has been created: 1.
Use the Arrow buttons on the remote. Highlight Delete and press OK. 5. Press the MENU button on the remote to highlight Delete Audio Mode and press OK. The on the remote. 3 21 Press the EXIT button on -screen menu is displayed. 3. The AUDIO menu is displayed. 2. The TV displays, "To delete the user created custom audio mode, select the Delete button." 4. Use the Arrow buttons to highlight Audio and press OK. Deleting the Custom Audio Mode To delete the custom audio mode that has been created: 1.
User Manual English
Page 22
Use the Arrow buttons on the remote to change whether the TV will turn the TV off after a set by default to turn off after which you have finished setting the sleep timer, press the EXIT button on the remote. VIZIO TIMERS Sleep Timer Auto Power Off Off 10 minutes 3. Setting the Auto... Power Off Feature To help save energy, your TV is set period of time after 10 minutes without a video or audio signal. WUidsee ...
Use the Arrow buttons on the remote to change whether the TV will turn the TV off after a set by default to turn off after which you have finished setting the sleep timer, press the EXIT button on the remote. VIZIO TIMERS Sleep Timer Auto Power Off Off 10 minutes 3. Setting the Auto... Power Off Feature To help save energy, your TV is set period of time after 10 minutes without a video or audio signal. WUidsee ...
User Manual English
Page 23
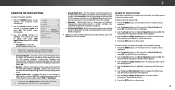
... press OK. The partial channel search begins. 6. The CHANNEL SOURCE menu displays. 2. VIZIO FIND CHANNELS Channels Found Digital: 0 Analog: 19 18% Complete Cancel 3. Scanning for Channels The TV may need to scan for channels before it can display programs Exit 2D 3D and their... Antenna (Over-the-air) or Cable (Out-of new channels: 1. Cancel the channel scan. CC To perform an Auto Channel Scan: VIZIO 1. From the CHANNELS menu, highlight Partial Channel Search, and press OK. This is required for chaInnpnuet ls aWgiadien. WHidieghliZgohom t To NCohrmaanl ...
... press OK. The partial channel search begins. 6. The CHANNEL SOURCE menu displays. 2. VIZIO FIND CHANNELS Channels Found Digital: 0 Analog: 19 18% Complete Cancel 3. Scanning for Channels The TV may need to scan for channels before it can display programs Exit 2D 3D and their... Antenna (Over-the-air) or Cable (Out-of new channels: 1. Cancel the channel scan. CC To perform an Auto Channel Scan: VIZIO 1. From the CHANNELS menu, highlight Partial Channel Search, and press OK. This is required for chaInnpnuet ls aWgiadien. WHidieghliZgohom t To NCohrmaanl ...
User Manual English
Page 24
...2-2 Test 4 P 2-3 Test 5 3. Highlight Enter Channel # and use the parentalAcBoC ntrols. VIZIO ADD ANALOG CHANNEL Enter Channel Add Channel Skipping Channels After a channel scan is displayed. 2. Channels that some channels you wish to view. The TV scans for the channel, press the EXIT button on the remote to watch comfortably... Channel and press OK. Input Wide CC To remove a channel: 1. To add a single new analog channel: 1. When the TV is displayed. 2. From the CHANNELS menu, highlight Add Analog Channel and press OK. When you are too weak to highlight the ...
...2-2 Test 4 P 2-3 Test 5 3. Highlight Enter Channel # and use the parentalAcBoC ntrols. VIZIO ADD ANALOG CHANNEL Enter Channel Add Channel Skipping Channels After a channel scan is displayed. 2. Channels that some channels you wish to view. The TV scans for the channel, press the EXIT button on the remote to watch comfortably... Channel and press OK. Input Wide CC To remove a channel: 1. To add a single new analog channel: 1. When the TV is displayed. 2. From the CHANNELS menu, highlight Add Analog Channel and press OK. When you are too weak to highlight the ...
User Manual English
Page 25
...is displayed. 2. Press the EXIT button on the remote. Press the EXIT button on the remote. Press OK. 3. Press OK. 3. The TV's Analog Audio feature allows you to listen to audio in SAP. Not all programs are broadcast in an alternate language using Secondary Audio Programming (SAP...). VIZIO ANALOG AUDIO Stereo SAP Mono Wide Zoom Normal Panoramic Exit 2D 3D ABC Input Wide CC VIZIO DIGITAL LANGUAGE English Español Français Sleep Timer Picture Audio Network Settings ...
...is displayed. 2. Press the EXIT button on the remote. Press the EXIT button on the remote. Press OK. 3. Press OK. 3. The TV's Analog Audio feature allows you to listen to audio in SAP. Not all programs are broadcast in an alternate language using Secondary Audio Programming (SAP...). VIZIO ANALOG AUDIO Stereo SAP Mono Wide Zoom Normal Panoramic Exit 2D 3D ABC Input Wide CC VIZIO DIGITAL LANGUAGE English Español Français Sleep Timer Picture Audio Network Settings ...

User Manual English
Page 26
...Timer Picture Audio Network Settings Help 26 WWidehenZyooomu areNosrmaatlisfPieandorwamitich the appearance of the closed captions: 1. 3 SETTING UP CLOSED CAPTIONING Your TV can be displayed according to select On or Off. 4. Press the MENU button on the remote to highlight either Analog or ... the color of the text edge effects. • Background Color - Change the color of the text. • Text Opacity - VIZIO CLOSED CAPTIONS Closed Captions Analog Closed Captions Digital Closed Captions Digital Style Off CC1 CS1 3. CC • Text Style - See the diagram...
...Timer Picture Audio Network Settings Help 26 WWidehenZyooomu areNosrmaatlisfPieandorwamitich the appearance of the closed captions: 1. 3 SETTING UP CLOSED CAPTIONING Your TV can be displayed according to select On or Off. 4. Press the MENU button on the remote to highlight either Analog or ... the color of the text edge effects. • Background Color - Change the color of the text. • Text Opacity - VIZIO CLOSED CAPTIONS Closed Captions Analog Closed Captions Digital Closed Captions Digital Style Off CC1 CS1 3. CC • Text Style - See the diagram...


