User Manual English
Page 2
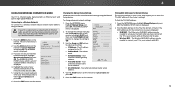
... 7 Setting Timers 33 Adjusting the CEC Settings 46 Installing the TV 8 Installing the TV Stand 8 Setting the Sleep Timer 33 Setting the Auto Power Off Feature 33 Turning the Power Indicator On or Off 46 Using the Reset & Admin Menu 47 Installing the TV on the Input Menu 41 Changing the TV Settings 42 Troubleshooting & Technical Support 58 Changing the Screen Aspect Ratio 23 Viewing System Information 42 Specifications 62 Viewing Video with the Menu Open 24 Adjusting the Picture Settings 25 Changing the On-Screen Menu Language...
... 7 Setting Timers 33 Adjusting the CEC Settings 46 Installing the TV 8 Installing the TV Stand 8 Setting the Sleep Timer 33 Setting the Auto Power Off Feature 33 Turning the Power Indicator On or Off 46 Using the Reset & Admin Menu 47 Installing the TV on the Input Menu 41 Changing the TV Settings 42 Troubleshooting & Technical Support 58 Changing the Screen Aspect Ratio 23 Viewing System Information 42 Specifications 62 Viewing Video with the Menu Open 24 Adjusting the Picture Settings 25 Changing the On-Screen Menu Language...

User Manual English
Page 4
... lightning flash with heavy dust or high humidity may function abnormally. The manufacturer's warranty does not cover user abuse or improper installations. • The power cord must be used as sunshine, fire or the like. • If any other moisture. - With continued exposure to loud noises, ears may become accustomed to the sound level, which can be replaced when using...
... lightning flash with heavy dust or high humidity may function abnormally. The manufacturer's warranty does not cover user abuse or improper installations. • The power cord must be used as sunshine, fire or the like. • If any other moisture. - With continued exposure to loud noises, ears may become accustomed to the sound level, which can be replaced when using...
User Manual English
Page 5
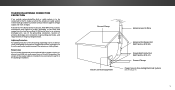
... from the wall outlet and disconnect the antenna or cable system. Power Lines Do not locate the antenna near overhead light or power circuits, or where it is left unattended or unused for long periods of the TV during a lightning storm or when it could fall into such power lines or circuits. Remember, the screen of the grounding electrode. TELEVISION ANTENNA CONNECTION PROTECTION...
... from the wall outlet and disconnect the antenna or cable system. Power Lines Do not locate the antenna near overhead light or power circuits, or where it is left unattended or unused for long periods of the TV during a lightning storm or when it could fall into such power lines or circuits. Remember, the screen of the grounding electrode. TELEVISION ANTENNA CONNECTION PROTECTION...
User Manual English
Page 12
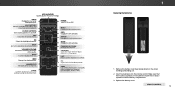
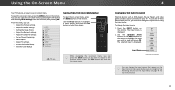
INPUT Change the currently displayed input. EXIT Close the on -screen menu. POWER Turn TV On or Off. ARROW Navigate the on -screen menu. LAST Return to the previous on -screen menu. CLOSED CAPTIONS Turn closed captions On and Off. BACK Go to the channel last viewed. MUTE Turn the audio Off or On. CHANNEL UP/DOWN Change the channel. A/V CONTROLS Control the USB media player and streaming video playback. WIDE Change the display mode. V BUTTON Open the VIZIO Internet Apps Plus® (V.I.A. Make sure that the (+) and...
INPUT Change the currently displayed input. EXIT Close the on -screen menu. POWER Turn TV On or Off. ARROW Navigate the on -screen menu. LAST Return to the previous on -screen menu. CLOSED CAPTIONS Turn closed captions On and Off. BACK Go to the channel last viewed. MUTE Turn the audio Off or On. CHANNEL UP/DOWN Change the channel. A/V CONTROLS Control the USB media player and streaming video playback. WIDE Change the display mode. V BUTTON Open the VIZIO Internet Apps Plus® (V.I.A. Make sure that the (+) and...
User Manual English
Page 22
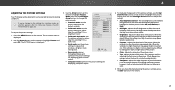
... External devices such as DVD players, Blu-ray Players, and video game consoles can : • Adjust the Picture settings • Adjust the Audio settings • Setting the Sleep Timers • Adjust the Network settings • Adjust the Channel settings • Set up Closed Captioning • Name Inputs • Adjust TV settings • Access the Guided Setup • View the User Manual VIZIO TV SETTINGS Picture Audio Timers Network Channels CC Closed Captions Devices System Guided Setup User Manual NAVIGATING THE ON-SCREEN MENU To open the on-screen menu, press the MENU button...
... External devices such as DVD players, Blu-ray Players, and video game consoles can : • Adjust the Picture settings • Adjust the Audio settings • Setting the Sleep Timers • Adjust the Network settings • Adjust the Channel settings • Set up Closed Captioning • Name Inputs • Adjust TV settings • Access the Guided Setup • View the User Manual VIZIO TV SETTINGS Picture Audio Timers Network Channels CC Closed Captions Devices System Guided Setup User Manual NAVIGATING THE ON-SCREEN MENU To open the on-screen menu, press the MENU button...
User Manual English
Page 25
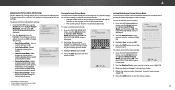
... sharpness of the picture colors. • Tint - Adjusts the LED brightness to highlight Picture and press OK. Adjusts the intensity of picture elements. Use the Arrow buttons on the remote to highlight Picture Mode, then use the Left/Right Arrow buttons to change each of tAhBCe picture. VIZIO PICTURE Picture Mode Auto Brightness Control Backlight - Tint - To manually change the picture mode: • Standard mode sets the picture settings to the default settings. • Calibrated mode sets the picture settings to values ideal for the best picture. Select Off...
... sharpness of the picture colors. • Tint - Adjusts the LED brightness to highlight Picture and press OK. Adjusts the intensity of picture elements. Use the Arrow buttons on the remote to highlight Picture Mode, then use the Left/Right Arrow buttons to change each of tAhBCe picture. VIZIO PICTURE Picture Mode Auto Brightness Control Backlight - Tint - To manually change the picture mode: • Standard mode sets the picture settings to the default settings. • Calibrated mode sets the picture settings to values ideal for the best picture. Select Off...
User Manual English
Page 27
...the EXIT button to factory default values. To lock all custom picture modes. EHxiitghligh2Dt Save3aDnd press OK. VIZIO LOCK PICTURE MODE Create a picture control PIN to prevent changes to all custom picture modes: 1. You must create a new 4-digit PIN. 5. Network Settings Help Wide Zoom Exit 2D Input Wide Sleep Timer Pictur Network Setting 27 The PICTURE MODE EDIT menu is locked) • Delete Picture Mode - Save a custom picture mode. • Lock Picture Mode - Save 4. Press the EXIT button to exit the menu screens. * Not available on HDMI input 5. †...
...the EXIT button to factory default values. To lock all custom picture modes. EHxiitghligh2Dt Save3aDnd press OK. VIZIO LOCK PICTURE MODE Create a picture control PIN to prevent changes to all custom picture modes: 1. You must create a new 4-digit PIN. 5. Network Settings Help Wide Zoom Exit 2D Input Wide Sleep Timer Pictur Network Setting 27 The PICTURE MODE EDIT menu is locked) • Delete Picture Mode - Save a custom picture mode. • Lock Picture Mode - Save 4. Press the EXIT button to exit the menu screens. * Not available on HDMI input 5. †...
User Manual English
Page 31
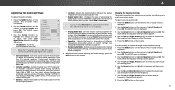
... -screen menu is displayed. 3. The on the remote. 31 VIZIO AUDIO TV Speakers Surround Sound Volume Leveling Balance - Use the Left and Right Arrow buttons to adjust the boost (up) and attenuation (down) for audio with ABC the TV's volume controls, or select Fixed if an external audio device (sound bar or AV receiver) will control the volume. Lip Sync - Input Wide CC • Equalizer - To create, modify, or replace the single custom equalizer setting: 1. Use...
... -screen menu is displayed. 3. The on the remote. 31 VIZIO AUDIO TV Speakers Surround Sound Volume Leveling Balance - Use the Left and Right Arrow buttons to adjust the boost (up) and attenuation (down) for audio with ABC the TV's volume controls, or select Fixed if an external audio device (sound bar or AV receiver) will control the volume. Lip Sync - Input Wide CC • Equalizer - To create, modify, or replace the single custom equalizer setting: 1. Use...
User Manual English
Page 34
... the EXIT button on the remote. The MANUAL SETUP menu is displayed. 4. The Wireless (WiFi) MAC address may require you will not see your network's password, then highlight Connect and press OK. The NETWORK menu is Internet-ready, featuring both an Ethernet port and built-in high-speed Wireless-N. VIZIO NETWORK Wired Connection Disconnected Wireless Access Points More Access Points WPS Manual Setup Hidden Network Test Connection 6. Changing the Manual Setup Settings Advanced users can fine-tune the network settings using the Manual Setup feature. The...
... the EXIT button on the remote. The MANUAL SETUP menu is displayed. 4. The Wireless (WiFi) MAC address may require you will not see your network's password, then highlight Connect and press OK. The NETWORK menu is Internet-ready, featuring both an Ethernet port and built-in high-speed Wireless-N. VIZIO NETWORK Wired Connection Disconnected Wireless Access Points More Access Points WPS Manual Setup Hidden Network Test Connection 6. Changing the Manual Setup Settings Advanced users can fine-tune the network settings using the Manual Setup feature. The...

User Manual English
Page 36
... Antenna (Over-the-air) or Cable (Out-of-the-wall) connections. 1. Use the Number Pad on the remote to enter the channel.) 5. Highlight Done and press OK. 7. CC To perform an Auto Channel Scan: VIZIO 1. 4 SETTING UP CHANNELS You can use the TV's Channels menu to: • Select a Channel Source • Find Channels • Perform a Partial Channel Scan • Manually Add Channels • Select channels to skip VIZIO CHANNELS Channels not searched Channel Source Find Channel Partial Channel Search Add Analog Channel Skip Channel Analog Audio Digital Language Cable...
... Antenna (Over-the-air) or Cable (Out-of-the-wall) connections. 1. Use the Number Pad on the remote to enter the channel.) 5. Highlight Done and press OK. 7. CC To perform an Auto Channel Scan: VIZIO 1. 4 SETTING UP CHANNELS You can use the TV's Channels menu to: • Select a Channel Source • Find Channels • Perform a Partial Channel Scan • Manually Add Channels • Select channels to skip VIZIO CHANNELS Channels not searched Channel Source Find Channel Partial Channel Search Add Analog Channel Skip Channel Analog Audio Digital Language Cable...

User Manual English
Page 43
... the INFO button, set a custom parental passcode, see Changing the Parental Control PIN on the remote to prevent children from displaying certain channels or programs without a password. AccSTelim eseepsr ingPitchtuere Audio Parental Controls Menu To access the Parental Controls menu: 1. Zip codes are often used by the local date and time is displayed. 4. From the PARENTAL CONTROLS menu, highlight Channel Locks and press OK. 4 Setting the Time and Local Settings To ensure the correct time is displayed when you the most accurate location-based information...
... the INFO button, set a custom parental passcode, see Changing the Parental Control PIN on the remote to prevent children from displaying certain channels or programs without a password. AccSTelim eseepsr ingPitchtuere Audio Parental Controls Menu To access the Parental Controls menu: 1. Zip codes are often used by the local date and time is displayed. 4. From the PARENTAL CONTROLS menu, highlight Channel Locks and press OK. 4 Setting the Time and Local Settings To ensure the correct time is displayed when you the most accurate location-based information...
User Manual English
Page 48
... on -screen menu is displayed. 2. The on the way? In this hour-long holiday special, Oliver goes on a journey in search of the program. Connect the TV to the Internet using your network. 4 USING THE GUIDED SETUP MENU Using Guided Setup The TV's Setup App can be used to easily set up the TV channel or to connect the TV with your network. 4. When finished, press the EXIT button on the remote. Network Settings Help Program Title...
... on -screen menu is displayed. 2. The on the way? In this hour-long holiday special, Oliver goes on a journey in search of the program. Connect the TV to the Internet using your network. 4 USING THE GUIDED SETUP MENU Using Guided Setup The TV's Setup App can be used to easily set up the TV channel or to connect the TV with your network. 4. When finished, press the EXIT button on the remote. Network Settings Help Program Title...

User Manual English
Page 60
... cables to change the screen mode. See Adjusting the Picture Settings on . 60 VIZIO recommends selecting Calibrated. • Check all cables are using an antenna, the signal strength of the TV to this type of the channel may be low. Connect your connection are using an antenna, the signal strength of product and do not constitute a defective product. The picture is securely attached to the TV. • Press the Power/Standby button on the remote...
... cables to change the screen mode. See Adjusting the Picture Settings on . 60 VIZIO recommends selecting Calibrated. • Check all cables are using an antenna, the signal strength of the TV to this type of the channel may be low. Connect your connection are using an antenna, the signal strength of product and do not constitute a defective product. The picture is securely attached to the TV. • Press the Power/Standby button on the remote...
User Manual English
Page 64
... applies to your claim For non-commercial use , VIZIO warrants this warranty pixel" guarantee on the terms set -up, or repairs WITHIN THIRTY (30) DAYS OF THE DATE OF PURCHASE, RETURN IT FOR You must ship the "FACTORY RECERTIFIED", or by calling 800-778-7879. VIZIO service center. ALL USER DATA AND DOWNLOADED APPLICATIONS STORED ON A attempt to file a formal...
... applies to your claim For non-commercial use , VIZIO warrants this warranty pixel" guarantee on the terms set -up, or repairs WITHIN THIRTY (30) DAYS OF THE DATE OF PURCHASE, RETURN IT FOR You must ship the "FACTORY RECERTIFIED", or by calling 800-778-7879. VIZIO service center. ALL USER DATA AND DOWNLOADED APPLICATIONS STORED ON A attempt to file a formal...
Quickstart Guide English
Page 2
.... Unplug the power cord immediately and contact your dealer for your display in a bookcase or cabinet unless proper ventilation is provided. • Never push any ventilation openings. Continued use attachments/accessories specified by the manufacturer. • Use only with the cart, stand, tripod, bracket, or table specified by qualified service personnel only. h • Please use your display cabinet. Changing the factory default picture settings or enabling...
.... Unplug the power cord immediately and contact your dealer for your display in a bookcase or cabinet unless proper ventilation is provided. • Never push any ventilation openings. Continued use attachments/accessories specified by the manufacturer. • Use only with the cart, stand, tripod, bracket, or table specified by qualified service personnel only. h • Please use your display cabinet. Changing the factory default picture settings or enabling...
Quickstart Guide English
Page 3
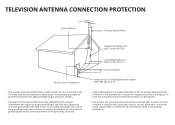
...Code, ANSI/NFPSA 70, provides information with regard to proper grounding of the mast and supporting structure, grounding of the lead-in the building installation. Remember, the screen of the coaxial cable ...antenna discharge unit, size of the grounding conductors, location of antenna discharge unit, connection to grounding electrodes, and requirements of the grounding electrode. • Lightning Protection: For added protection of time, unplug the TV from the wall outlet and disconnect the antenna or cable system. • Power Lines: Do not locate the antenna near overhead light or power...
...Code, ANSI/NFPSA 70, provides information with regard to proper grounding of the mast and supporting structure, grounding of the lead-in the building installation. Remember, the screen of the coaxial cable ...antenna discharge unit, size of the grounding conductors, location of antenna discharge unit, connection to grounding electrodes, and requirements of the grounding electrode. • Lightning Protection: For added protection of time, unplug the TV from the wall outlet and disconnect the antenna or cable system. • Power Lines: Do not locate the antenna near overhead light or power...
Quickstart Guide English
Page 16
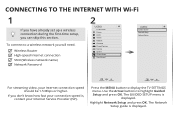
... already set up a wireless connection during the first-time setup, you will need: Wireless Router High-speed Internet connection SSID (Wireless network name) Network Password 2 VIZIO TV SETTINGS Picture Audio Timers Network Channels CC Closed Captions Devices System Guided Setup User Manual VIZIO GUIDED SETUP Wide ZooCmhannelNSoerm tupal Panoramic W Network Setup Exit 2D 3D E ABC Input Wide CC I Sleep Timer Picture Audio S T Network Settings Help Ne For streaming video, your Internet Service Provider (ISP). Press the MENU button to highlight Guided Setup and press...
... already set up a wireless connection during the first-time setup, you will need: Wireless Router High-speed Internet connection SSID (Wireless network name) Network Password 2 VIZIO TV SETTINGS Picture Audio Timers Network Channels CC Closed Captions Devices System Guided Setup User Manual VIZIO GUIDED SETUP Wide ZooCmhannelNSoerm tupal Panoramic W Network Setup Exit 2D 3D E ABC Input Wide CC I Sleep Timer Picture Audio S T Network Settings Help Ne For streaming video, your Internet Service Provider (ISP). Press the MENU button to highlight Guided Setup and press...

Quickstart Guide English
Page 20
... by pressing the POWER button on the top/bottom/ • sides of your router for the best connection. • Turn off . • Press MENU > Audio. I .A. If you have changed the default Parental Control Passcode, enter it back on -screen menu has guided setup. Remember that all devices. Be sure TV Speakers is off all of the screen. • Note that mute is set Volume Control to your Internet Service Provider (ISP). Restart...
... by pressing the POWER button on the top/bottom/ • sides of your router for the best connection. • Turn off . • Press MENU > Audio. I .A. If you have changed the default Parental Control Passcode, enter it back on -screen menu has guided setup. Remember that all devices. Be sure TV Speakers is off all of the screen. • Note that mute is set Volume Control to your Internet Service Provider (ISP). Restart...
Quickstart Guide English
Page 24
... the product in its option) repair or replace it, or refund the purchase price to you and VIZIO, but VIZIO will be limited to resolve the issue informally with VIZIO's user guides and manuals. What This Warranty Does Not Cover This warranty does not cover: (a) cosmetic damage; (b) normal wear and tear; (c) improper operation; (d) improper voltage supply or power surges; (e) signal issues; (f) damage from an authorized retailer...
... the product in its option) repair or replace it, or refund the purchase price to you and VIZIO, but VIZIO will be limited to resolve the issue informally with VIZIO's user guides and manuals. What This Warranty Does Not Cover This warranty does not cover: (a) cosmetic damage; (b) normal wear and tear; (c) improper operation; (d) improper voltage supply or power surges; (e) signal issues; (f) damage from an authorized retailer...
Quickstart Guide English
Page 26
... unreadable or removed serial numbers; (k) products requiring routine maintenance; When you always clear all applicable user data and downloaded applications. Replacement parts and VIZIO's labor are unable to resolve the issue informally and wish to the VIZIO service center. What This Warranty Does Not Cover This warranty does not cover: (a) cosmetic damage; (b) normal wear and tear; (c) improper operation; (d) improper voltage supply or power surges; (e) signal issues; (f) damage from...
... unreadable or removed serial numbers; (k) products requiring routine maintenance; When you always clear all applicable user data and downloaded applications. Replacement parts and VIZIO's labor are unable to resolve the issue informally and wish to the VIZIO service center. What This Warranty Does Not Cover This warranty does not cover: (a) cosmetic damage; (b) normal wear and tear; (c) improper operation; (d) improper voltage supply or power surges; (e) signal issues; (f) damage from...


