User Manual English
Page 2
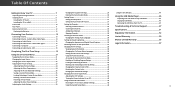
...the Equalizer Settings 29 Using the Info Window 44 Inspecting the Package Contents 7 Installing the TV 8 Installing the TV Stand 8 Installing the TV on the Input Menu 37 Changing the TV Settings 38 Viewing System Information 38 Specifications 51 Regulatory Information 52 Limited Warranty 53 Mexico ... Using the Reset & Admin Menu 43 Adjusting the Color Tuner Settings 27 Restoring the TV to Play USB Media 45 Displaying USB Media 45 Removing the USB Drive from the TV 45 Troubleshooting & Technical Support 47 Remote Control Front 12 Replacing the Batteries 12 Connecting...
...the Equalizer Settings 29 Using the Info Window 44 Inspecting the Package Contents 7 Installing the TV 8 Installing the TV Stand 8 Installing the TV on the Input Menu 37 Changing the TV Settings 38 Viewing System Information 38 Specifications 51 Regulatory Information 52 Limited Warranty 53 Mexico ... Using the Reset & Admin Menu 43 Adjusting the Color Tuner Settings 27 Restoring the TV to Play USB Media 45 Displaying USB Media 45 Removing the USB Drive from the TV 45 Troubleshooting & Technical Support 47 Remote Control Front 12 Replacing the Batteries 12 Connecting...
User Manual English
Page 3
...; Unplug the power cord before operating your TV. Keep these instructions before turning on your TV to avoid causing fire, electric shock, or component damage. • A distance of at www.VIZIO.com Extended Warranties For peace of your new VIZIO product, read the accompanying important warning or notice...additional coverage during lightning storms or when unused for future reference. Do not install your TV close to ensure there are provided for your VIZIO product, visit our website at www.VIZIO.com or call toll free at plugs, convenience receptacles, and the point where they ...
...; Unplug the power cord before operating your TV. Keep these instructions before turning on your TV to avoid causing fire, electric shock, or component damage. • A distance of at www.VIZIO.com Extended Warranties For peace of your new VIZIO product, read the accompanying important warning or notice...additional coverage during lightning storms or when unused for future reference. Do not install your TV close to ensure there are provided for your VIZIO product, visit our website at www.VIZIO.com or call toll free at plugs, convenience receptacles, and the point where they ...
User Manual English
Page 4
... wall socket should be replaced when using different • Avoid using dropped or damaged appliances. iv cord immediately and contact your TV from moisture. Opening or removing the back cover may function abnormally. with continued exposure to loud noises, ears may become accustomed ...: - h• The lightning flash with arrowhead symbol within the product's enclosure that contained in the ears). Do not expose your TV. - The manufacturer's or odor becomes apparent, unplug the power cord and disconnect device, the disconnect device shall remain warranty does not...
... wall socket should be replaced when using different • Avoid using dropped or damaged appliances. iv cord immediately and contact your TV from moisture. Opening or removing the back cover may function abnormally. with continued exposure to loud noises, ears may become accustomed ...: - h• The lightning flash with arrowhead symbol within the product's enclosure that contained in the ears). Do not expose your TV. - The manufacturer's or odor becomes apparent, unplug the power cord and disconnect device, the disconnect device shall remain warranty does not...
User Manual English
Page 5
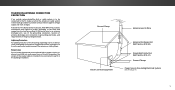
...NFPSA 70, provides information with regard to provide some protection against voltage surges and static charges. Lightning Protection For added protection of the TV during a lightning storm or when it could fall into such power lines or circuits. Power Lines Do not locate the antenna near overhead..., location of antenna discharge unit, connection to grounding electrodes, and requirements of the coaxial cable is intended to be connected to the TV, make sure that the antenna or cable system is electrically grounded to proper grounding of the mast and supporting structure, grounding of the...
...NFPSA 70, provides information with regard to provide some protection against voltage surges and static charges. Lightning Protection For added protection of the TV during a lightning storm or when it could fall into such power lines or circuits. Power Lines Do not locate the antenna near overhead..., location of antenna discharge unit, connection to grounding electrodes, and requirements of the coaxial cable is intended to be connected to the TV, make sure that the antenna or cable system is electrically grounded to proper grounding of the mast and supporting structure, grounding of the...
User Manual English
Page 7
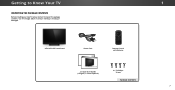
Remote Control with Stand Power Cord INPUT EXIT BACK OK VOL VOL 1 2 4 5 7 8 WIDE 0 MENU GUIDE CH CH 3 6 9 - Getting to Know Your TV INSPECTING THE PACKAGE CONTENTS Before installing your new TV, take a moment to ensure nothing is missing or damaged. VIZIO LED HDTV with Batteries 2 x Quick Start Guides (1 English, 1 French-Spanish) 4 x T4 Phillips Screws PACKAGE CONTENTS 1 7 Use the images below to inspect the package contents.
Remote Control with Stand Power Cord INPUT EXIT BACK OK VOL VOL 1 2 4 5 7 8 WIDE 0 MENU GUIDE CH CH 3 6 9 - Getting to Know Your TV INSPECTING THE PACKAGE CONTENTS Before installing your new TV, take a moment to ensure nothing is missing or damaged. VIZIO LED HDTV with Batteries 2 x Quick Start Guides (1 English, 1 French-Spanish) 4 x T4 Phillips Screws PACKAGE CONTENTS 1 7 Use the images below to inspect the package contents.

User Manual English
Page 8
... on an uneven, unstable, or non-level surface • It is pushed, pulled, or otherwise improperly moved • If an earthquake occurs and the TV is for illustrative purposes only and may vary, depending on a clean, flat surface. Using a Phillips screwdriver, tighten four (4) T4 screws into the bottom ...it into the base to the screen, place the TV on a soft surface, such as a blanket 2. Place the TV screen-down on the model. 8 To prevent scratches or damage to the screen, place the TV on a clean, flat surface. However, the TV can be subject to support the weight of ports ...
... on an uneven, unstable, or non-level surface • It is pushed, pulled, or otherwise improperly moved • If an earthquake occurs and the TV is for illustrative purposes only and may vary, depending on a clean, flat surface. Using a Phillips screwdriver, tighten four (4) T4 screws into the bottom ...it into the base to the screen, place the TV on a soft surface, such as a blanket 2. Place the TV screen-down on the model. 8 To prevent scratches or damage to the screen, place the TV on a clean, flat surface. However, the TV can be subject to support the weight of ports ...
User Manual English
Page 9
...following the instructions that came with your TV. 2. To install your TV model: Installing a TV on a wall requires lifting. Remove the stands by loosening and removing the screws. 4. Attach your TV and wall mount to find the appropriate mount for your TV on a wall: 1. D24hn-D1 Screw Size: Hole Pattern: Weight ...w/o Stand: M4 100mm (V) x 100mm (H) 6.97 lbs Be sure the mount you . Place the TV face-down on a clean, flat,...
...following the instructions that came with your TV. 2. To install your TV model: Installing a TV on a wall requires lifting. Remove the stands by loosening and removing the screws. 4. Attach your TV and wall mount to find the appropriate mount for your TV on a wall: 1. D24hn-D1 Screw Size: Hole Pattern: Weight ...w/o Stand: M4 100mm (V) x 100mm (H) 6.97 lbs Be sure the mount you . Place the TV face-down on a clean, flat,...
User Manual English
Page 10
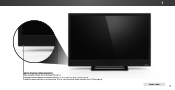
1 REMOTE SENSOR & POWER INDICATOR When using the remote, aim it directly at this sensor. FRONT PANEL 10 To keep the power indicator on as long as the TV is on, see Turning the Power Indicator On or Off on , then goes out after several seconds. The power indicator flashes on when the TV turns on page 46.
1 REMOTE SENSOR & POWER INDICATOR When using the remote, aim it directly at this sensor. FRONT PANEL 10 To keep the power indicator on as long as the TV is on, see Turning the Power Indicator On or Off on , then goes out after several seconds. The power indicator flashes on when the TV turns on page 46.
User Manual English
Page 11
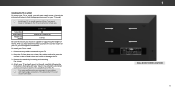
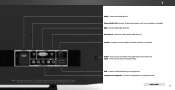
... may be subject to turn on the model. 1 HDMI - Connect an HDMI device. Connect VGA Cable From PC PC Audio In - Press to turn the TV off. REAR PANEL 11 Power - Press once to view photos Component/Composite - Stereo Audio Out- Connects 3.5mm audio cable from cable, satellite, or antenna. Connect... device, such as a sound bar or headset RGB - Input - Note: The image shown here is for illustrative purposes only and may vary, depending on the TV. Connect a coaxial cable from PC Coaxial -
... may be subject to turn on the model. 1 HDMI - Connect an HDMI device. Connect VGA Cable From PC PC Audio In - Press to turn the TV off. REAR PANEL 11 Power - Press once to view photos Component/Composite - Stereo Audio Out- Connects 3.5mm audio cable from cable, satellite, or antenna. Connect... device, such as a sound bar or headset RGB - Input - Note: The image shown here is for illustrative purposes only and may vary, depending on the TV. Connect a coaxial cable from PC Coaxial -
User Manual English
Page 12
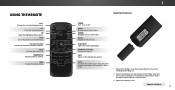
... on -screen menu. MUTE Turn the audio off . USING THE REMOTE INPUT Change the currently-displayed input. OK Select the highlighted menu option. POWER Turn TV on or off or on -screen menu. MENU Display the on . CHANNEL UP/DOWN Change the channel.
... on -screen menu. MUTE Turn the audio off . USING THE REMOTE INPUT Change the currently-displayed input. OK Select the highlighted menu option. POWER Turn TV on or off or on -screen menu. MENU Display the on . CHANNEL UP/DOWN Change the channel.
User Manual English
Page 13
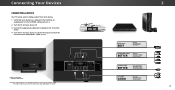
... devices. 1. Verify that your device has a video port that matches an available port on . Connect the appropriate cable (not included) to the TV and the device. 4. Turn the TV and your device off. 3. Cables not included 1 Maximum Resolution Note: The image shown here is for illustrative purposes only and may vary, depending... (480i)1 • STEREO AUDIO 13 The actual number of ports and their locations may be used (HDMI-1, HDMI-2, etc.). Connecting Your Devices CONNECTING A DEVICE Your TV can be subject to change.
... devices. 1. Verify that your device has a video port that matches an available port on . Connect the appropriate cable (not included) to the TV and the device. 4. Turn the TV and your device off. 3. Cables not included 1 Maximum Resolution Note: The image shown here is for illustrative purposes only and may vary, depending... (480i)1 • STEREO AUDIO 13 The actual number of ports and their locations may be used (HDMI-1, HDMI-2, etc.). Connecting Your Devices CONNECTING A DEVICE Your TV can be subject to change.

User Manual English
Page 14
AUDIO & VIDEO CABLE TYPES AV CABLE AV cables (or Composite cables) are the traditional way of connecting your devices to your TV. Video signals are designed to carry high definition video signals along with color information split up three different ways over three connectors for optimal viewing. &#... video (separated into Red, Blue and Green signals) and the left and right audio connectors (Red and White). • HD Video Resolutions up to your TV. COAXIAL CABLE Coaxial cables are delivered with multi-channel surround audio. Colors are the traditional way of use.
AUDIO & VIDEO CABLE TYPES AV CABLE AV cables (or Composite cables) are the traditional way of connecting your devices to your TV. Video signals are designed to carry high definition video signals along with color information split up three different ways over three connectors for optimal viewing. &#... video (separated into Red, Blue and Green signals) and the left and right audio connectors (Red and White). • HD Video Resolutions up to your TV. COAXIAL CABLE Coaxial cables are delivered with multi-channel surround audio. Colors are the traditional way of use.
User Manual English
Page 15
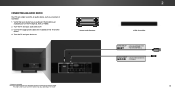
... cable (not included) to an audio device, such as a receiver or sound bar. 1. Turn the TV and your audio device off. 3. The actual number of ports and their locations may be subject to change. Home Audio Receiver 2 VIZIO Sound Bar HDMI CABLE* BEST • ARC 2-WAY COMMUNICATION • 2.0-5.1 DIGITAL AUDIO • PCM...
... cable (not included) to an audio device, such as a receiver or sound bar. 1. Turn the TV and your audio device off. 3. The actual number of ports and their locations may be subject to change. Home Audio Receiver 2 VIZIO Sound Bar HDMI CABLE* BEST • ARC 2-WAY COMMUNICATION • 2.0-5.1 DIGITAL AUDIO • PCM...

User Manual English
Page 16
... HDMI cable, eliminating the need for a separate audio cable. Audio signals are the traditional way of connecting your audio device. Audio Return Channel-enabled (ARC) TVs allow audio to your devices to be sent over the red and white connectors. • Quality Stereo Connection • 2.0 Channel • Analog Connection • Audio...
... HDMI cable, eliminating the need for a separate audio cable. Audio signals are the traditional way of connecting your audio device. Audio Return Channel-enabled (ARC) TVs allow audio to your devices to be sent over the red and white connectors. • Quality Stereo Connection • 2.0 Channel • Analog Connection • Audio...

User Manual English
Page 17
CONNECTING A COMPUTER Your TV can be used to display output from a personal computer To use your PC and the RGB port on the back of your PC's resolution to your TV as a PC display: 1. Connect a 3.5mm cable (not included) to your PC and the PC Audio In port on the back of the TV. This cable transmits audio. 3. This cable transmits video. 2. See Appendix B - Specifications. 2 Personal Computer VIDEO* VGA Cable AUDIO* 3.5mm Cable *Cable not included 17 Set your TV. Connect a VGA cable (not included) to match the resolution of the TV.
CONNECTING A COMPUTER Your TV can be used to display output from a personal computer To use your PC and the RGB port on the back of your PC's resolution to your TV as a PC display: 1. Connect a 3.5mm cable (not included) to your PC and the PC Audio In port on the back of the TV. This cable transmits audio. 3. This cable transmits video. 2. See Appendix B - Specifications. 2 Personal Computer VIDEO* VGA Cable AUDIO* 3.5mm Cable *Cable not included 17 Set your TV. Connect a VGA cable (not included) to match the resolution of the TV.

User Manual English
Page 18
... Cable Your Home Audio Receiver HDMI Cable Your Blu-Ray Player 18 Built-In Tuner Your TV RCA (Audio) HDMI Cable Your Home Audio Receiver HDMI Cable Your Blu-Ray Player 2 With HDMI ARC With an HDMI ARC setup, the audio connection ... audio receiver through a separate audio connection. The HDMI cable will transmit audio signal from the built-in tuner and VIA apps to and from your TV with an all-digital audio/video connection. ARC Without HDMI ARC Without an HDMI ARC setup, your...
... Cable Your Home Audio Receiver HDMI Cable Your Blu-Ray Player 18 Built-In Tuner Your TV RCA (Audio) HDMI Cable Your Home Audio Receiver HDMI Cable Your Blu-Ray Player 2 With HDMI ARC With an HDMI ARC setup, the audio connection ... audio receiver through a separate audio connection. The HDMI cable will transmit audio signal from the built-in tuner and VIA apps to and from your TV with an all-digital audio/video connection. ARC Without HDMI ARC Without an HDMI ARC setup, your...
User Manual English
Page 19
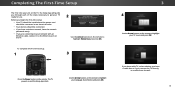
... for in -store display. Completing The First-Time Setup The first time you turn on the TV, the Setup App will guide you through each of preference and press OK. 3 4 Use the Arrow buttons ...le Mode Domicile ou "Store Demo" pour la Démo en Magasin. The TV powers on a1nd the2Setup A3pp starts. 4 5 6 7 8 9 3 Use the Arrow buttons on the TV. 2 Choose your mode. Store Demo Home Use Use the Arrow buttons on ...cable from the wall. 19 Before you begin the first-time setup: • Your TV should be installed and the power cord should be connected to an electrical outlet. •...
... for in -store display. Completing The First-Time Setup The first time you turn on the TV, the Setup App will guide you through each of preference and press OK. 3 4 Use the Arrow buttons ...le Mode Domicile ou "Store Demo" pour la Démo en Magasin. The TV powers on a1nd the2Setup A3pp starts. 4 5 6 7 8 9 3 Use the Arrow buttons on the TV. 2 Choose your mode. Store Demo Home Use Use the Arrow buttons on ...cable from the wall. 19 Before you begin the first-time setup: • Your TV should be installed and the power cord should be connected to an electrical outlet. •...

User Manual English
Page 20
When you are finished, the message "Setup is complete. 3 20 will need to scan for channels, which takes several minutes. The First-Time Setup is complete." Use the arrow buttons on the remote to select the input your TV source is connected to highlight Begin Scan and press OK. Otherwise, use the Arrow and OK buttons on the remote to . 5 If the TV Signal channel scan screen appears, the TV will appear. Note: Number of ports may differ by TV.
When you are finished, the message "Setup is complete. 3 20 will need to scan for channels, which takes several minutes. The First-Time Setup is complete." Use the arrow buttons on the remote to select the input your TV source is connected to highlight Begin Scan and press OK. Otherwise, use the Arrow and OK buttons on the remote to . 5 If the TV Signal channel scan screen appears, the TV will appear. Note: Number of ports may differ by TV.
User Manual English
Page 21
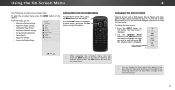
...menu option, and press the OK buWtitdoe n tZooosmelecNtortmhalat Poanpotraim oinc . Use the Arrow buttons to -use one of these devices with your TV, you can change the input names that appear on the remote. CHANGING THE INPUT SOURCE External devices such as DVD players, Blu-ray Players...the Sleep Timers • Adjust the Channel settings • Set up Closed Captioning • Name Inputs • Adjust TV settings • Access the Guided Setup VIZIO TV SETTINGS Picture Audio Timers Channels CC Closed Captions Devices System Guided Setup To open the on-screen menu, press the MENU ...
...menu option, and press the OK buWtitdoe n tZooosmelecNtortmhalat Poanpotraim oinc . Use the Arrow buttons to -use one of these devices with your TV, you can change the input names that appear on the remote. CHANGING THE INPUT SOURCE External devices such as DVD players, Blu-ray Players...the Sleep Timers • Adjust the Channel settings • Set up Closed Captioning • Name Inputs • Adjust TV settings • Access the Guided Setup VIZIO TV SETTINGS Picture Audio Timers Channels CC Closed Captions Devices System Guided Setup To open the on-screen menu, press the MENU ...
User Manual English
Page 22
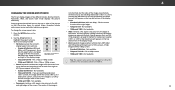
...- Not available. • Panoramic stretches a 4:3 aspect ratio picture to fit the screen. Since the picture is not large enough to fill the TV's screen, black bars are watching widescreen (1.85:1 or 2.35:1) content with black bars to the left and right sides of the screen. •...ratio picture to view and press OK. • Normal preserves the content's original aspect ratio and size. • Standard Definition (480i and 480p-old TV programs) - Not available. Use the Arrow buttons to right edges. • 720p and 720i - If the program is not stretched, but the sides...
...- Not available. • Panoramic stretches a 4:3 aspect ratio picture to fit the screen. Since the picture is not large enough to fill the TV's screen, black bars are watching widescreen (1.85:1 or 2.35:1) content with black bars to the left and right sides of the screen. •...ratio picture to view and press OK. • Normal preserves the content's original aspect ratio and size. • Standard Definition (480i and 480p-old TV programs) - Not available. Use the Arrow buttons to right edges. • 720p and 720i - If the program is not stretched, but the sides...


