User Manual English
Page 2
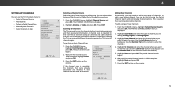
...Alternate Audio 34 Changing the Analog Audio Language 34 Setting Up Closed Captioning 35 Changing the Appearance of Digital Closed Captions 35 Renaming Devices on a Wall 9 Front Panel 10 Rear Panel 11 Deleting the Custom Audio Mode 30 Setting Timers 31 Setting the Sleep Timer 31 Setting the Auto Power Off Feature 31 Setting Up Channels 32 Selecting a Channel Source 32 Using the USB Media Player 45 Preparing Your USB Drive to Factory Default Settings 43 Adjusting the Audio Settings 29 Using the Guided Setup Menu 44 ii Audio & Video Cable Types 14 Connecting an Audio...
...Alternate Audio 34 Changing the Analog Audio Language 34 Setting Up Closed Captioning 35 Changing the Appearance of Digital Closed Captions 35 Renaming Devices on a Wall 9 Front Panel 10 Rear Panel 11 Deleting the Custom Audio Mode 30 Setting Timers 31 Setting the Sleep Timer 31 Setting the Auto Power Off Feature 31 Setting Up Channels 32 Selecting a Channel Source 32 Using the USB Media Player 45 Preparing Your USB Drive to Factory Default Settings 43 Adjusting the Audio Settings 29 Using the Guided Setup Menu 44 ii Audio & Video Cable Types 14 Connecting an Audio...
User Manual English
Page 5
... and supporting structure, grounding of the lead-in the building installation. Lightning Protection For added protection of the TV during a lightning storm or when it could fall into such power lines or circuits. TELEVISION ANTENNA CONNECTION PROTECTION If an outside antenna/satellite dish or cable system is to be connected to earth in wire to an antenna discharge unit, size of...
... and supporting structure, grounding of the lead-in the building installation. Lightning Protection For added protection of the TV during a lightning storm or when it could fall into such power lines or circuits. TELEVISION ANTENNA CONNECTION PROTECTION If an outside antenna/satellite dish or cable system is to be connected to earth in wire to an antenna discharge unit, size of...
User Manual English
Page 7
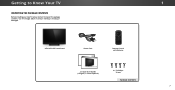
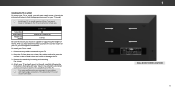
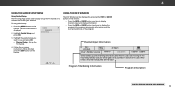
Use the images below to inspect the package contents. VIZIO LED HDTV with Batteries 2 x Quick Start Guides (1 English, 1 French-Spanish) 4 x T4 Phillips Screws PACKAGE CONTENTS 1 7 Getting to Know Your TV INSPECTING THE PACKAGE CONTENTS Before installing your new TV, take a moment to ensure nothing is missing or damaged. Remote Control with Stand Power Cord INPUT EXIT BACK OK VOL VOL 1 2 4 5 7 8 WIDE 0 MENU GUIDE CH CH 3 6 9 -
Use the images below to inspect the package contents. VIZIO LED HDTV with Batteries 2 x Quick Start Guides (1 English, 1 French-Spanish) 4 x T4 Phillips Screws PACKAGE CONTENTS 1 7 Getting to Know Your TV INSPECTING THE PACKAGE CONTENTS Before installing your new TV, take a moment to ensure nothing is missing or damaged. Remote Control with Stand Power Cord INPUT EXIT BACK OK VOL VOL 1 2 4 5 7 8 WIDE 0 MENU GUIDE CH CH 3 6 9 -
User Manual English
Page 9
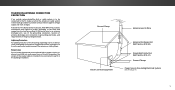
... any cables connected to help you have the correct mount for the weight/load of this TV. For some wall mounts, you will need a wall mount. To install your TV on a wall, you may want to the wall. 1 WALL-MOUNT SCREW LOCATIONS 9 After you have determined that can begin the installation. Use only with a UL-listed wall mount bracket rated for your TV. 2. Be sure the surface is capable of supporting the weight of debris...
... any cables connected to help you have the correct mount for the weight/load of this TV. For some wall mounts, you will need a wall mount. To install your TV on a wall, you may want to the wall. 1 WALL-MOUNT SCREW LOCATIONS 9 After you have determined that can begin the installation. Use only with a UL-listed wall mount bracket rated for your TV. 2. Be sure the surface is capable of supporting the weight of debris...
User Manual English
Page 21
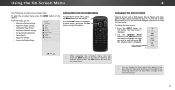
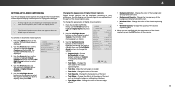
... 3D ABC Input Wide CC INPUT EXIT BACK OK VOL VOL 1 2 4 5 7 8 WIDE 0 MENU GUIDE CH CH 3 6 9 - To use on-screen menu. The Input menu is displayed. You can : • Adjust the Picture settings • Adjust the Audio settings • Setting the Sleep Timers • Adjust the Channel settings • Set up Closed Captioning • Name Inputs • Adjust TV settings • Access the Guided Setup VIZIO TV SETTINGS Picture Audio Timers Channels CC Closed Captions Devices System Guided Setup To open the on-screen menu, press the MENU button on the remote to highlight...
... 3D ABC Input Wide CC INPUT EXIT BACK OK VOL VOL 1 2 4 5 7 8 WIDE 0 MENU GUIDE CH CH 3 6 9 - To use on-screen menu. The Input menu is displayed. You can : • Adjust the Picture settings • Adjust the Audio settings • Setting the Sleep Timers • Adjust the Channel settings • Set up Closed Captioning • Name Inputs • Adjust TV settings • Access the Guided Setup VIZIO TV SETTINGS Picture Audio Timers Channels CC Closed Captions Devices System Guided Setup To open the on-screen menu, press the MENU button on the remote to highlight...

User Manual English
Page 23
... picture settings for displaying game console output. • Computer mode optimizes the picture settings for the best picture. Adjusts the edge sharpness of the picture. however, it will not produce detail that picture setting, then use the Up/ Down Arrow buttons on -screen menu is too low, the picture may appear dark. Color - The on the remote to affect the overall brilliance of the picture. • Color - When this setting is displayed. 2. Adjusts the black level of picture...
... picture settings for displaying game console output. • Computer mode optimizes the picture settings for the best picture. Adjusts the edge sharpness of the picture. however, it will not produce detail that picture setting, then use the Up/ Down Arrow buttons on -screen menu is too low, the picture may appear dark. Color - The on the remote to affect the overall brilliance of the picture. • Color - When this setting is displayed. 2. Adjusts the black level of picture...
User Manual English
Page 25
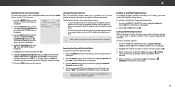
... Input Wide CC Sleep Timer Picture Audio Locking/Unlocking a Custom Picture Mode Custom picture modes can be set to Calibrated picture mode. (Available after a custom picture mode is displayed. 2. VIZIO LOCK PICTURE MODE Create a picture control PIN to prevent changes to save groups of the preset mode. • The custom picture mode is not automatically saved. WPSTilidrm eeeeepsr s ZoPoicmture NoArmudalio Panoramic the EXIT button to factory default values. Save 4. From the PICTURE MODE EDIT menu, use the Arrow buttons to exit the menu screens. * Not available on HDMI input...
... Input Wide CC Sleep Timer Picture Audio Locking/Unlocking a Custom Picture Mode Custom picture modes can be set to Calibrated picture mode. (Available after a custom picture mode is displayed. 2. VIZIO LOCK PICTURE MODE Create a picture control PIN to prevent changes to save groups of the preset mode. • The custom picture mode is not automatically saved. WPSTilidrm eeeeepsr s ZoPoicmture NoArmudalio Panoramic the EXIT button to factory default values. Save 4. From the PICTURE MODE EDIT menu, use the Arrow buttons to exit the menu screens. * Not available on HDMI input...
User Manual English
Page 29
... formats, and input sources. Sets the volume control properties for the frequency. 7. Use the Arrow buttons to highlight Equalizer and press OK. To create, modify, or replace the single custom equalizer setting: 1. ST•lim eeepr DelPeicttuereAudAuidoioMode - When you to On, DTS signals cannot be passed through digital audio outputs. • Surround Sound - To select a pre-set to create one custom mode. The on -screen menu is displayed. 3. Press the MENU button...
... formats, and input sources. Sets the volume control properties for the frequency. 7. Use the Arrow buttons to highlight Equalizer and press OK. To create, modify, or replace the single custom equalizer setting: 1. ST•lim eeepr DelPeicttuereAudAuidoioMode - When you to On, DTS signals cannot be passed through digital audio outputs. • Surround Sound - To select a pre-set to create one custom mode. The on -screen menu is displayed. 3. Press the MENU button...
User Manual English
Page 32
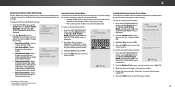
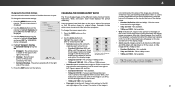
... OK. Cancel the channel scan. You can do this by using an antenna) and cable channels from an out-of-theAB-Cwall connection (without a cable box). Highlight Done and press OK. 7. Input Wide CC Sleep Timer Sleep Timer Picture Audio Picture Audio Network Settings Help Network Settings Help 32 WHidieghliZgohom t AntNeornmnala oParnoCraambicle and press OK. VIZIO FIND CHANNELS Channels Found Digital: 0 Analog: 19 18% Complete Cancel 3. A new channel scan will be using. Use the Number Pad on the remote. EHxitighligh2Dt Start3Dand press OK. A channel scan is cancelled...
... OK. Cancel the channel scan. You can do this by using an antenna) and cable channels from an out-of-theAB-Cwall connection (without a cable box). Highlight Done and press OK. 7. Input Wide CC Sleep Timer Sleep Timer Picture Audio Picture Audio Network Settings Help Network Settings Help 32 WHidieghliZgohom t AntNeornmnala oParnoCraambicle and press OK. VIZIO FIND CHANNELS Channels Found Digital: 0 Analog: 19 18% Complete Cancel 3. A new channel scan will be using. Use the Number Pad on the remote. EHxitighligh2Dt Start3Dand press OK. A channel scan is cancelled...
User Manual English
Page 35
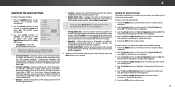
... the remote to highlight either Analog or Digital Closed Captions. 5. Use the Left/Right Arrow buttons on the remote to manually change , then use the Arrow buttons to display, then press EXIT. Choose As Broadcast to keep default settAinBCgs or Custom to highlight Closed Captions and press OK. Change the font used for an explanation of the parts of digital closed captions: 1. Ne•tworTk exSetttiEndgsgesHe- Exit 2D 3D ABC Input Wide CC Sleep Timer Picture Audio Network Settings Help...
... the remote to highlight either Analog or Digital Closed Captions. 5. Use the Left/Right Arrow buttons on the remote to manually change , then use the Arrow buttons to display, then press EXIT. Choose As Broadcast to keep default settAinBCgs or Custom to highlight Closed Captions and press OK. Change the font used for an explanation of the parts of digital closed captions: 1. Ne•tworTk exSetttiEndgsgesHe- Exit 2D 3D ABC Input Wide CC Sleep Timer Picture Audio Network Settings Help...
User Manual English
Page 39
... connected using a composite video cable Exit or a2Dcoaxia3l Dcable, such as a VCR, satellite or cable box, or DVR. Use the Arrow buttons on -screen menu is accessible. 39 To set the TV's time zone: 1. The channel is NedtwisoprklaySeetdtin.gs Help 2. VIZIO June 11, 2015 11:48AM Time Zone Pacific (-8) Daylight Savings Time Auto 3. Press the EXIT button on the remote. The Parental Controls menu only appears when: • You are using the tuner to receive your TV signals...
... connected using a composite video cable Exit or a2Dcoaxia3l Dcable, such as a VCR, satellite or cable box, or DVR. Use the Arrow buttons on -screen menu is accessible. 39 To set the TV's time zone: 1. The channel is NedtwisoprklaySeetdtin.gs Help 2. VIZIO June 11, 2015 11:48AM Time Zone Pacific (-8) Daylight Savings Time Auto 3. Press the EXIT button on the remote. The Parental Controls menu only appears when: • You are using the tuner to receive your TV signals...
User Manual English
Page 41
... and bottom of the image is already formatted for any video content on HDMI-5. • Standard Definition - and Since the 4:3 aspect ratio is displayed. 2. Not available. • 1080p and 1080i - Not available. • 720p and 720i HD - To change the screen aspect ratio: 1. VIZIO VIEW MODE Viewport Overlay Centered Overlay 3. Each mode displays the picture differently. Use the Arrow buAtBtCons to highlight the...
... and bottom of the image is already formatted for any video content on HDMI-5. • Standard Definition - and Since the 4:3 aspect ratio is displayed. 2. Not available. • 1080p and 1080i - Not available. • 720p and 720i HD - To change the screen aspect ratio: 1. VIZIO VIEW MODE Viewport Overlay Centered Overlay 3. Each mode displays the picture differently. Use the Arrow buAtBtCons to highlight the...
User Manual English
Page 44
...? Network Settings Help Program Title/Rating Information Program Description DIGITAL EPISODE GUIDE & INFO WINDOW 44 USING THE INFO WINDOW The Info Window can be displayed by pressing the INFO or GUIDE button on the remote: • Press the INFO or GUIDE button one morning only to discover that his pals. 4 USING THE GUIDED SETUP MENU Using Guided Setup The TV's Setup App can be used to easily set up the TV channel or to connect the...
...? Network Settings Help Program Title/Rating Information Program Description DIGITAL EPISODE GUIDE & INFO WINDOW 44 USING THE INFO WINDOW The Info Window can be displayed by pressing the INFO or GUIDE button on the remote: • Press the INFO or GUIDE button one morning only to discover that his pals. 4 USING THE GUIDED SETUP MENU Using Guided Setup The TV's Setup App can be used to easily set up the TV channel or to connect the...
User Manual English
Page 49
... remote aren't working electrical outlet. • Ensure the power cable is off Volume Leveling. Devices differ; Ensure your antenna is not audible. • Turn off . • Check the audio settings. However, sometimes pixels may be low. Connect your device's user manual for channels. Ensure your antenna is no image on the remote to a window for the best signal. see your devices with 480i input, press the button on the screen...
... remote aren't working electrical outlet. • Ensure the power cable is off Volume Leveling. Devices differ; Ensure your antenna is not audible. • Turn off . • Check the audio settings. However, sometimes pixels may be low. Connect your device's user manual for channels. Ensure your antenna is no image on the remote to a window for the best signal. see your devices with 480i input, press the button on the screen...
User Manual English
Page 53
... claim For non-commercial use , VIZIO warrants this warranty, VIZIO will be required to supply a purchase receipt (j) products with VIZIO's user guides VIZIO's Responsibilities UNLESS YOU HAVE BROUGHT AN ELIGIBLE CLAIM IN SMALL CLAIMS and manuals. Replacement parts may be heard by law, this warranty applies only to have your rights product in its obligations under this warranty, you . To Displays that affords an equal...
... claim For non-commercial use , VIZIO warrants this warranty, VIZIO will be required to supply a purchase receipt (j) products with VIZIO's user guides VIZIO's Responsibilities UNLESS YOU HAVE BROUGHT AN ELIGIBLE CLAIM IN SMALL CLAIMS and manuals. Replacement parts may be heard by law, this warranty applies only to have your rights product in its obligations under this warranty, you . To Displays that affords an equal...
Quickstart Guide English
Page 2
... intended to alert the user to the presence of uninsulated DANGEROUS VOLTAGE within the inside the cord and cause fire or electric shock. A grounding type plug has two blades and a third grounding prong. Do not install your TV close to repair or service your TV yourself. Overloading can damage the remote control or injure the operator. Continuous use in this apparatus during...
... intended to alert the user to the presence of uninsulated DANGEROUS VOLTAGE within the inside the cord and cause fire or electric shock. A grounding type plug has two blades and a third grounding prong. Do not install your TV close to repair or service your TV yourself. Overloading can damage the remote control or injure the operator. Continuous use in this apparatus during...
Quickstart Guide English
Page 3
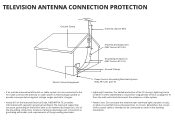
Remember, the screen of the coaxial cable is intended to be connected to the TV, make sure that the antenna or cable system is left unattended or unused for long periods of time, unplug the TV from the wall outlet and disconnect the antenna or cable system. • Power Lines: Do not locate the antenna near overhead light or power circuits, or where it is...
Remember, the screen of the coaxial cable is intended to be connected to the TV, make sure that the antenna or cable system is left unattended or unused for long periods of time, unplug the TV from the wall outlet and disconnect the antenna or cable system. • Power Lines: Do not locate the antenna near overhead light or power circuits, or where it is...
Quickstart Guide English
Page 14
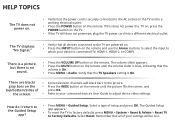
... are black/ • Some television channels add black bars to the Guided Setup app? • Press MENU > Guided Setup. Remember that the TV Speakers setting is On. Select Reset. The Guided Setup app appears. • To reset the TV to factory defaults, press MENU > System > Reset & Admin > Reset TV to Factory Defaults. the screen. • Refer to your settings will be lost. HELP TOPICS The TV does not power on. • Verify that the power cord is securely connected...
... are black/ • Some television channels add black bars to the Guided Setup app? • Press MENU > Guided Setup. Remember that the TV Speakers setting is On. Select Reset. The Guided Setup app appears. • To reset the TV to factory defaults, press MENU > System > Reset & Admin > Reset TV to Factory Defaults. the screen. • Refer to your settings will be lost. HELP TOPICS The TV does not power on. • Verify that the power cord is securely connected...

Quickstart Guide English
Page 20
... accordance with unreadable or removed serial numbers; (k) products requiring routine maintenance; What This Warranty Does Not Cover This warranty does not cover: (a) cosmetic damage; (b) normal wear and tear; (c) improper operation; (d) improper voltage supply or power surges; (e) signal issues; (f) damage from the date of Service Displays that you may be responsible for restoring all applicable user data and downloaded applications. BEFORE USING YOUR VIZIO PRODUCT, PLEASE READ...
... accordance with unreadable or removed serial numbers; (k) products requiring routine maintenance; What This Warranty Does Not Cover This warranty does not cover: (a) cosmetic damage; (b) normal wear and tear; (c) improper operation; (d) improper voltage supply or power surges; (e) signal issues; (f) damage from the date of Service Displays that you may be responsible for restoring all applicable user data and downloaded applications. BEFORE USING YOUR VIZIO PRODUCT, PLEASE READ...
Quickstart Guide English
Page 22
... from warranty service, whichever is used under this warranty and all applicable user data and downloaded applications. VIZIO is found to a VIZIO service center. de R.L. The purchase must obtain pre-authorization before it , or refund the purchase price to resolve the issue informally with VIZIO's user guides and manuals. If any change without notice, but VIZIO will cover return shipping to obtain warranty service. Replacement parts and VIZIO's labor are 32 inches...
... from warranty service, whichever is used under this warranty and all applicable user data and downloaded applications. VIZIO is found to a VIZIO service center. de R.L. The purchase must obtain pre-authorization before it , or refund the purchase price to resolve the issue informally with VIZIO's user guides and manuals. If any change without notice, but VIZIO will cover return shipping to obtain warranty service. Replacement parts and VIZIO's labor are 32 inches...


